Structr
Introduction
Getting Started with Structr
Welcome to Structr! This guide will help you get up and running with Structr, a powerful low-code development platform that combines a graph database with a web application framework. Whether you’re building a simple website or a complex business application, Structr provides the tools you need to create data-driven applications quickly and efficiently.
What is Structr?
Structr is an open-source low-code platform that allows you to:
- Build web applications without extensive coding
- Create and manage complex data models using a visual schema editor
- Design responsive web pages with drag-and-drop functionality
- Implement business logic using server-side JavaScript (or other languages)
- Create REST APIs automatically based on your data model
- Manage users, groups, roles, permissions, and access rights out of the box
- Store and manage files in a virtual folder tree with your own metadata
Read More
Admin User Interface Overview, Building Applications with Structr, The Data Model.
Prerequisites
Before you begin, you should have:
- Basic understanding of web technologies (HTML, CSS, JavaScript)
- A modern web browser (Chrome, Firefox, Safari, or Edge)
- For local installation: Java 25 or higher and a Neo4j database (optional, as Structr can manage this for you)
Choose Your Installation Method
There are three ways to get started with Structr:
Option 1: Structr Sandbox (Recommended for Testing/Exploring)
The easiest way to start is with a free Structr Sandbox - a cloud-hosted server instance managed by the Structr team.
Advantages:
- No installation required
- Ready to use in minutes
- Full functionality for testing
- No costs, no obligations, no aggressive marketing
- Free for 14 days
How to get started:
- Visit https://structr.com/try-structr/
- Sign up for a free sandbox
- Access your personal Structr instance via the provided URL
- Sign in with the credentials sent to your email
Note: Sandboxes have limited CPU, memory, and disk space but are perfect for learning and prototyping. After the 14-day trial, you can upgrade to a paid plan to keep your sandbox running.
Option 2: Docker Installation (Recommended for Development)
For local development or self-hosted production environments, Docker provides the most straightforward setup. See https://gitlab.structr.com/structr/docker-setup for more details.
Advantages:
- Consistent environment across different systems
- Easy to update and maintain
- Includes all necessary dependencies
Tip: If you’re new to Docker, install Docker Desktop and use its integrated Terminal (button at the bottom-right of the Docker Desktop window) to run the commands below.
Quick start:
# Clone the Docker setup repository
git clone https://gitlab.structr.com/structr/docker-setup.git

# Change to the docker-setup directory
cd docker-setup
Before starting Structr, open docker-compose.yml in a text editor and change the privacy policy setting from no to yes:
AGREE_TO_STRUCTR_PRIVACY_POLICY=yes
Then start the containers:
# Start Structr with Docker Compose
docker compose up -d
Access Structr in your browser at http://localhost:8082/structr.
Option 3: Manual Installation (Advanced Users)
For experienced administrators who need custom configurations, manual installation is available. In this installation guide, we assume a recent Debian Linux system and you working as the root user.
Update the system and install dependencies
$ apt update
$ apt -y upgrade
Install GraalVM
GraalVM is a high-performance runtime that can execute applications written in Java, JavaScript, Python, Ruby, R, and LLVM-based languages like C and C++. It provides advanced optimizations including ahead-of-time compilation to native executables, resulting in faster startup times and lower memory usage compared to traditional JVMs.
Note: Depending on your server architecture, you need to adapt the following commands to the download URLs and version strings. Use
uname -ato determine the architecture of your server (aarch64orx86_64).
Download the GraalVM binaries from https://www.graalvm.org/downloads/.
Example for x64_64 (X86-64/AMD64) architecture
$ wget https://download.oracle.com/graalvm/25/latest/graalvm-jdk-25_linux-x64_bin.tar.gz && tar xvzf graalvm-jdk-25_linux-x64_bin.tar.gz && mkdir -p /usr/lib/jvm && mv graalvm-jdk-25+37.1 /usr/lib/jvm && update-alternatives --install /usr/bin/java java /usr/lib/jvm/graalvm-jdk-25+37.1/bin/java 2537 && update-alternatives --auto java
Example for aarch64 (ARM) architecture
$ wget https://download.oracle.com/graalvm/25/latest/graalvm-jdk-25_linux-aarch64_bin.tar.gz && tar xvf graalvm-jdk-25_linux-aarch64_bin.tar.gz && mkdir -p /usr/lib/jvm && mv graalvm-jdk-25+37.1 /usr/lib/jvm && update-alternatives --install /usr/bin/java java /usr/lib/jvm/graalvm-jdk-25+37.1/bin/java 2537 && update-alternatives --auto java
If the installation was successful, running java -version should result in the following output:
java version "25" 2025-09-16 LTS
Java(TM) SE Runtime Environment Oracle GraalVM 25+37.1 (build 25+37-LTS-jvmci-b01)
Java HotSpot(TM) 64-Bit Server VM Oracle GraalVM 25+37.1 (build 25+37-LTS-jvmci-b01, mixed mode, sharing)
Install Neo4j Debian Package (version 5.26 LTS)
$ wget -O - https://debian.neo4j.com/neotechnology.gpg.key | sudo apt-key add -
$ echo 'deb https://debian.neo4j.com stable 5' | sudo tee -a /etc/apt/sources.list.d/neo4j.list
$ apt update
$ apt -y install neo4j
You can alternatively install the latest Neo4j version 2026.01.4:
$ wget -O - https://debian.neo4j.com/neotechnology.gpg.key | sudo gpg --dearmor -o /etc/apt/keyrings/neotechnology.gpg
$ echo 'deb [signed-by=/etc/apt/keyrings/neotechnology.gpg] https://debian.neo4j.com stable latest' | sudo tee -a /etc/apt/sources.list.d/neo4j.list
$ sudo apt-get update
$ apt -y install neo4j=1:2026.01.4
Configure and Start Neo4j
Edit /etc/neo4j/neo4j.conf and adjust memory settings to fit your server configuration. For a server with 8 GB RAM, we recommend the following initial settings:
server.memory.heap.initial_size=1g
server.memory.heap.max_size=1g
server.memory.pagecache.size=2g
Start Neo4j with the following command:
$ systemctl start neo4j
You can check the status of the Neo4j process with the following command:
$ systemctl status neo4j
Install and Start Structr (version 6.1.0)
$ wget https://download.structr.com/repositories/releases/org/structr/structr/6.1.0/structr-6.1.0.deb
$ dpkg -i structr-6.1.0.deb
$ systemctl start structr
Troubleshooting: Conflicting Java Versions
Note: If Structr can’t be started with
systemctl start structr, it’s probably because you installed the GraalVM JDK for the wrong architecture, or there’s an existing Java version configured.
Check which Java version is currently active with java -version.
If you get something like cannot execute binary file: Exec format error as result, you have installed the wrong JDK for your CPU architecture. Use uname -a to see which architecture your server has (aarch64 or x86_64), download and install the right JDK.
If the result doesn’t show JDK version 25 you installed earlier, run update-alternatives --config java and choose the correct version from the list by entering the number displayed in the Selection column, 1 in the following example.
  Selection    Path                                         Priority   Status
------------------------------------------------------------
* 0            /usr/lib/jvm/java-17-openjdk-arm64/bin/java   1711      auto mode
  1            /usr/lib/jvm/graalvm-jdk-25+37.1/bin/java     2537      manual mode
  2            /usr/lib/jvm/java-17-openjdk-arm64/bin/java   1711      manual mode
In this example, you have to press 1 to select and configure the correct version.
Don’t forget to re-run `systemctl start structr’ to start the Structr process.
If Structr has been started successfully, the last lines of its system log file should look similar to the following:
2025-09-24 12:33:20.695 [main] INFO  o.structr.rest.service.HttpService - Starting Structr (host=0.0.0.0:8082, maxIdleTime=1800, requestHeaderSize=8192)
2025-09-24 12:33:20.696 [main] INFO  o.structr.rest.service.HttpService - Base path ./
2025-09-24 12:33:20.697 [main] INFO  o.structr.rest.service.HttpService - Structr started at http://0.0.0.0:8082
2025-09-24 12:33:20.701 [main] INFO  org.eclipse.jetty.server.Server - jetty-12.0.23; built: 2025-07-02T14:02:02.445Z; git: 01a4119797e9cee53c974ae126cc316d0c8a533a; jvm 25+37-LTS-jvmci-b01
2025-09-24 12:33:20.770 [main] INFO  o.e.j.s.DefaultSessionIdManager - Session workerName=93118b0075dc8a19a6d487948fe5ddf7
2025-09-24 12:33:20.777 [main] INFO  o.e.j.server.handler.ContextHandler - Started oeje10s.ServletContextHandler@4c0d7878{ROOT,/,b=null,a=AVAILABLE,h=GzipHandler@5a349644{STARTED,min=256,inflate=32768}}
2025-09-24 12:33:20.788 [main] INFO  o.e.j.e.s.ServletContextHandler - Started oeje10s.ServletContextHandler@4c0d7878{ROOT,/,b=null,a=AVAILABLE,h=GzipHandler@5a349644{STARTED,min=256,inflate=32768}}
2025-09-24 12:33:20.789 [main] INFO  o.e.j.server.handler.ContextHandler - Started oejsh.ContextHandler@18dda2e1{/structr,/structr,b=null,a=AVAILABLE,h=osrs.HttpService$@3c0b9643{STARTED}}
2025-09-24 12:33:20.802 [main] INFO  o.e.jetty.server.AbstractConnector - Started ServerConnector@4bd29a01{HTTP/1.1, (http/1.1, h2c)}{0.0.0.0:8082}
2025-09-24 12:33:20.809 [main] INFO  org.eclipse.jetty.server.Server - Started oejs.Server@6e1d939e{STARTING}[12.0.23,sto=1000] @6888ms
2025-09-24 12:33:20.811 [main] INFO  org.structr.core.Services - 5 service(s) processed
2025-09-24 12:33:20.812 [main] INFO  org.structr.core.Services - Registering shutdown hook.
2025-09-24 12:33:20.826 [main] INFO  org.structr.core.Services - Started Structr 6.1.0 abcde 202601291210
2025-09-24 12:33:20.827 [main] INFO  org.structr.core.Services - ---------------- Initialization complete ----------------
Initial Configuration
After installation (for Docker or manual setup), you’ll need to go through the initial configuration procedure as follows.
Note: In the following chapter, we assume that you installed Structr on your local computer (localhost). If you installed it on a server instead, you need to adapt the URLs accordingly.
1. Set a Superuser Password
Navigate to http://localhost:8082/structr which will redirect you to the configuration wizard at http://localhost:8082/structr/config.
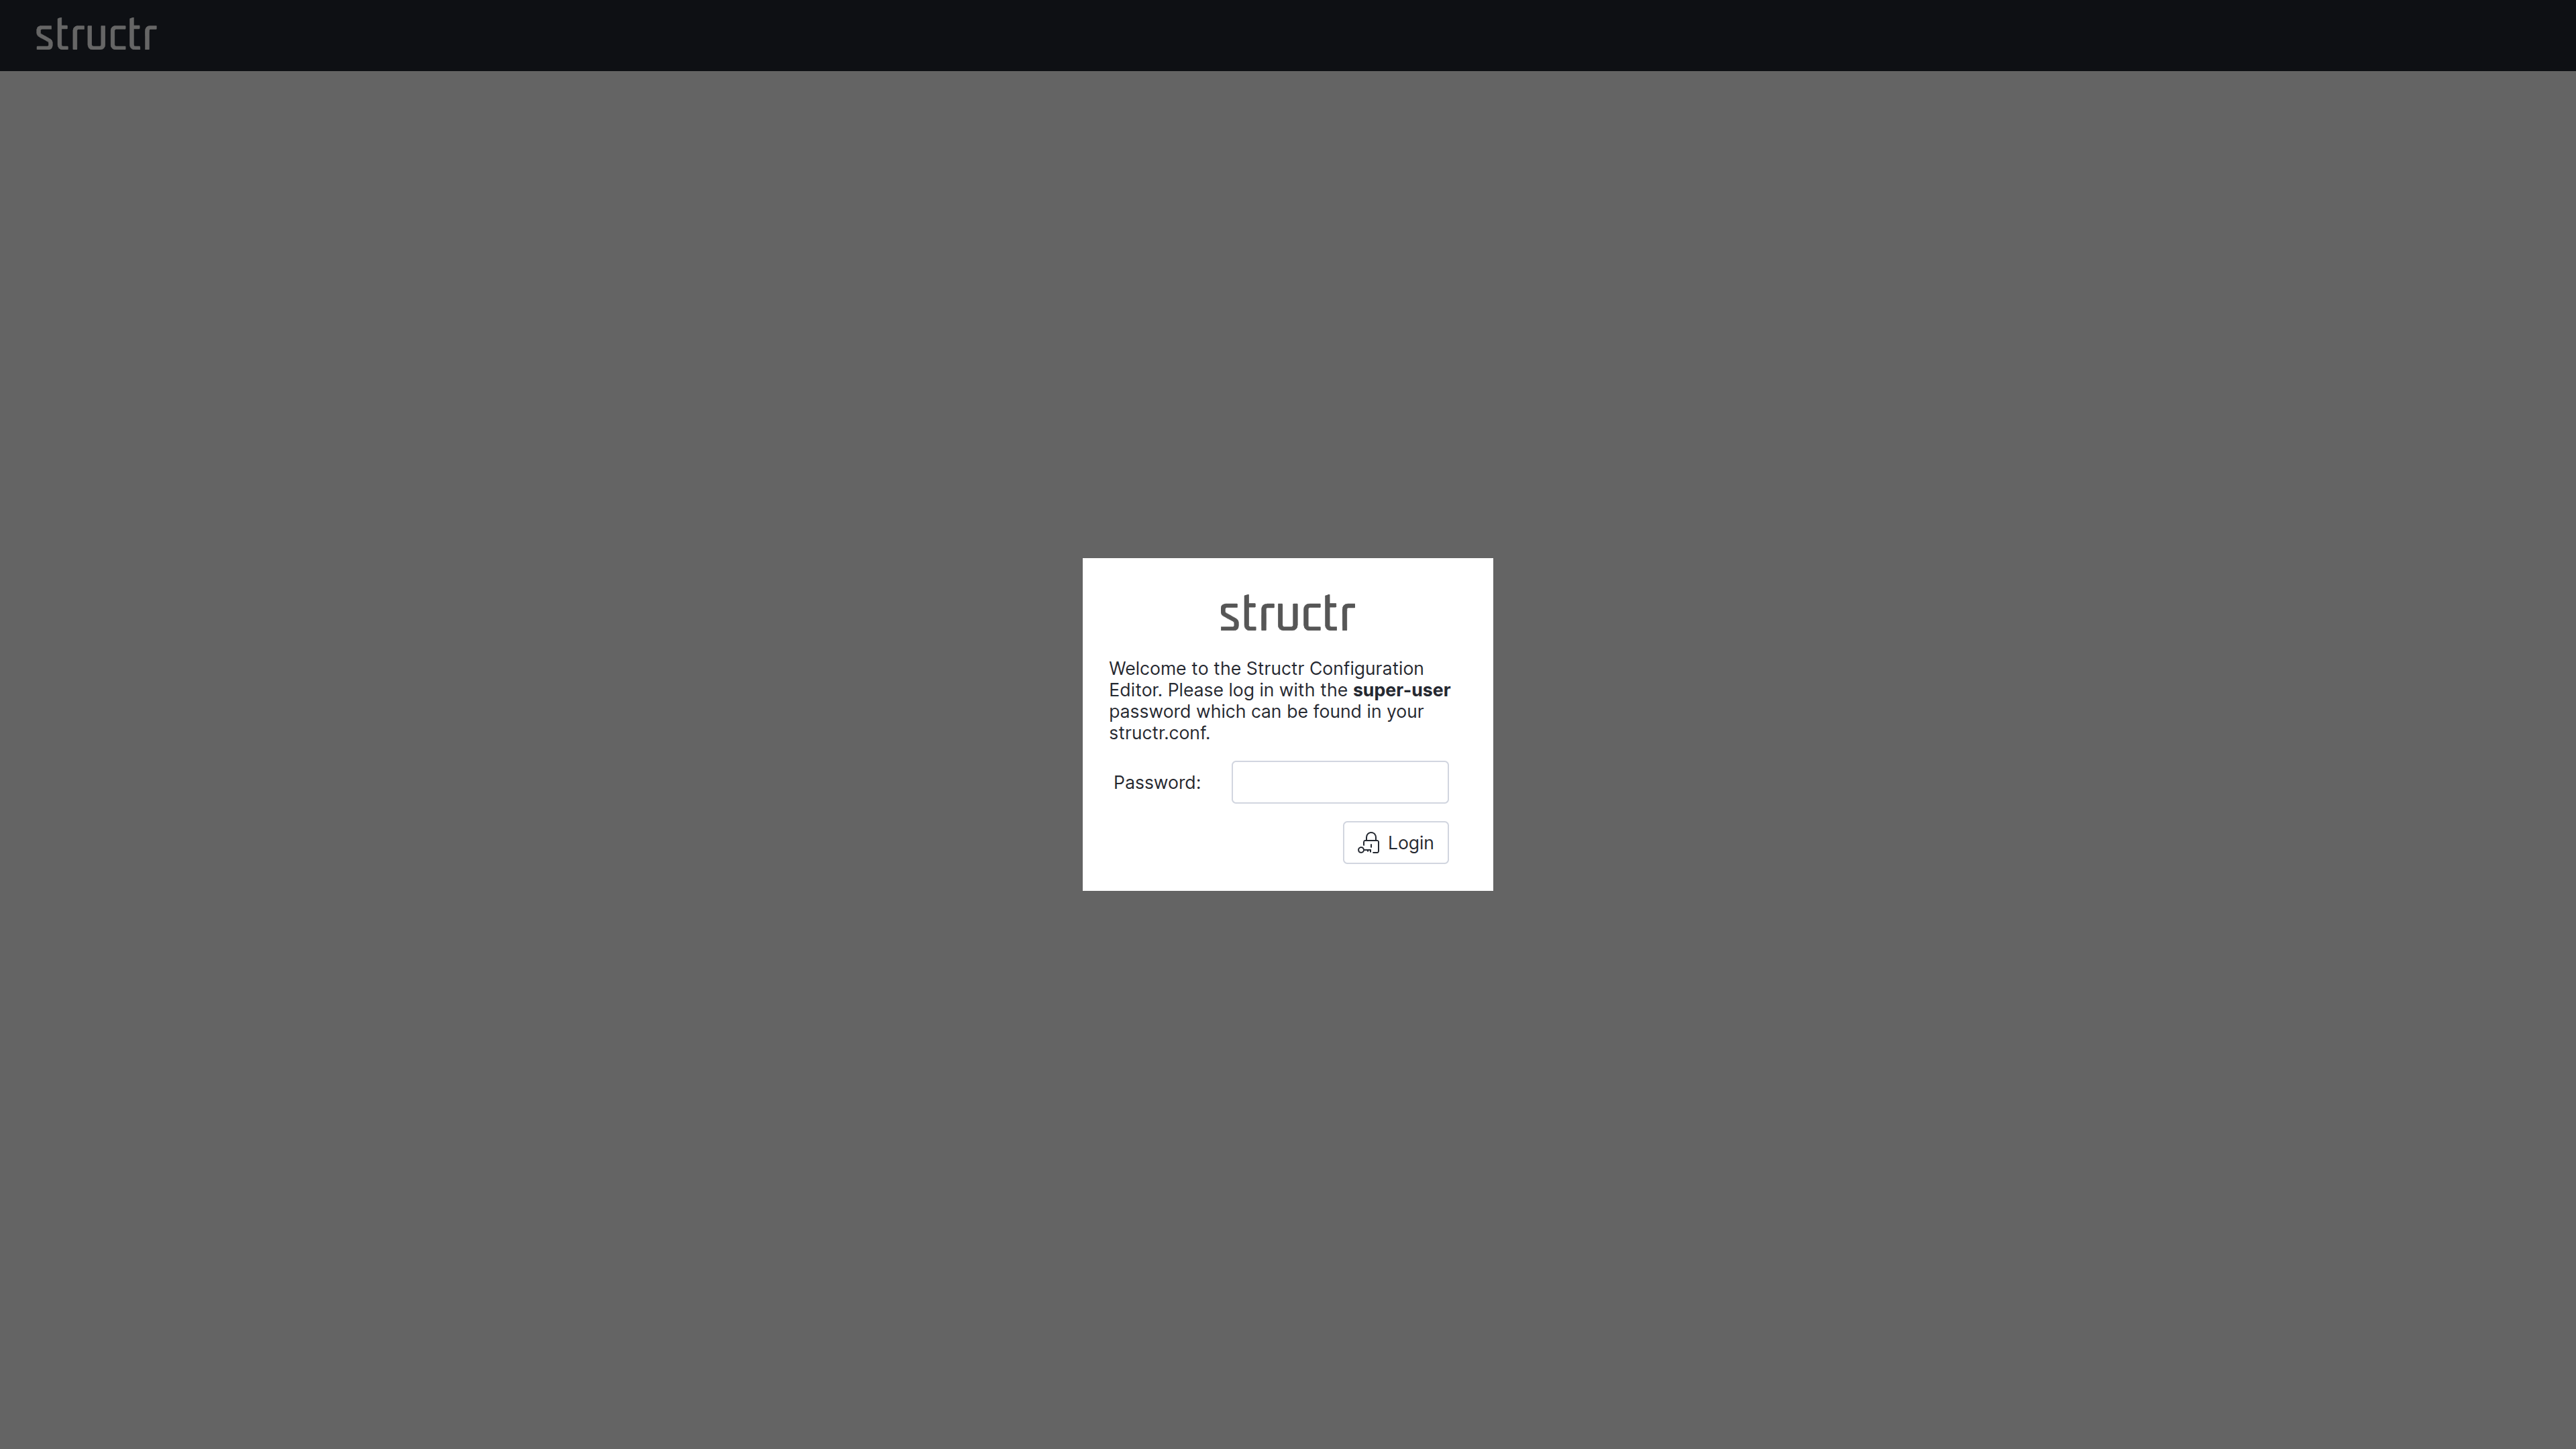
Note: Choose a strong password - this is your system administrator account with full access to all Structr features. After the first call, the configuration tool is secured with this password. If you have forgotten the password, you can only obtain it as a system administrator at the operating system level from structr.conf.
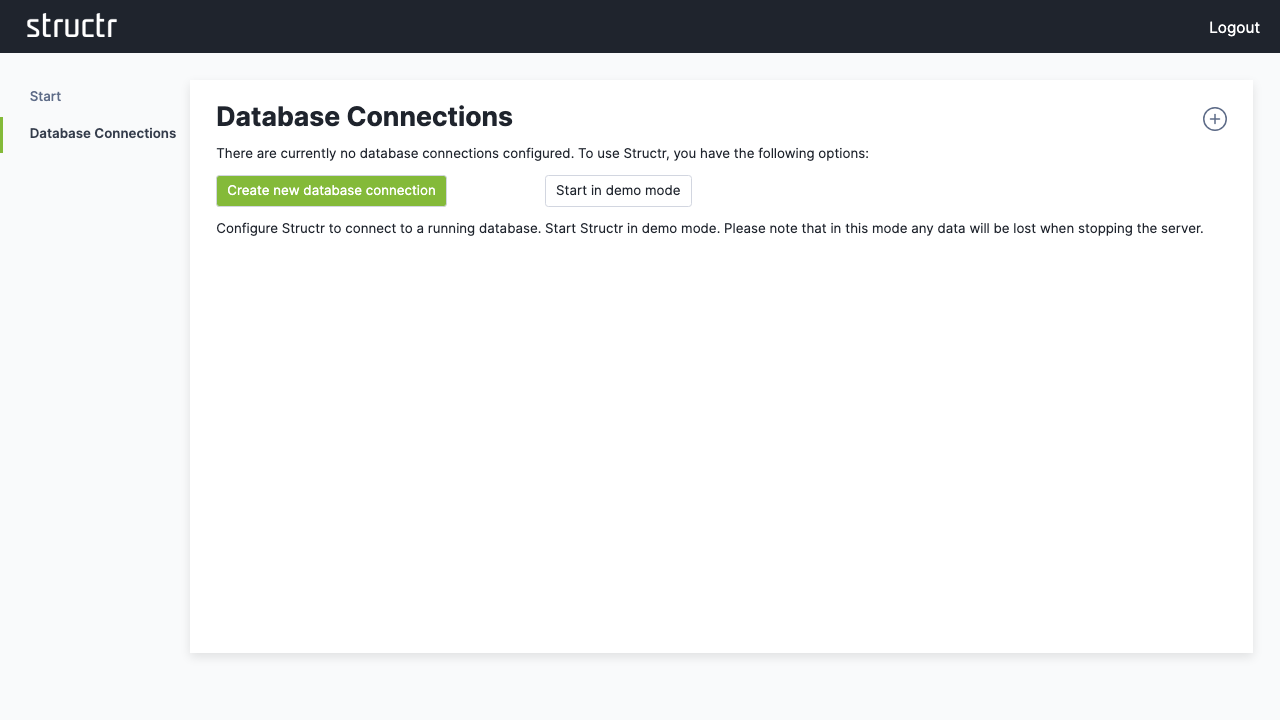
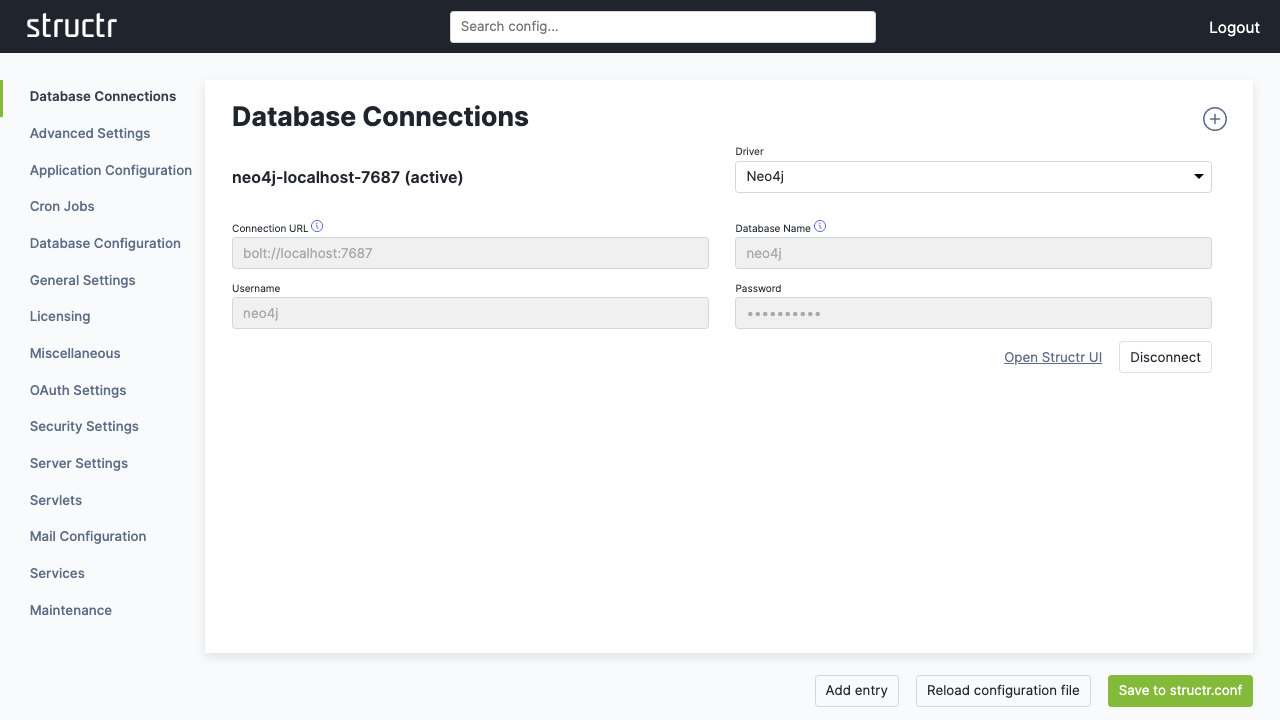
2. Configure a Database Connection
Click “Configure a database connection” and then “Create new database connection”.
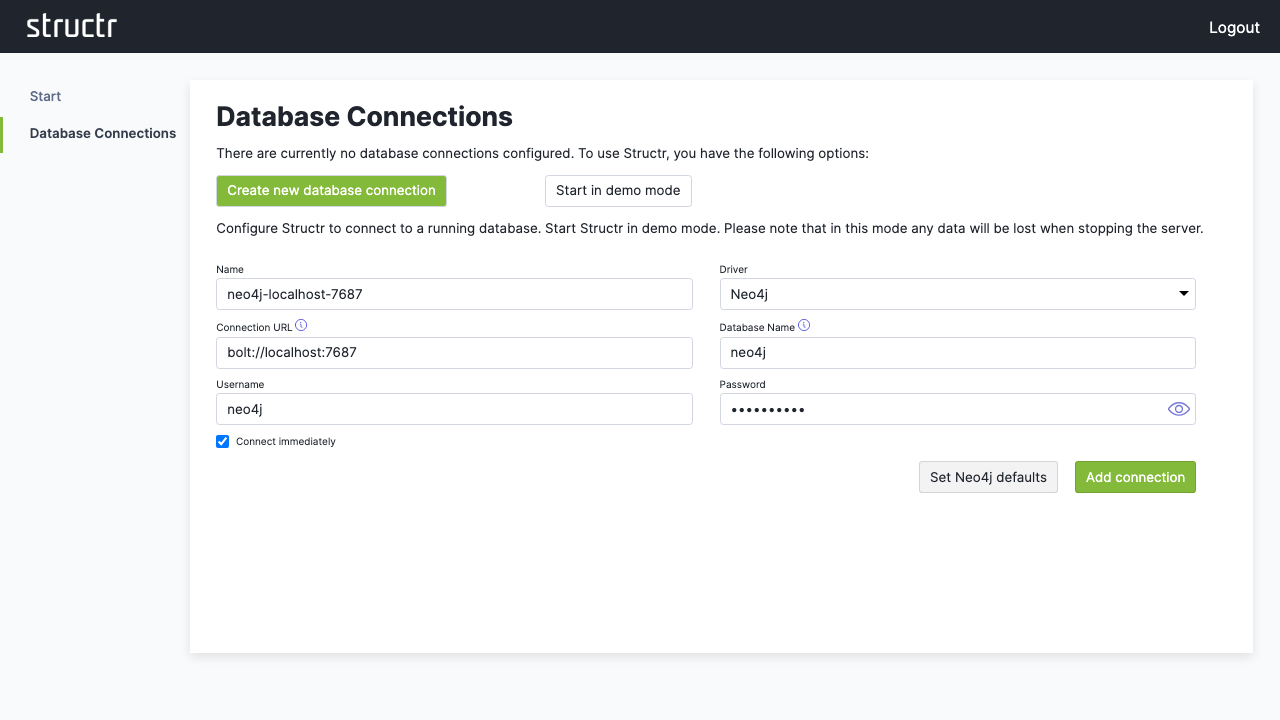
For a standard Neo4j setup:
- Click “Set Neo4j defaults” to auto-fill typical values
- Adjust the connection parameters if needed
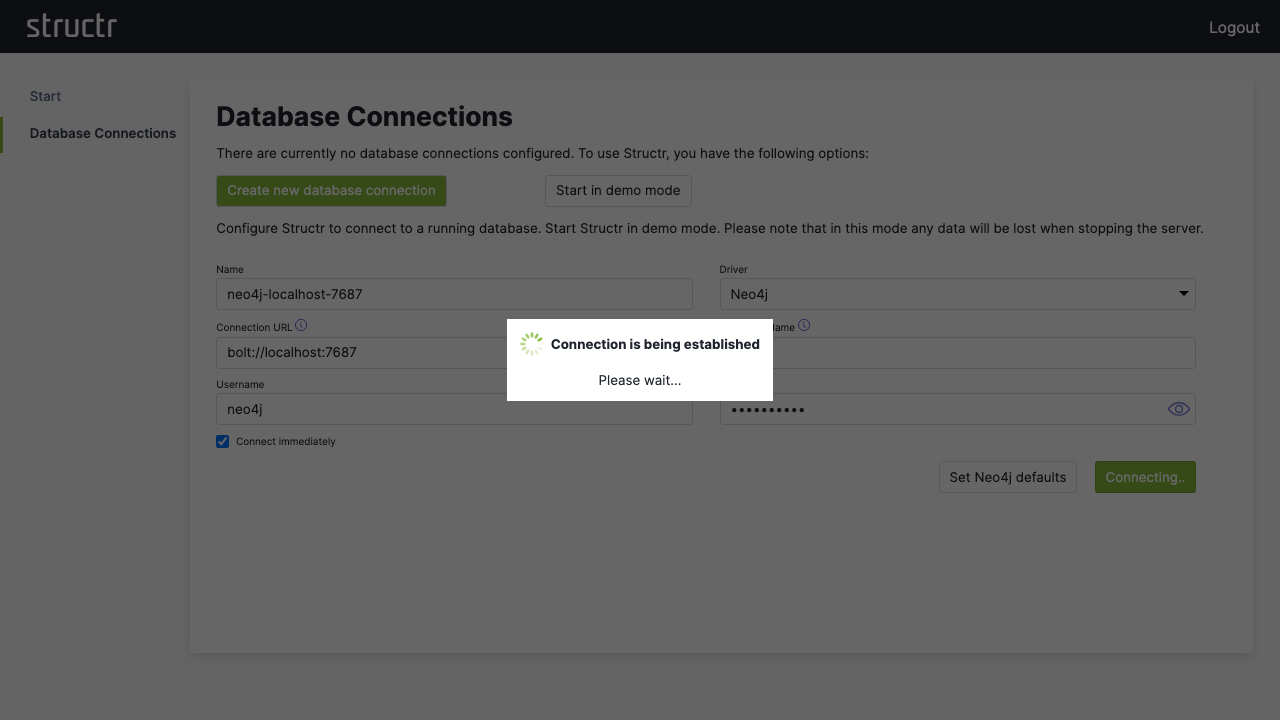
- Click “Save” to establish the connection

If your database connection does not use these default settings, change them according to your database configuration.
3. Access the Admin Interface
Once connected, click “Open Structr UI” to enter the main application.
First Steps
When you see the sign-in screen, you’re ready to start working with your Structr instance.
Sign In
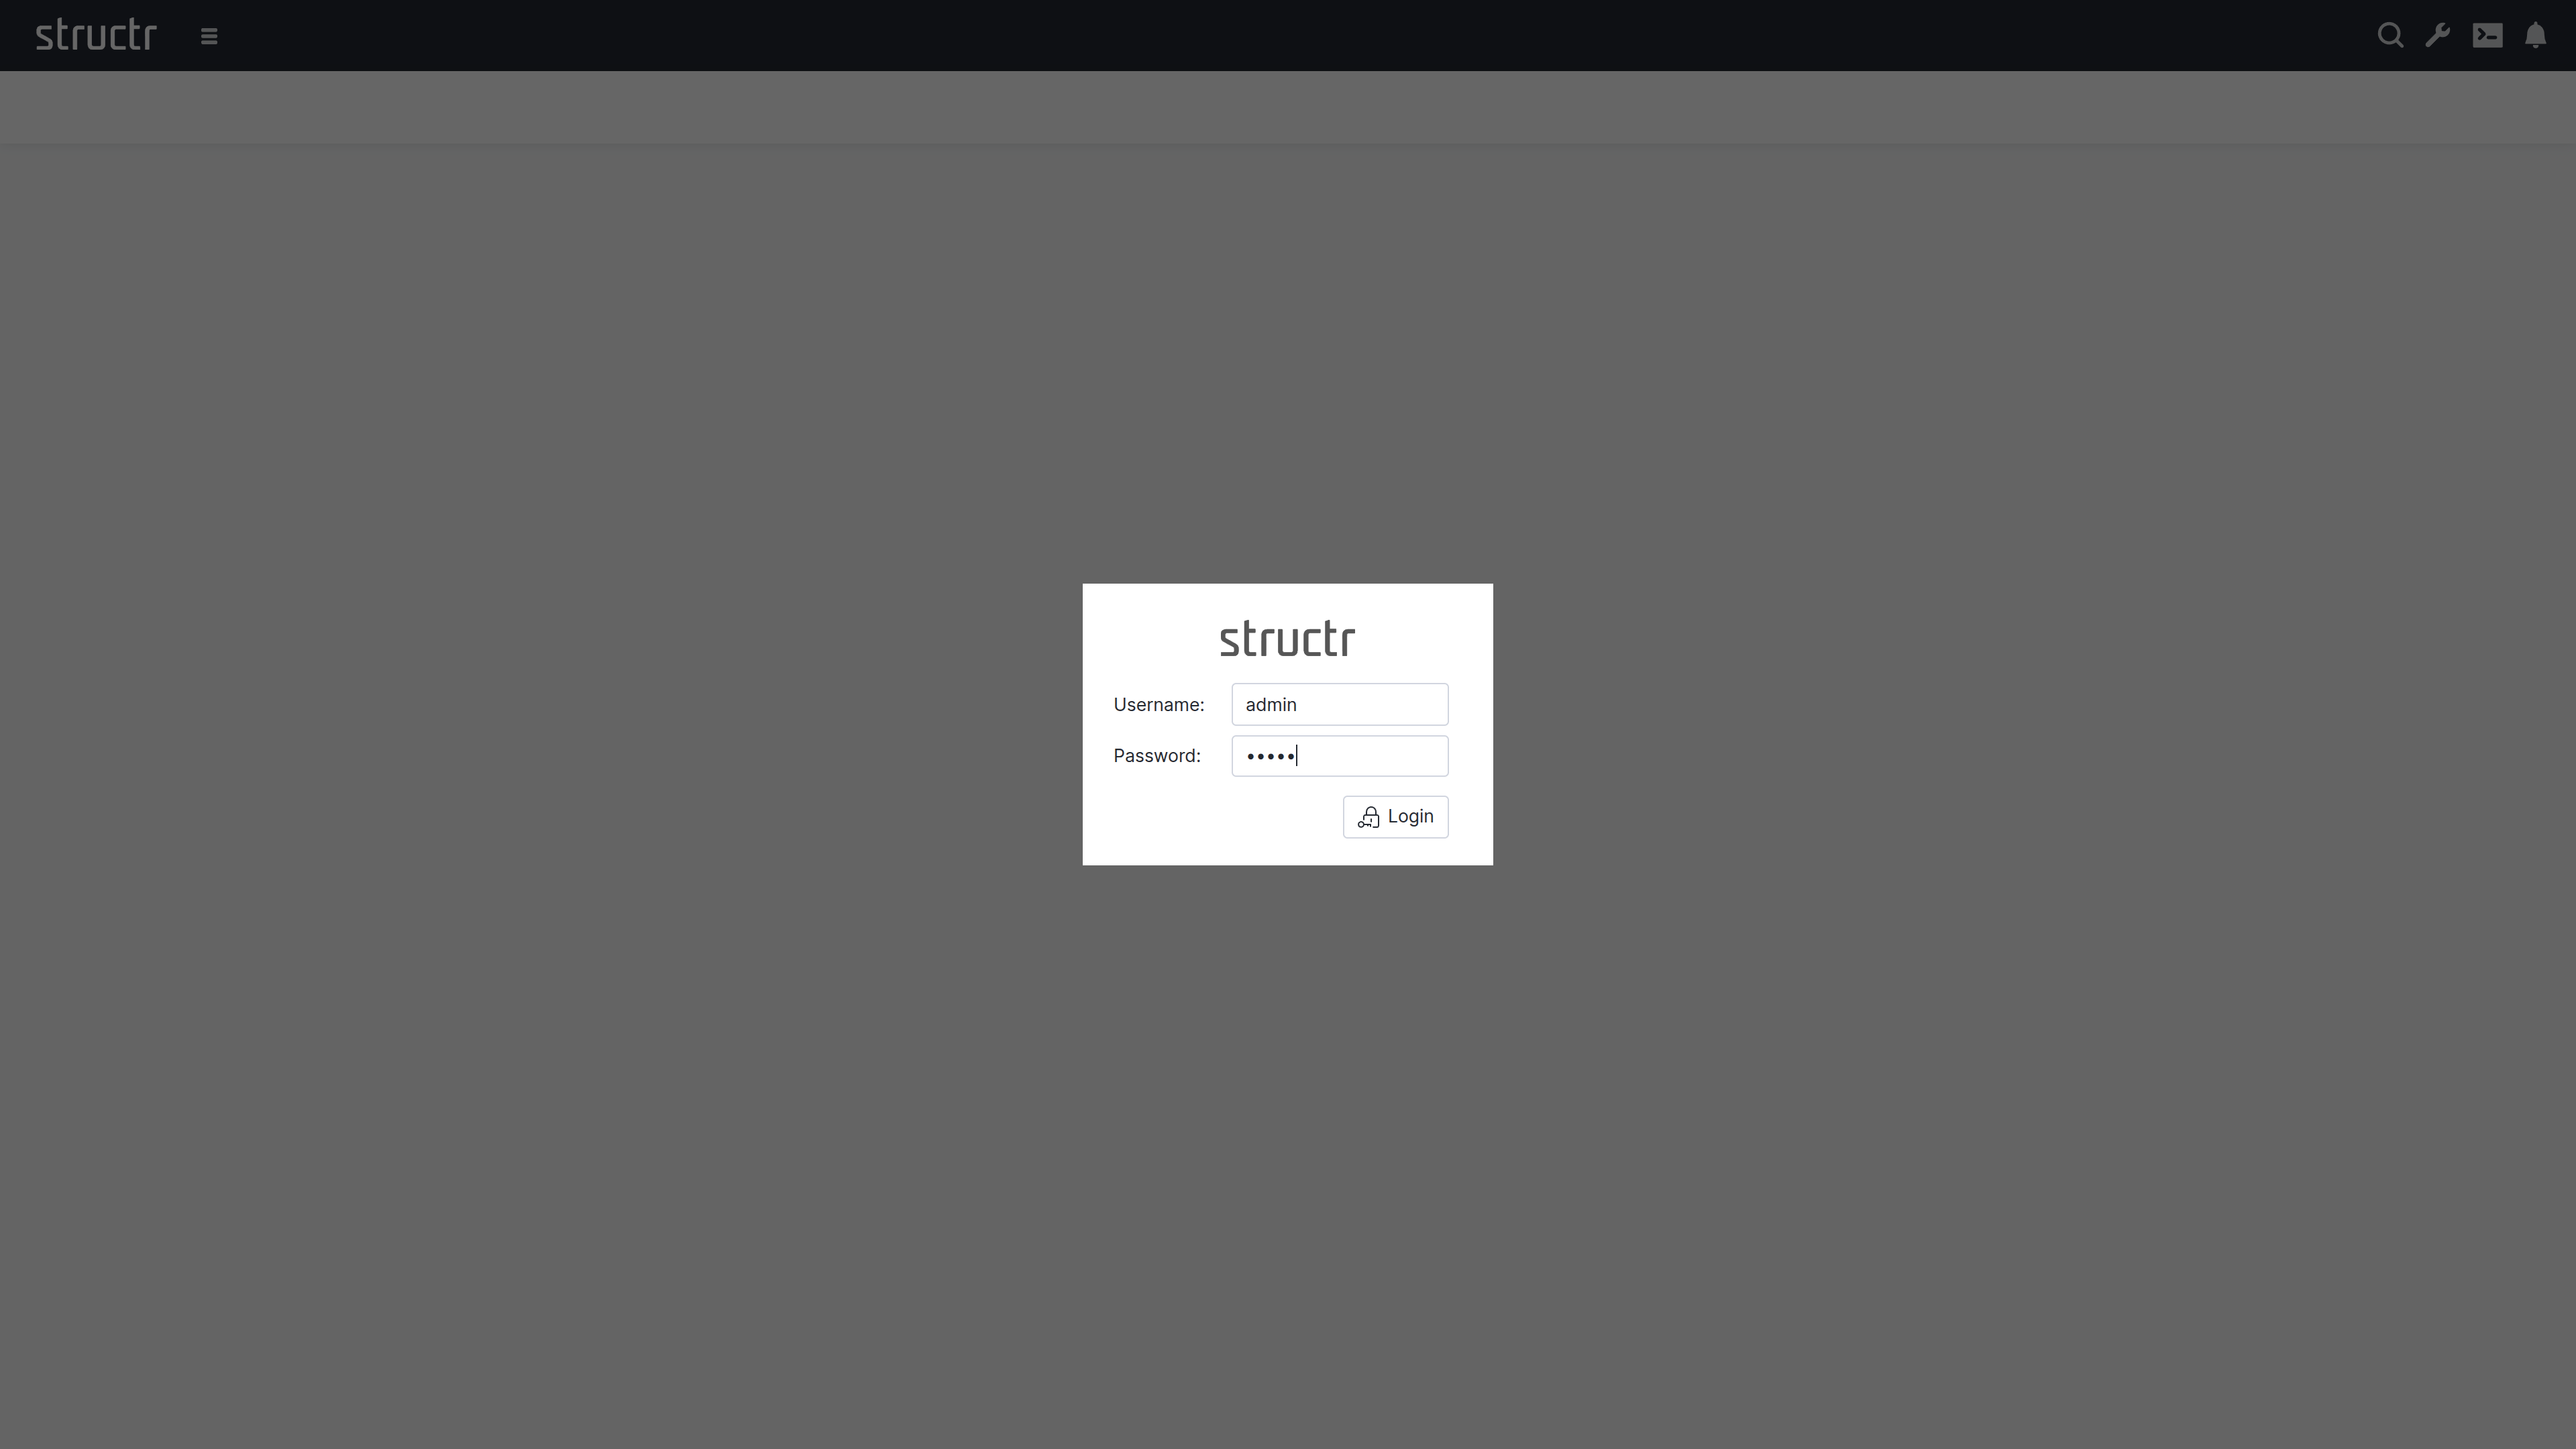
There’s default admin user which is created automatically if the database was found empty. The default password is admin.
Note: You should change the admin password immediately after signing in. Go to
Security→Users and Groups, right-click onadmin→Generaland set a password that can’t be easily guessed. You can also set password rules in the configuration.
Change Admin Password
Now you’re set and done and ready for the first steps with Structr.
First Steps with Structr
This guide walks you through typical steps of building an application using Structr’s visual development tools.
The use case is a simple system for managing projects, milestones and tasks. We’ll start with the schema, add some sample data and create a web page to display the data.
As an optional addition, we add a user and a group, define API access permissions and a CORS rules.
Chapter 1: Defining the Data Schema
Start by creating the data structure for your project management system. The schema defines three main entities:
- Projects
- Milestones
- Tasks
Creating the Project Type
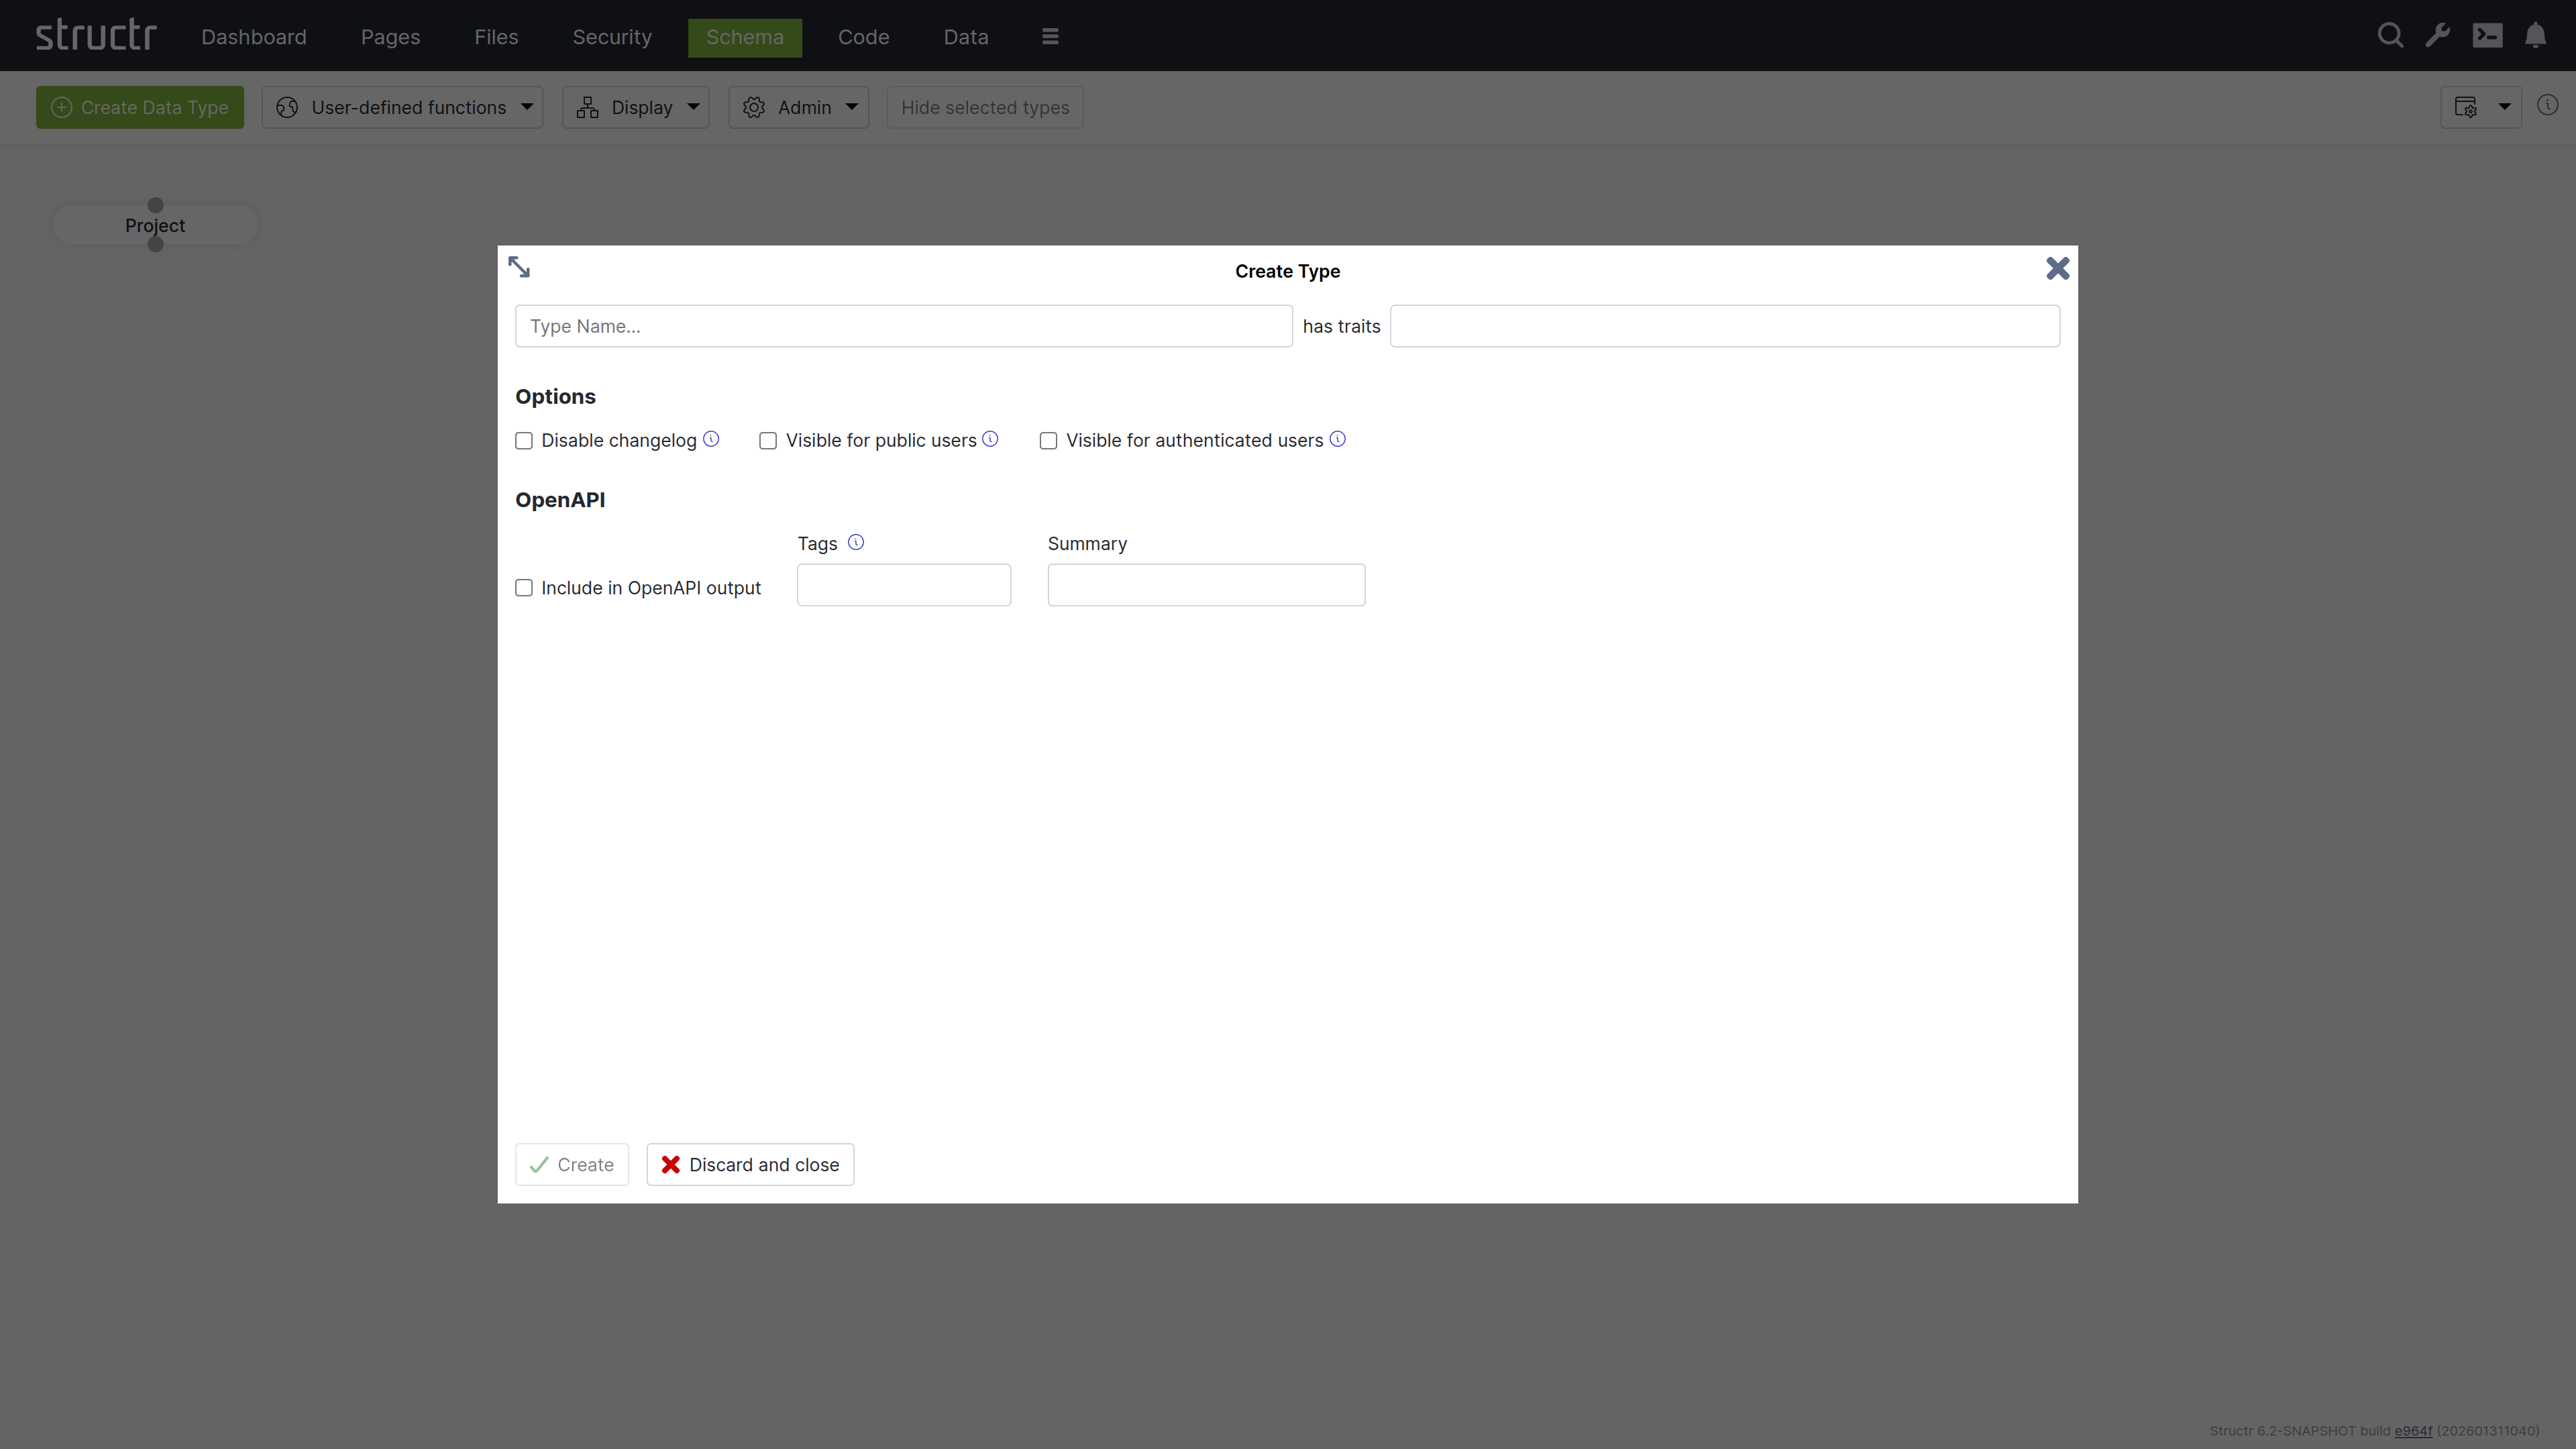
Navigate to the “Schema” view and click “Create Data Type” to add your first entity type.
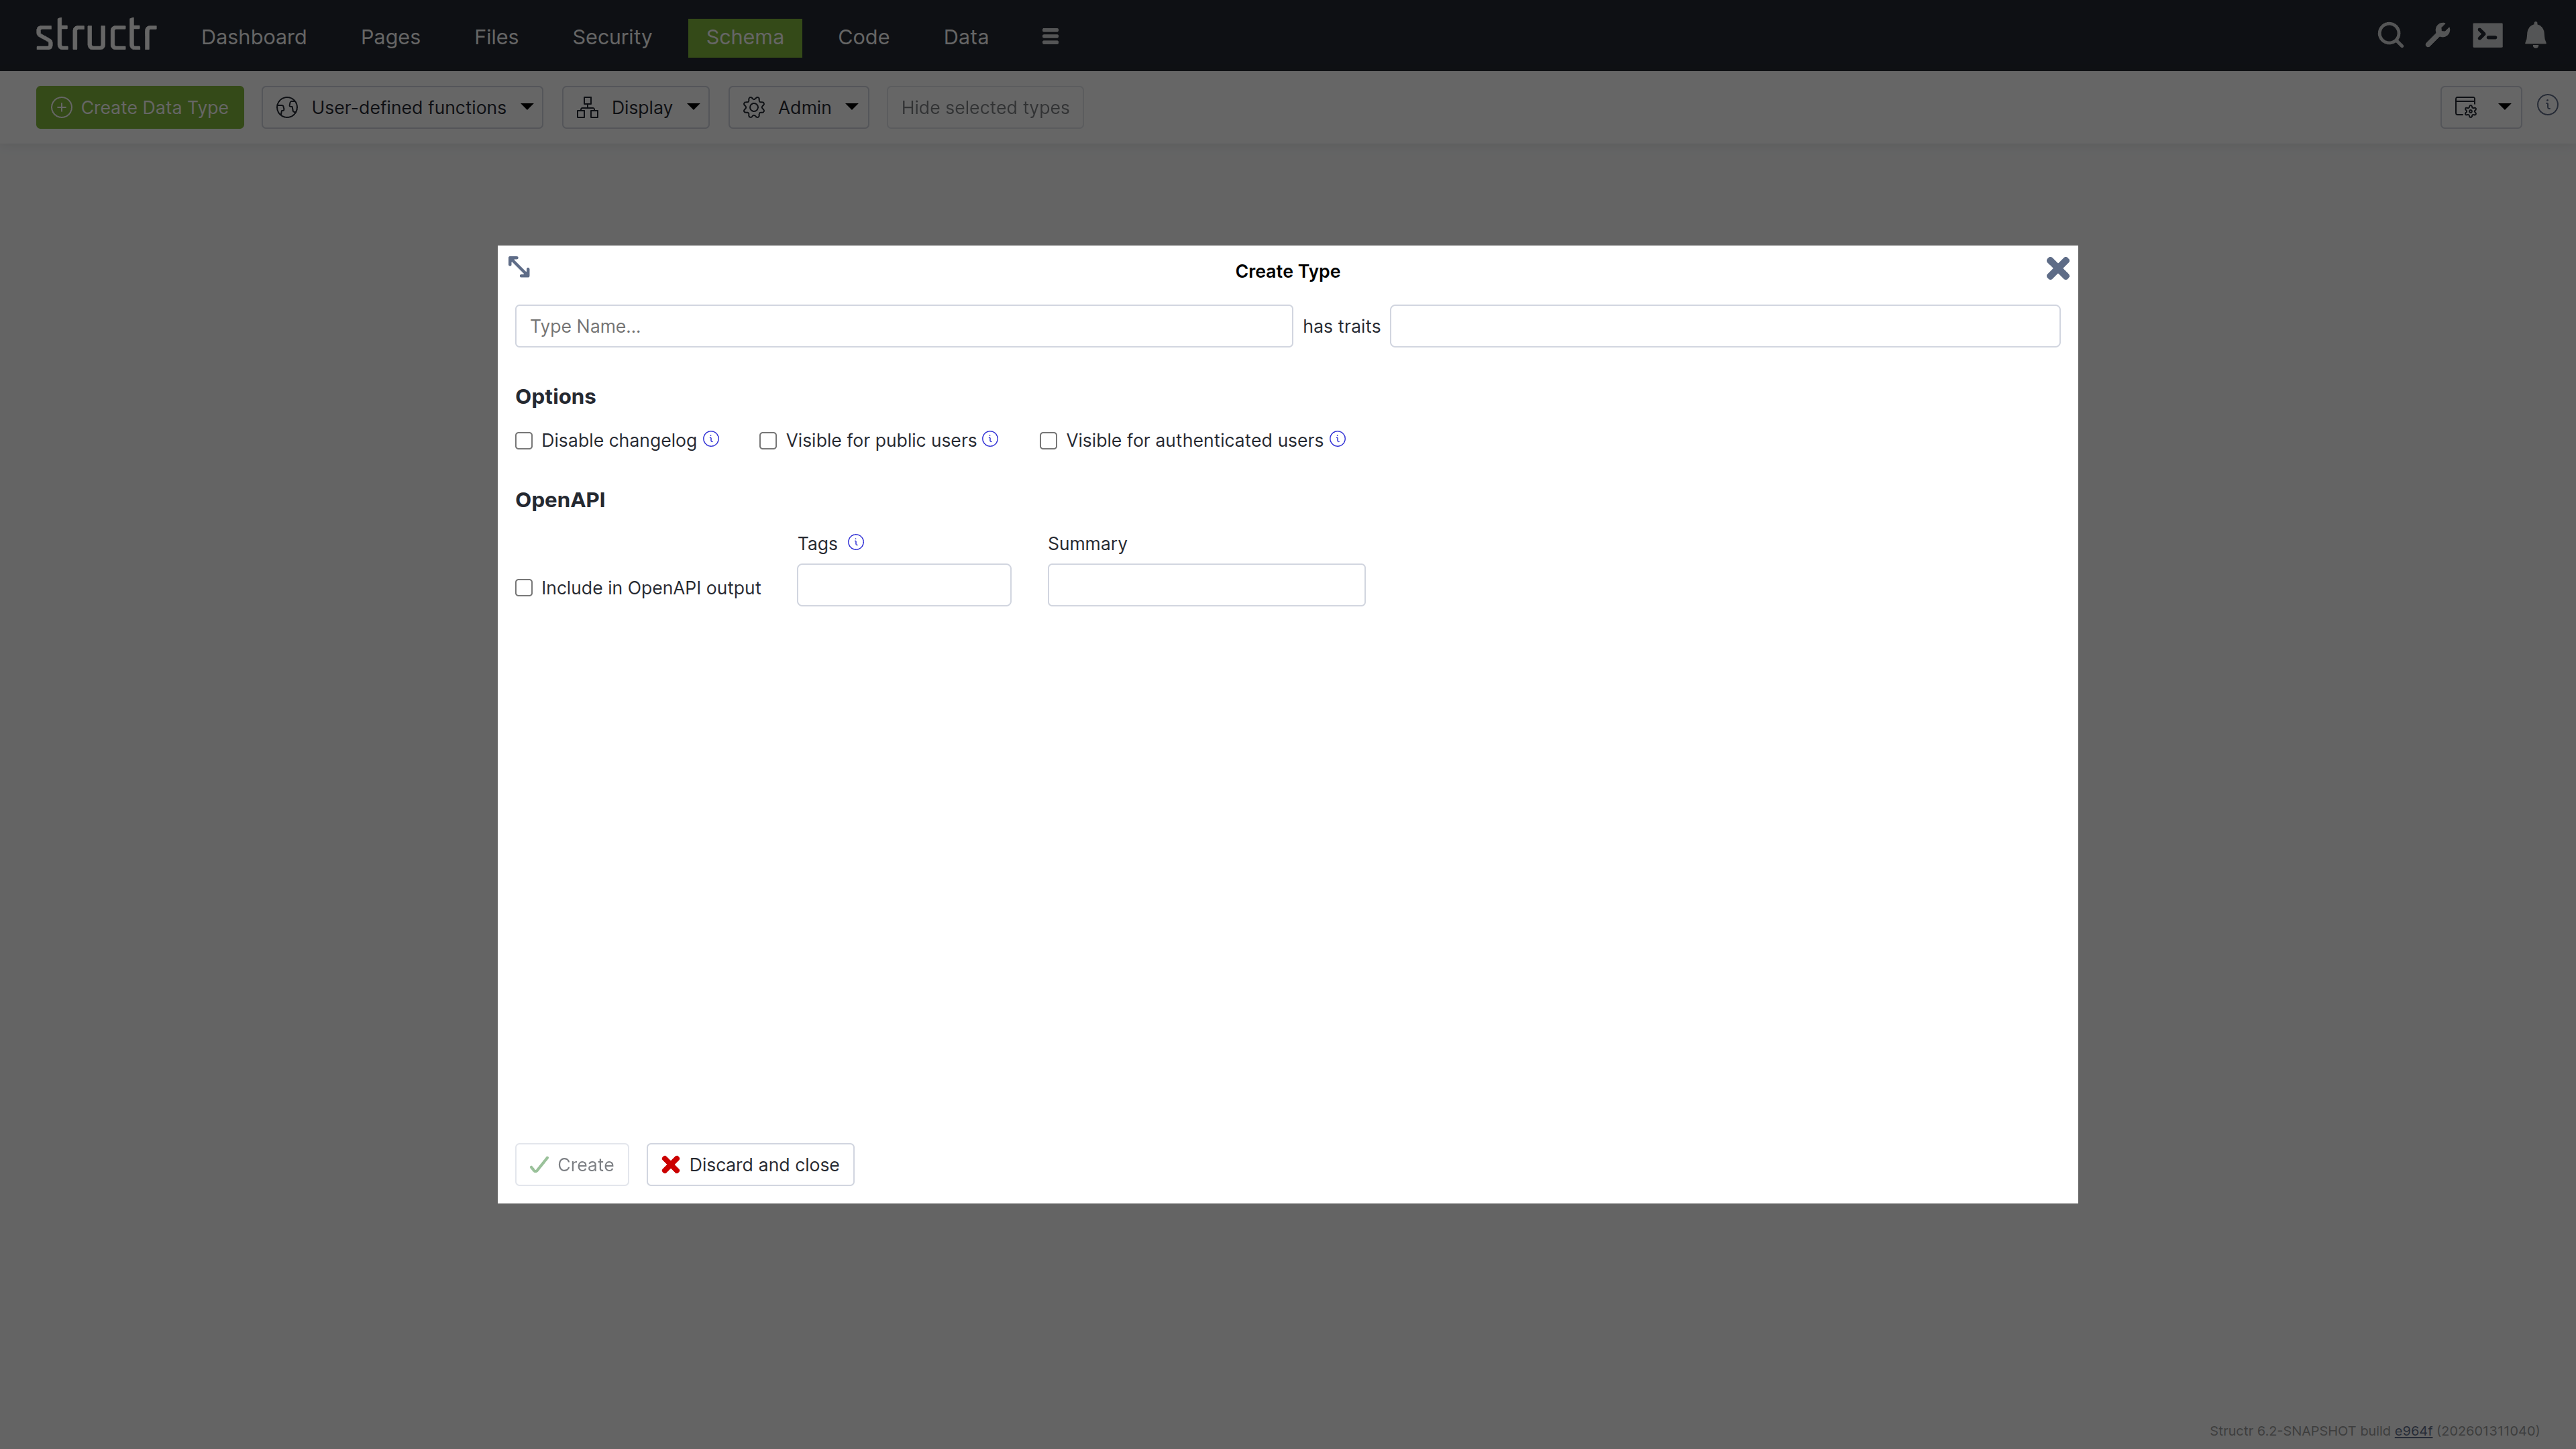
- Enter “Project” as the type name
- Click “Create” to add the type
Add a custom property to uniquely identify projects:
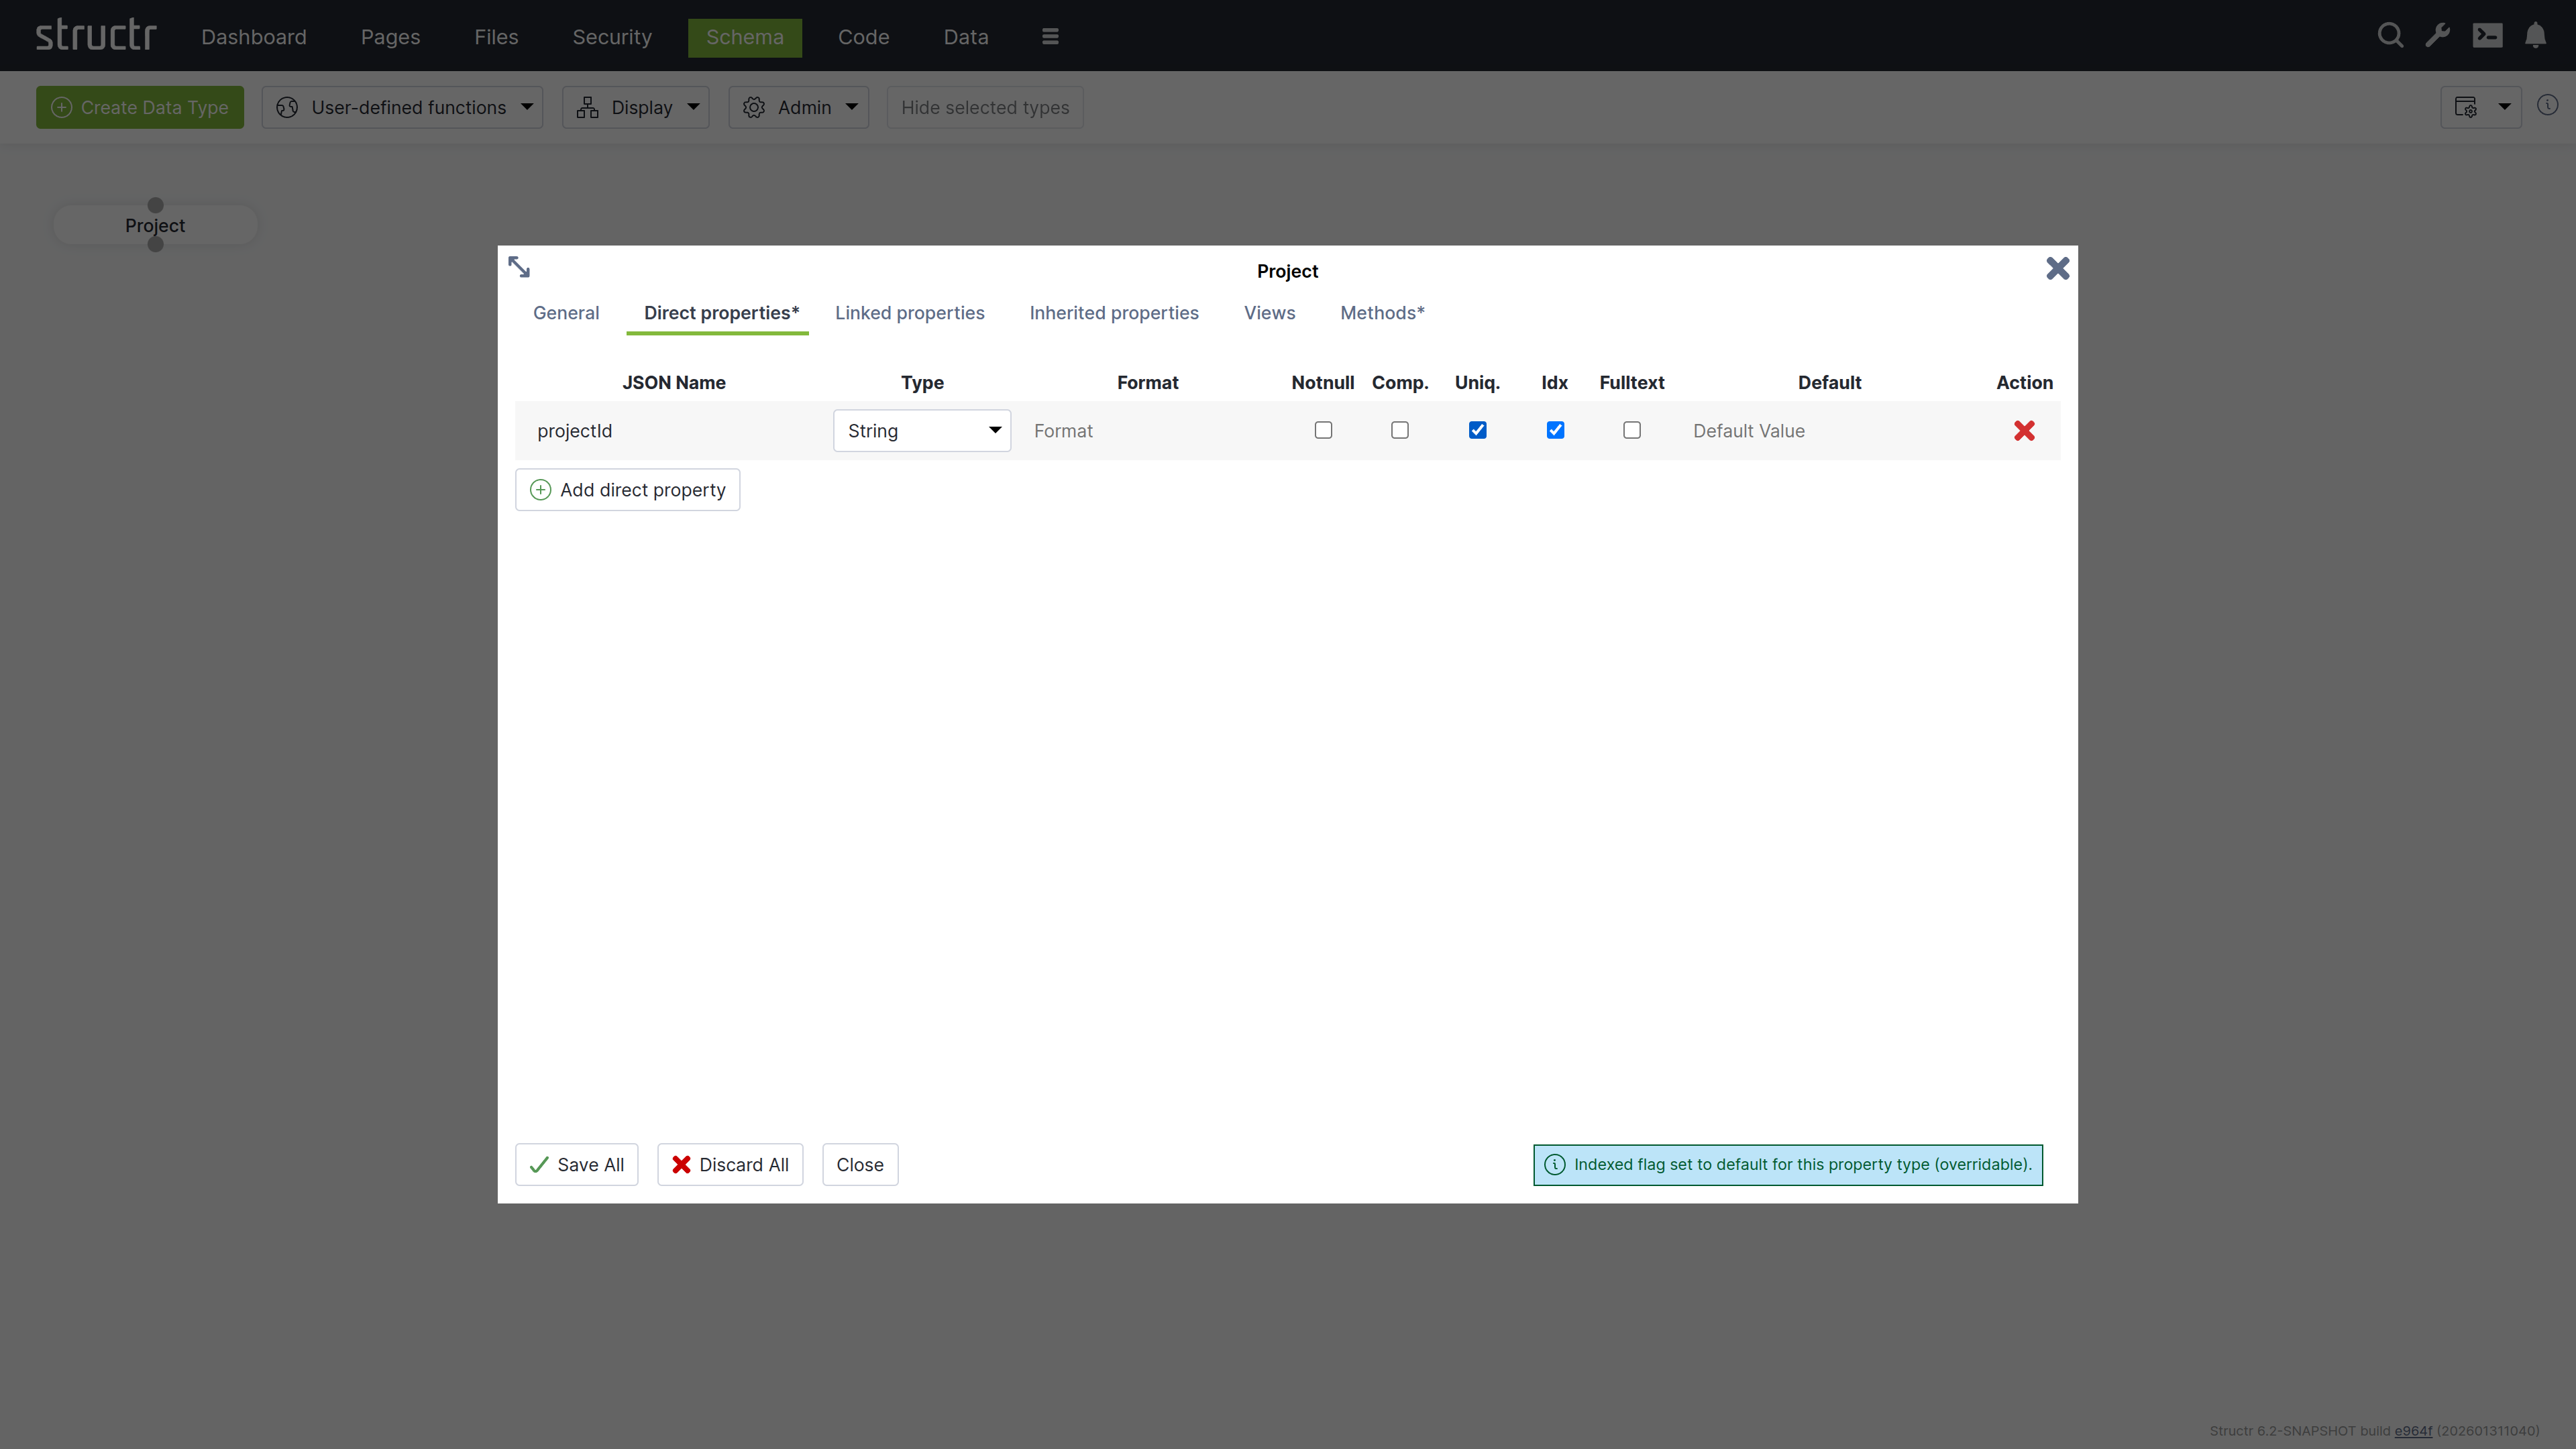
- Expand “Direct properties”
- Click “Add direct property”
- Set JSON name to “projectId”
- Check “unique” to ensure each project has a unique identifier
- Select “String” as the property type
- Click “Save All”
Creating the Milestone Type
Add a Milestone type following the same pattern:
Add multiple properties to track milestone details:
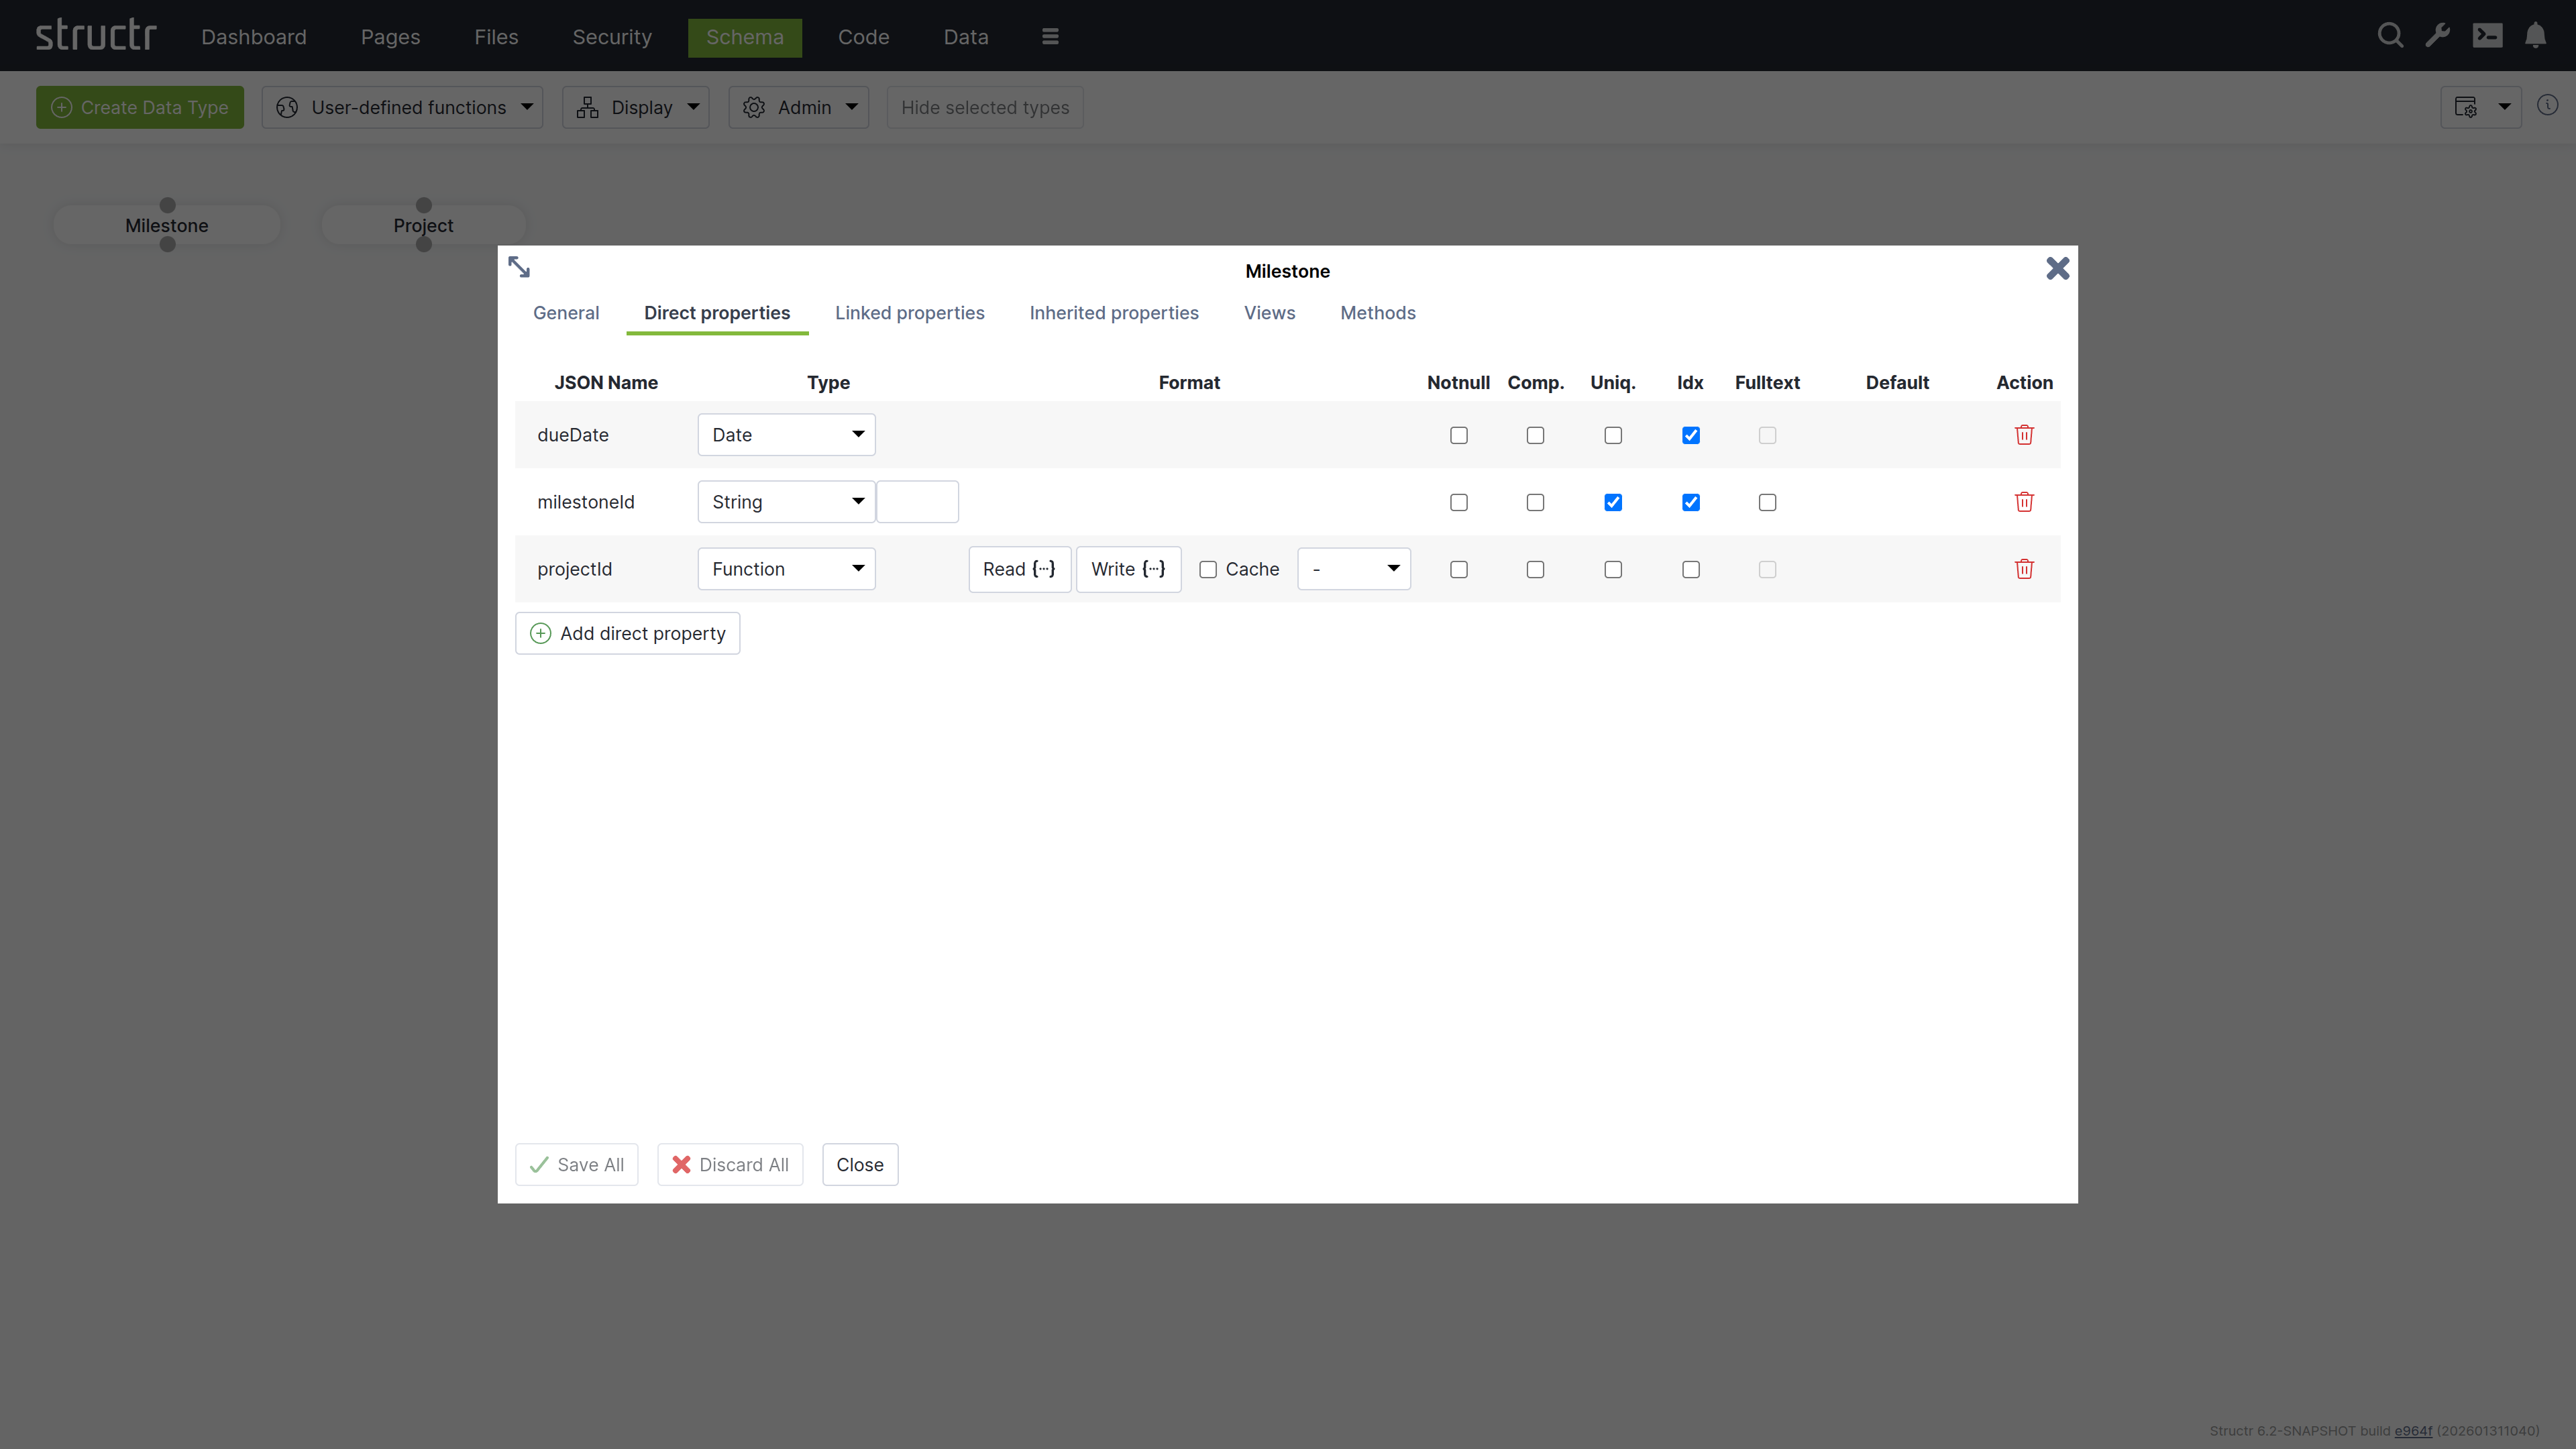
milestoneId: String property marked as uniquedueDate: Date property for deadline trackingprojectId: Function property that automatically links to the parent project
The Function property allows setting a Read and a Write function which are called when a value is read from or written to the property.
In our example, the Read function just returns the value of the projectId property of the connected project.
The Write function establishes a relationship between the Milestone object and the Project object referenced by the given value.
- Read:
this.project.projectId - Write:
set(this, 'project', first(find('Project', 'projectId', value)))
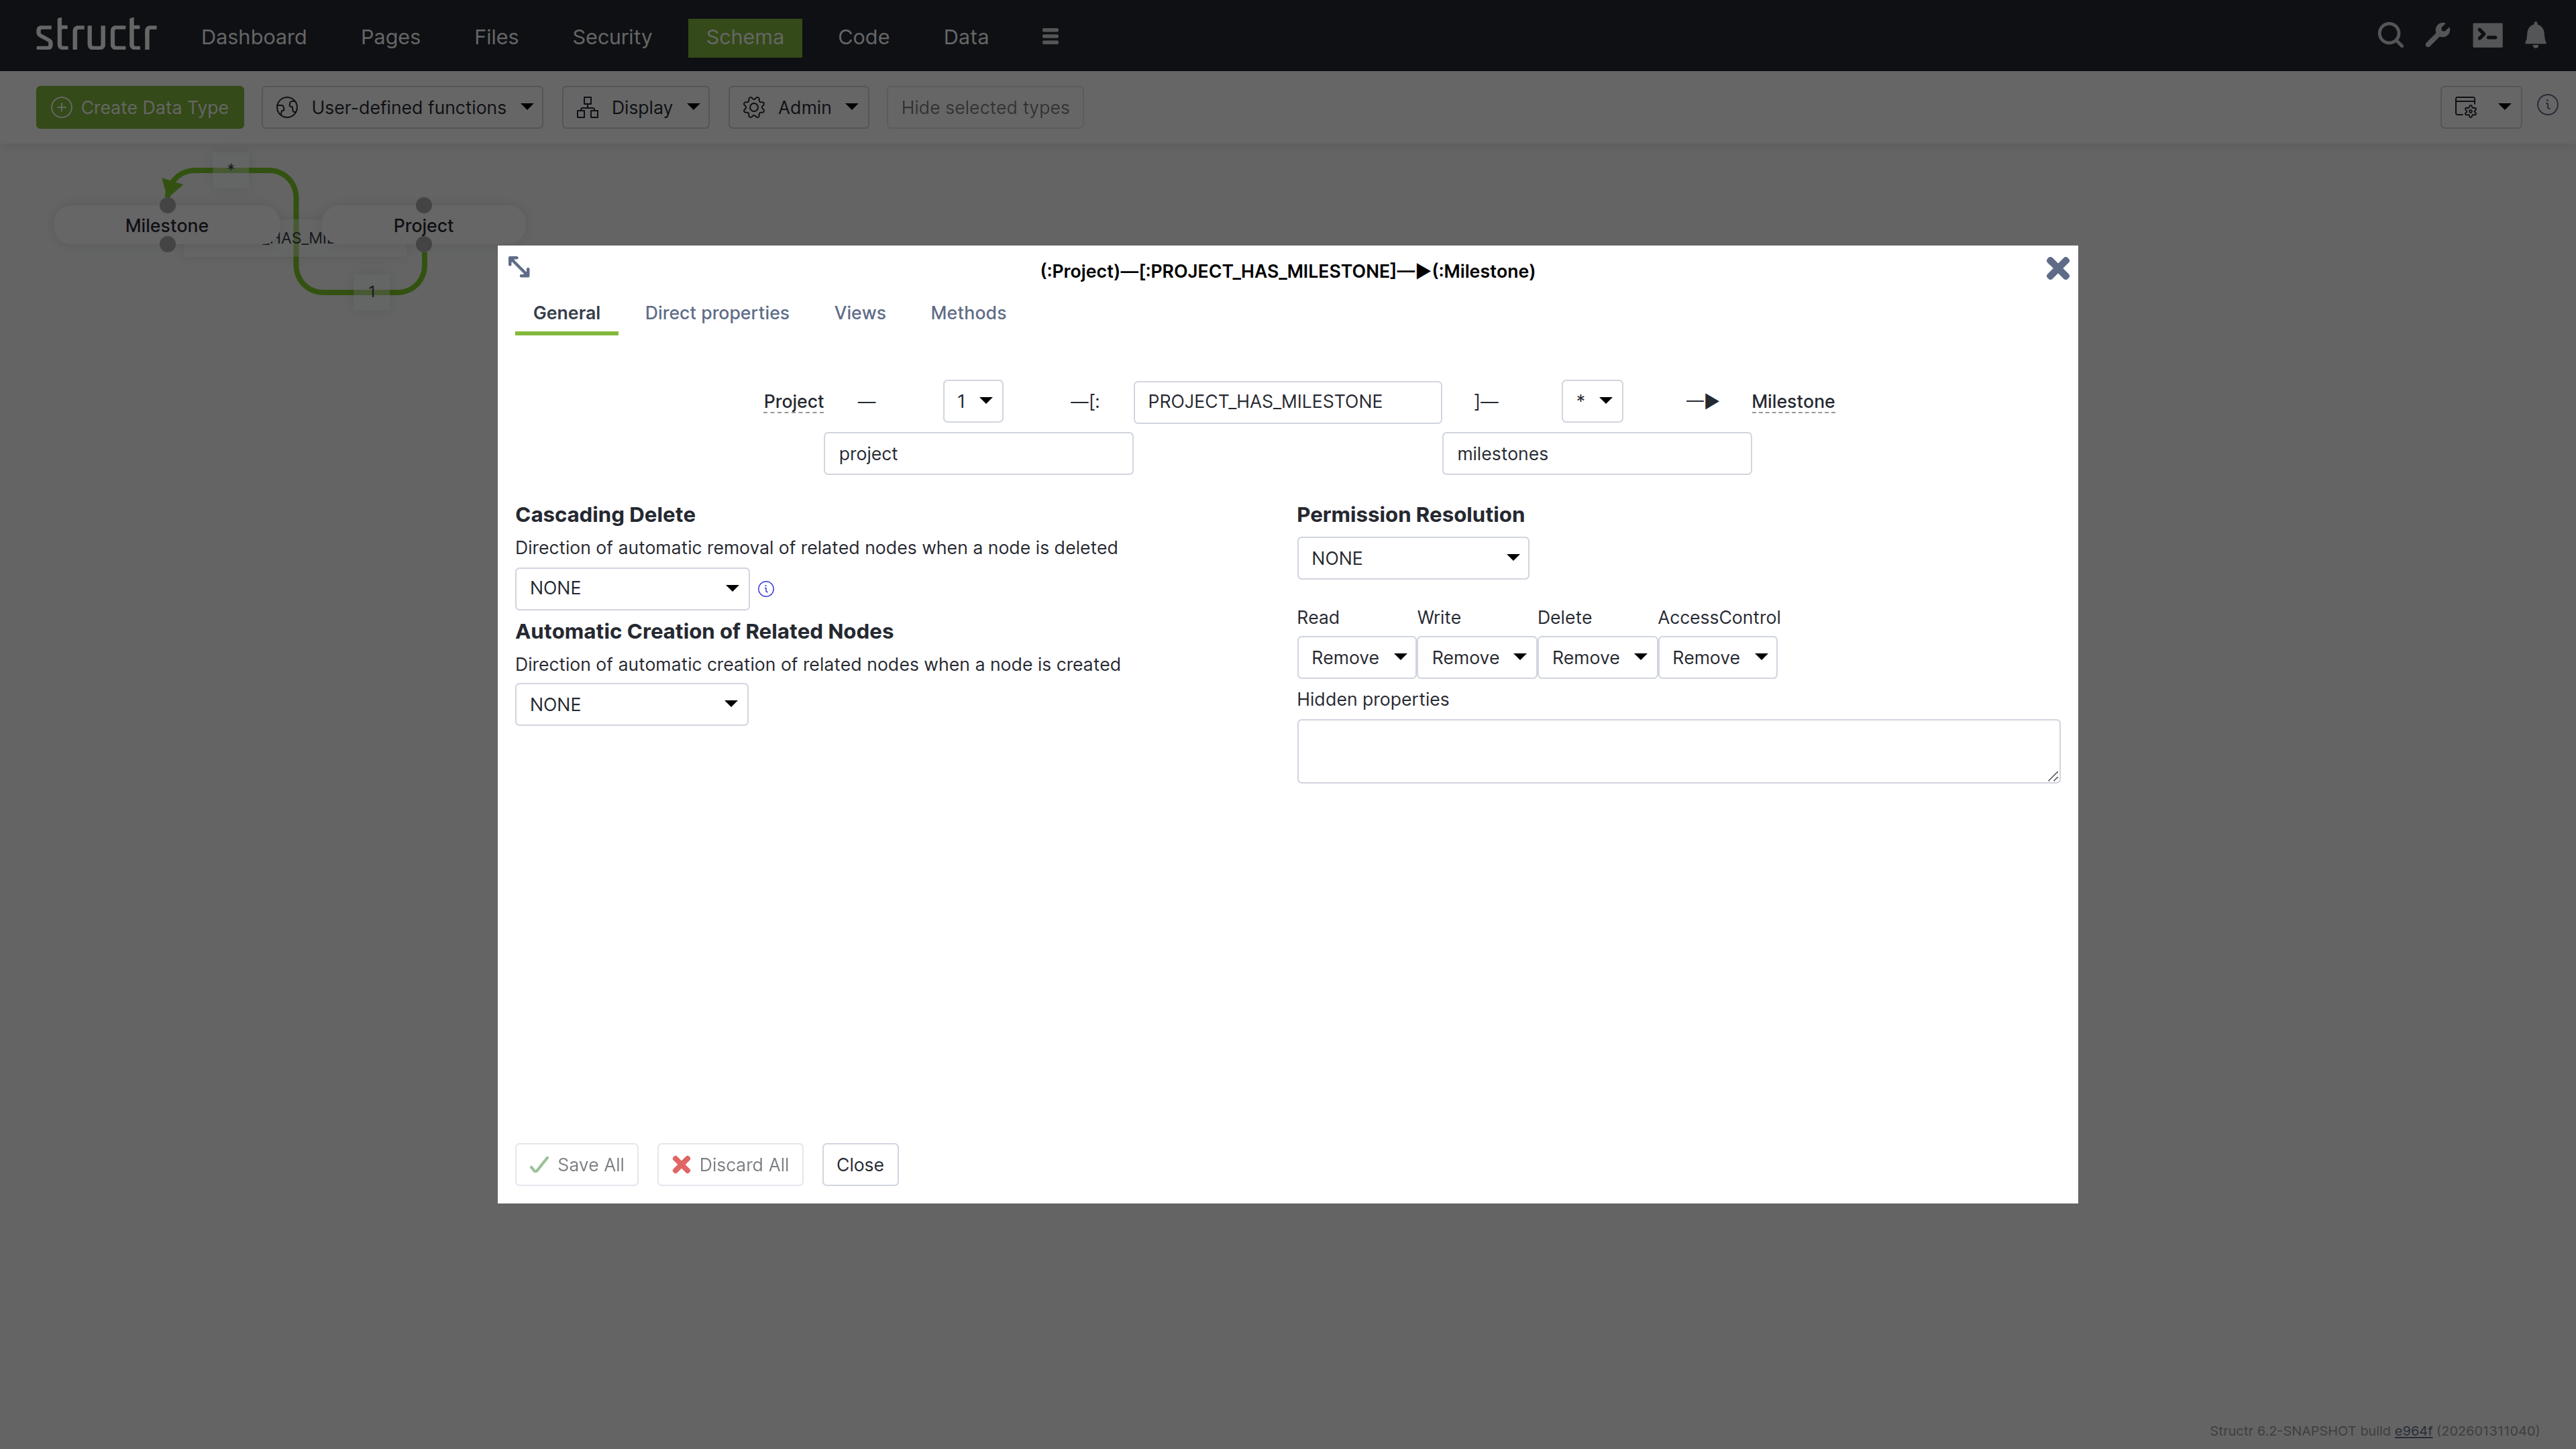
Defining Relationships
Connect your types by dragging from one connection point to another:
Create these relationships and set the type to:
- PROJECT_HAS_MILESTONE: One project can have many milestones
- TASK_BELONGS_TO: Many tasks belong to one project
Creating the Task Type
Create a Task type with similar structure:
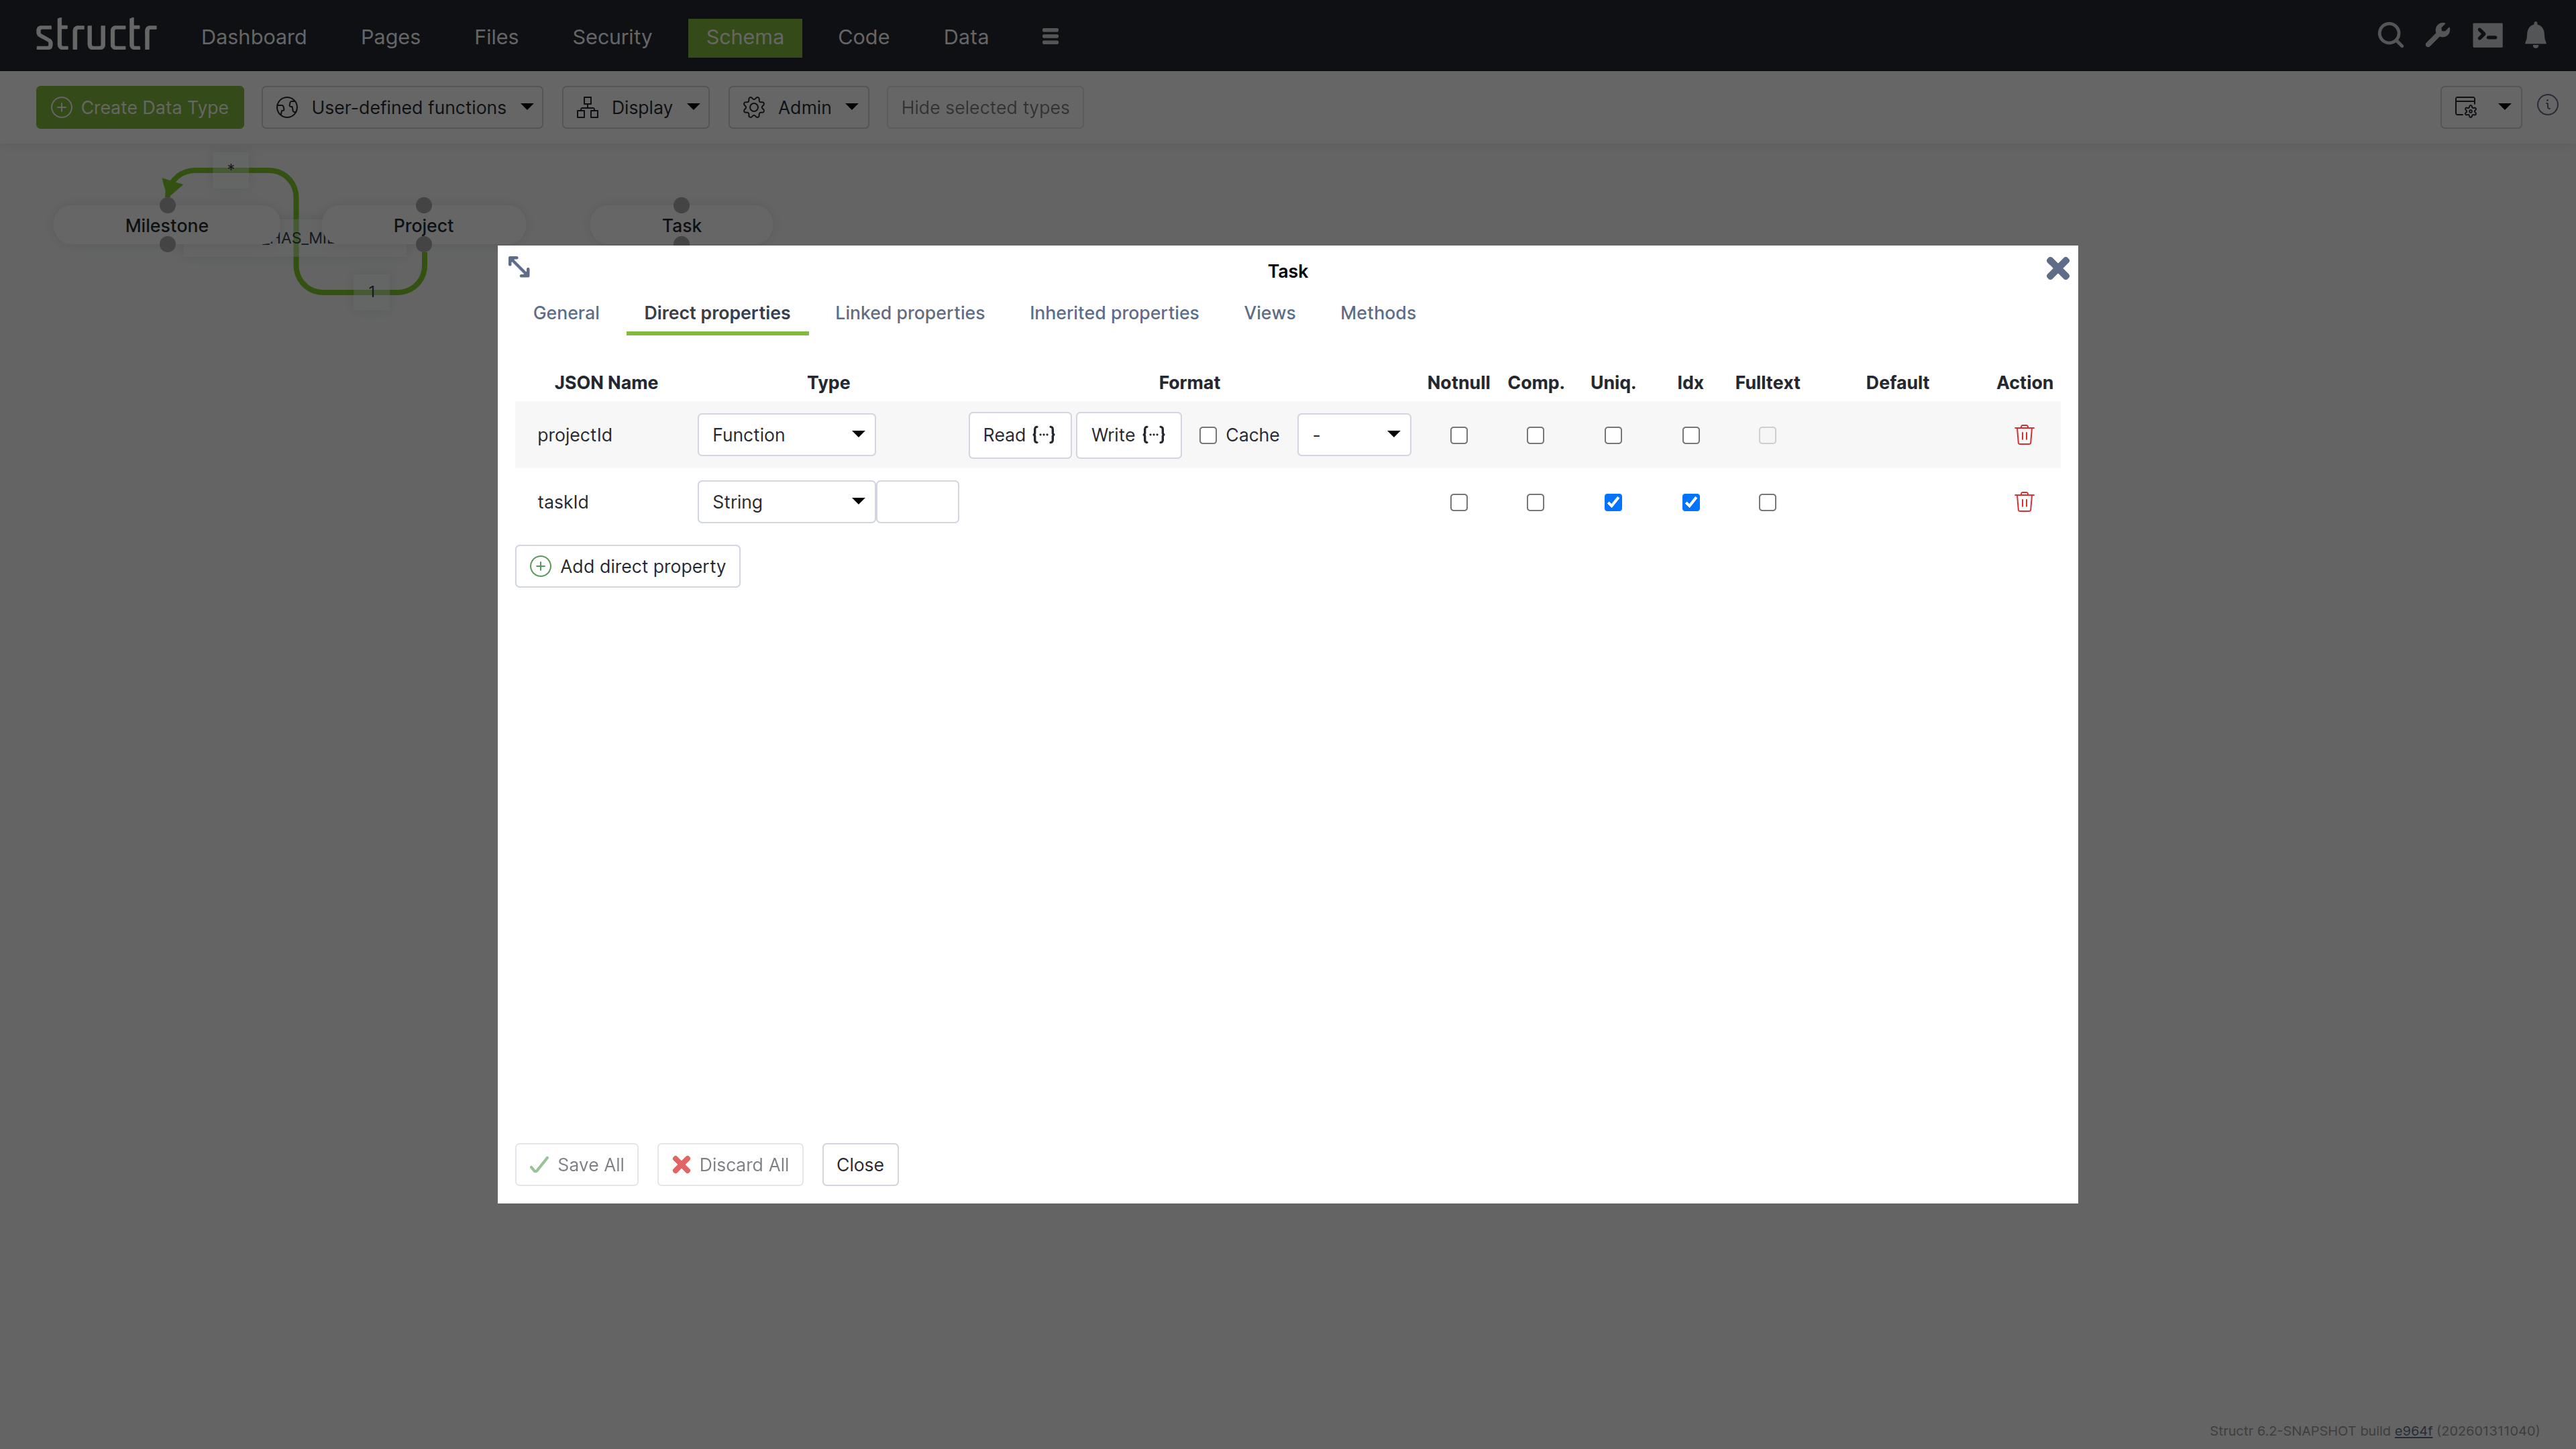
taskId: String property marked as uniqueprojectId: Function property linking to projects
Chapter 2: Adding Sample Data
Switch to the Data tab to create test records for your project management system.
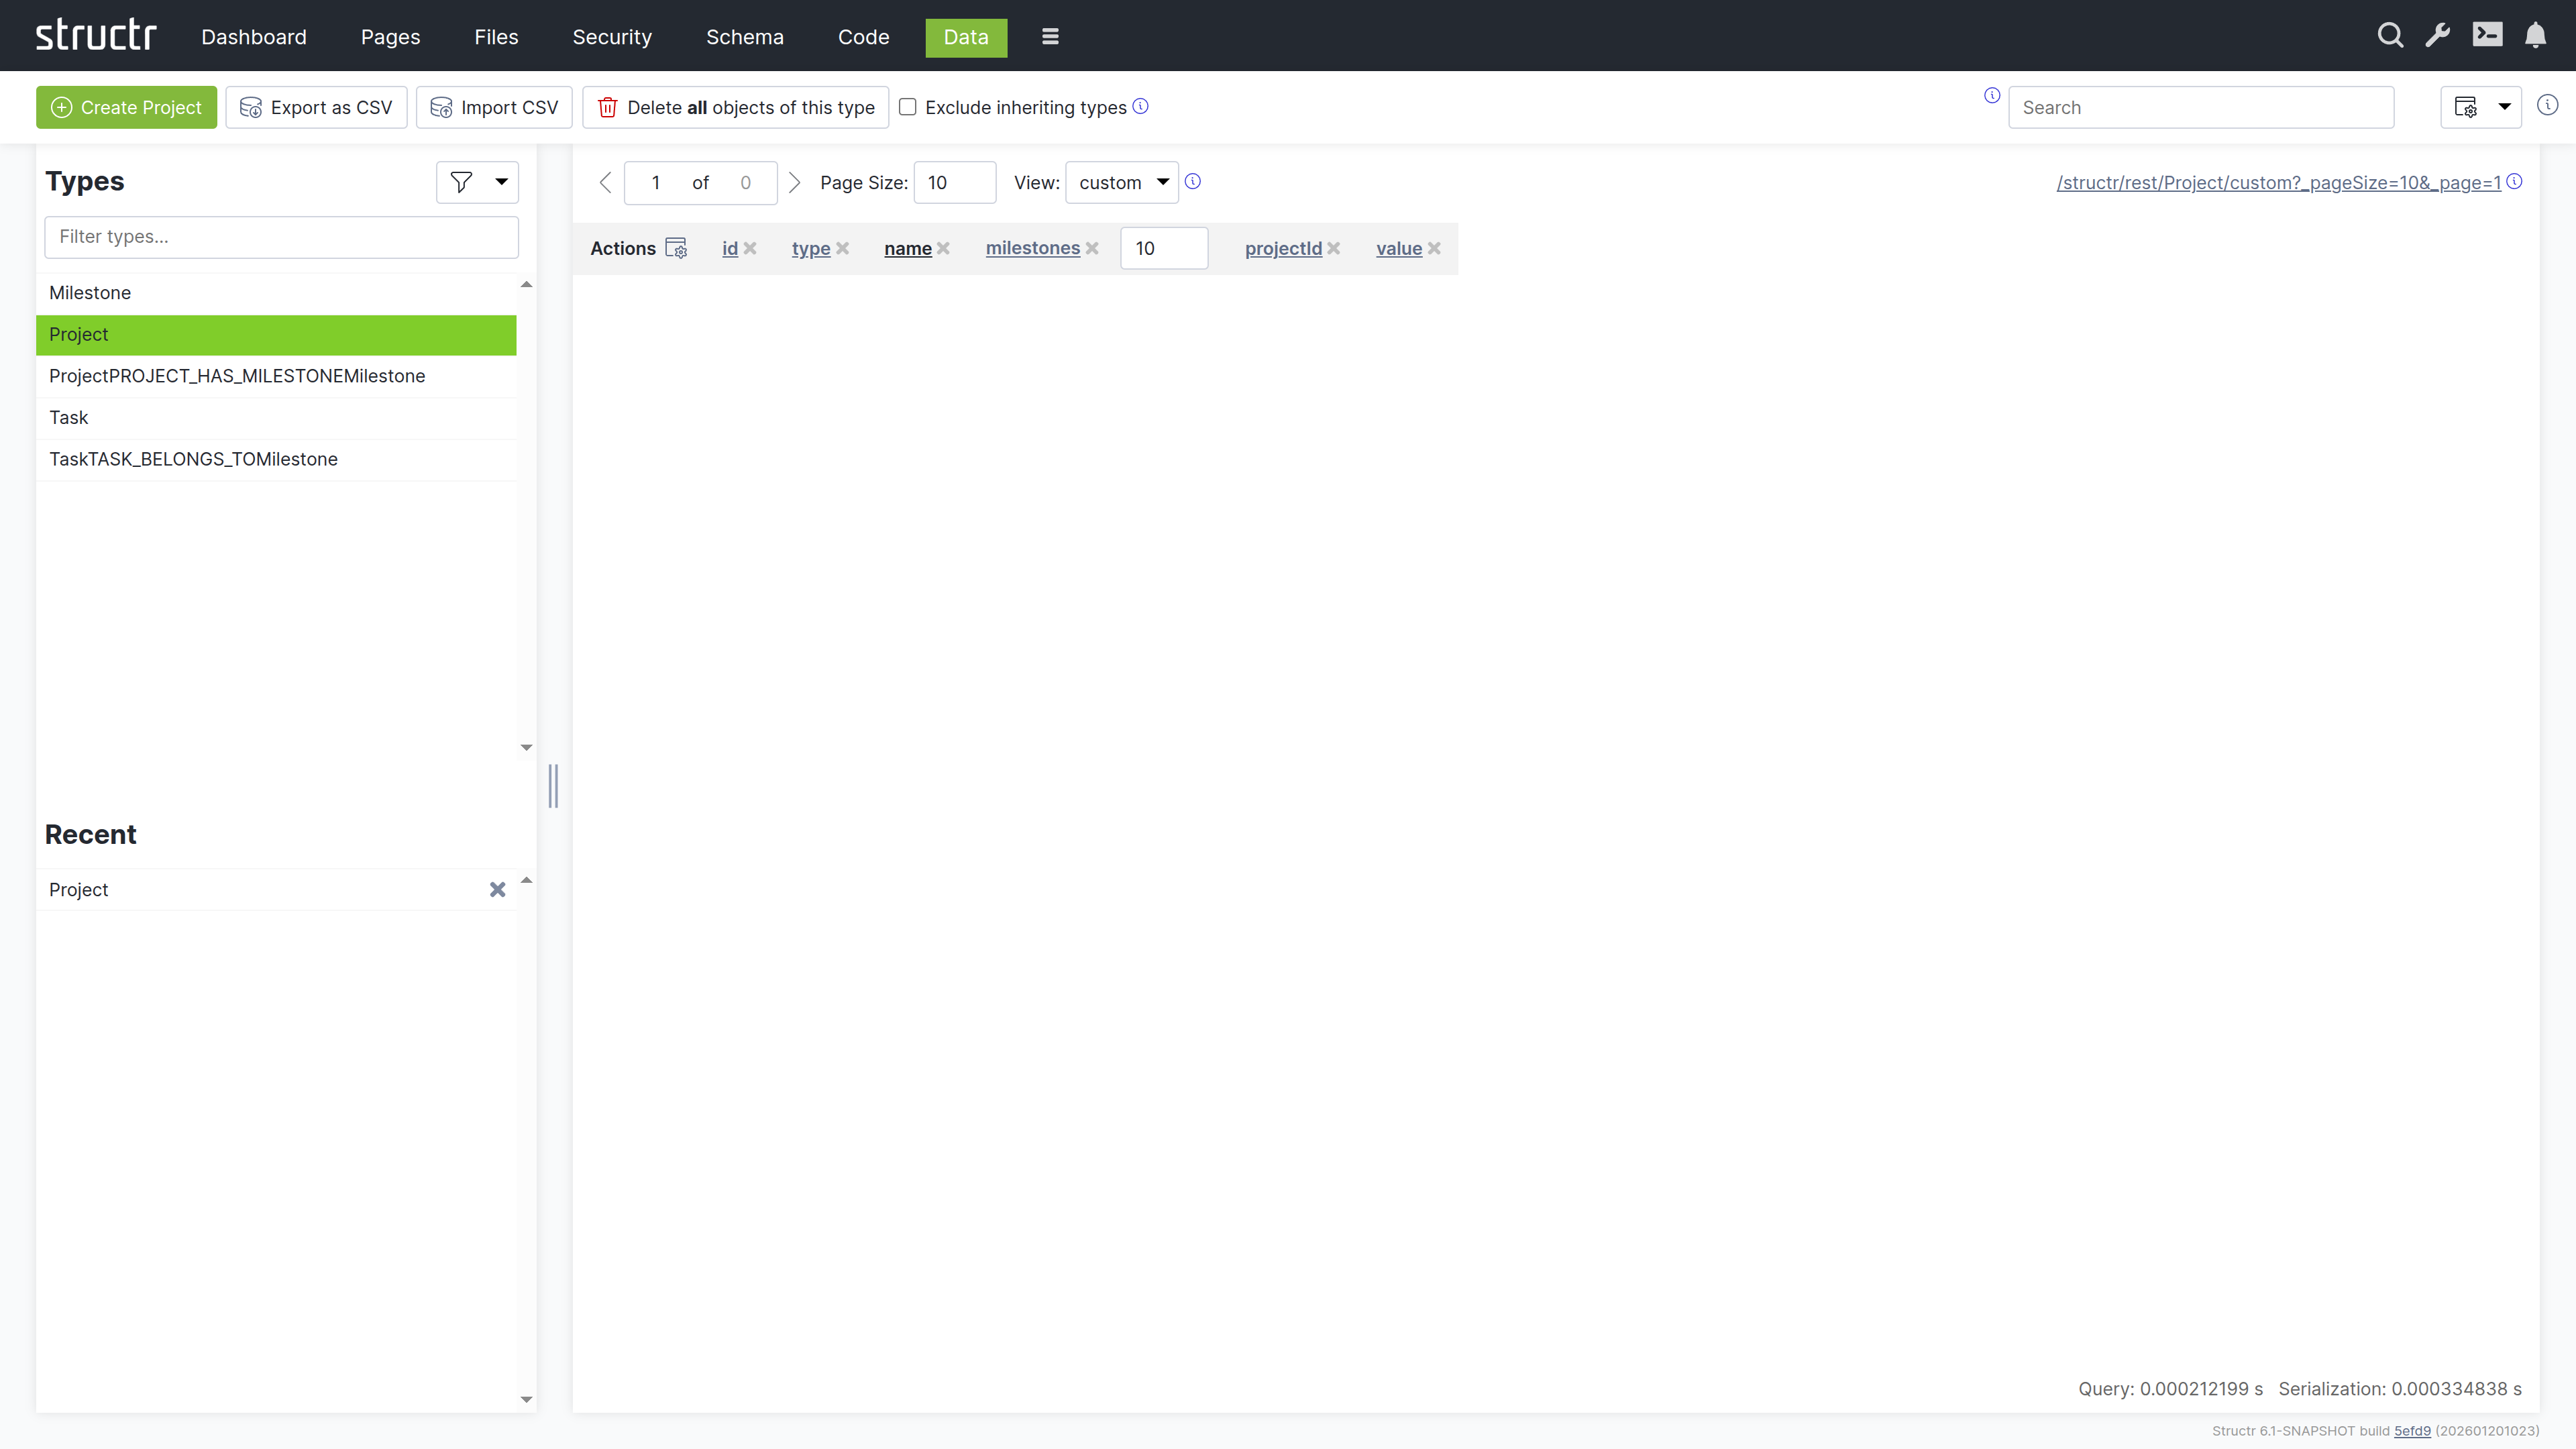
Creating Projects
- Search for “Project” and click on the “Project” type in the sidebar
- Use “Create Project” to add three sample projects
- Set names by clicking on the name cells:
- Project A
- Project B
- Project C
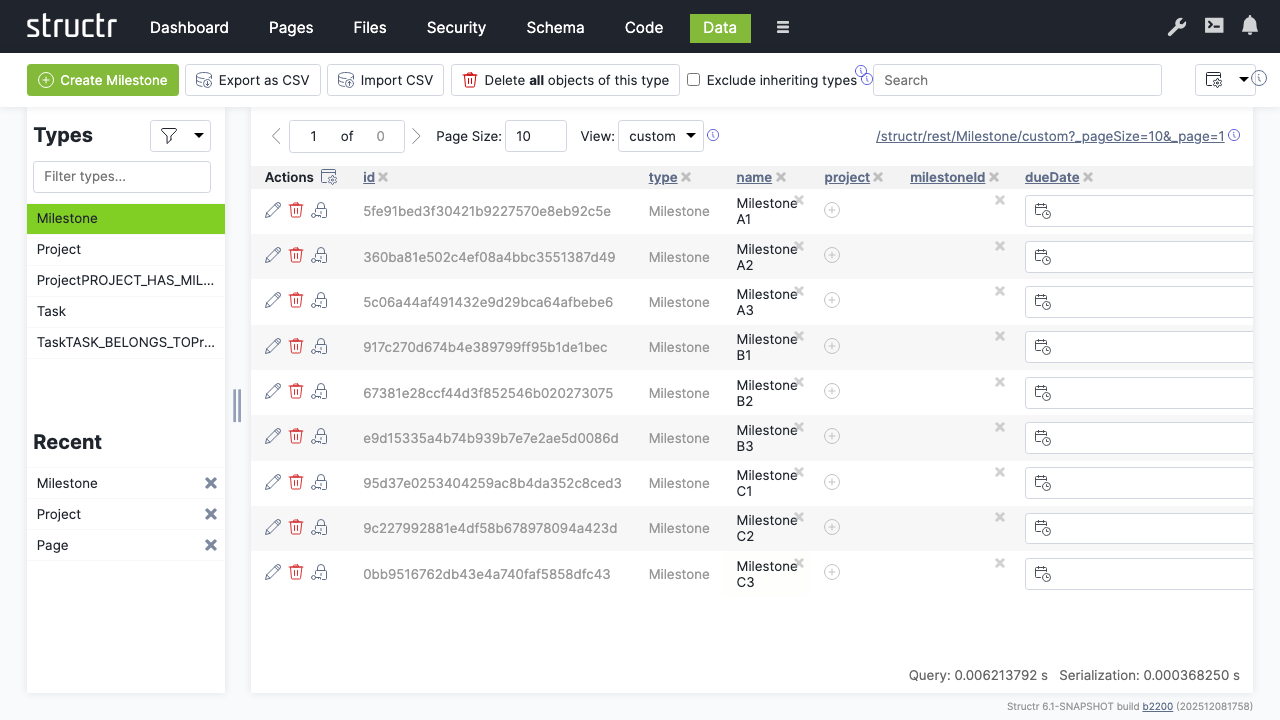
Creating Milestones
- Click on the “Milestone” type
- Create a couple of milestone records
- Name them according to their projects, e.g.:
- Milestone A1, A2, A3 (for Project A)
- Milestone B1, B2, B3 (for Project B)
- Milestone C1, C2, C3 (for Project C)
Linking Data
Connect milestones to their respective projects:
- Select the “Project” type
- Click the relationship icon in the “milestones” column for each project
- Select the appropriate milestones for each project

Chapter 3: Building the Web Interface
Create a web page to display your project data using Structr’s page builder.
Creating a New Page
- Click the dropdown menu and select “Create Page”
- Choose the “Sidebar Layout” template
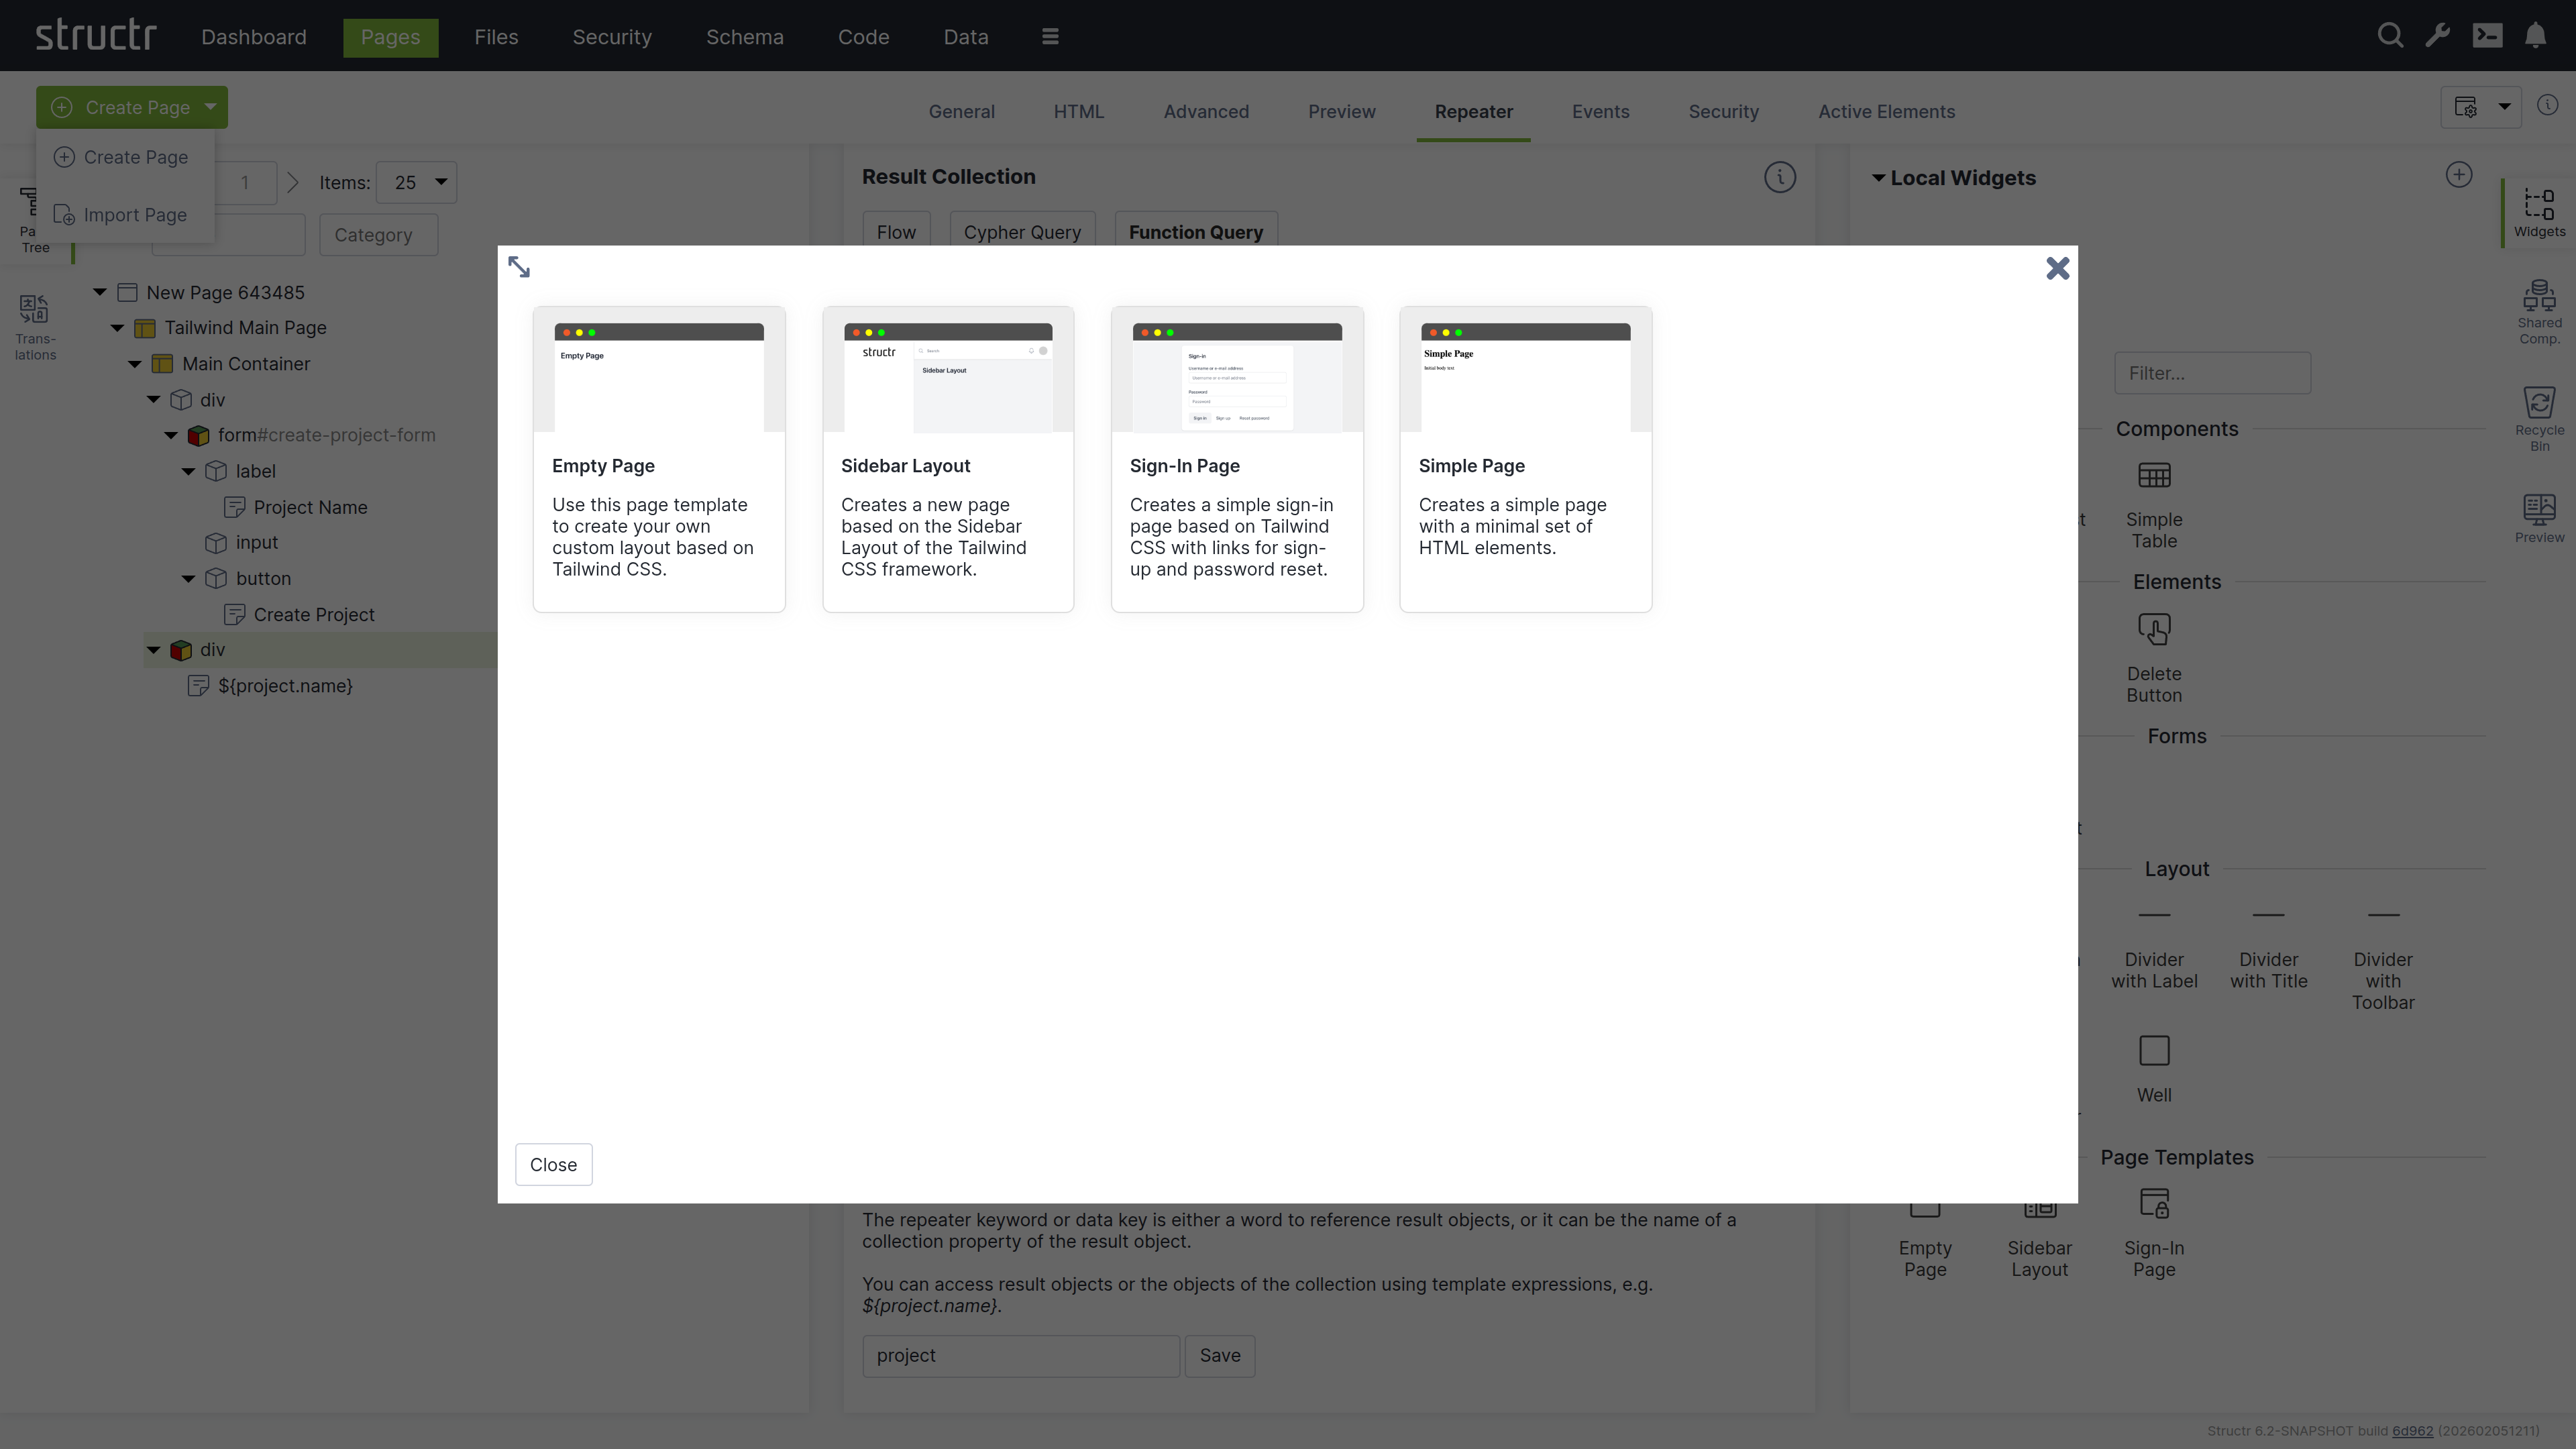
- Name the page “projects” in the General tab
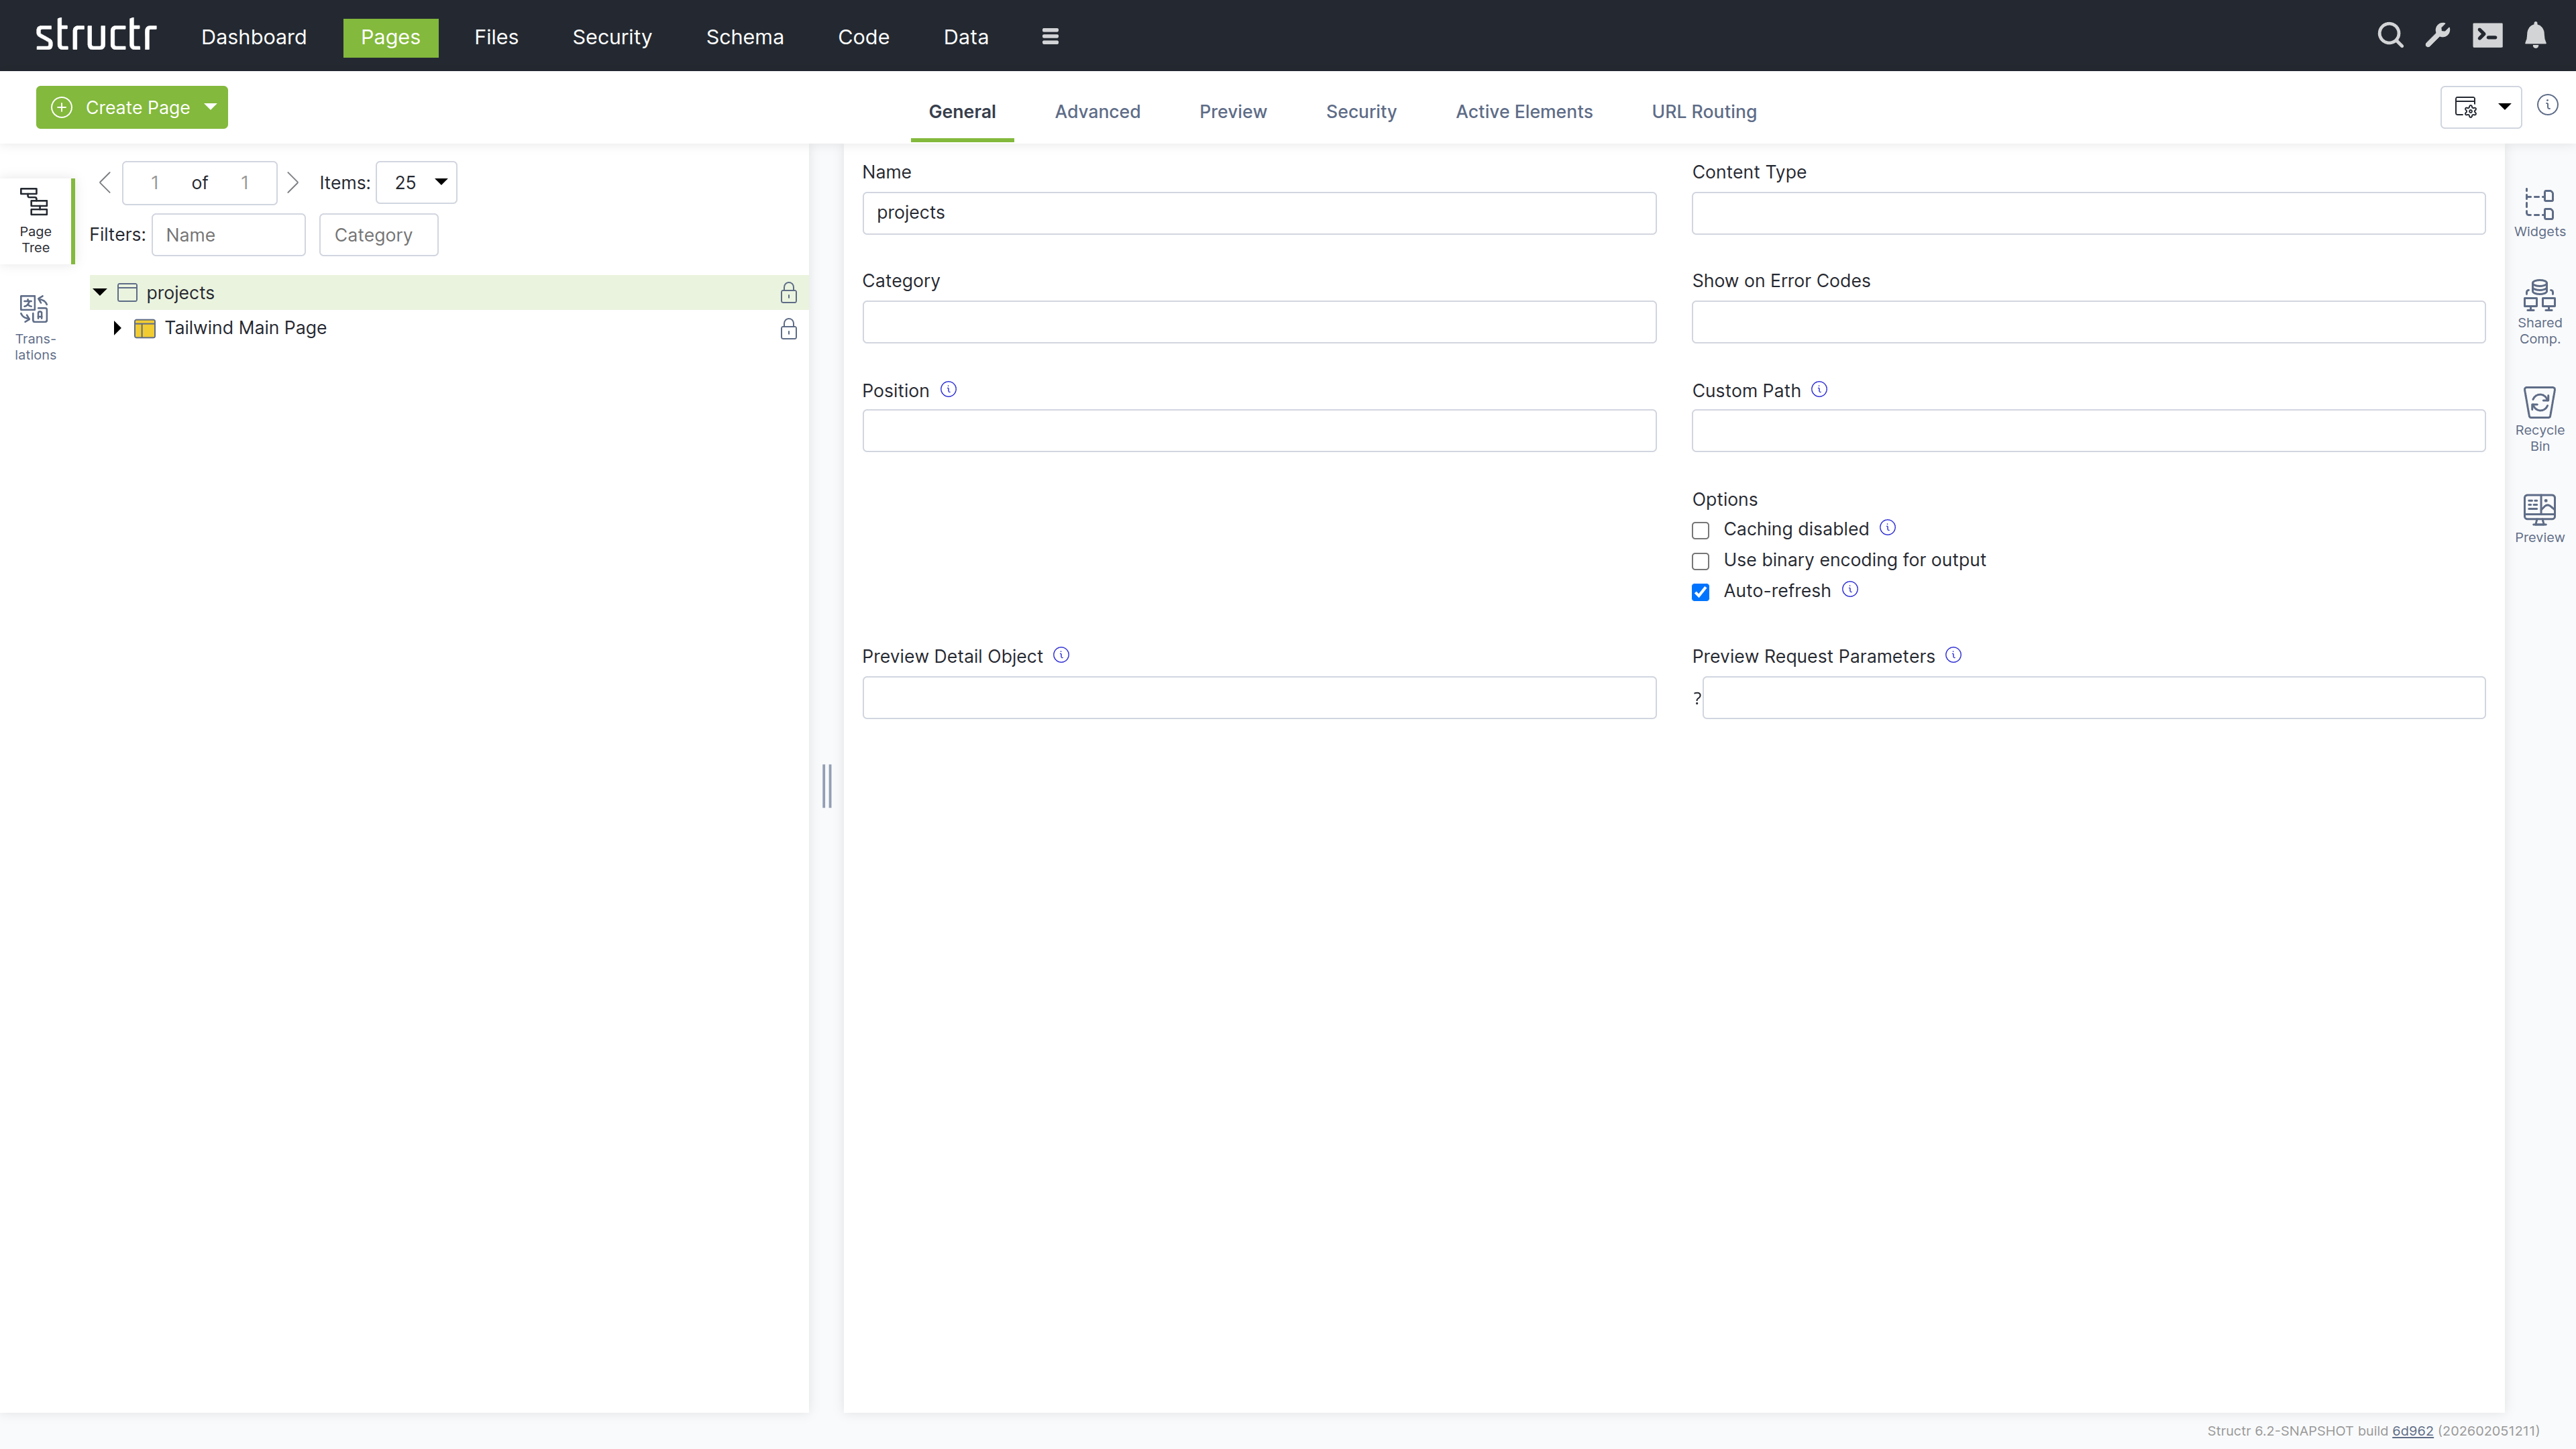
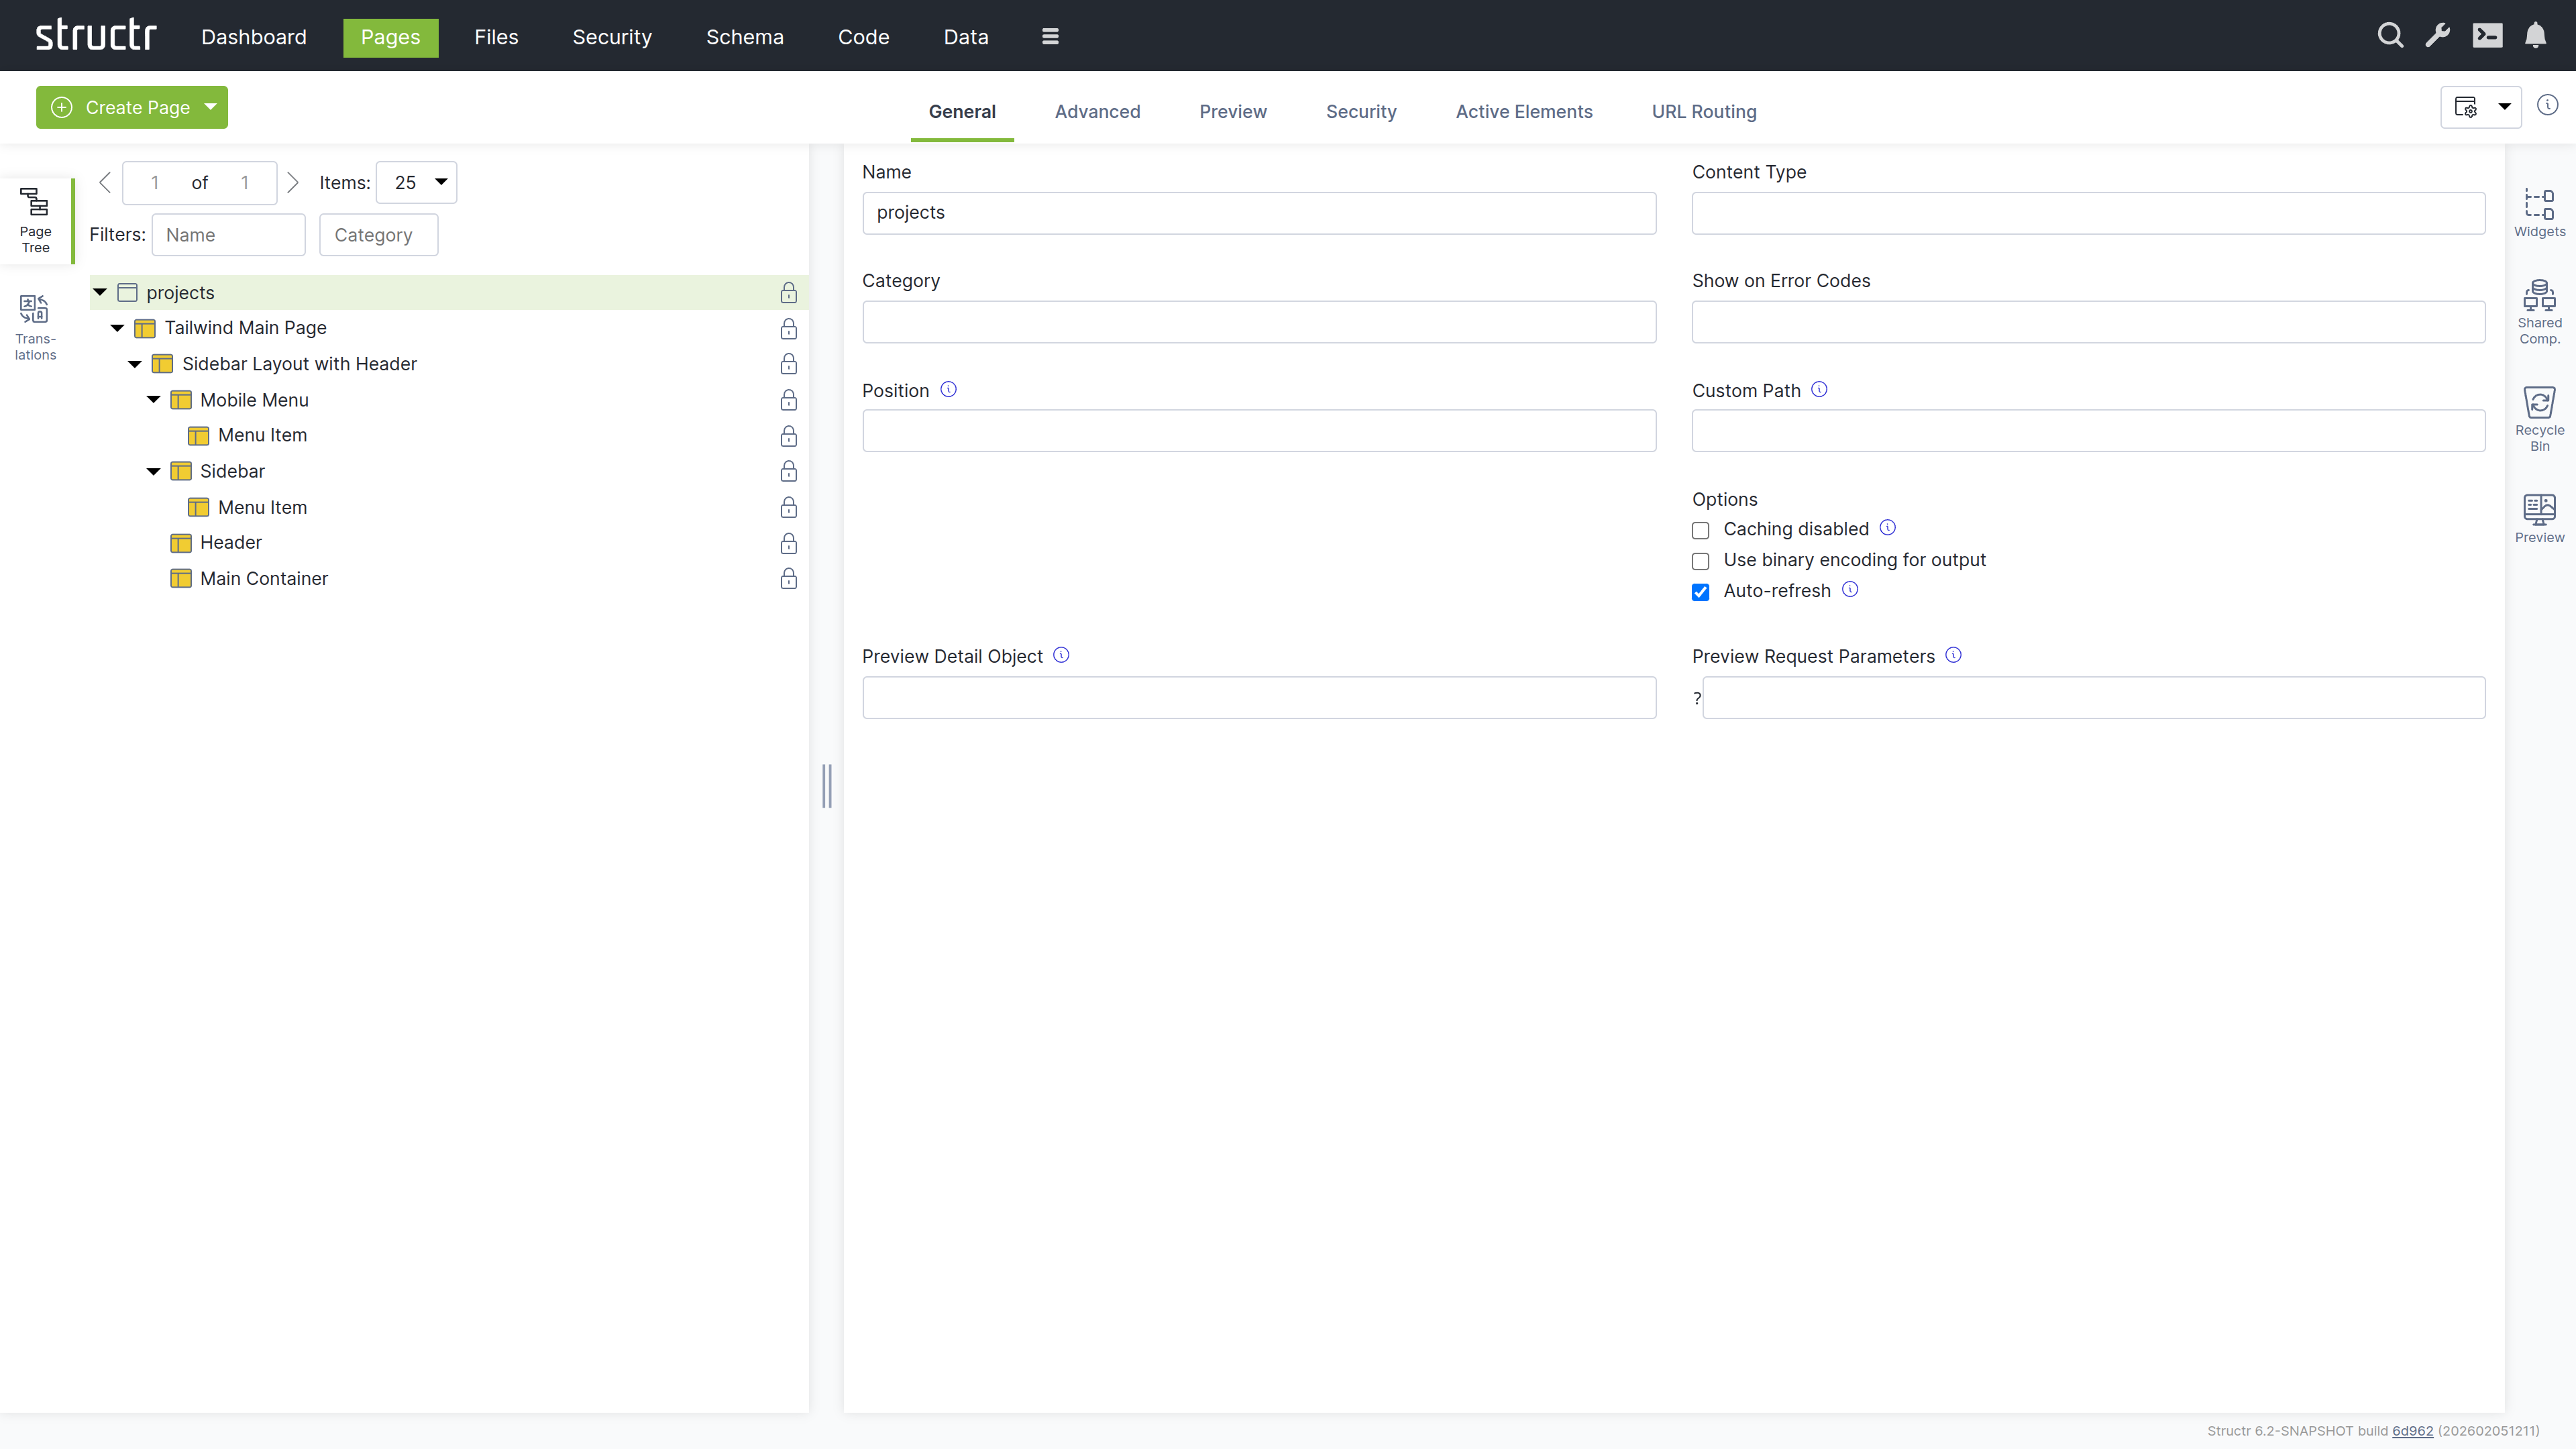
- Right-click the page and expand the tree structure to see all elements
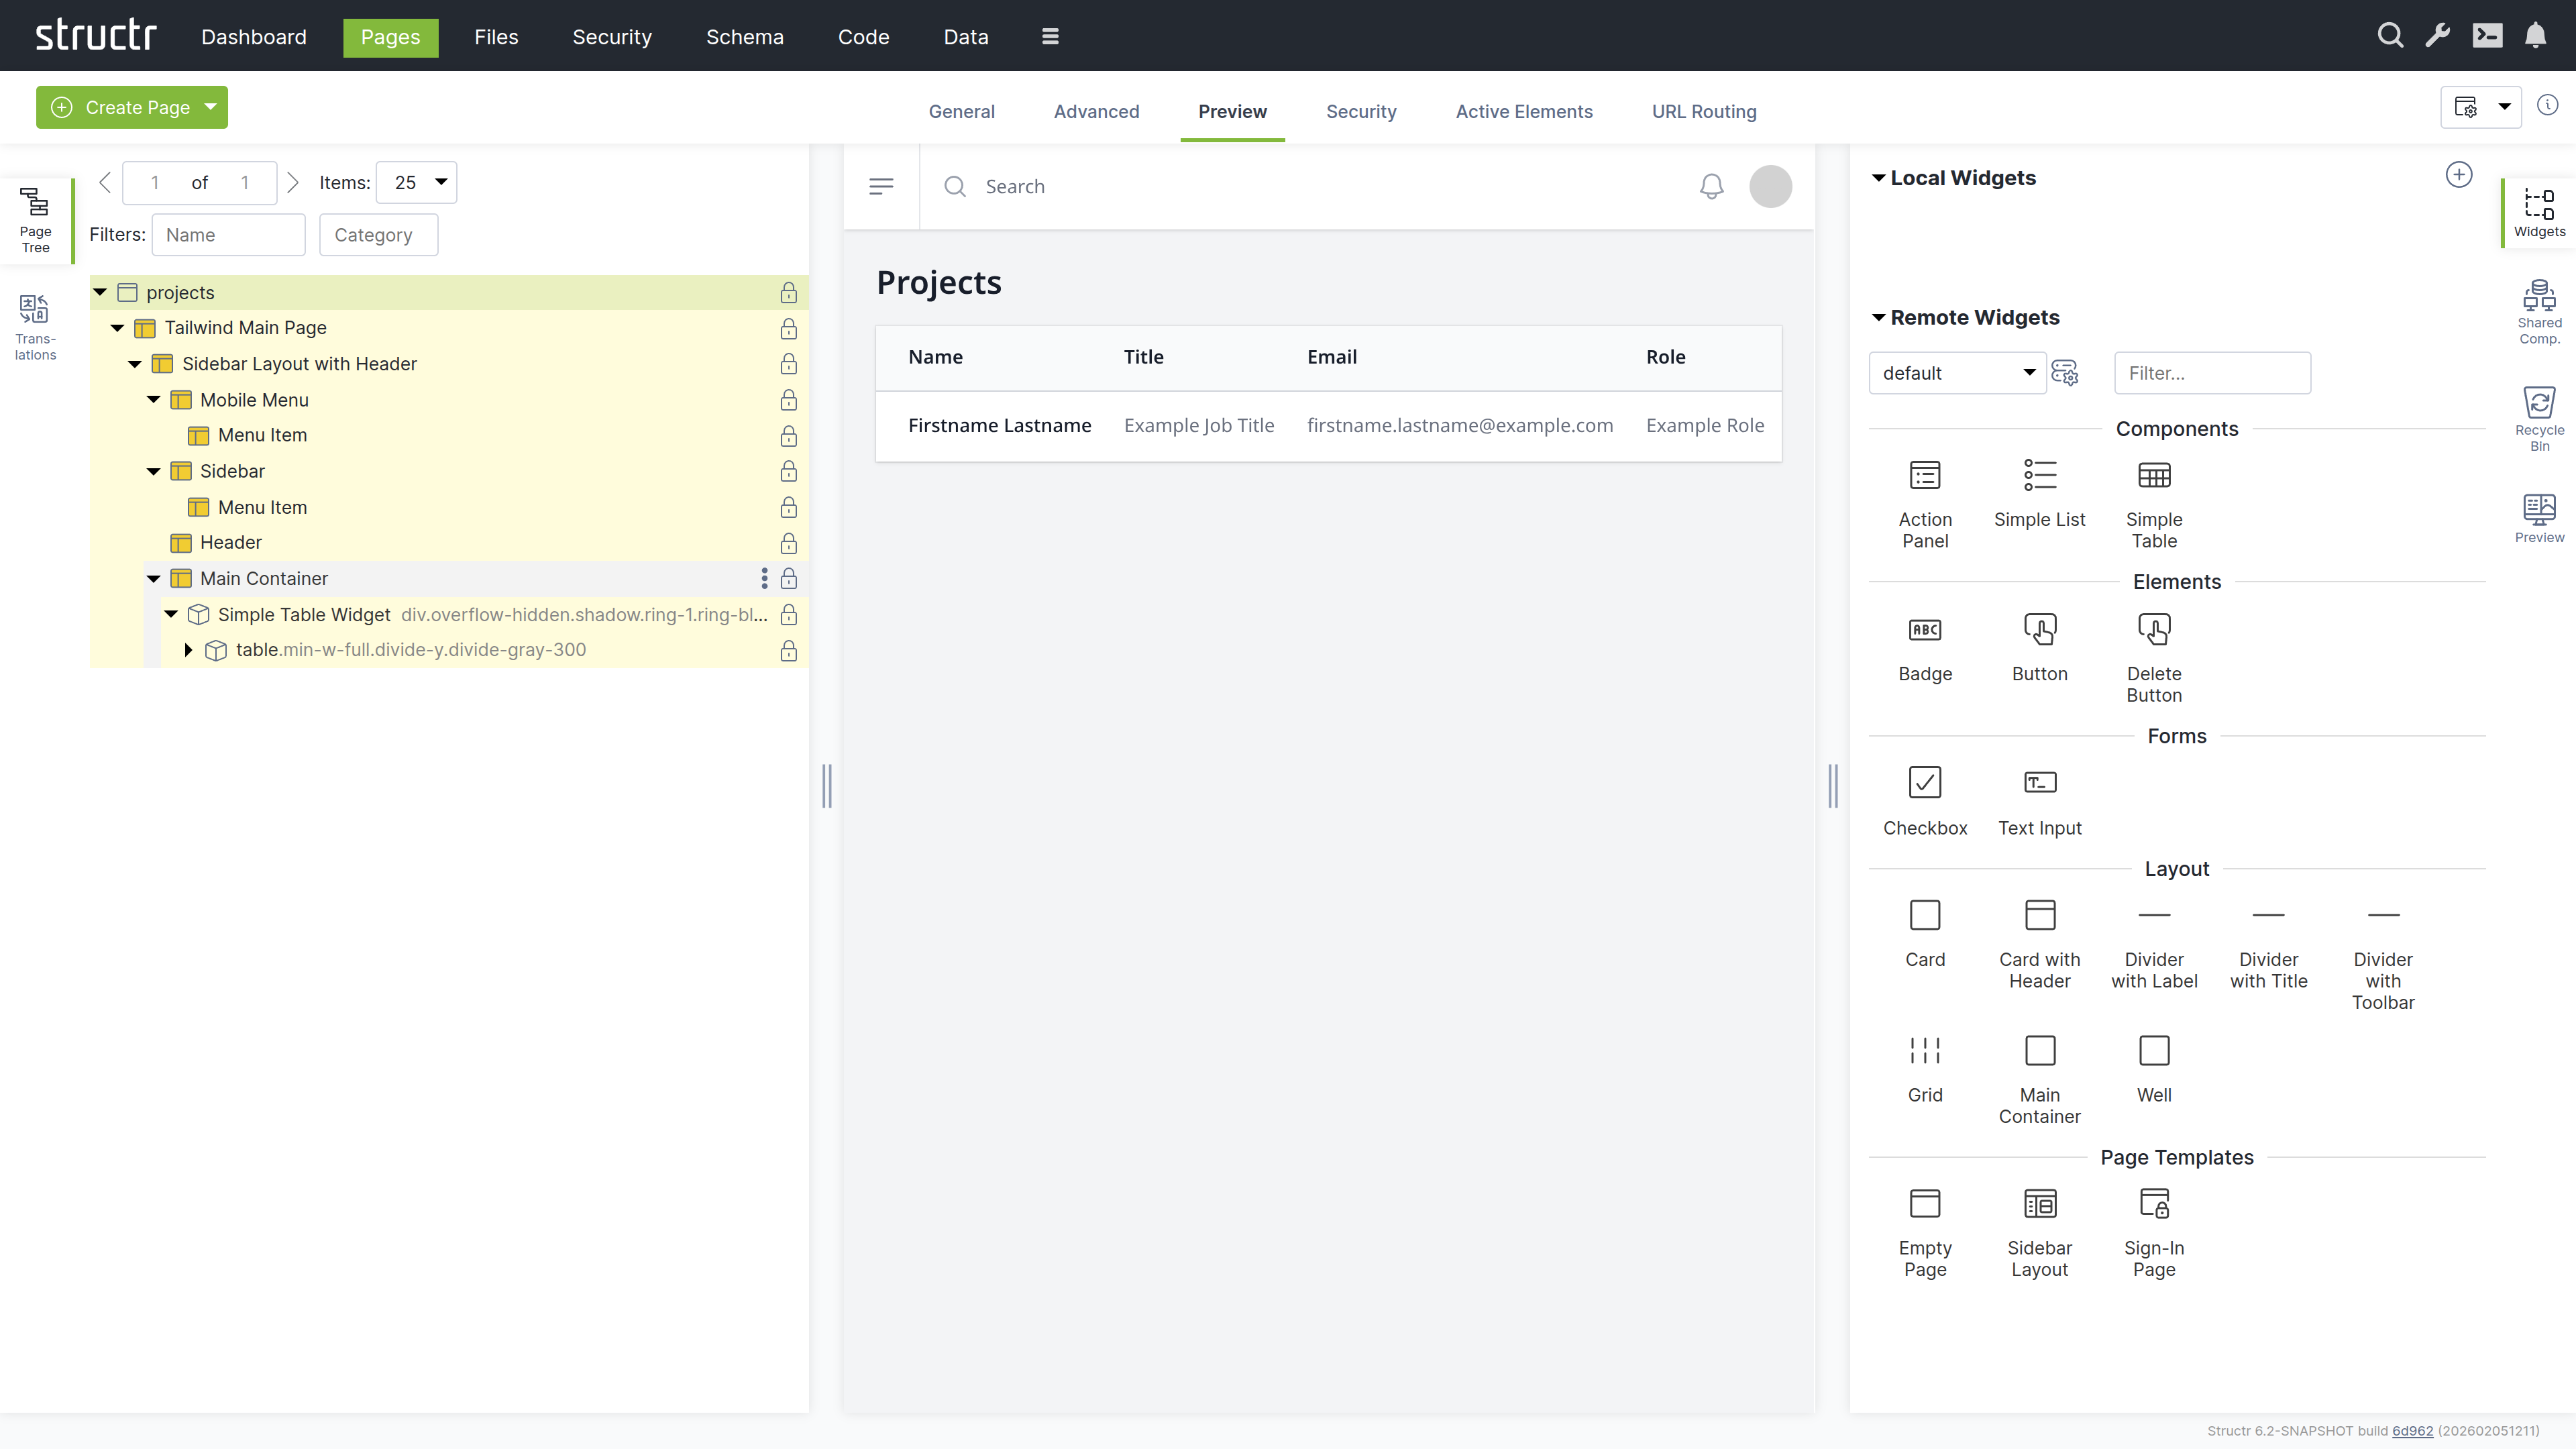
Adding a Table
- Switch to the Preview tab to see your page
- Open the tab on the right-hand side labeled “Widgets”
- Drag the “Simple Table” widget from the Widgets tab onto the Main Container
The widget is attached to the page tree as a branch of individual DOM elements that can be navigated and modified.
Customizing the Table
Note: In this section, we’re using template expressions which are enclosed in
${...}. See [Keywords](5-API Reference/1-Keywords.md) and [Functions](5-API Reference/2-Functions.md).
Modify the table to display project information:
-
Change the table header from “Title” to a localized header:
${localize("milestones", "table-header")} -
Replace placeholder content with dynamic project data:
- Name column:
${project.name} - Description column:
${join(extract(project.milestones, "name"), ", ")}
- Remove unnecessary columns by right-clicking and selecting “Remove Node”
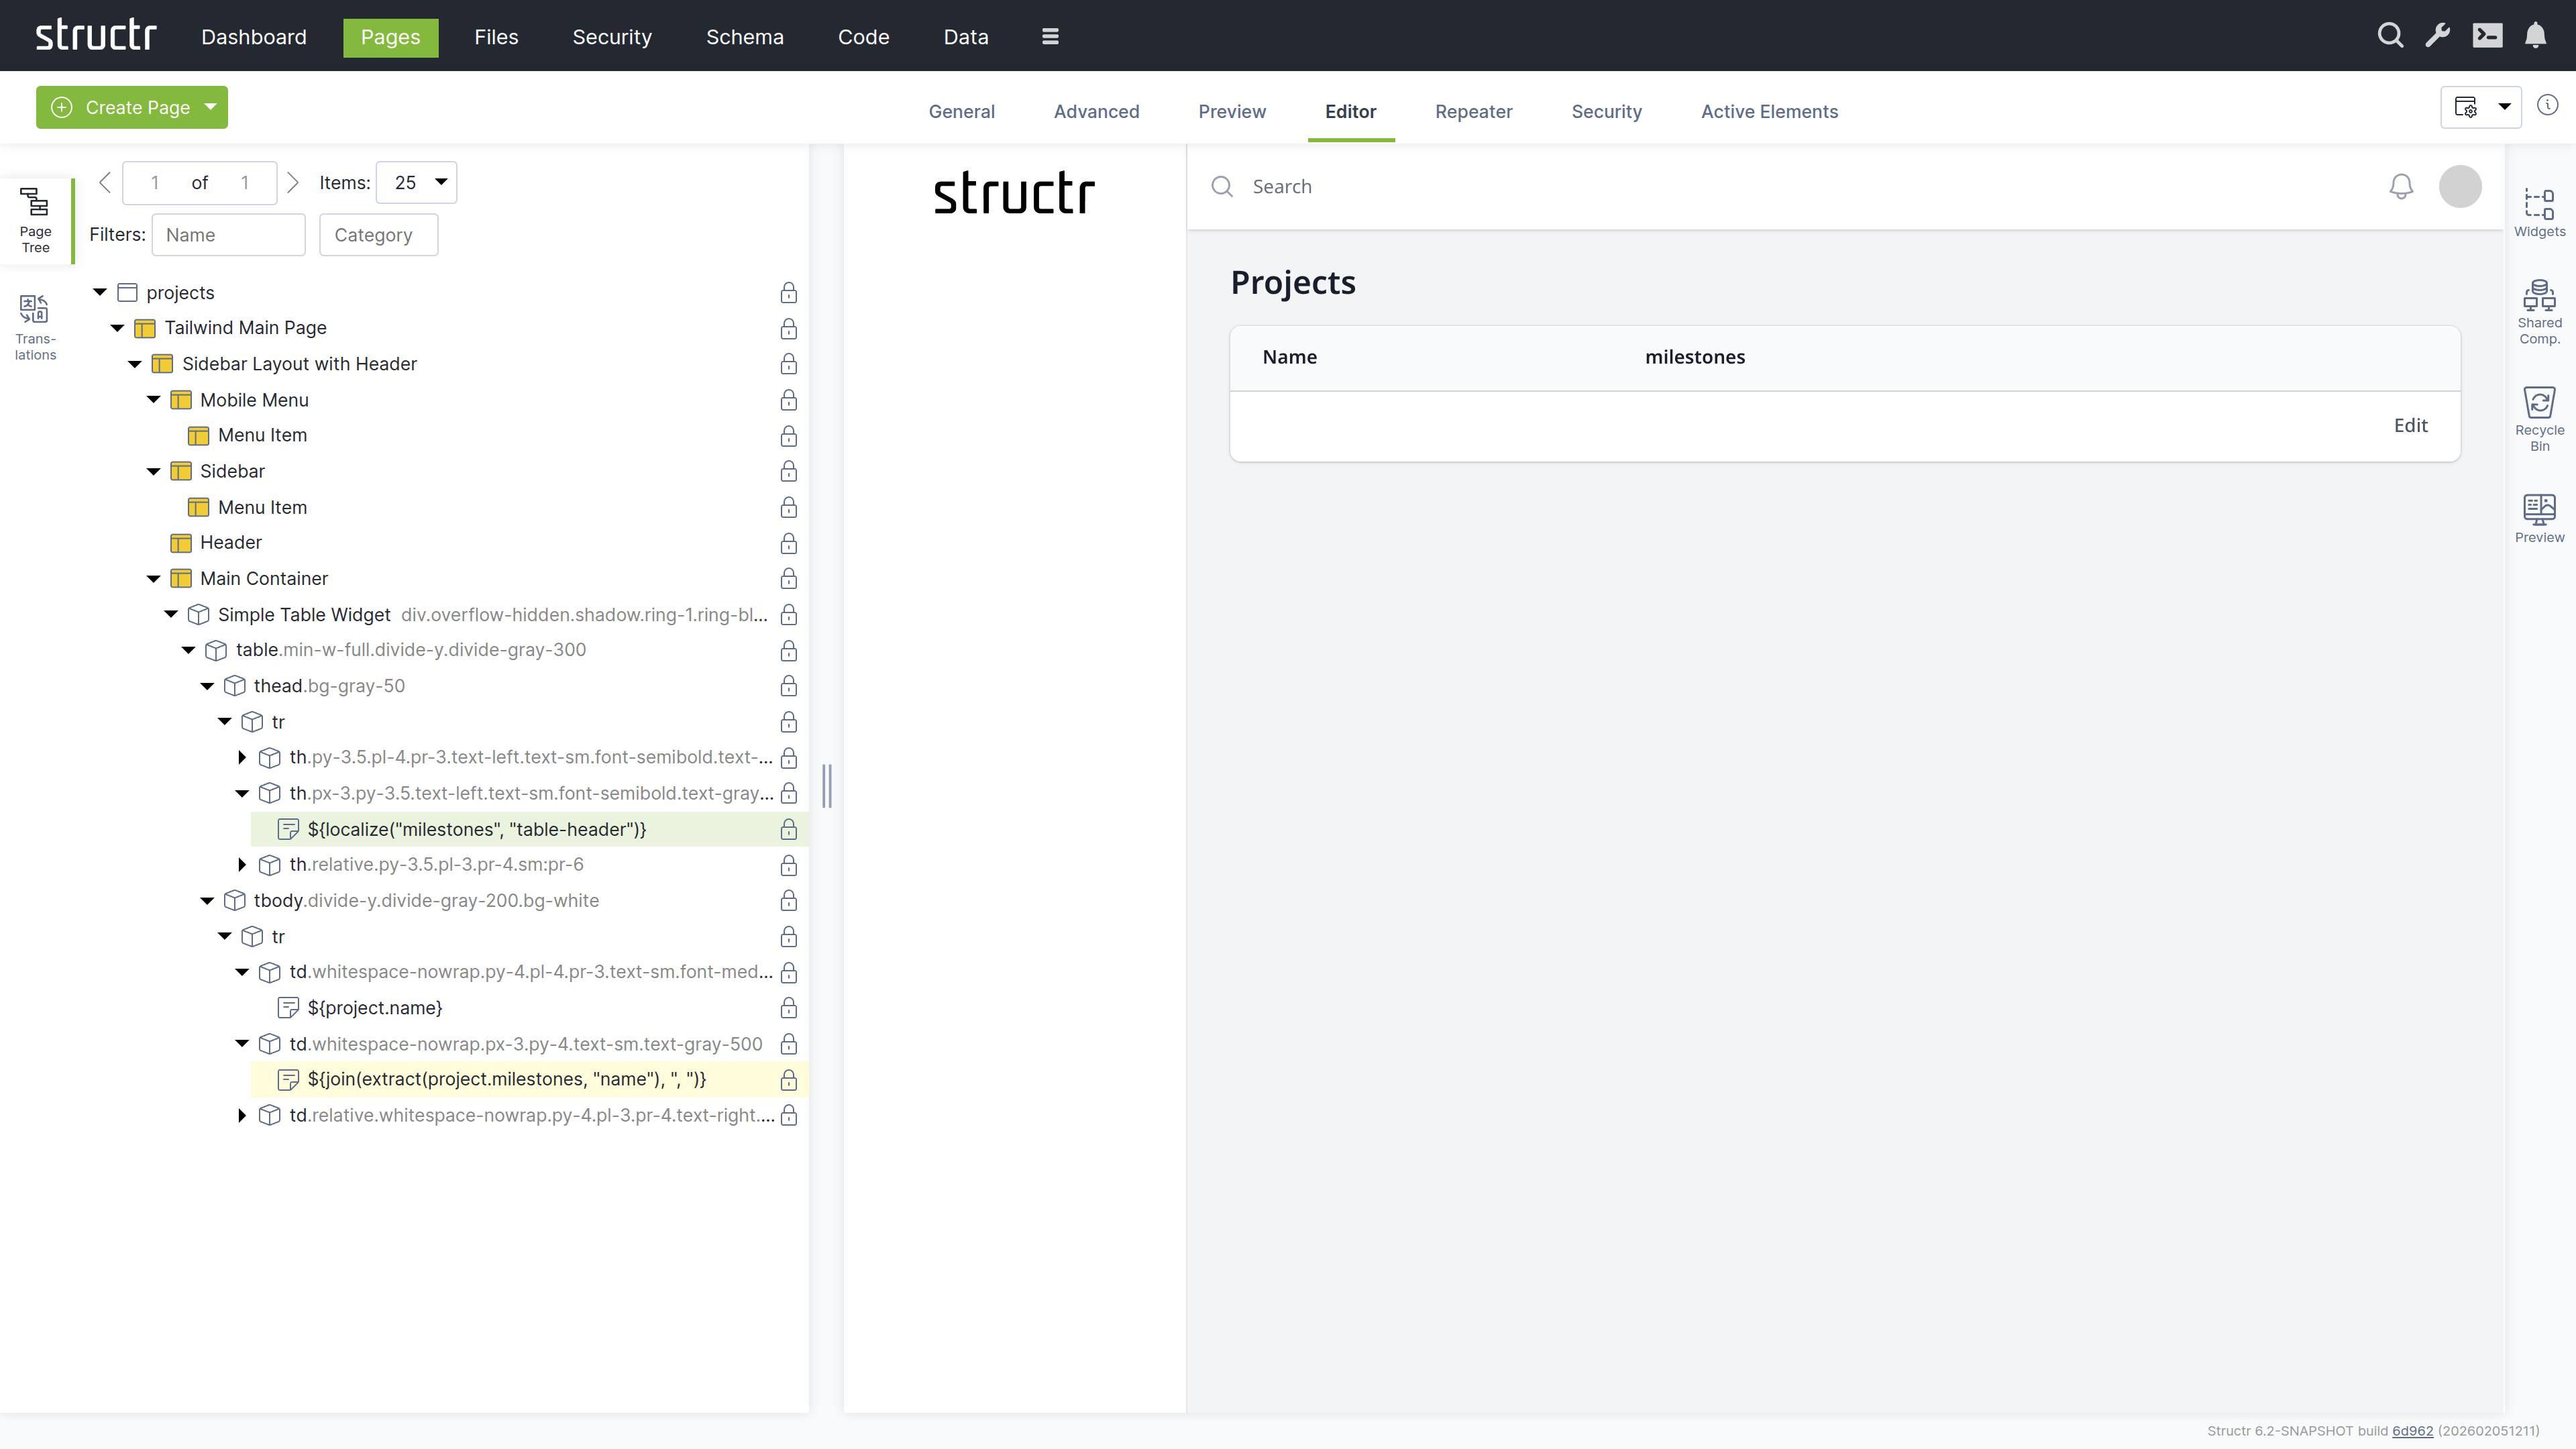
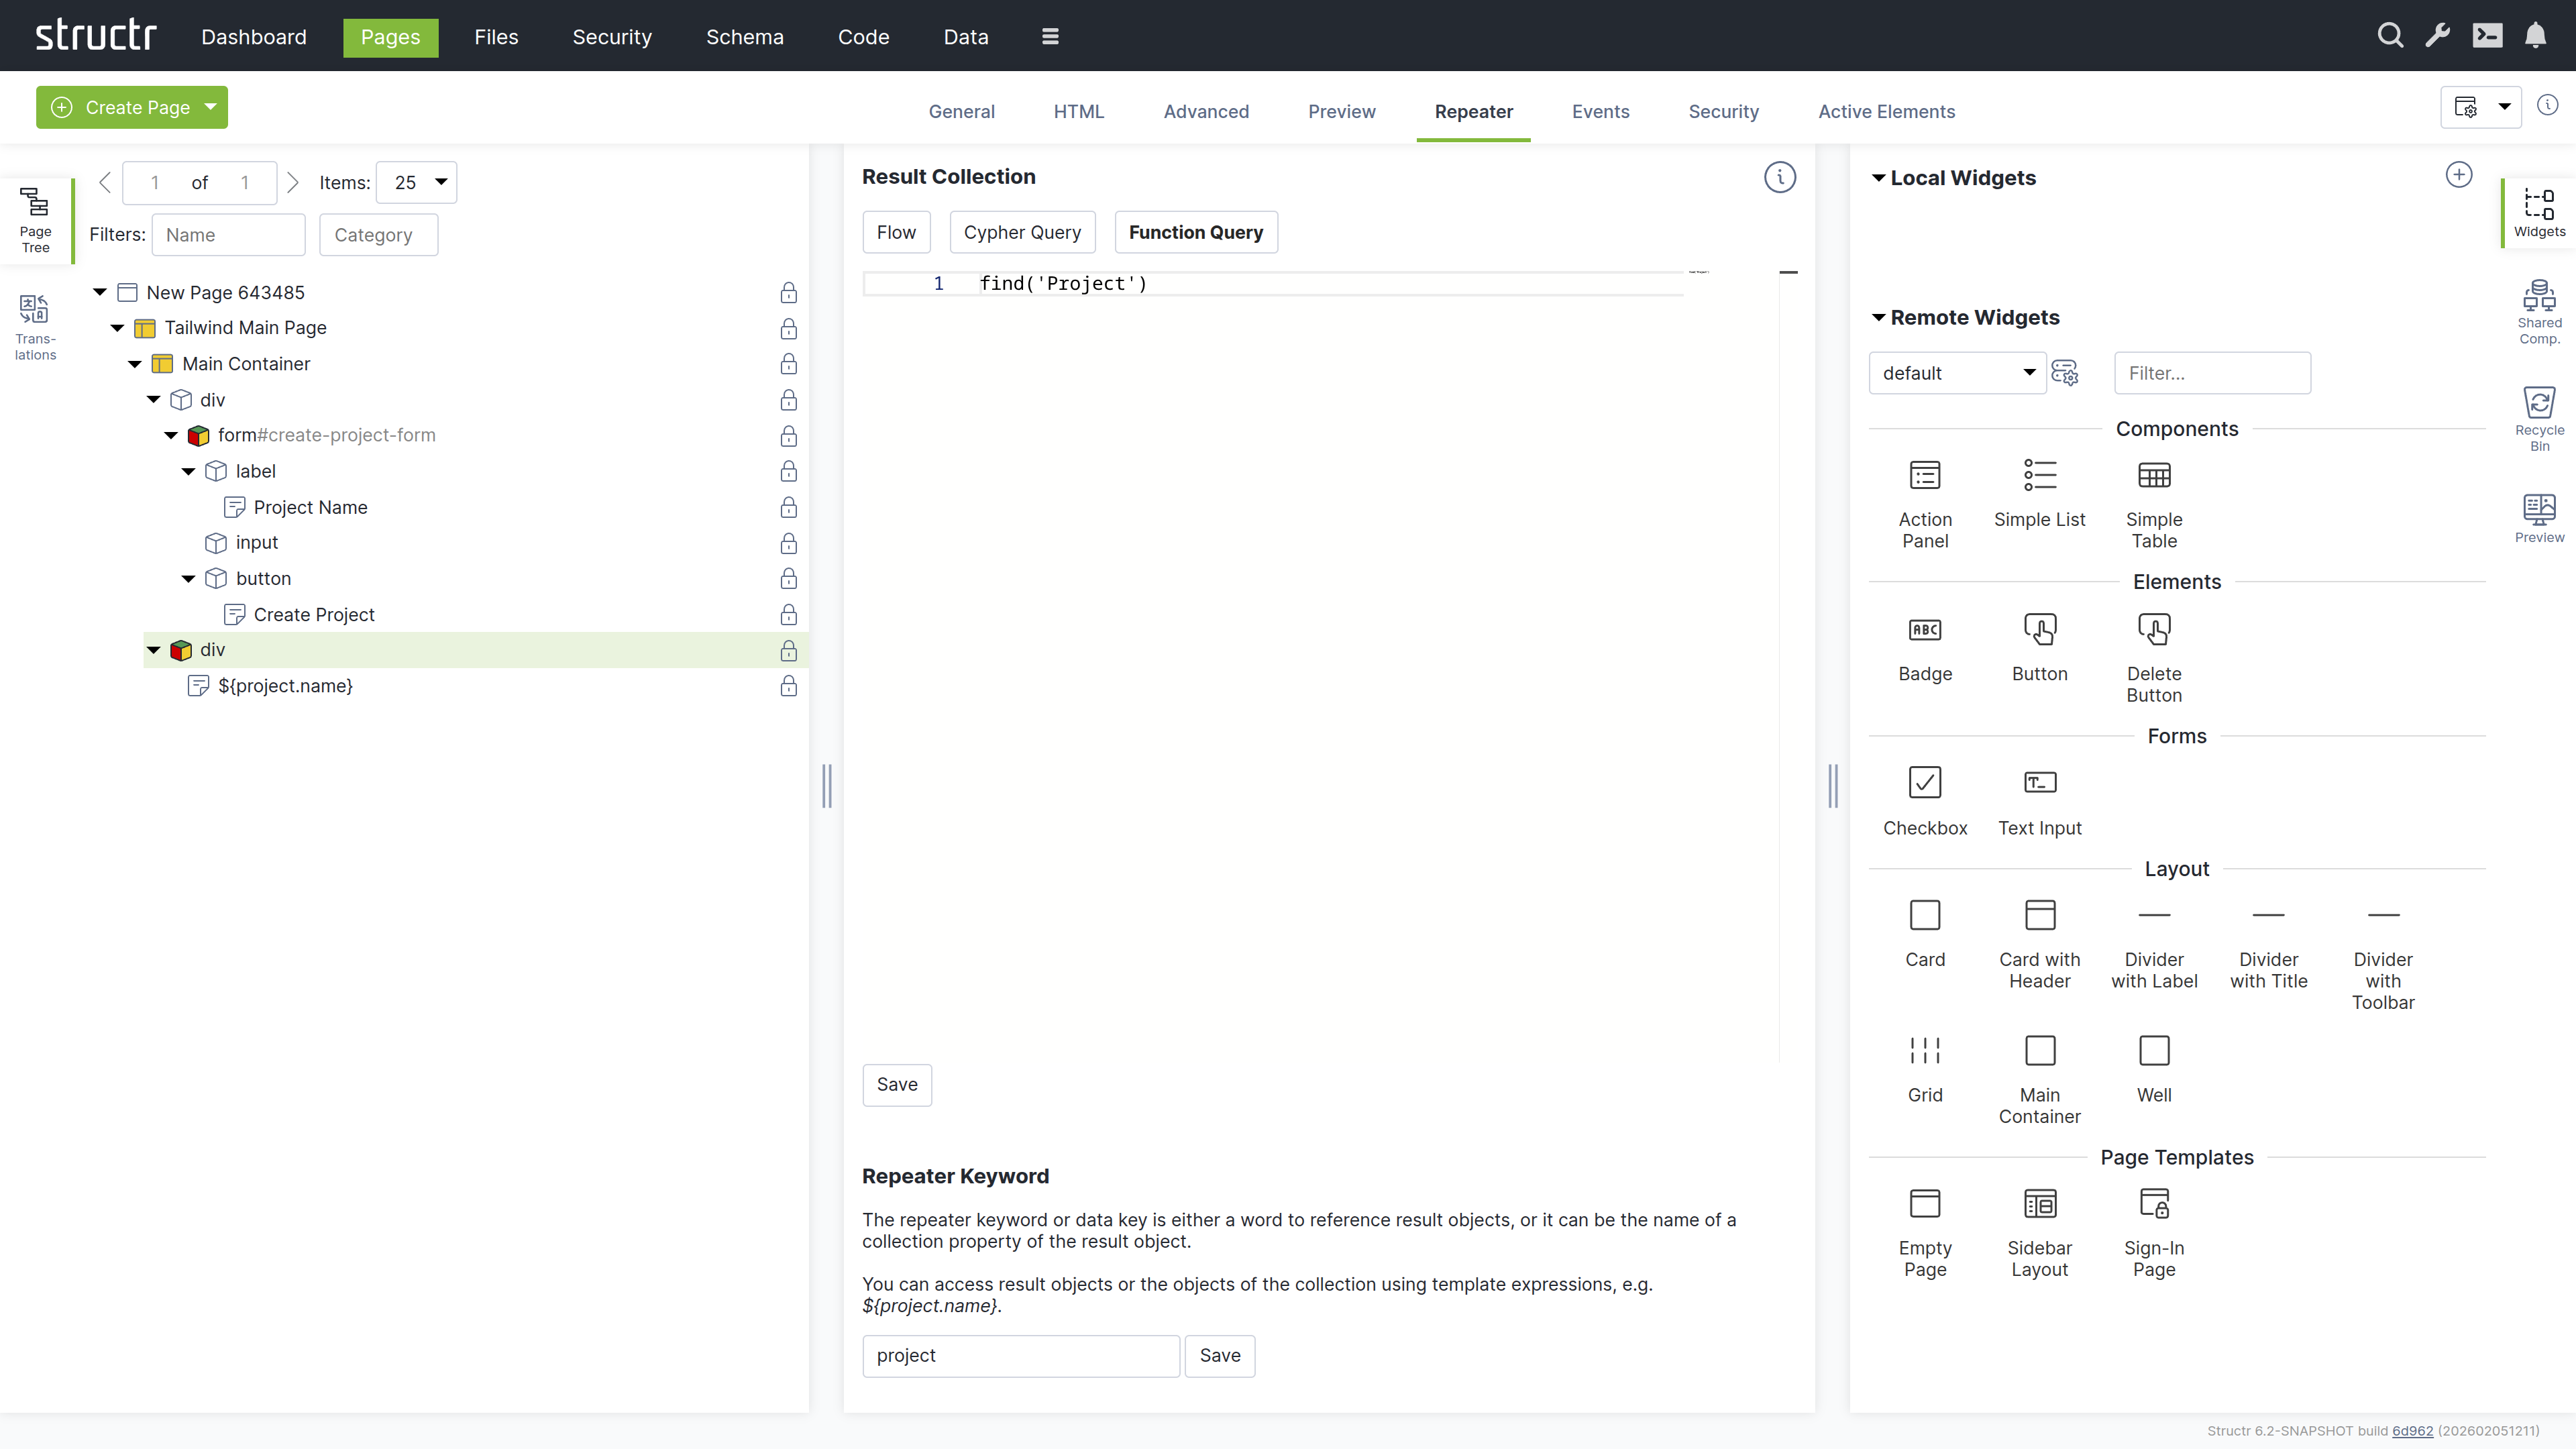
Adding Dynamic Data
Configure the table to display all projects:
- Select the table row (
tr) element - Switch to the “Repeater” tab
- Set up a Function Query:
find('Project') - Set the data key to “project”
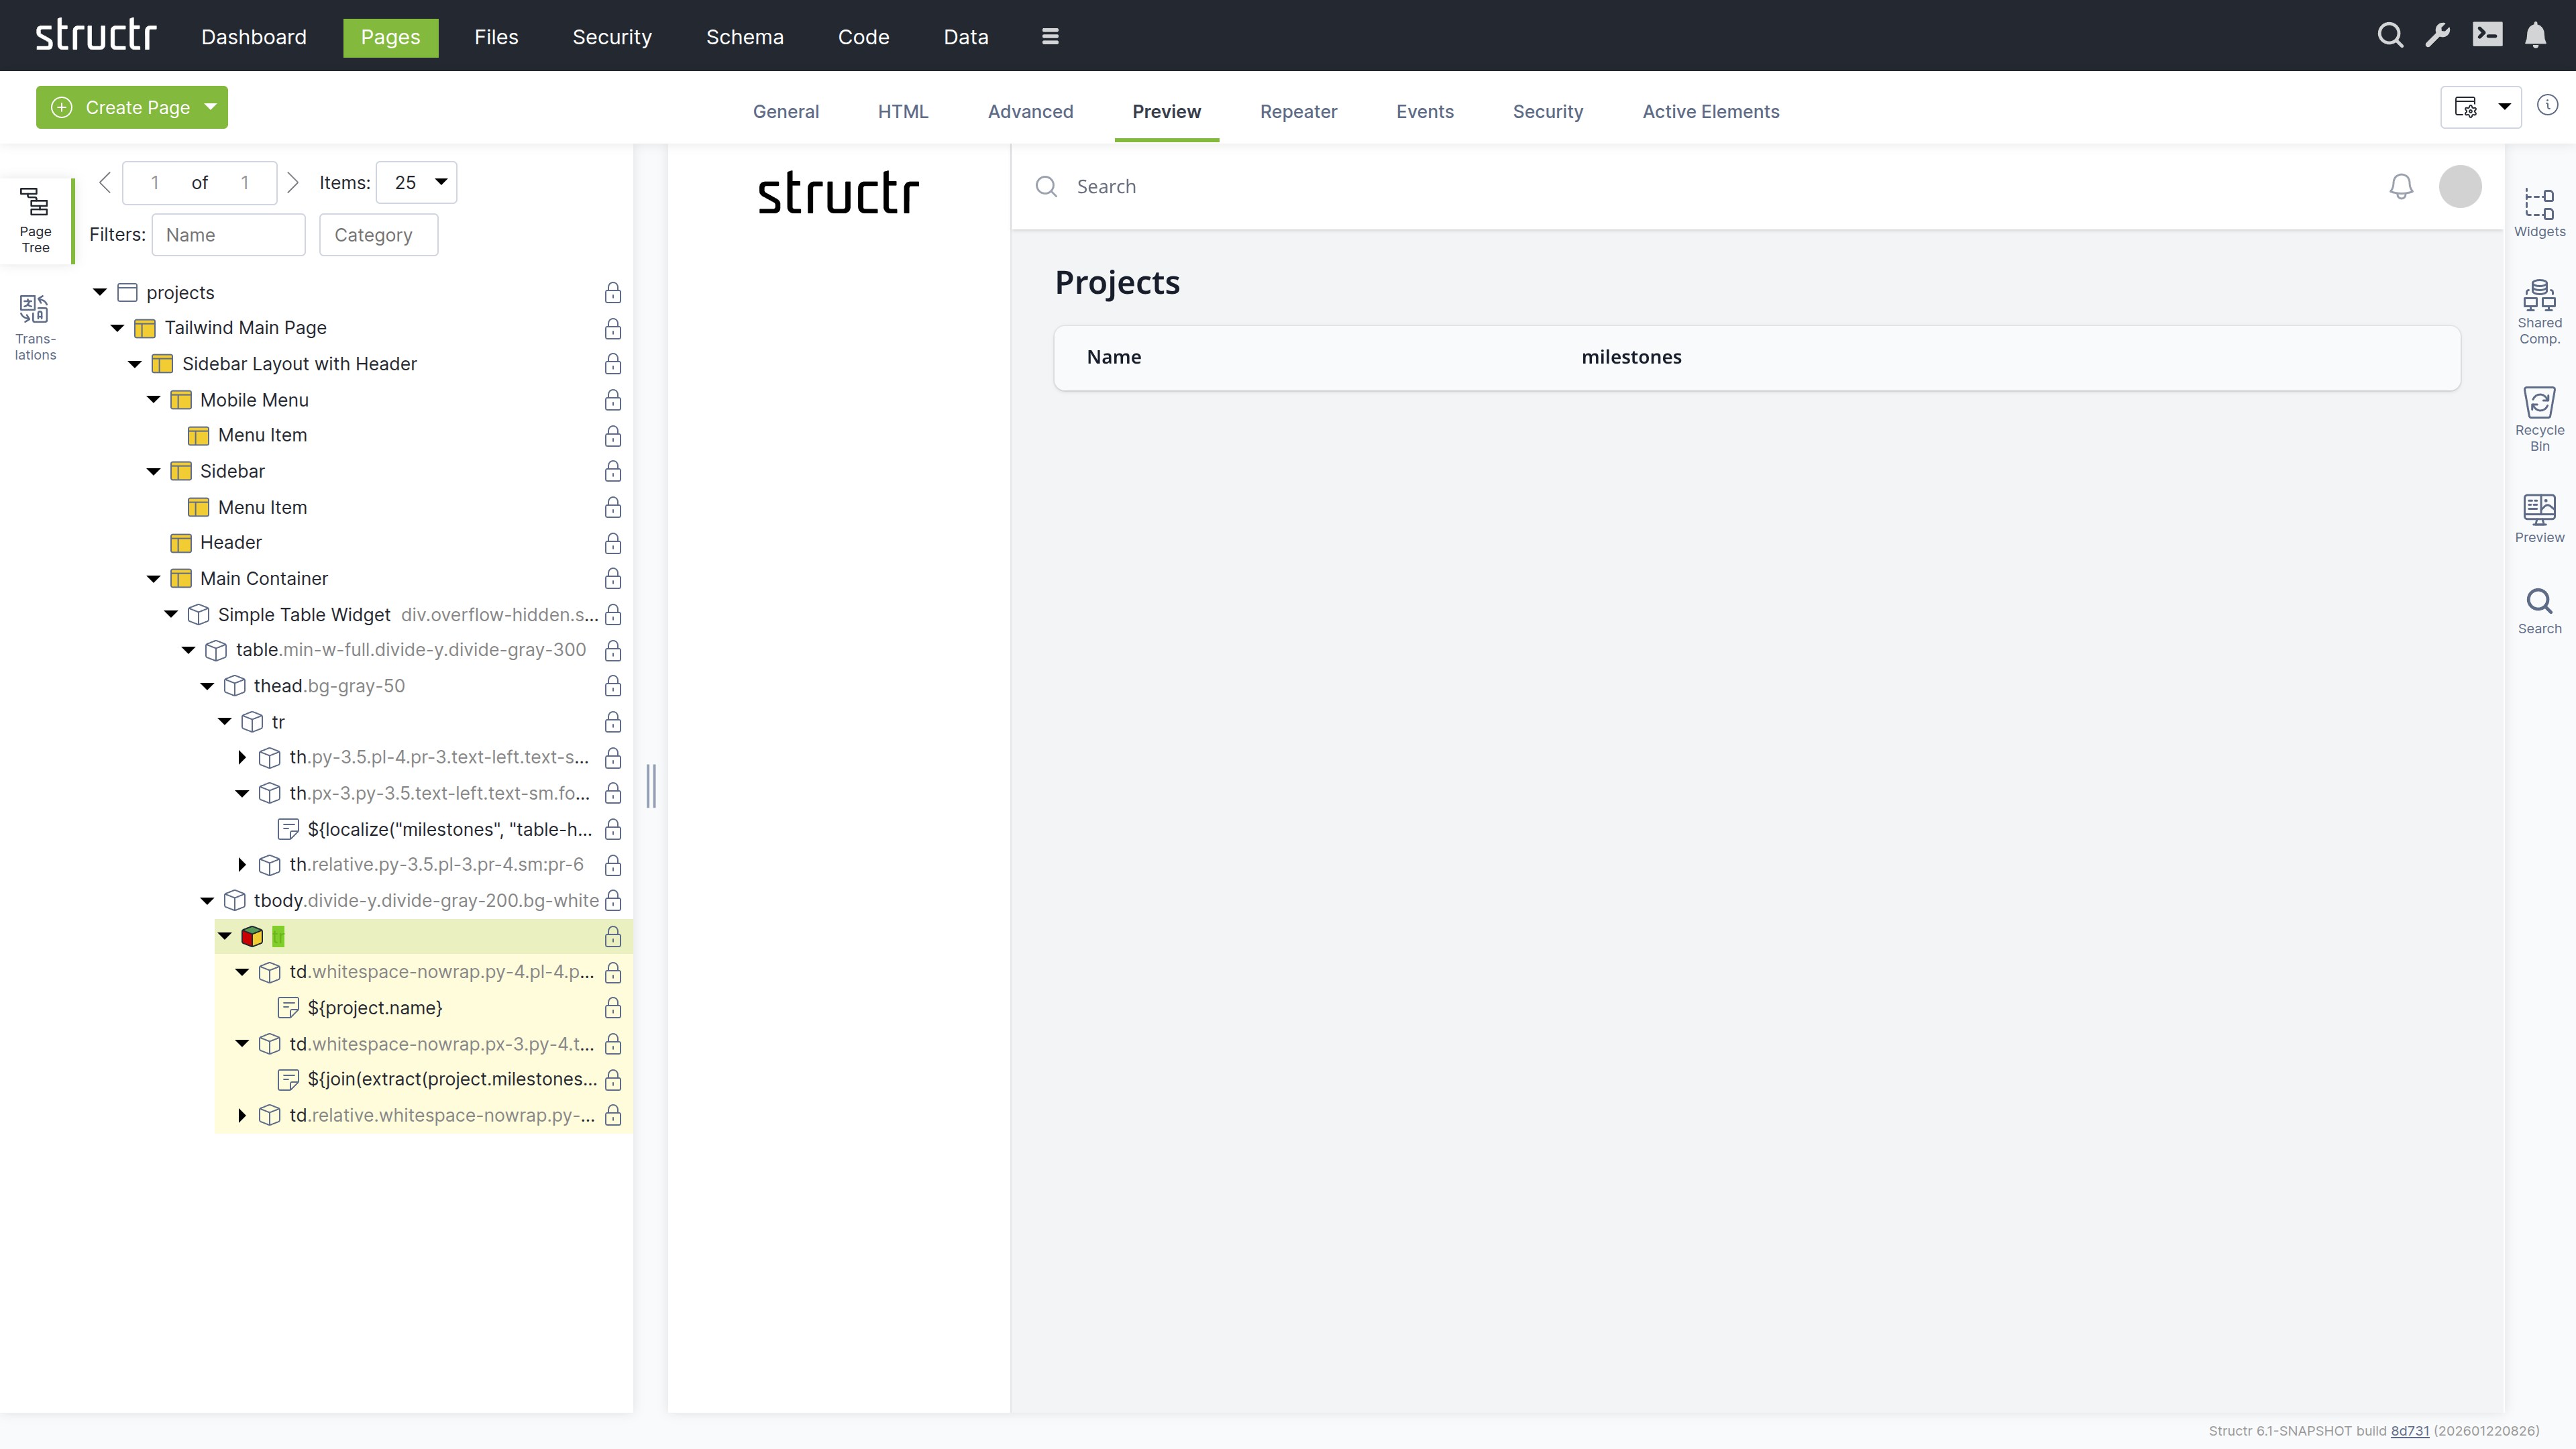
Your page now dynamically displays all projects with their associated milestones.
Chapter 4: Configuring Security
Set up user access controls to secure your project management system.
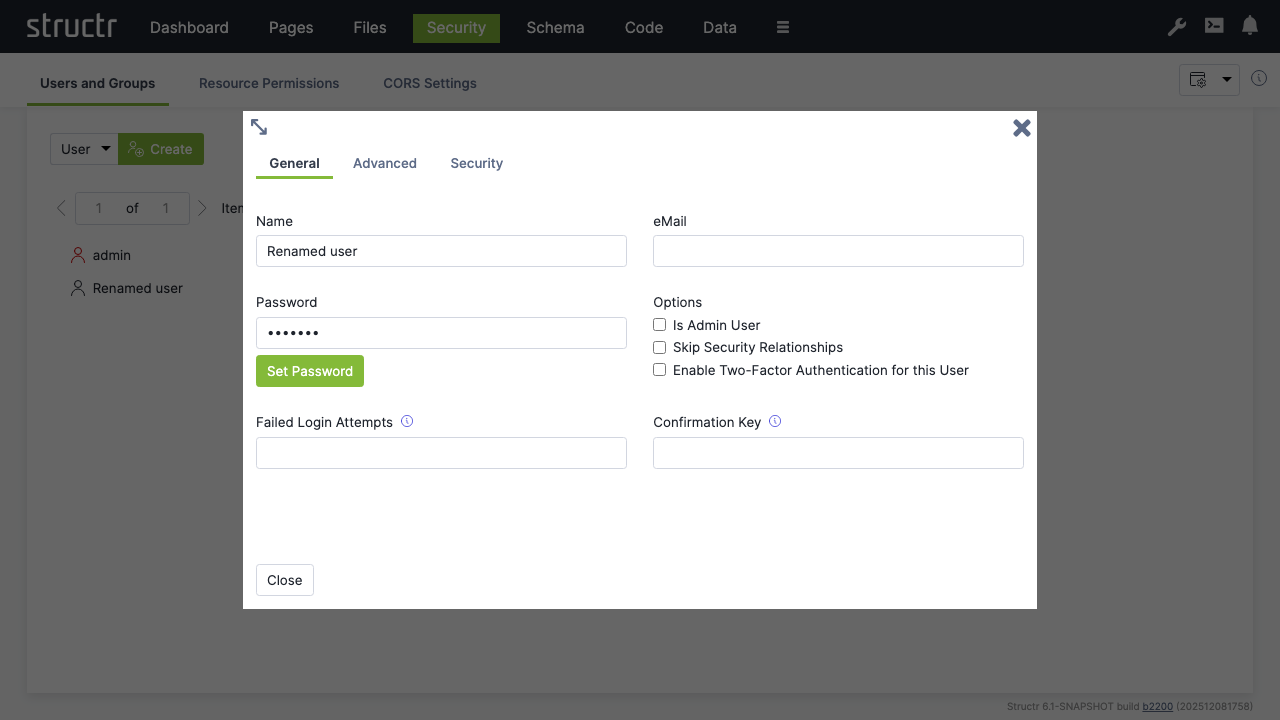
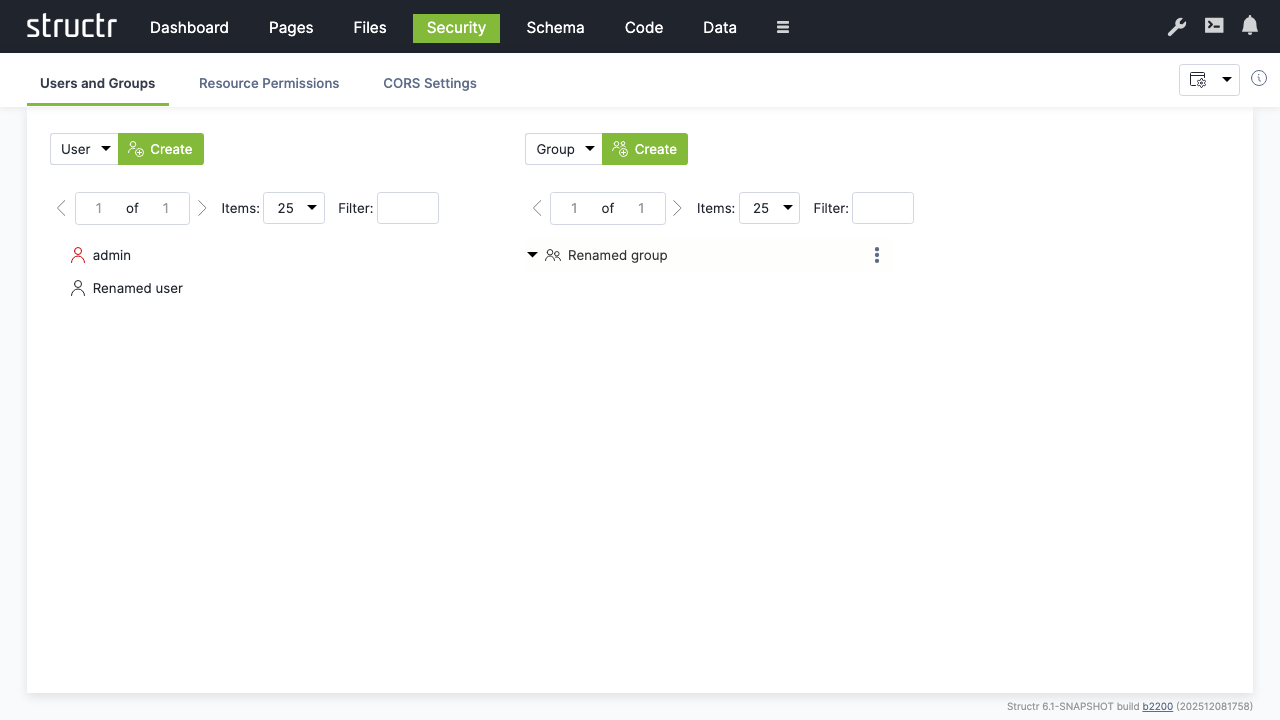
Creating Users
To create users, navigate to Security via the main menu.
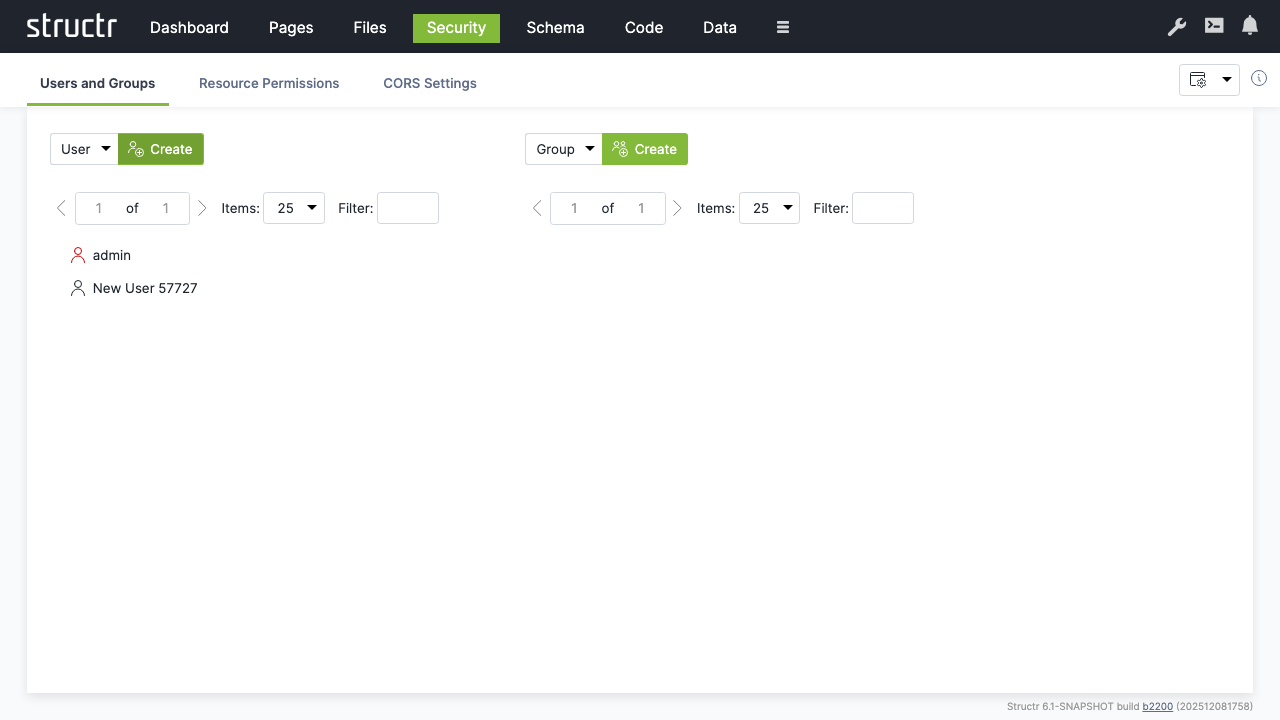
- Make sure “User” is selected and click “Create” to create a new user account
- Rename the user from “New User” to a new user name of your choice
- Right-click the user and select “General” to change the password to a new value that is difficult to guess.
Note: We recommend using a password manager to create a good password and to store it securely. Structr is compatible with most password managers.
Creating Groups
- Make sure “Group” is selected and click “Create” to create a user group
- Rename from “New Group” to a new group name of your choice

- Drag the user onto the group to add them as a member
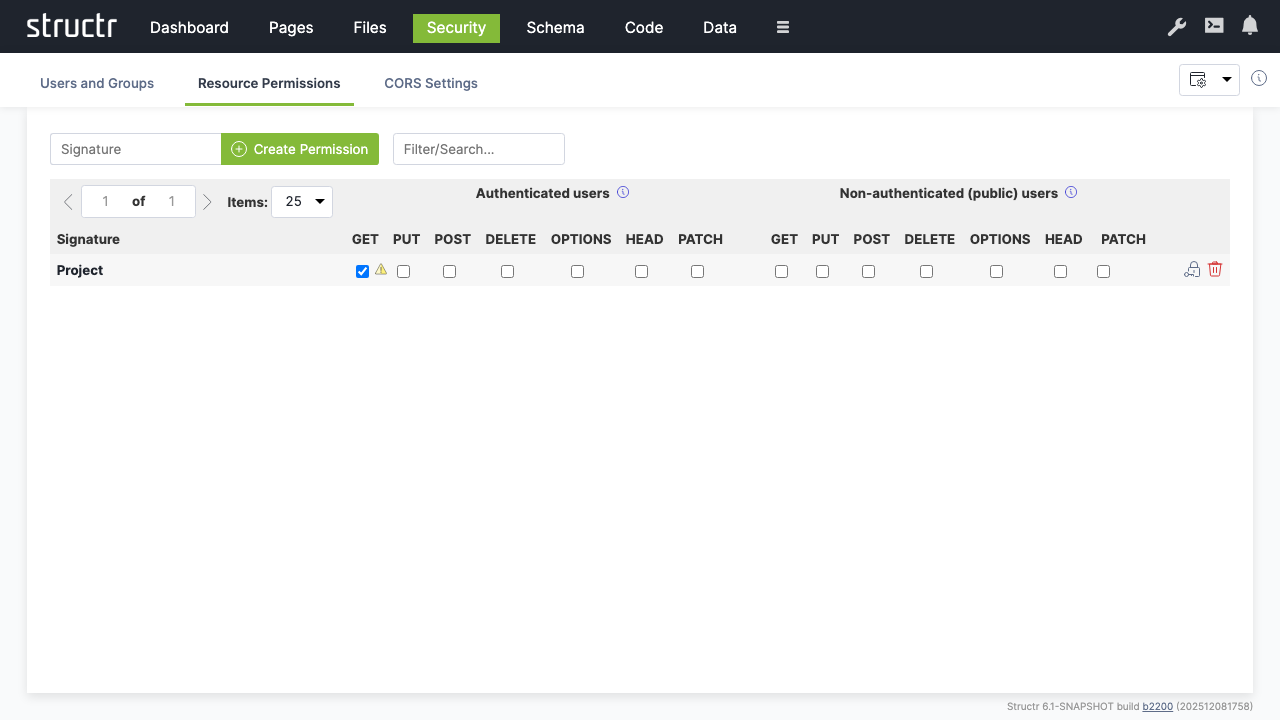
Setting Resource Permissions
Grant API access permissions for authenticated users:
- Switch to the “Resource Access” tab
- Create a permission for “Project” resources
- Enable “GET” for authenticated users to allow them read access to project data
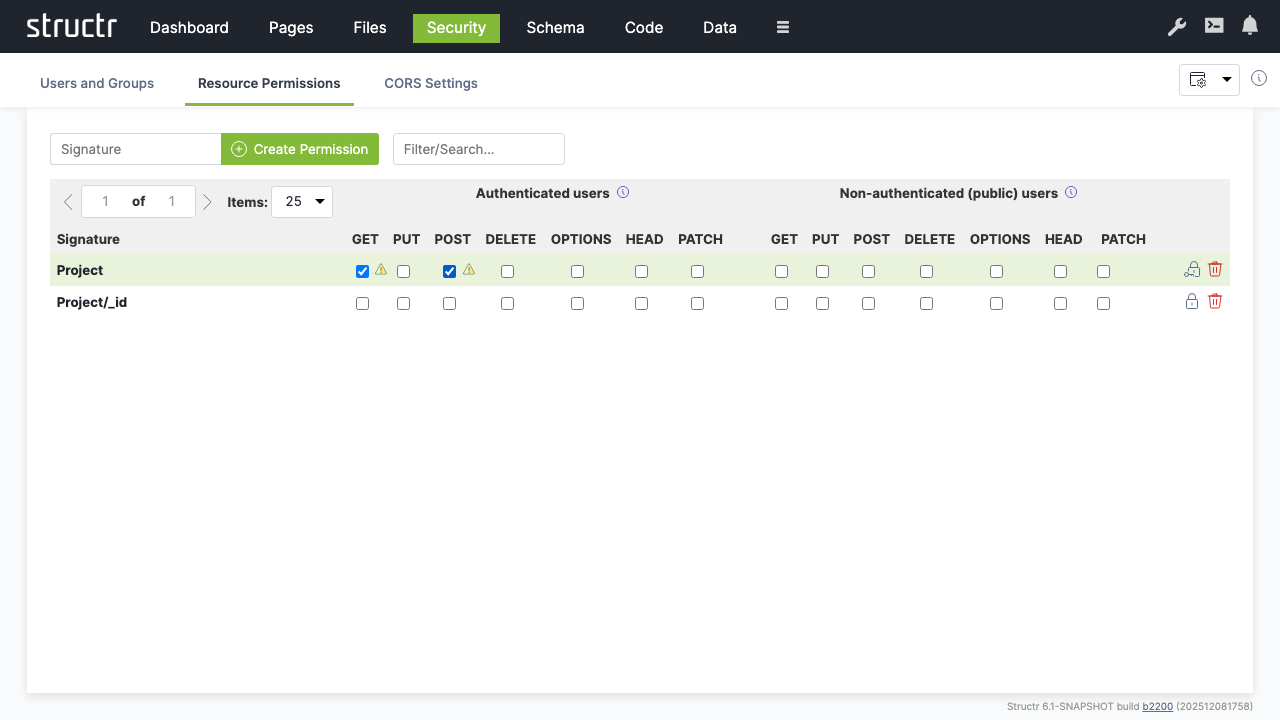
- Create an additional permission for “Project/_id” resources
- Enable “POST” to allow authenticated users to create new projects
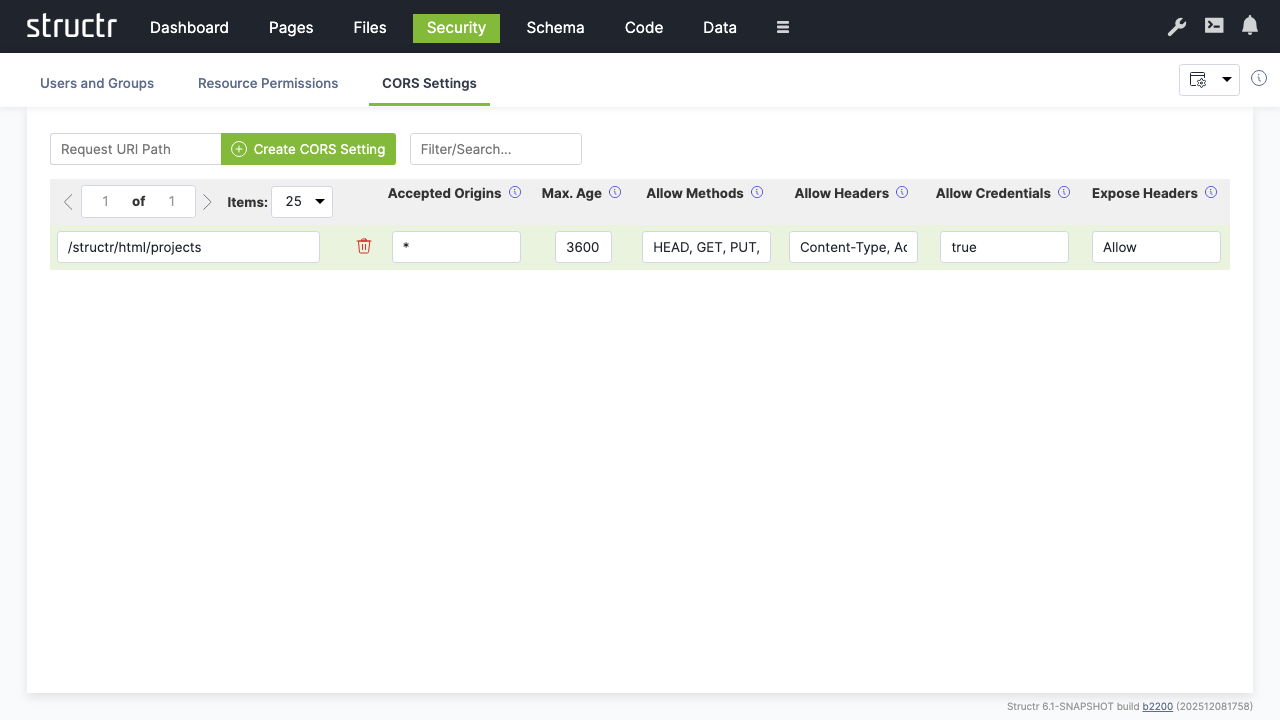
CORS Configuration
Enable cross-origin requests for web applications:
- Switch to “CORS Settings”
- Set request URI to
/structr/html/projects - Configure CORS headers:
- Accepted Origins:
* - Max Age:
3600 - Allow Methods:
HEAD, GET, PUT, POST, OPTIONS - Allow Headers:
Content-Type, Accept - Allow Credentials:
true - Expose Headers:
Allow
Conclusion
You now have a simple project management application with:
- Schema: Defined data types for Projects, Milestones, and Tasks with proper relationships
- Data: Sample data demonstrating the structure and relationships
- Pages: A web interface displaying projects and their milestones
- Security: User authentication, authorization, and API access controls
The application provides a foundation that can be extended with additional features like task management, user assignment, progress tracking, and reporting capabilities.
Core Concepts
Structr is built on a graph database foundation. Understanding this architecture helps you make better decisions when modeling data and building applications.
The Graph Data Model
All data in Structr is stored as a graph in the mathematical sense: objects are nodes, and connections between objects are relationships. Both nodes and relationships can have properties that store data, and both can have labels that indicate their type.
This differs fundamentally from relational databases, where data lives in tables and connections are established through foreign keys and join operations. In a graph database, relationships are first-class citizens stored as direct pointers between nodes, making traversal from one object to its related objects extremely efficient.
Nodes, Relationships, and Properties
Nodes represent things – users, projects, documents, products, or any other entity in your domain. Each node has a type (like User or Project) and can have any number of properties (like name, email, or createdDate).
Relationships connect nodes and represent how things relate to each other. A relationship always has a direction (from source to target), a type (like WORKS_ON or BELONGS_TO), and can also have properties. For example, a WORKS_ON relationship between a User and a Project might have a role property indicating whether the user is a developer, manager, or reviewer.
Properties store actual data values. Structr supports common types like strings, numbers, booleans, and dates, as well as arrays and encrypted strings.
Why Graphs?
Graph databases excel at handling connected data. When you need to find all projects a user works on, or all users who work on a specific project, or the shortest path between two entities, a graph database answers these questions by traversing relationships directly rather than performing expensive join operations.
The performance difference becomes significant as data grows. In relational databases, query time typically increases exponentially with the number of tables involved because joins have multiplicative cost. In graph databases, query time grows linearly with the number of nodes and relationships actually traversed – unrelated data doesn’t slow things down.
Graph Uniqueness
An important concept in graph modeling is that objects which are unique in reality should be represented by a single node in the graph. If the same person works on multiple projects, there should be one Person node connected to multiple Project nodes – not separate Person records duplicated for each project.
This differs from document databases where nested objects are often duplicated. In Structr, you model the relationship once, and the graph structure naturally reflects the real-world connections between entities.
Supported Databases
Structr supports several graph database backends:
- Neo4j – The primary supported database, recommended for production use
- Memgraph – Experimental support
- Amazon Neptune – Experimental support
- In-Memory Database – For testing only
Schema Enforcement
Structr validates all data against your schema before writing to the database. This ensures that structural and value-based constraints are never violated.
How It Works
Schema enforcement operates at multiple levels:
- Type validation – Ensures data types match the schema definition
- Required properties – Prevents creation or modification of objects if mandatory fields are missing
- Cardinality constraints – Enforces relationship multiplicities (one-to-one, one-to-many, many-to-many)
- Custom validators – Through validation expressions and format constraints
All validations run during the transaction before data is persisted. If any validation fails, the entire transaction is rolled back and no changes are saved.
Automatic Relationship Management
Structr manages relationships automatically based on the cardinality you define in the schema.
One-to-One
When you change one end of the relationship, Structr automatically removes the existing relationship and creates the new one. This ensures an object is never connected to more than one target.
One-to-Many
Existing relationships persist until you explicitly remove them or delete the related object. Multiple objects can connect on the “many” side while maintaining a single connection on the “one” side.
Many-to-Many
Maximum flexibility – any number of objects can connect on both sides. Relationships persist until explicitly removed.
Real-Time Schema Evolution
Unlike traditional databases that require migrations and downtime for schema changes, Structr applies schema modifications instantly while the system is running. Changes take only milliseconds to propagate.
This works because the schema itself is stored as nodes and relationships in the graph database. When you modify the schema, you’re updating data like any other operation – and the new constraints apply immediately to all subsequent operations.
Schema and Data Are Loosely Coupled
However, the schema is loosely coupled to your data. When you rename a property, change a type, or restructure relationships, existing data is not automatically migrated. The old data remains as it was – a renamed property simply means existing nodes still have the old property name while new nodes get the new one. You need to migrate existing data manually, either through a script that updates all affected nodes or by handling both old and new structures in your application logic until the migration is complete.
Incremental Development
This enables a development workflow where you can model your domain incrementally: start with a basic structure, build features against it, then extend the schema as requirements evolve. There’s no migration step and no deployment process for schema changes. But keep in mind that while the schema changes instantly, bringing your existing data in line with the new schema is your responsibility.
Accessing Data
Structr provides several ways to work with data, depending on the context.
In pages and business logic, you use built-in functions like $.find(), $.create(), and $.delete(). These functions work in both StructrScript (a simple expression language for template expressions) and JavaScript (for more complex logic). They handle security checks, transactions, and type conversion automatically.
For complex graph traversals, Structr supports Cypher – the query language developed by Neo4j for pattern matching in graphs:
MATCH (p:Project)-[:HAS_TASK]->(t:Task)
WHERE p.status = 'active'
RETURN p, t
This query finds all active projects and their tasks by matching the pattern of Project nodes connected to Task nodes via HAS_TASK relationships.
External systems access data through the REST API, which provides standard CRUD operations with filtering, sorting, and pagination.
Next Steps
With these concepts in mind, you’re ready to start building. The typical workflow is:
- Design your data model in the Schema area
- Create sample data to test your model
- Build pages that display and manipulate your data
- Add business logic to enforce rules and automate processes
Each of these topics is covered in detail in the Building Applications section.