Markdown Rendering Hint: Unknown(Structr) not rendered because no formatter registered for format markdown, mode overview and Unknown(Structr)
Introduction
Getting Started with Structr
Welcome to Structr! This guide will help you get up and running with Structr, a powerful low-code development platform that combines a graph database with a web application framework. Whether you’re building a simple website or a complex business application, Structr provides the tools you need to create data-driven applications quickly and efficiently.
What is Structr?
Structr is an open-source low-code platform that allows you to:
- Build web applications without extensive coding
- Create and manage complex data models using a visual schema editor
- Design responsive web pages with drag-and-drop functionality
- Implement business logic using server-side JavaScript (or other languages)
- Create REST APIs automatically based on your data model
- Manage users, groups, roles, permissions, and access rights out of the box
- Store and manage files in a virtual folder tree with your own metadata
Read More
Admin User Interface Overview, Building Applications with Structr, The Data Model.
Prerequisites
Before you begin, you should have:
- Basic understanding of web technologies (HTML, CSS, JavaScript)
- A modern web browser (Chrome, Firefox, Safari, or Edge)
- For local installation: Java 25 or higher and a Neo4j database (optional, as Structr can manage this for you)
Choose Your Installation Method
There are three ways to get started with Structr:
Option 1: Structr Sandbox (Recommended for Testing/Exploring)
The easiest way to start is with a free Structr Sandbox - a cloud-hosted server instance managed by the Structr team.
Advantages:
- No installation required
- Ready to use in minutes
- Full functionality for testing
- No costs, no obligations, no aggressive marketing
- Free for 14 days
How to get started:
- Visit https://structr.com/try-structr/
- Sign up for a free sandbox
- Access your personal Structr instance via the provided URL
- Sign in with the credentials sent to your email
Note: Sandboxes have limited CPU, memory, and disk space but are perfect for learning and prototyping. After the 14-day trial, you can upgrade to a paid plan to keep your sandbox running.
Option 2: Docker Installation (Recommended for Development)
For local development or self-hosted production environments, Docker provides the most straightforward setup. See https://gitlab.structr.com/structr/docker-setup for more details.
Advantages:
- Consistent environment across different systems
- Easy to update and maintain
- Includes all necessary dependencies
Tip: If you’re new to Docker, install Docker Desktop and use its integrated Terminal (button at the bottom-right of the Docker Desktop window) to run the commands below.
Quick start:
# Clone the Docker setup repository
git clone https://gitlab.structr.com/structr/docker-setup.git

# Change to the docker-setup directory
cd docker-setup
Before starting Structr, open docker-compose.yml in a text editor and change the privacy policy setting from no to yes:
AGREE_TO_STRUCTR_PRIVACY_POLICY=yes
Then start the containers:
# Start Structr with Docker Compose
docker compose up -d
Access Structr in your browser at http://localhost:8082/structr.
Option 3: Manual Installation (Advanced Users)
For experienced administrators who need custom configurations, manual installation is available. In this installation guide, we assume a recent Debian Linux system and you working as the root user.
Update the system and install dependencies
$ apt update
$ apt -y upgrade
Markdown Rendering Hint: MarkdownTopic(Install GraalVM) not rendered because level 5 >= maxLevels (5)
Markdown Rendering Hint: MarkdownTopic(Install Neo4j Debian Package (version 5.26 LTS)) not rendered because level 5 >= maxLevels (5)
Markdown Rendering Hint: MarkdownTopic(Configure and Start Neo4j) not rendered because level 5 >= maxLevels (5)
Markdown Rendering Hint: MarkdownTopic(Install and Start Structr (version 6.1.0)) not rendered because level 5 >= maxLevels (5)
Markdown Rendering Hint: MarkdownTopic(Troubleshooting: Conflicting Java Versions) not rendered because level 5 >= maxLevels (5)
Initial Configuration
After installation (for Docker or manual setup), you’ll need to go through the initial configuration procedure as follows.
Note: In the following chapter, we assume that you installed Structr on your local computer (localhost). If you installed it on a server instead, you need to adapt the URLs accordingly.
1. Set a Superuser Password
Navigate to http://localhost:8082/structr which will redirect you to the configuration wizard at http://localhost:8082/structr/config.
Note: Choose a strong password - this is your system administrator account with full access to all Structr features. After the first call, the configuration tool is secured with this password. If you have forgotten the password, you can only obtain it as a system administrator at the operating system level from structr.conf.
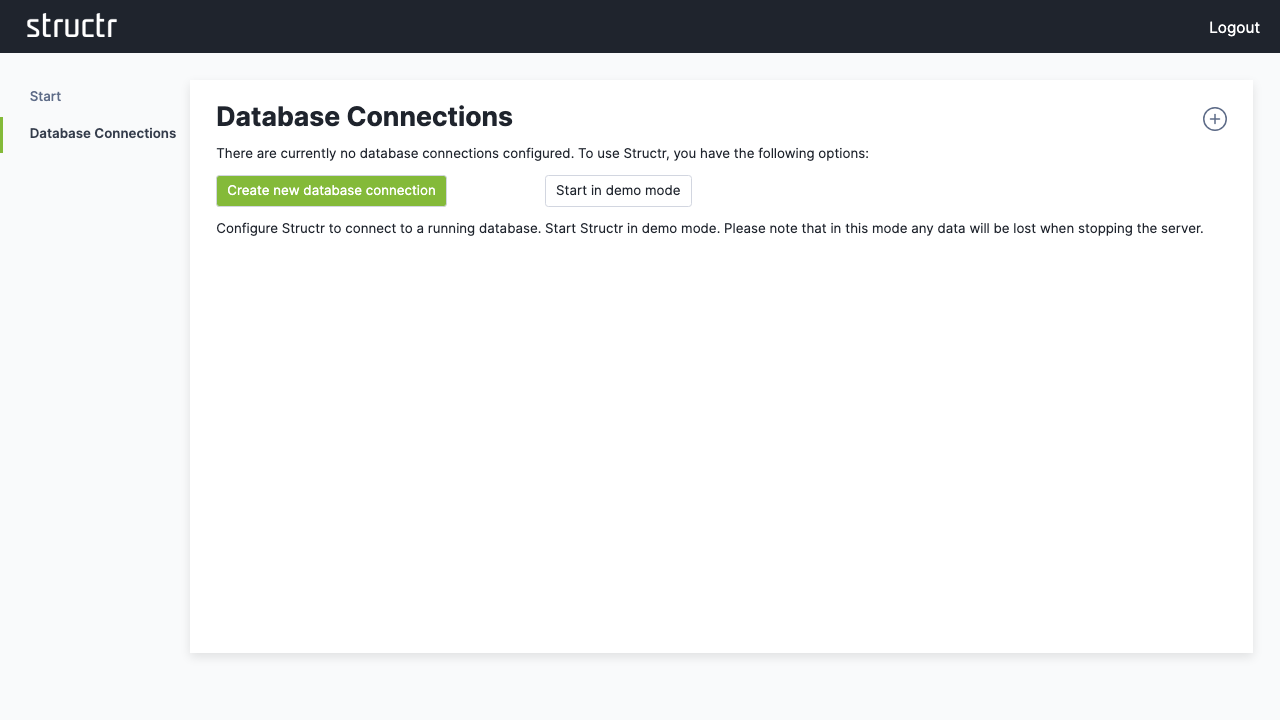
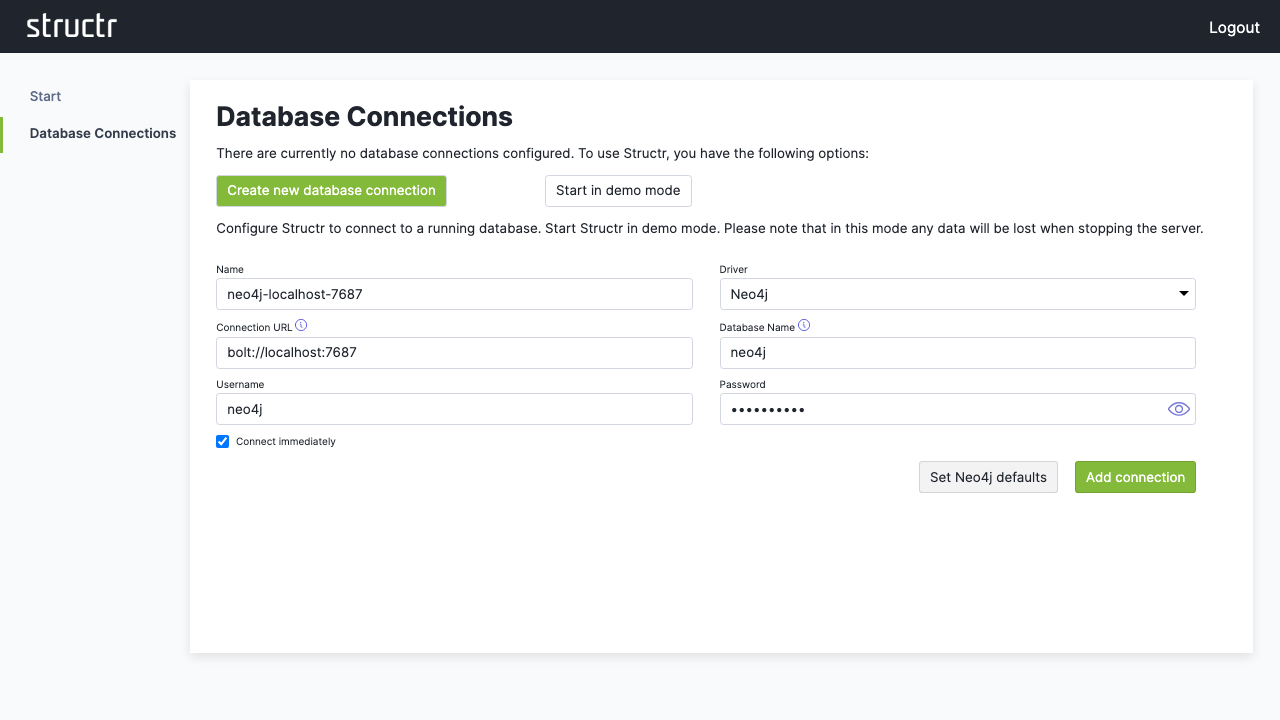
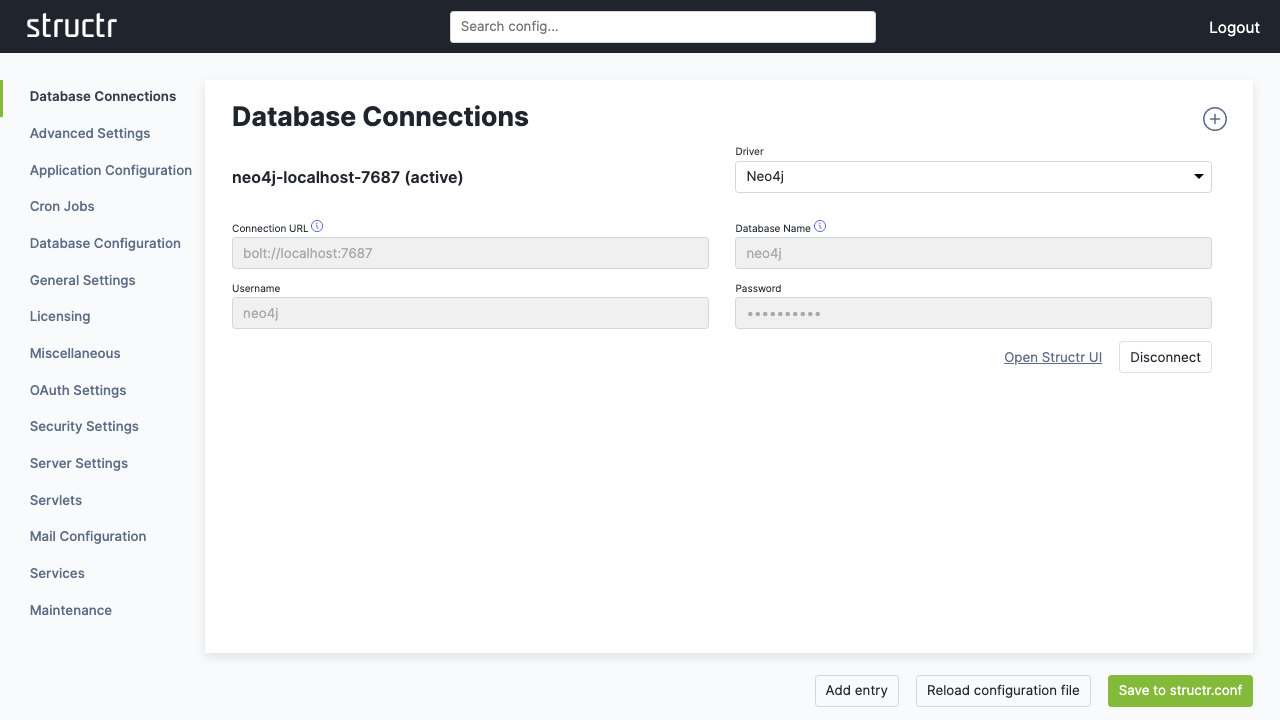
2. Configure a Database Connection
Click “Configure a database connection” and then “Create new database connection”.
For a standard Neo4j setup:
- Click “Set Neo4j defaults” to auto-fill typical values
- Adjust the connection parameters if needed
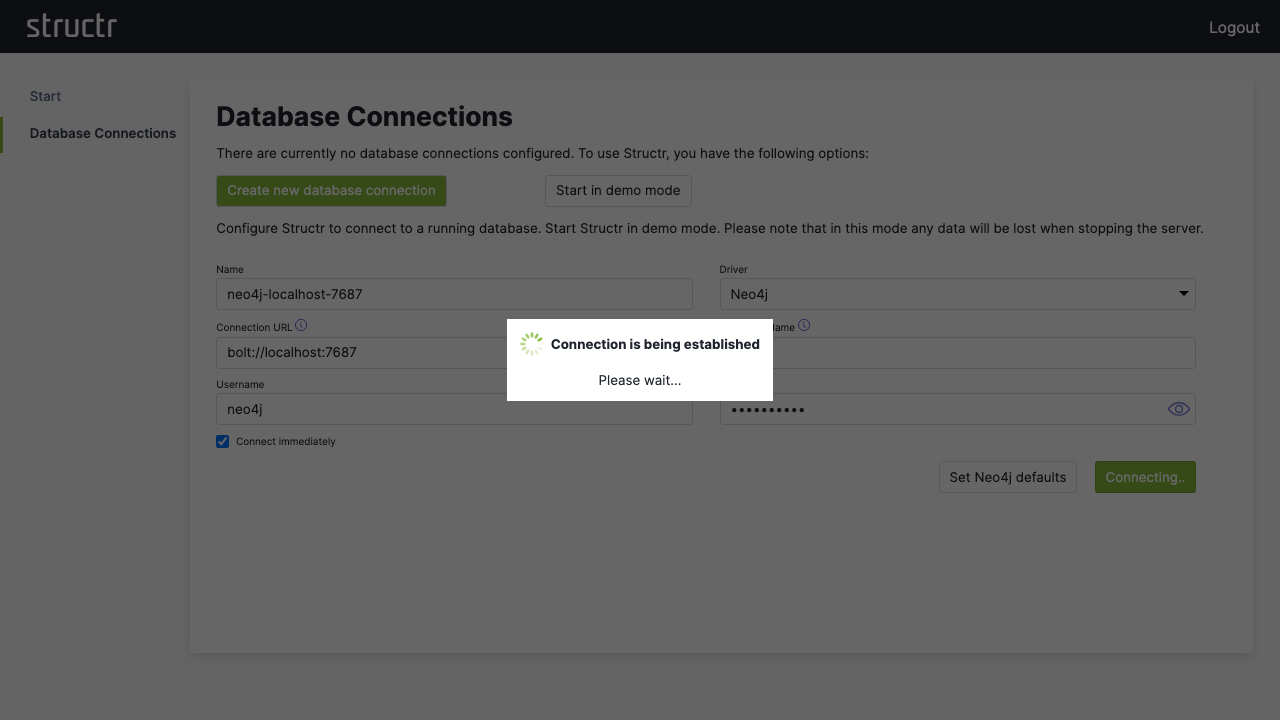
- Click “Save” to establish the connection

If your database connection does not use these default settings, change them according to your database configuration.
3. Access the Admin Interface
Once connected, click “Open Structr UI” to enter the main application.
First Steps
When you see the sign-in screen, you’re ready to start working with your Structr instance.
Sign In
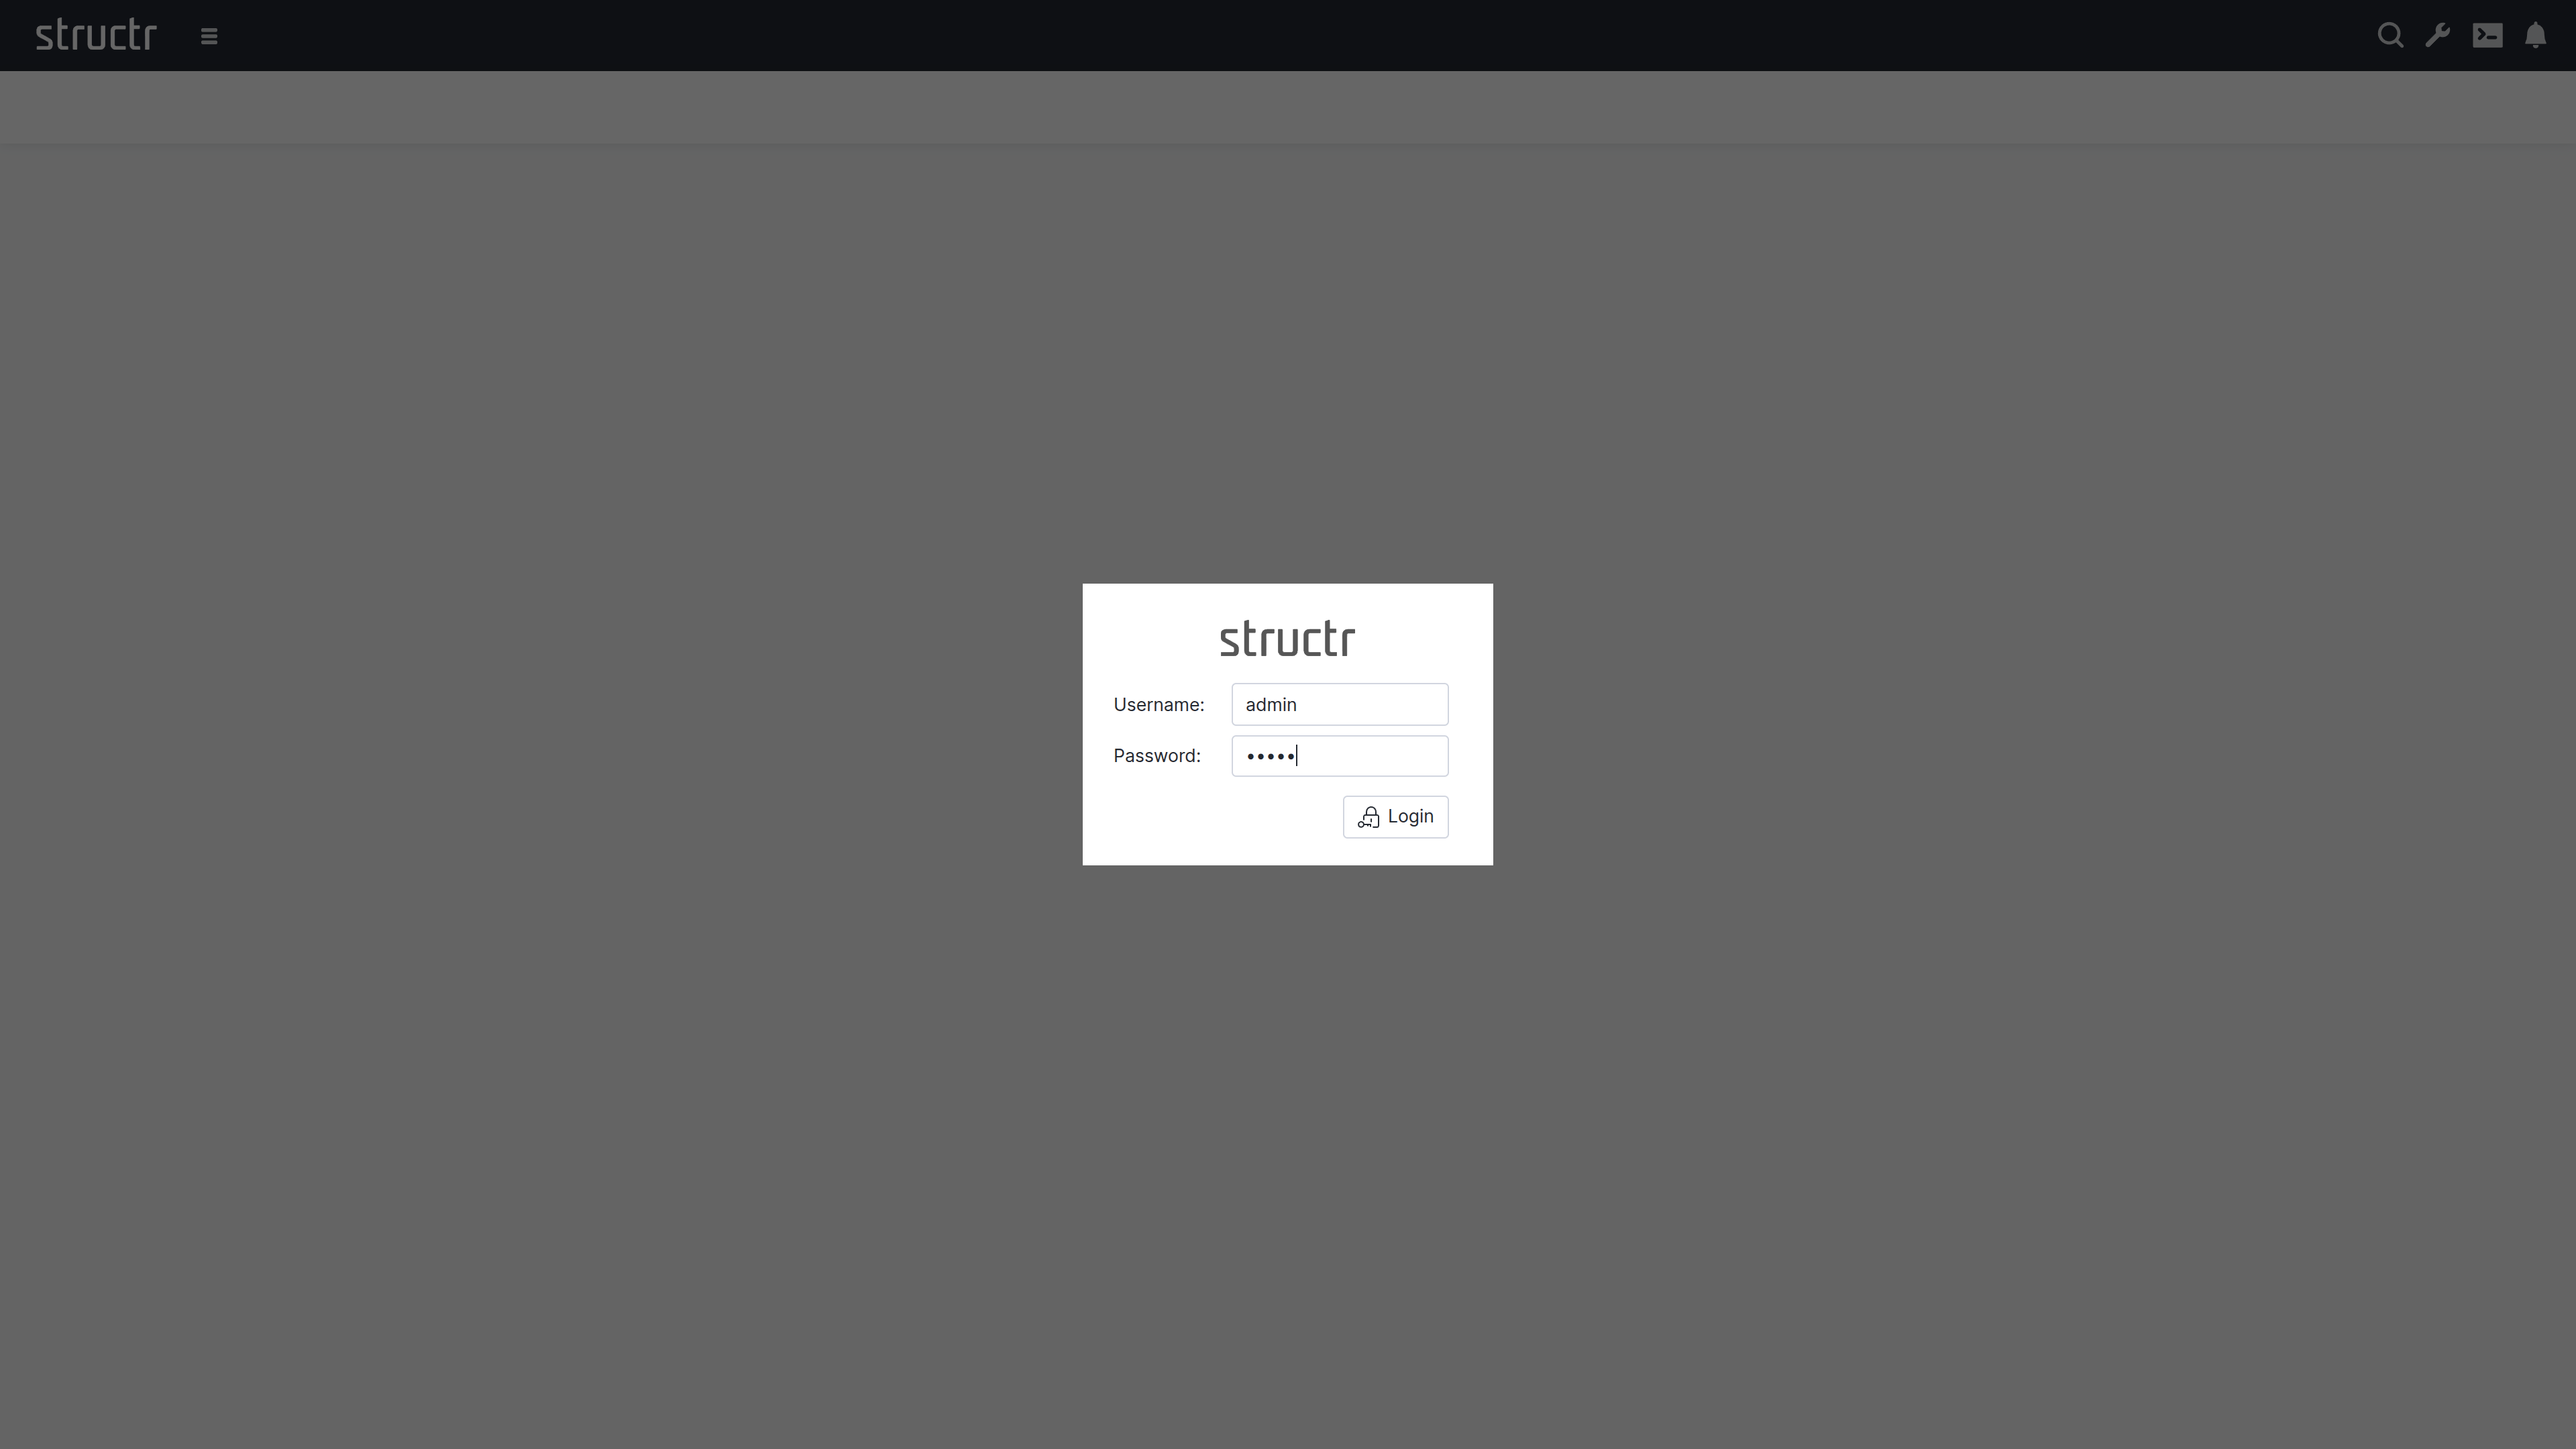
There’s default admin user which is created automatically if the database was found empty. The default password is admin.
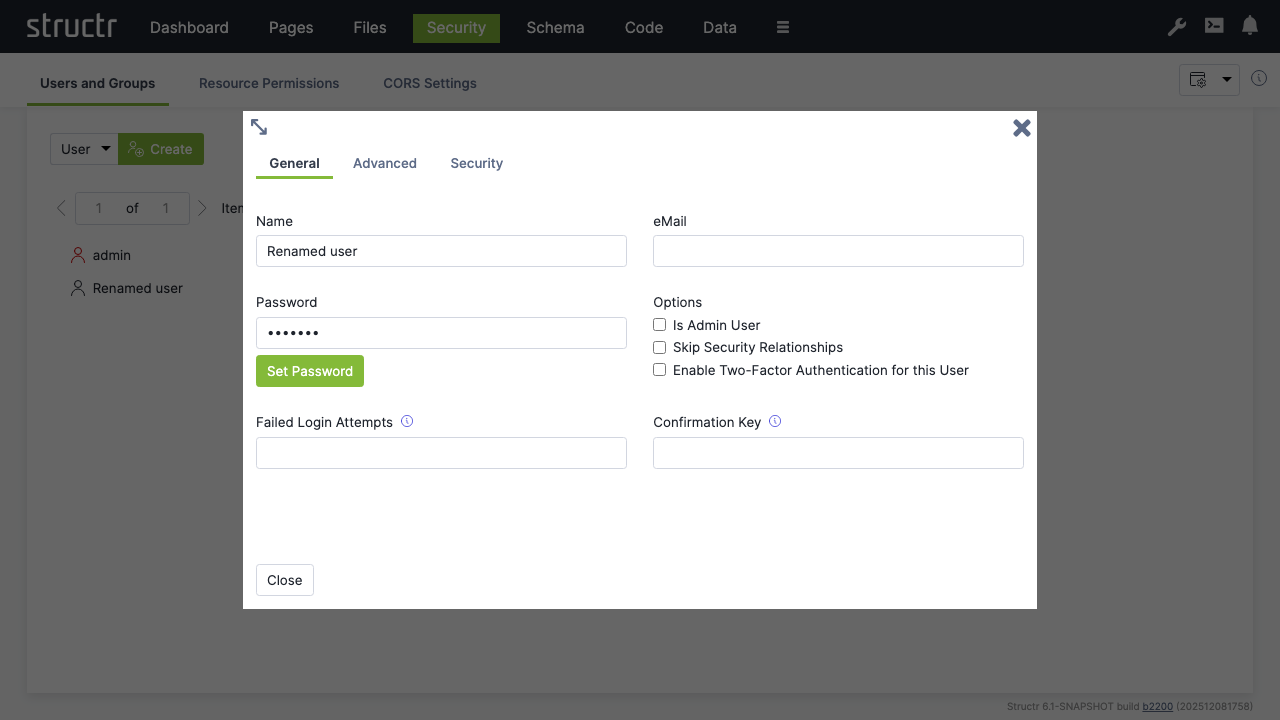
Note: You should change the admin password immediately after signing in. Go to
Security→Users and Groups, right-click onadmin→Generaland set a password that can’t be easily guessed. You can also set password rules in the configuration.
Change Admin Password
Now you’re set and done and ready for the first steps with Structr.
First Steps with Structr
This guide walks you through typical steps of building an application using Structr’s visual development tools.
The use case is a simple system for managing projects, milestones and tasks. We’ll start with the schema, add some sample data and create a web page to display the data.
As an optional addition, we add a user and a group, define API access permissions and a CORS rules.
Chapter 1: Defining the Data Schema
Start by creating the data structure for your project management system. The schema defines three main entities:
- Projects
- Milestones
- Tasks
Creating the Project Type
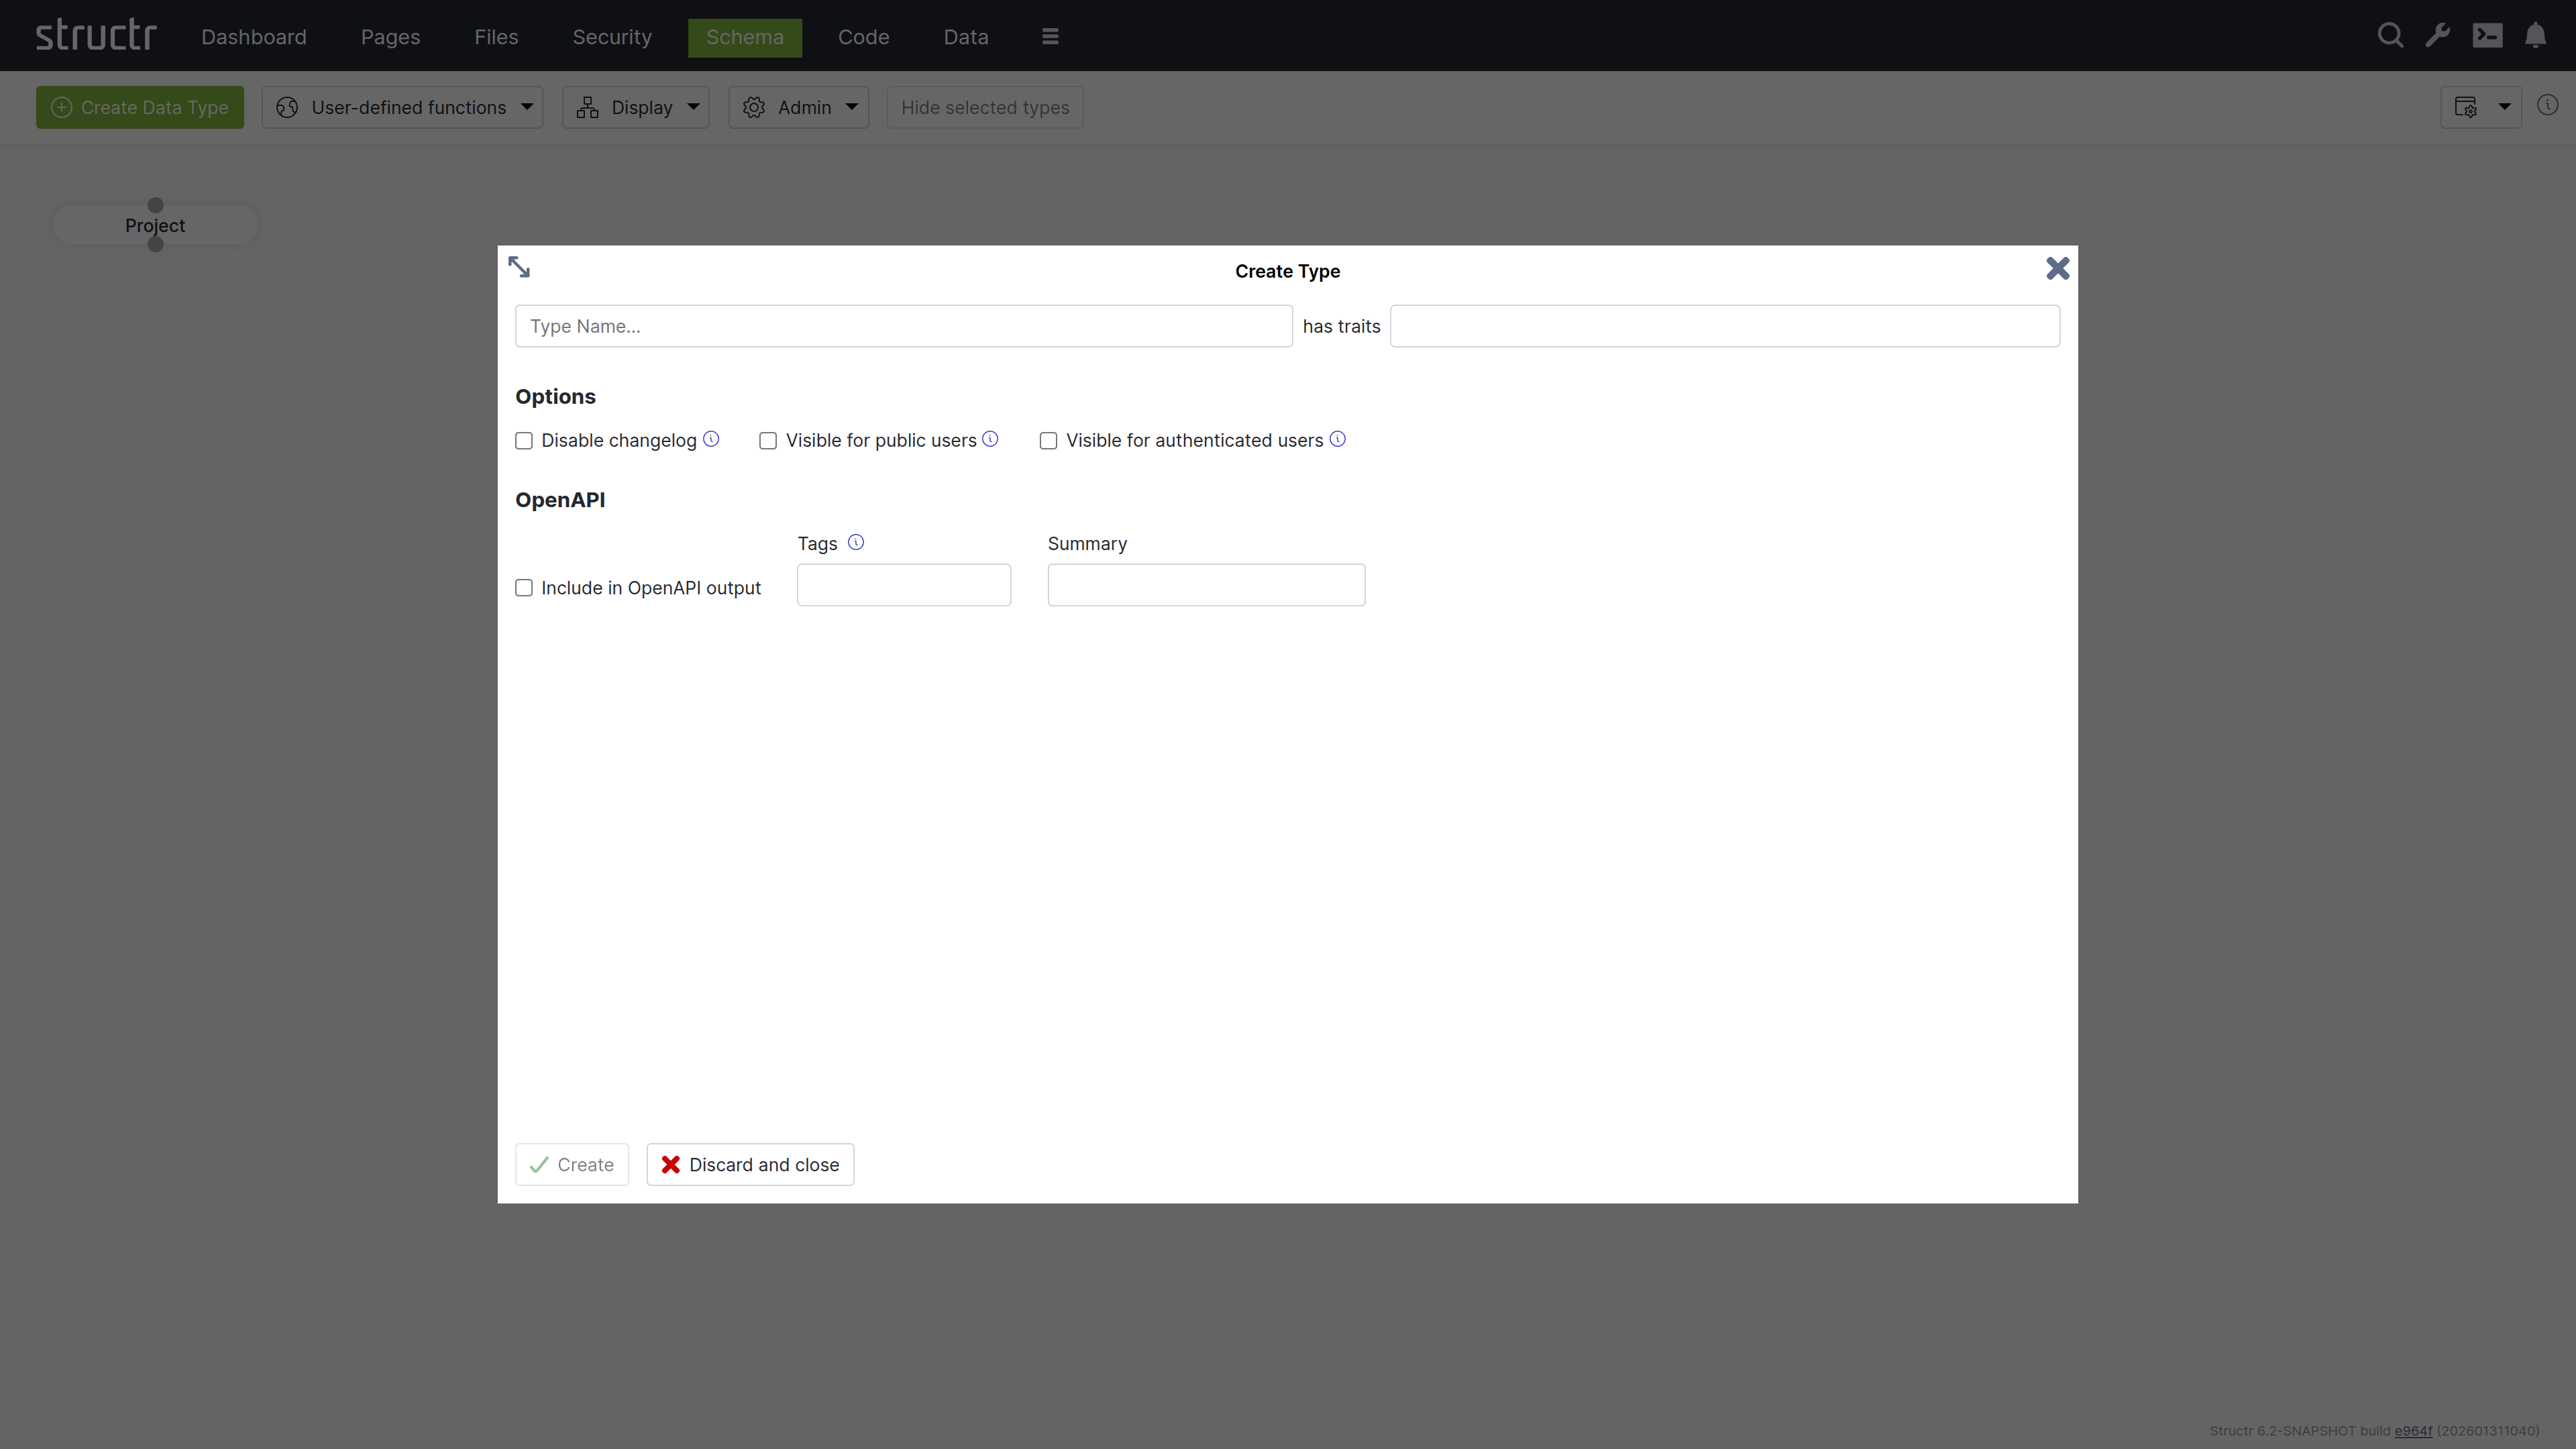
Navigate to the “Schema” view and click “Create Data Type” to add your first entity type.
- Enter “Project” as the type name
- Click “Create” to add the type
Add a custom property to uniquely identify projects:
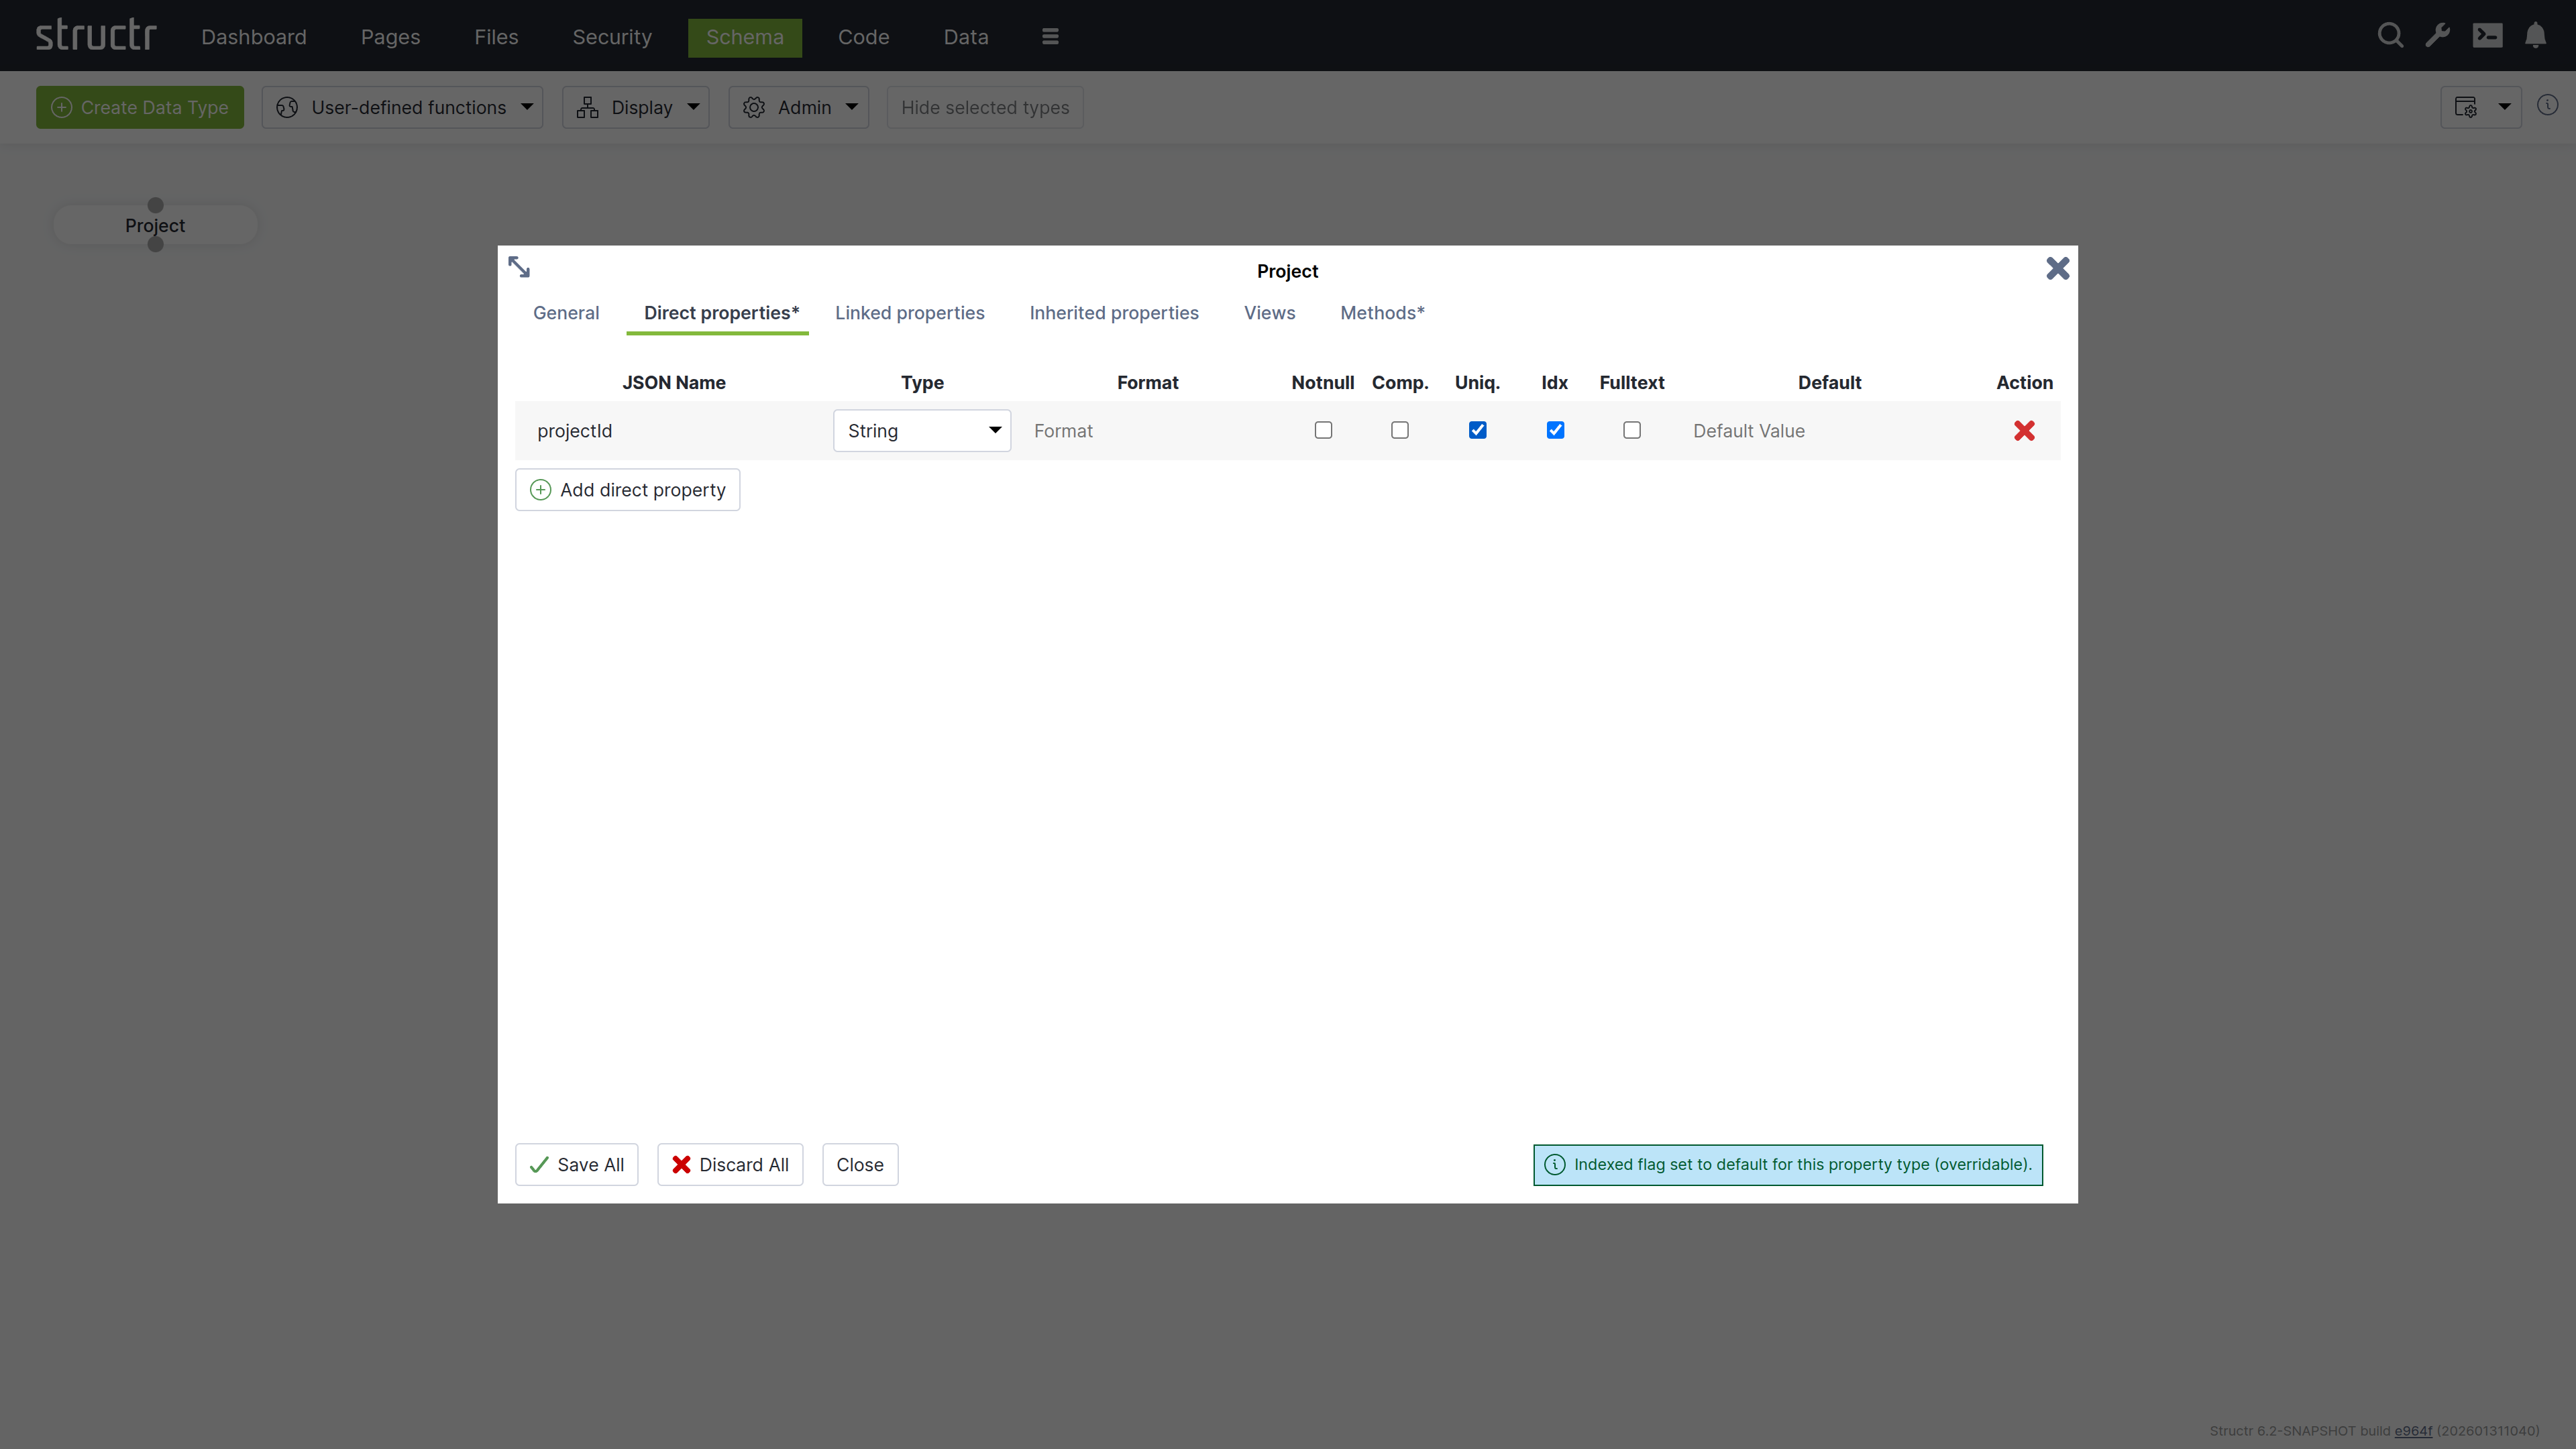
- Expand “Direct properties”
- Click “Add direct property”
- Set JSON name to “projectId”
- Check “unique” to ensure each project has a unique identifier
- Select “String” as the property type
- Click “Save All”
Creating the Milestone Type
Add a Milestone type following the same pattern:
Add multiple properties to track milestone details:
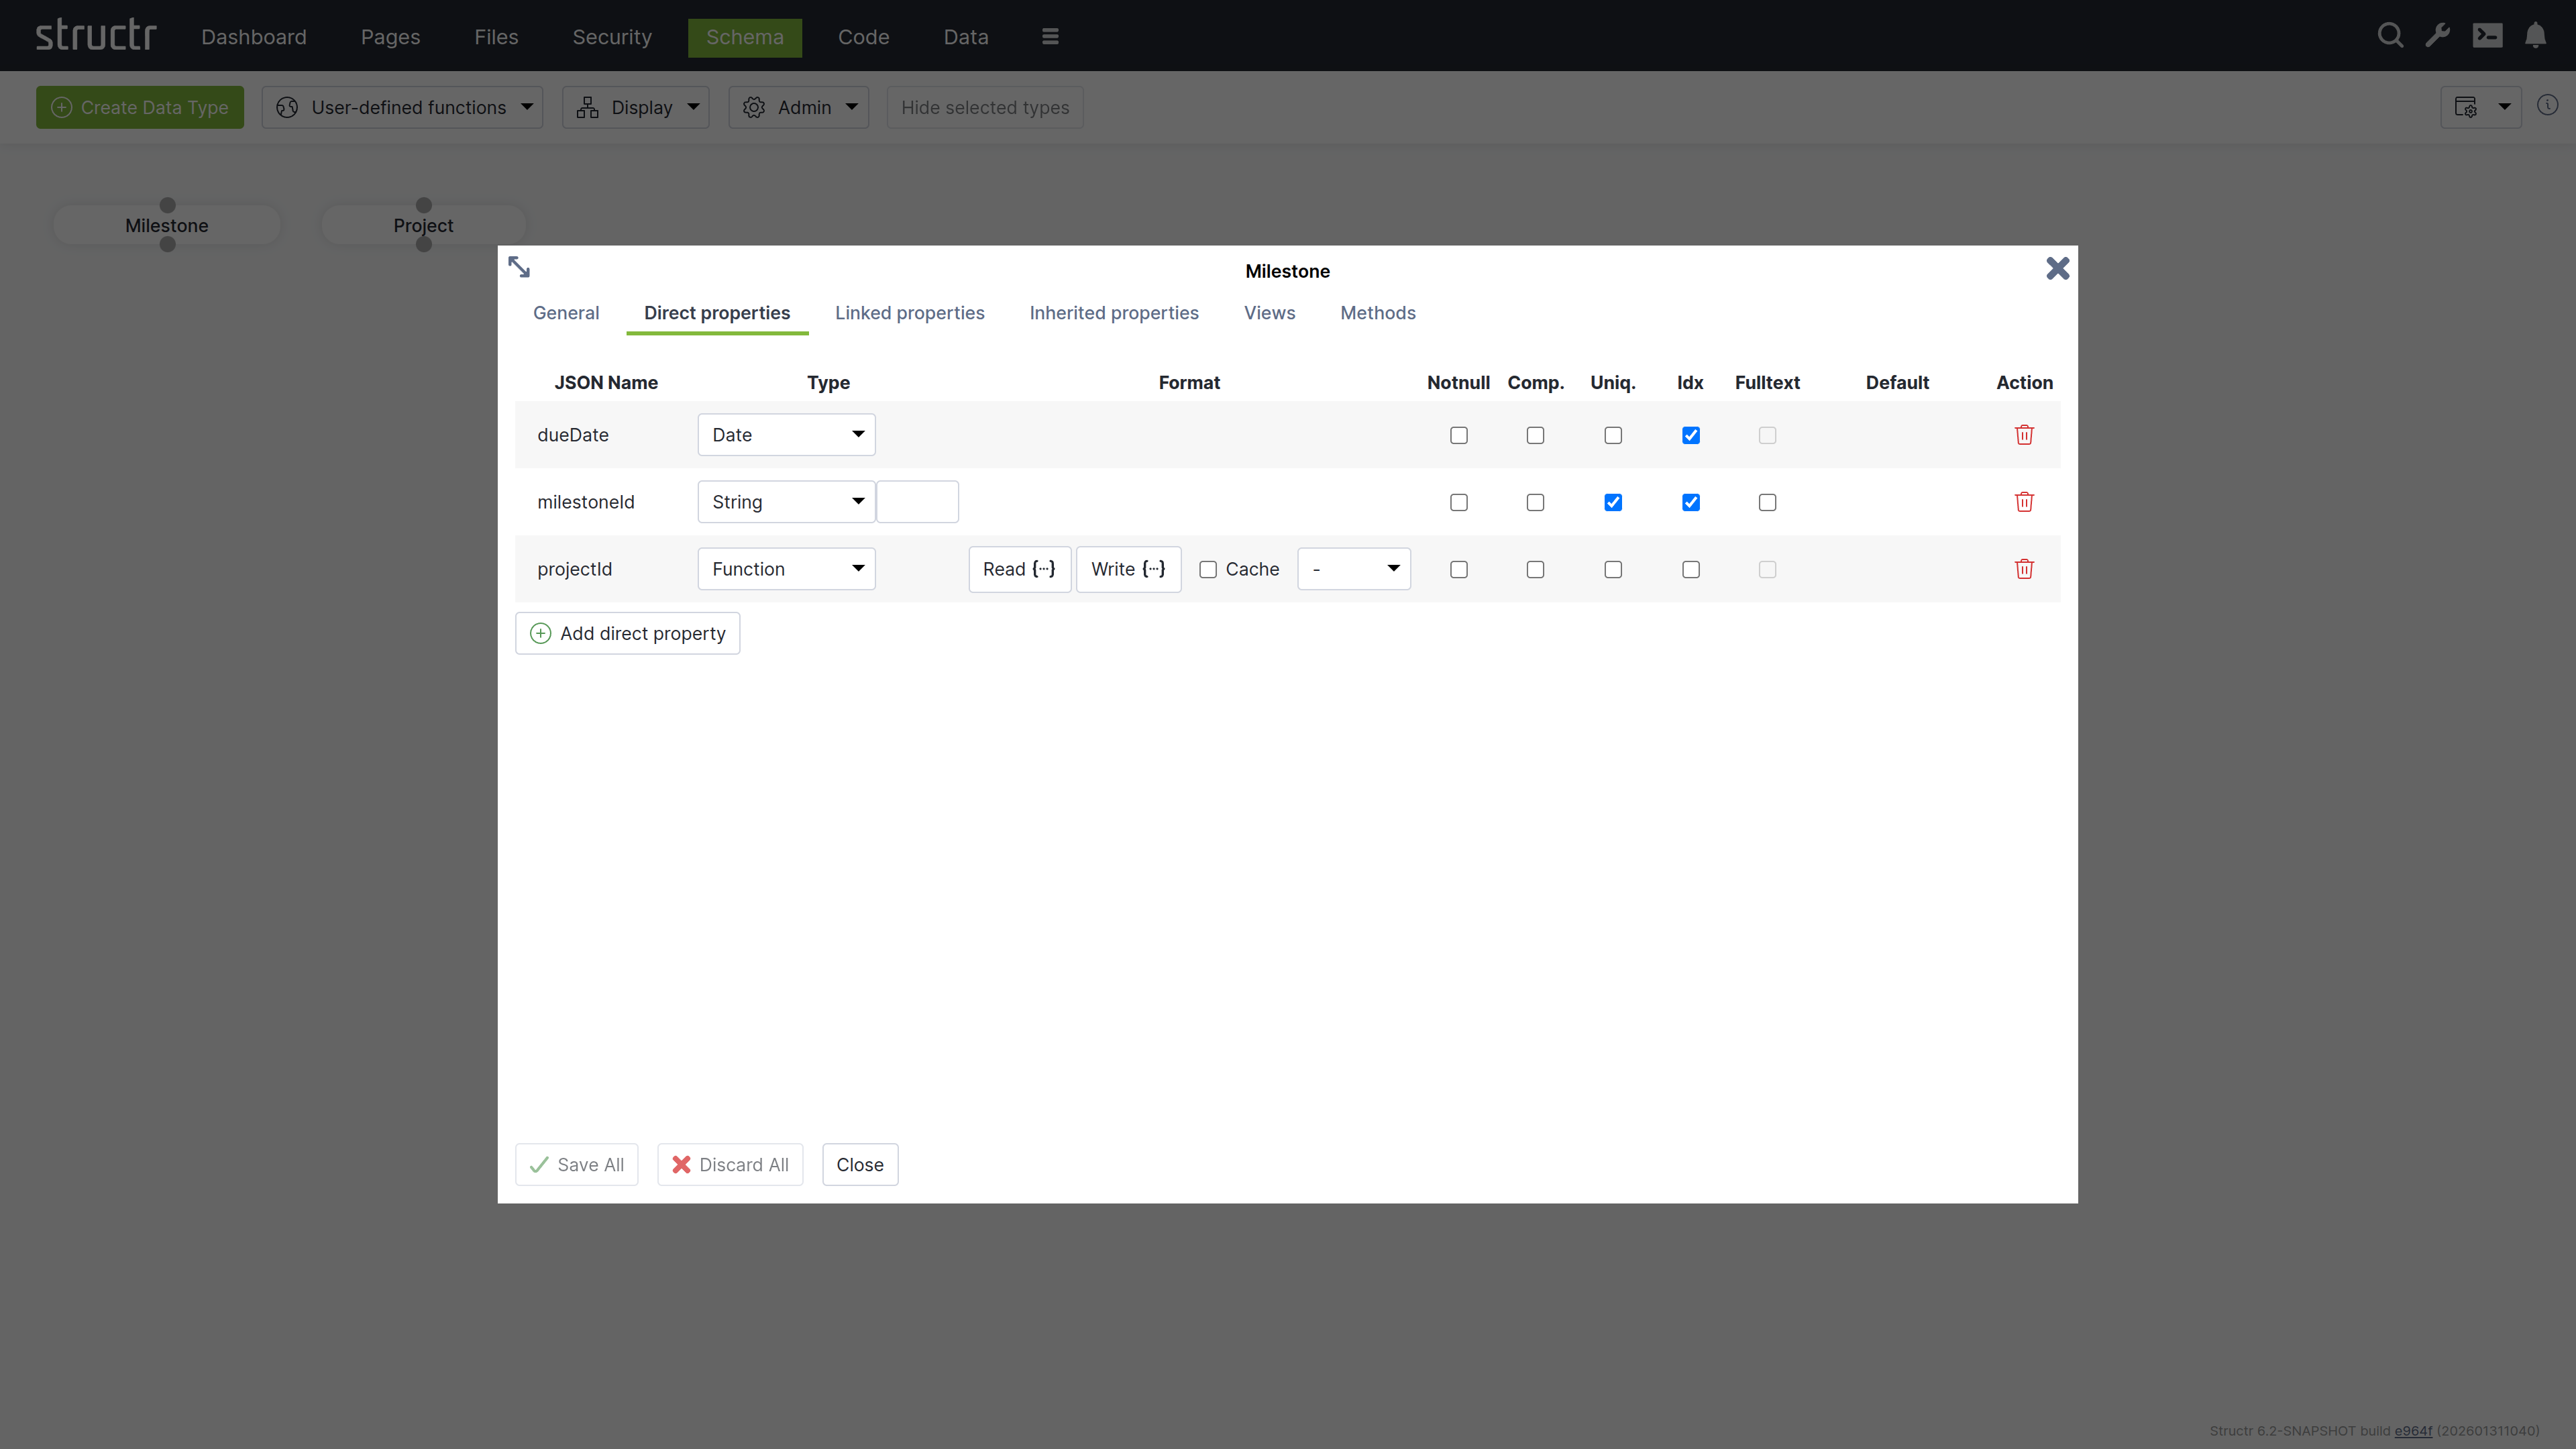
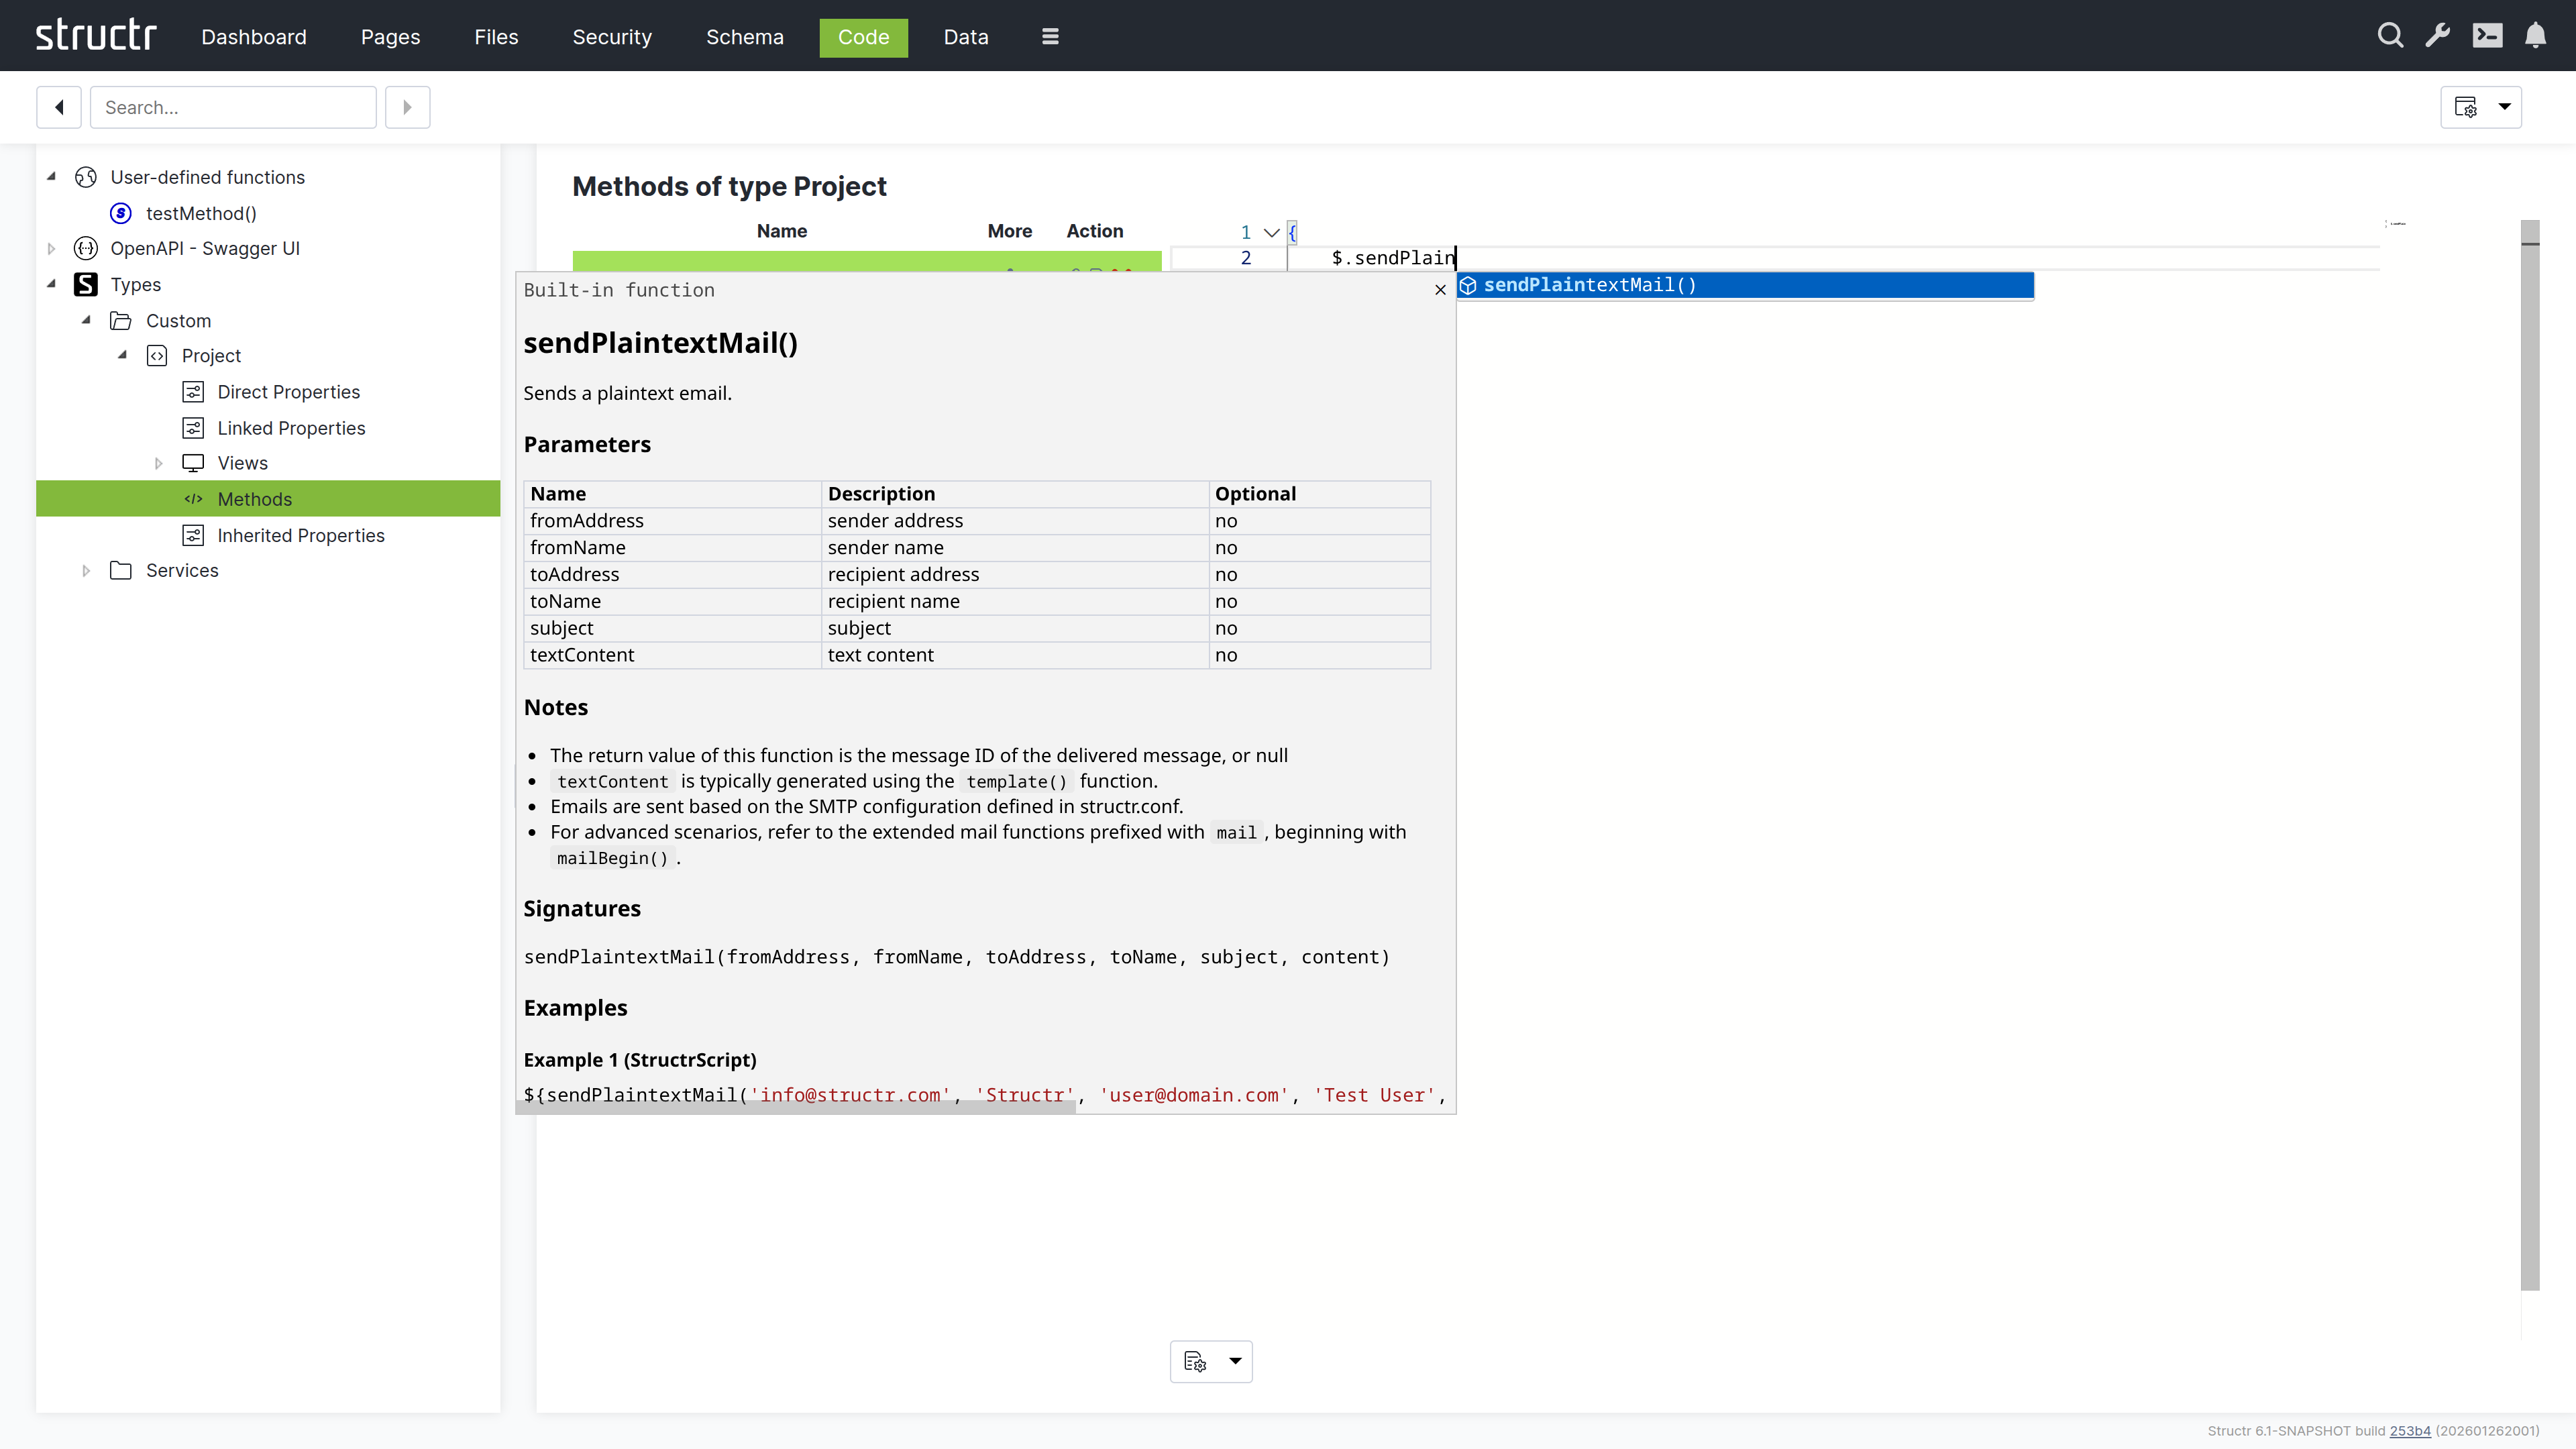
milestoneId: String property marked as uniquedueDate: Date property for deadline trackingprojectId: Function property that automatically links to the parent project
The Function property allows setting a Read and a Write function which are called when a value is read from or written to the property.
In our example, the Read function just returns the value of the projectId property of the connected project.
The Write function establishes a relationship between the Milestone object and the Project object referenced by the given value.
- Read:
this.project.projectId - Write:
set(this, 'project', first(find('Project', 'projectId', value)))
Defining Relationships
Connect your types by dragging from one connection point to another:
Create these relationships and set the type to:
- PROJECT_HAS_MILESTONE: One project can have many milestones
- TASK_BELONGS_TO: Many tasks belong to one project

Creating the Task Type
Create a Task type with similar structure:
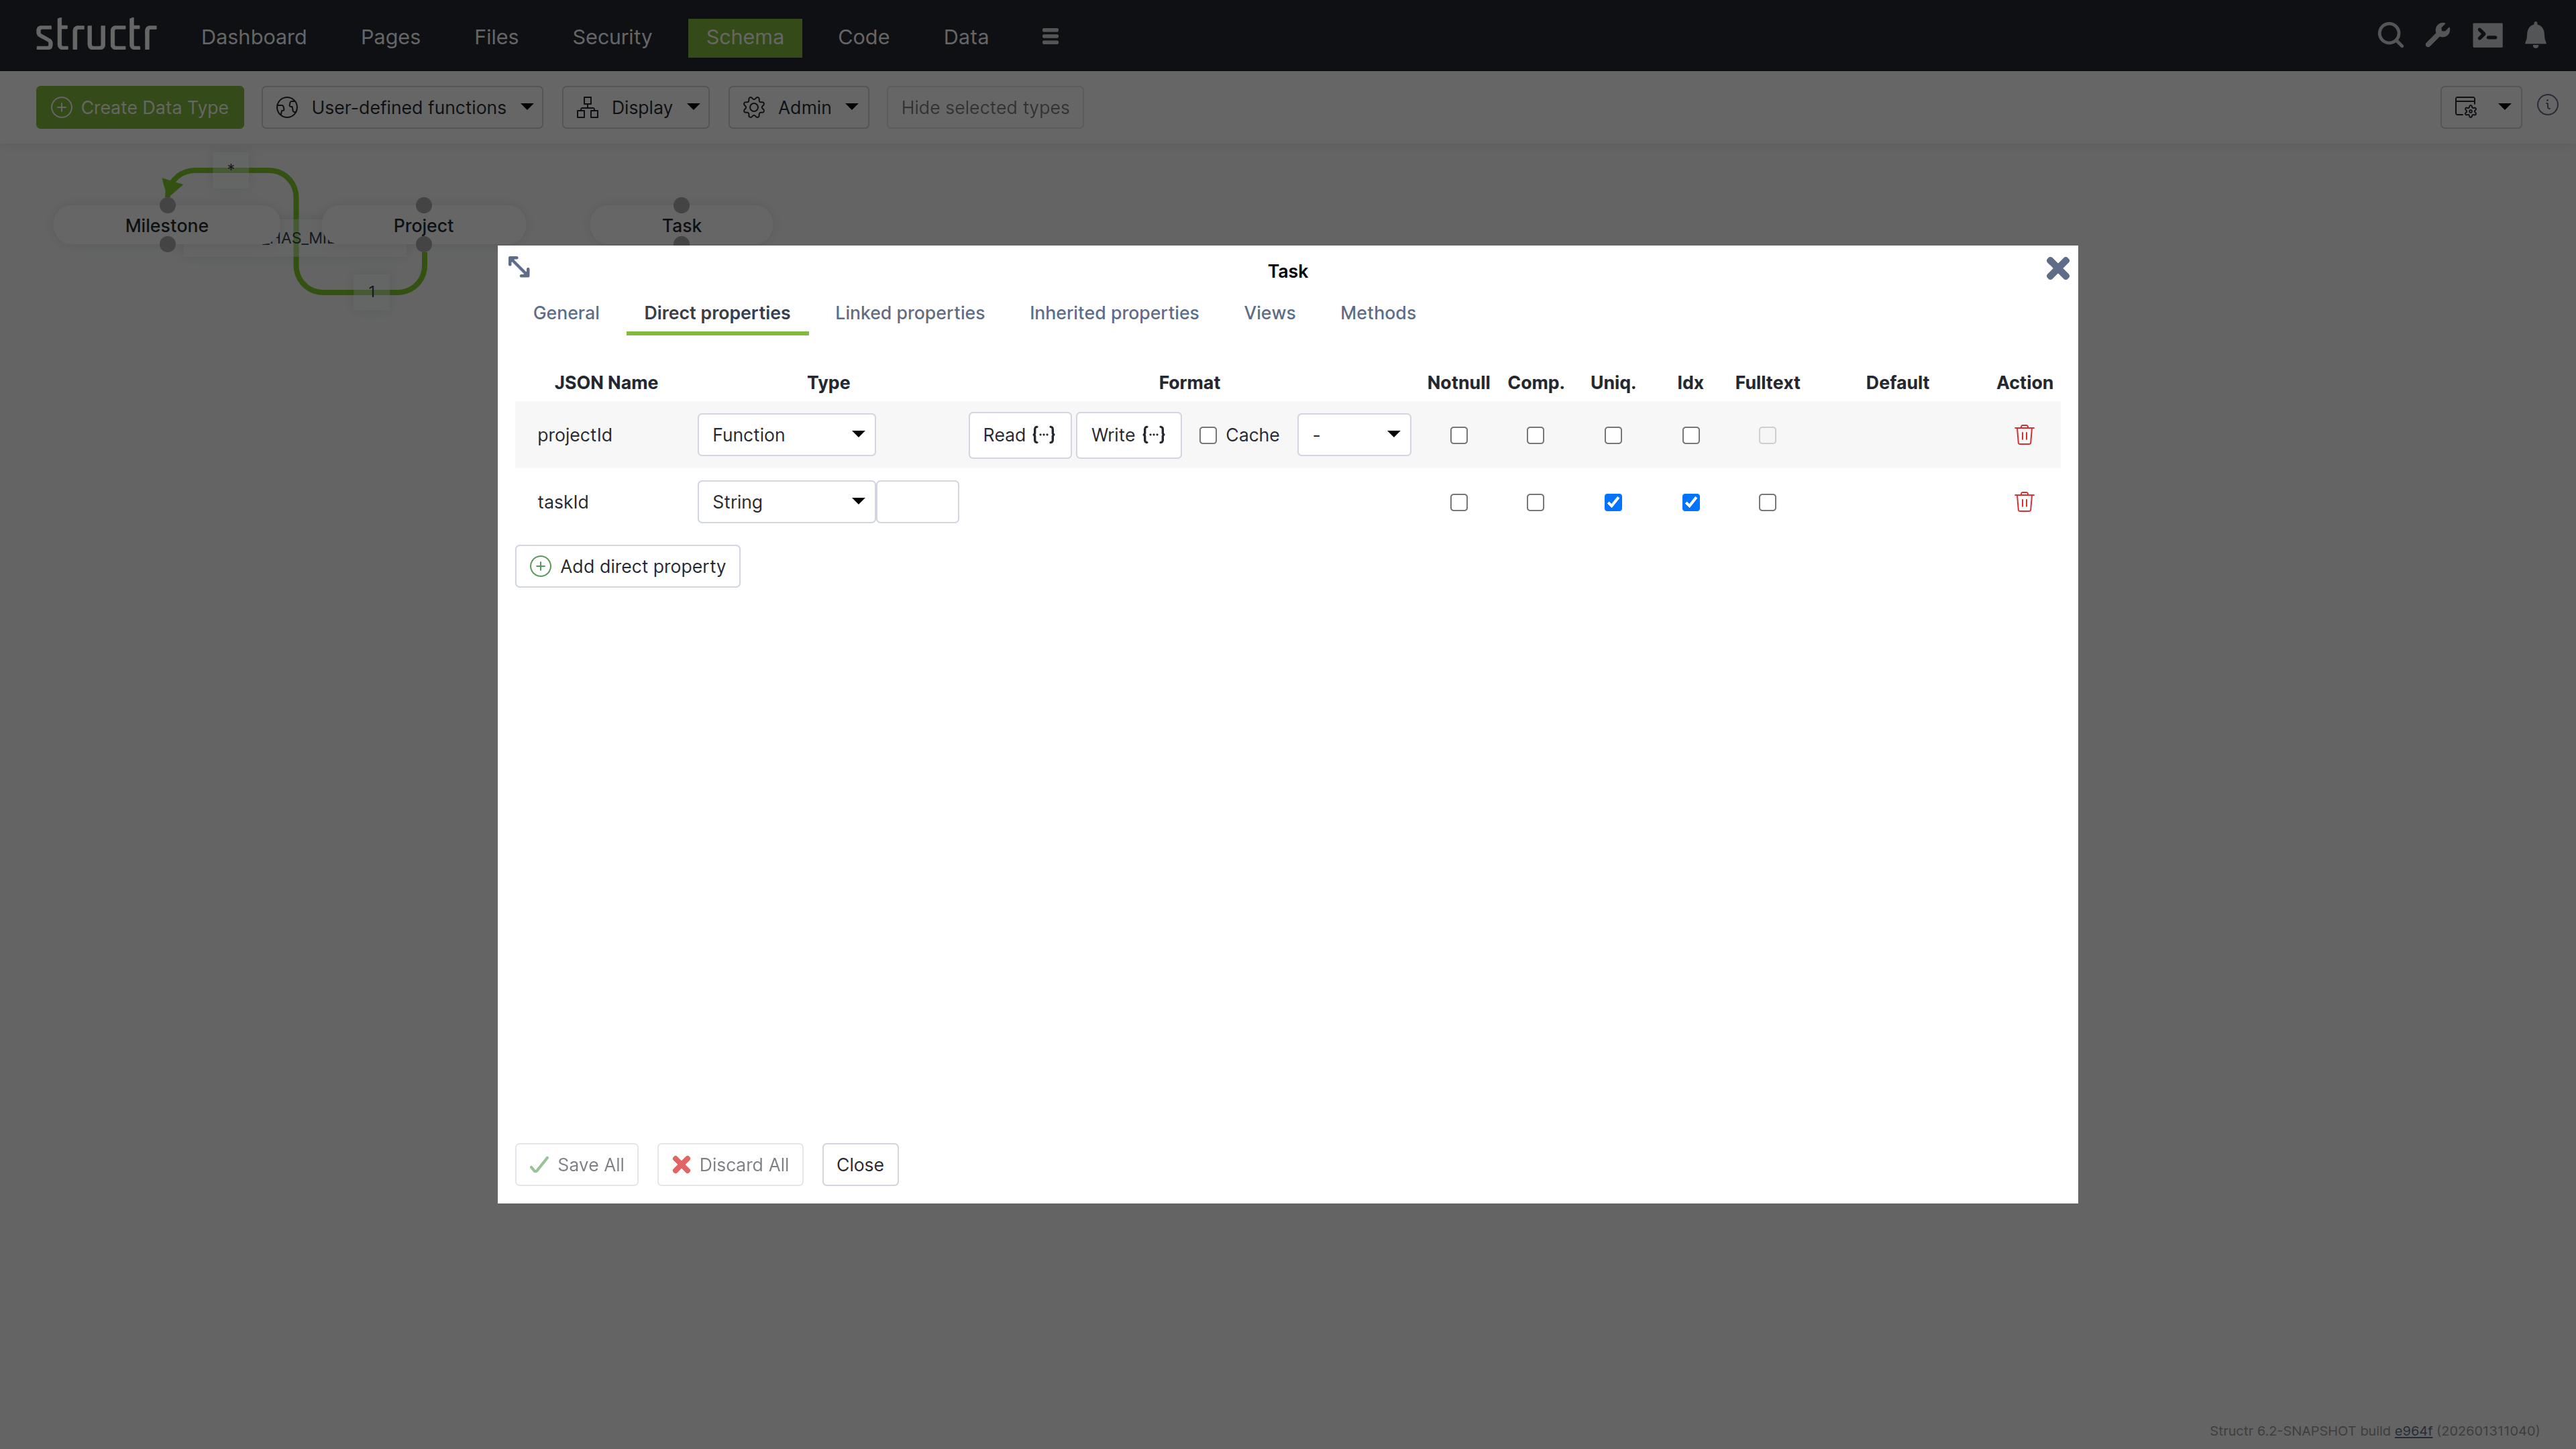
taskId: String property marked as uniqueprojectId: Function property linking to projects
Chapter 2: Adding Sample Data
Switch to the Data tab to create test records for your project management system.
Creating Projects
- Search for “Project” and click on the “Project” type in the sidebar
- Use “Create Project” to add three sample projects
- Set names by clicking on the name cells:
- Project A
- Project B
- Project C
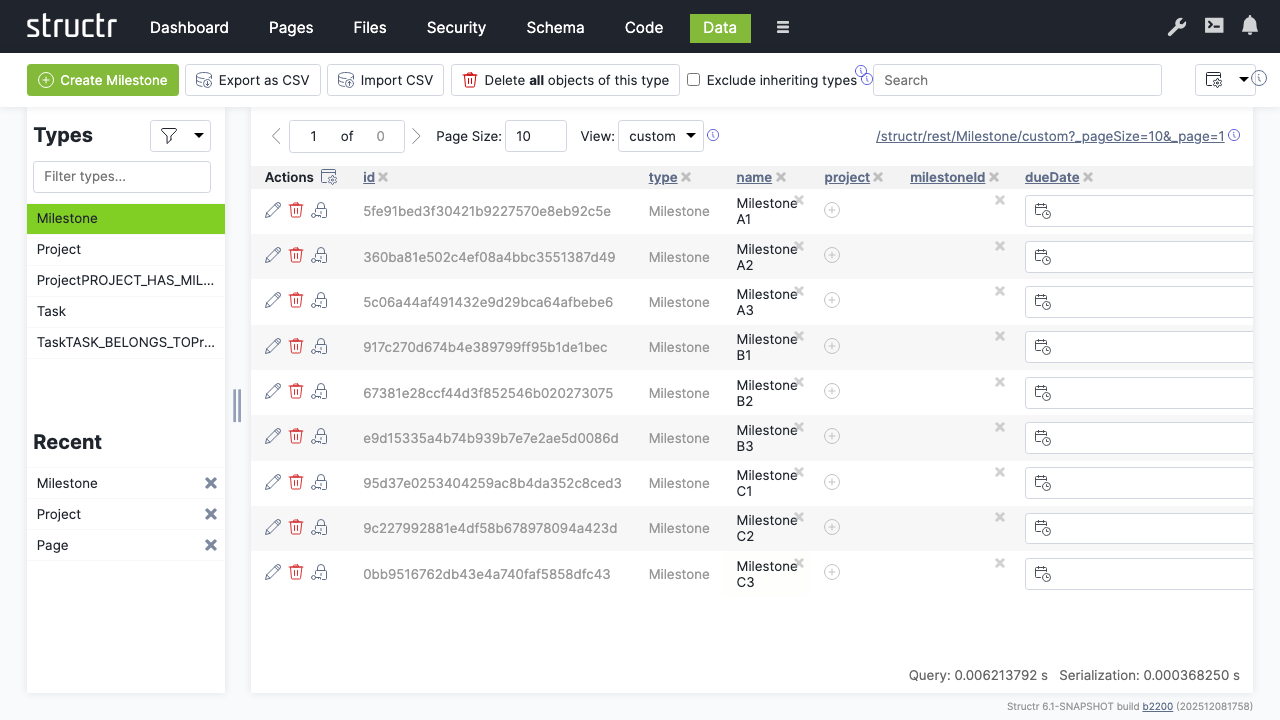
Creating Milestones
- Click on the “Milestone” type
- Create a couple of milestone records
- Name them according to their projects, e.g.:
- Milestone A1, A2, A3 (for Project A)
- Milestone B1, B2, B3 (for Project B)
- Milestone C1, C2, C3 (for Project C)
Linking Data
Connect milestones to their respective projects:
- Select the “Project” type
- Click the relationship icon in the “milestones” column for each project
- Select the appropriate milestones for each project

Chapter 3: Building the Web Interface
Create a web page to display your project data using Structr’s page builder.
Creating a New Page
- Click the dropdown menu and select “Create Page”
- Choose the “Sidebar Layout” template
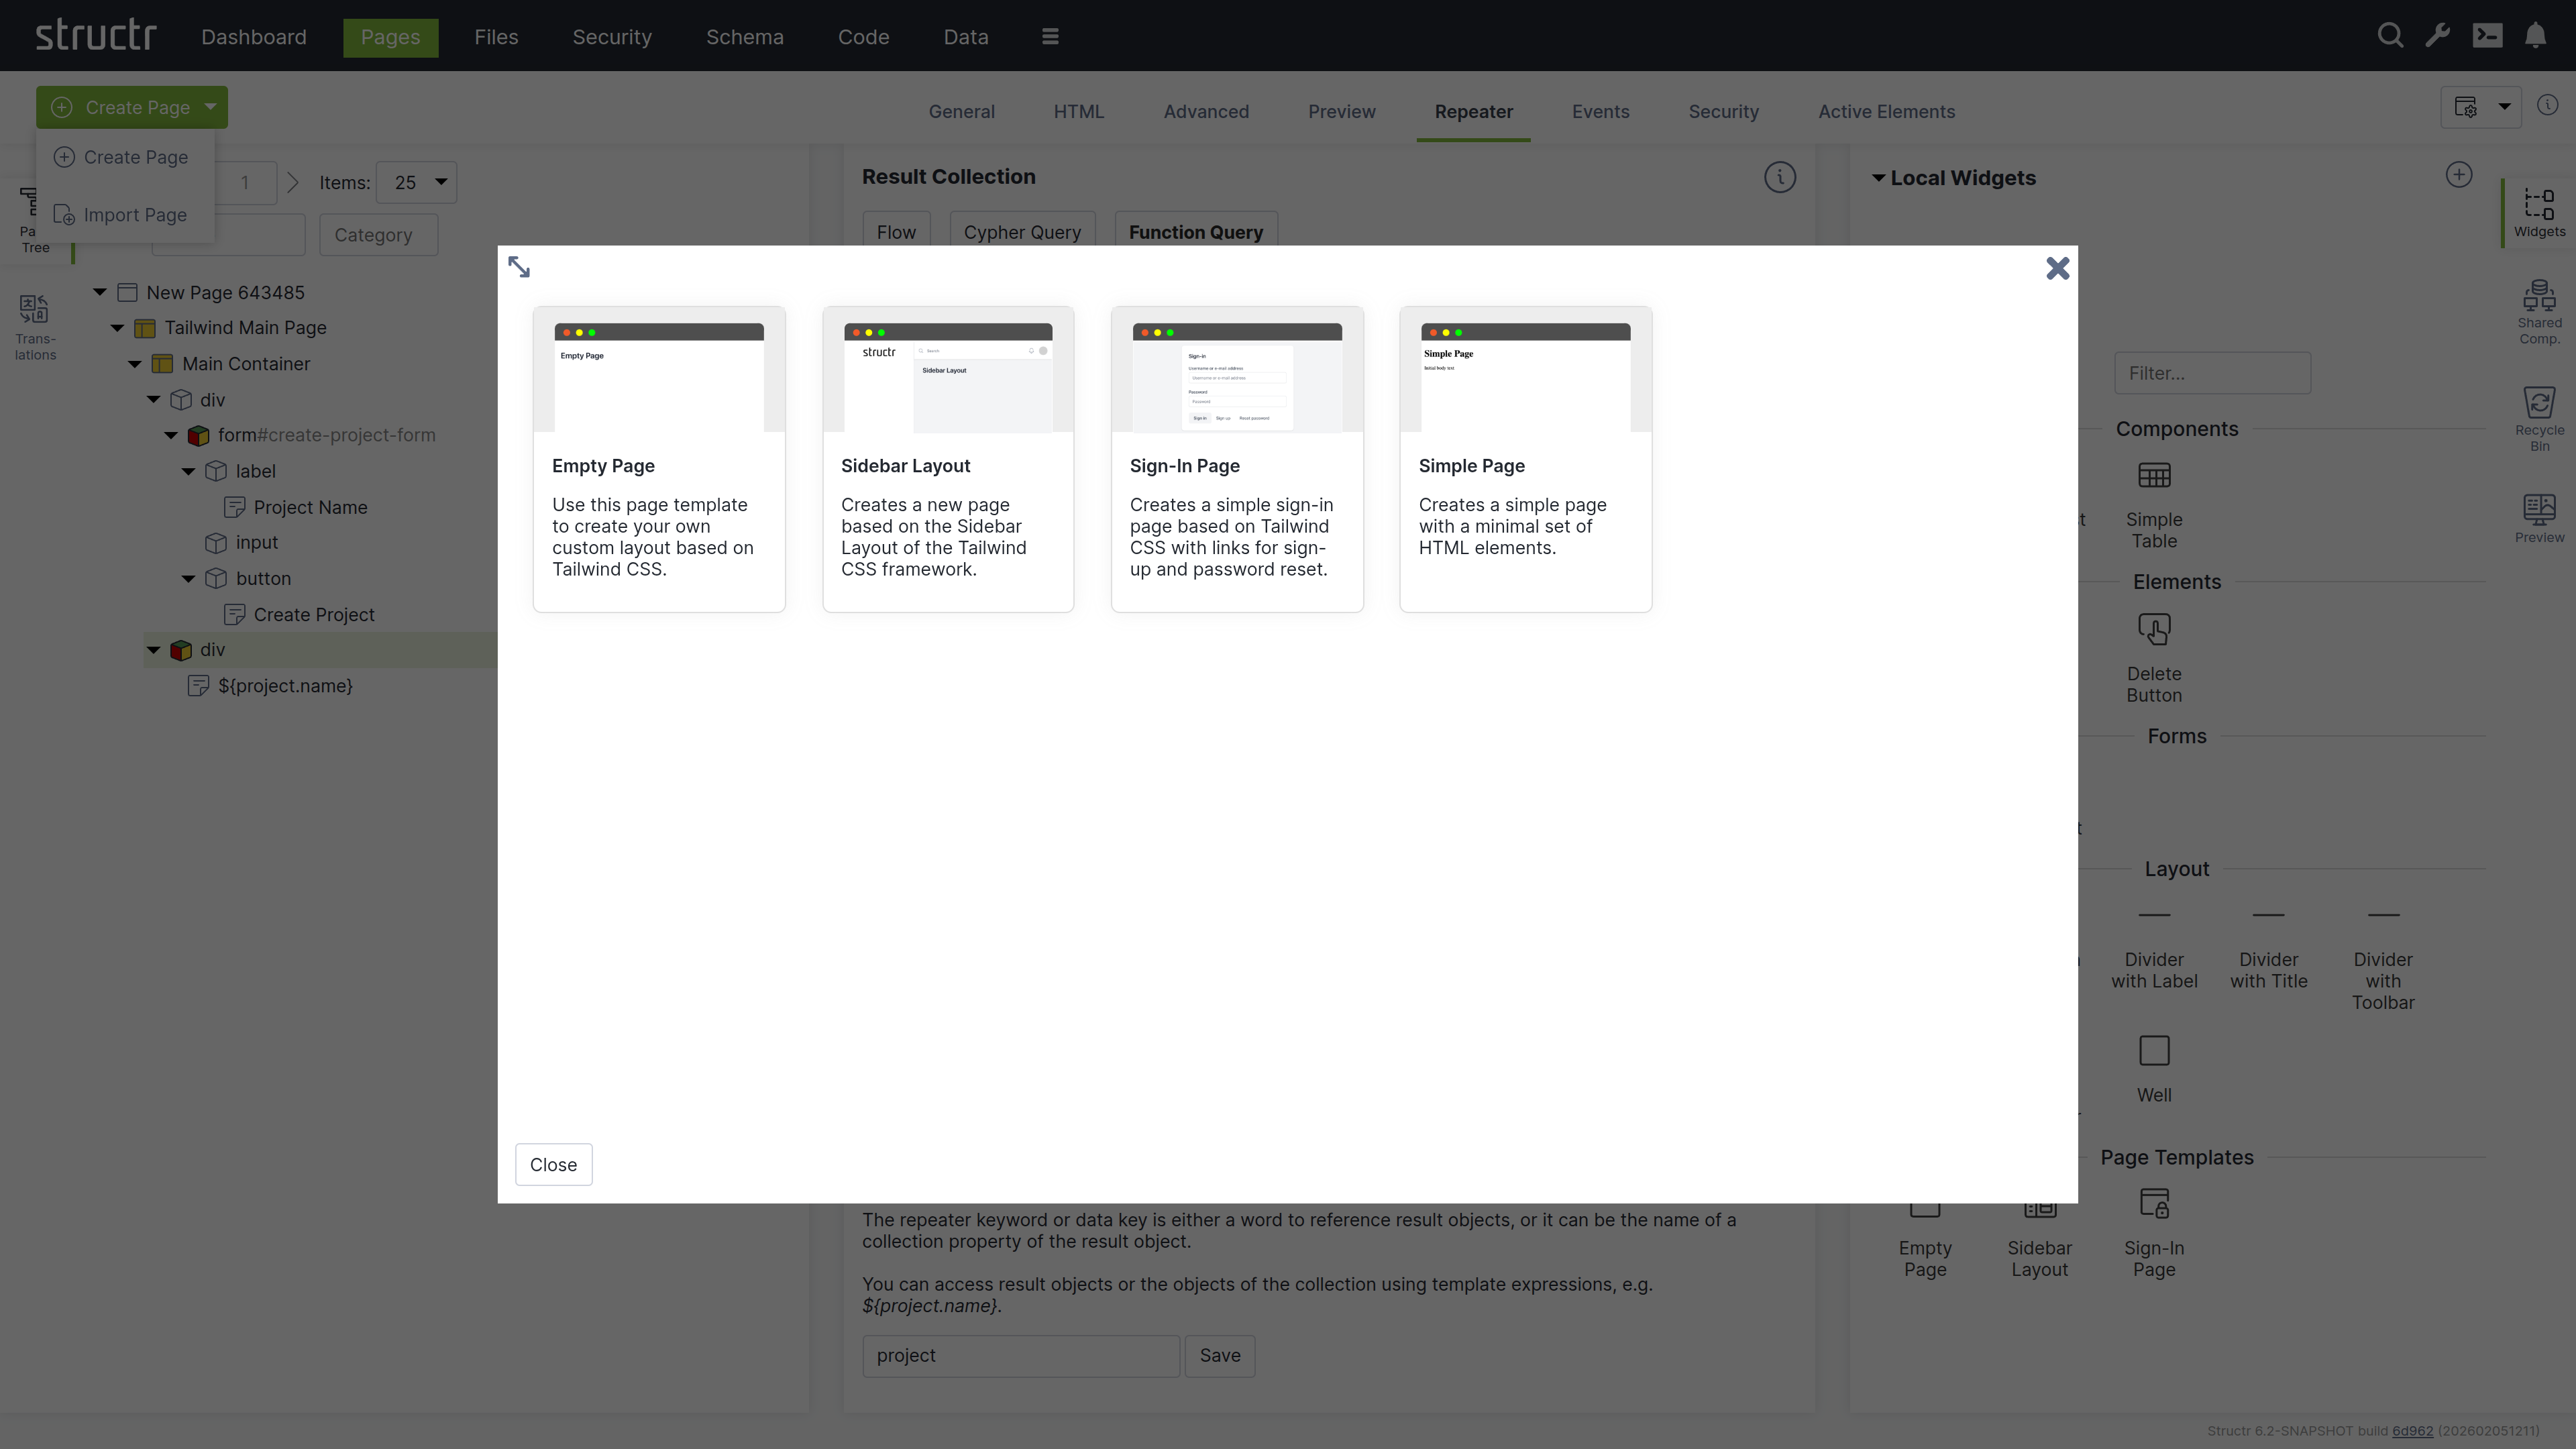
- Name the page “projects” in the General tab
- Right-click the page and expand the tree structure to see all elements
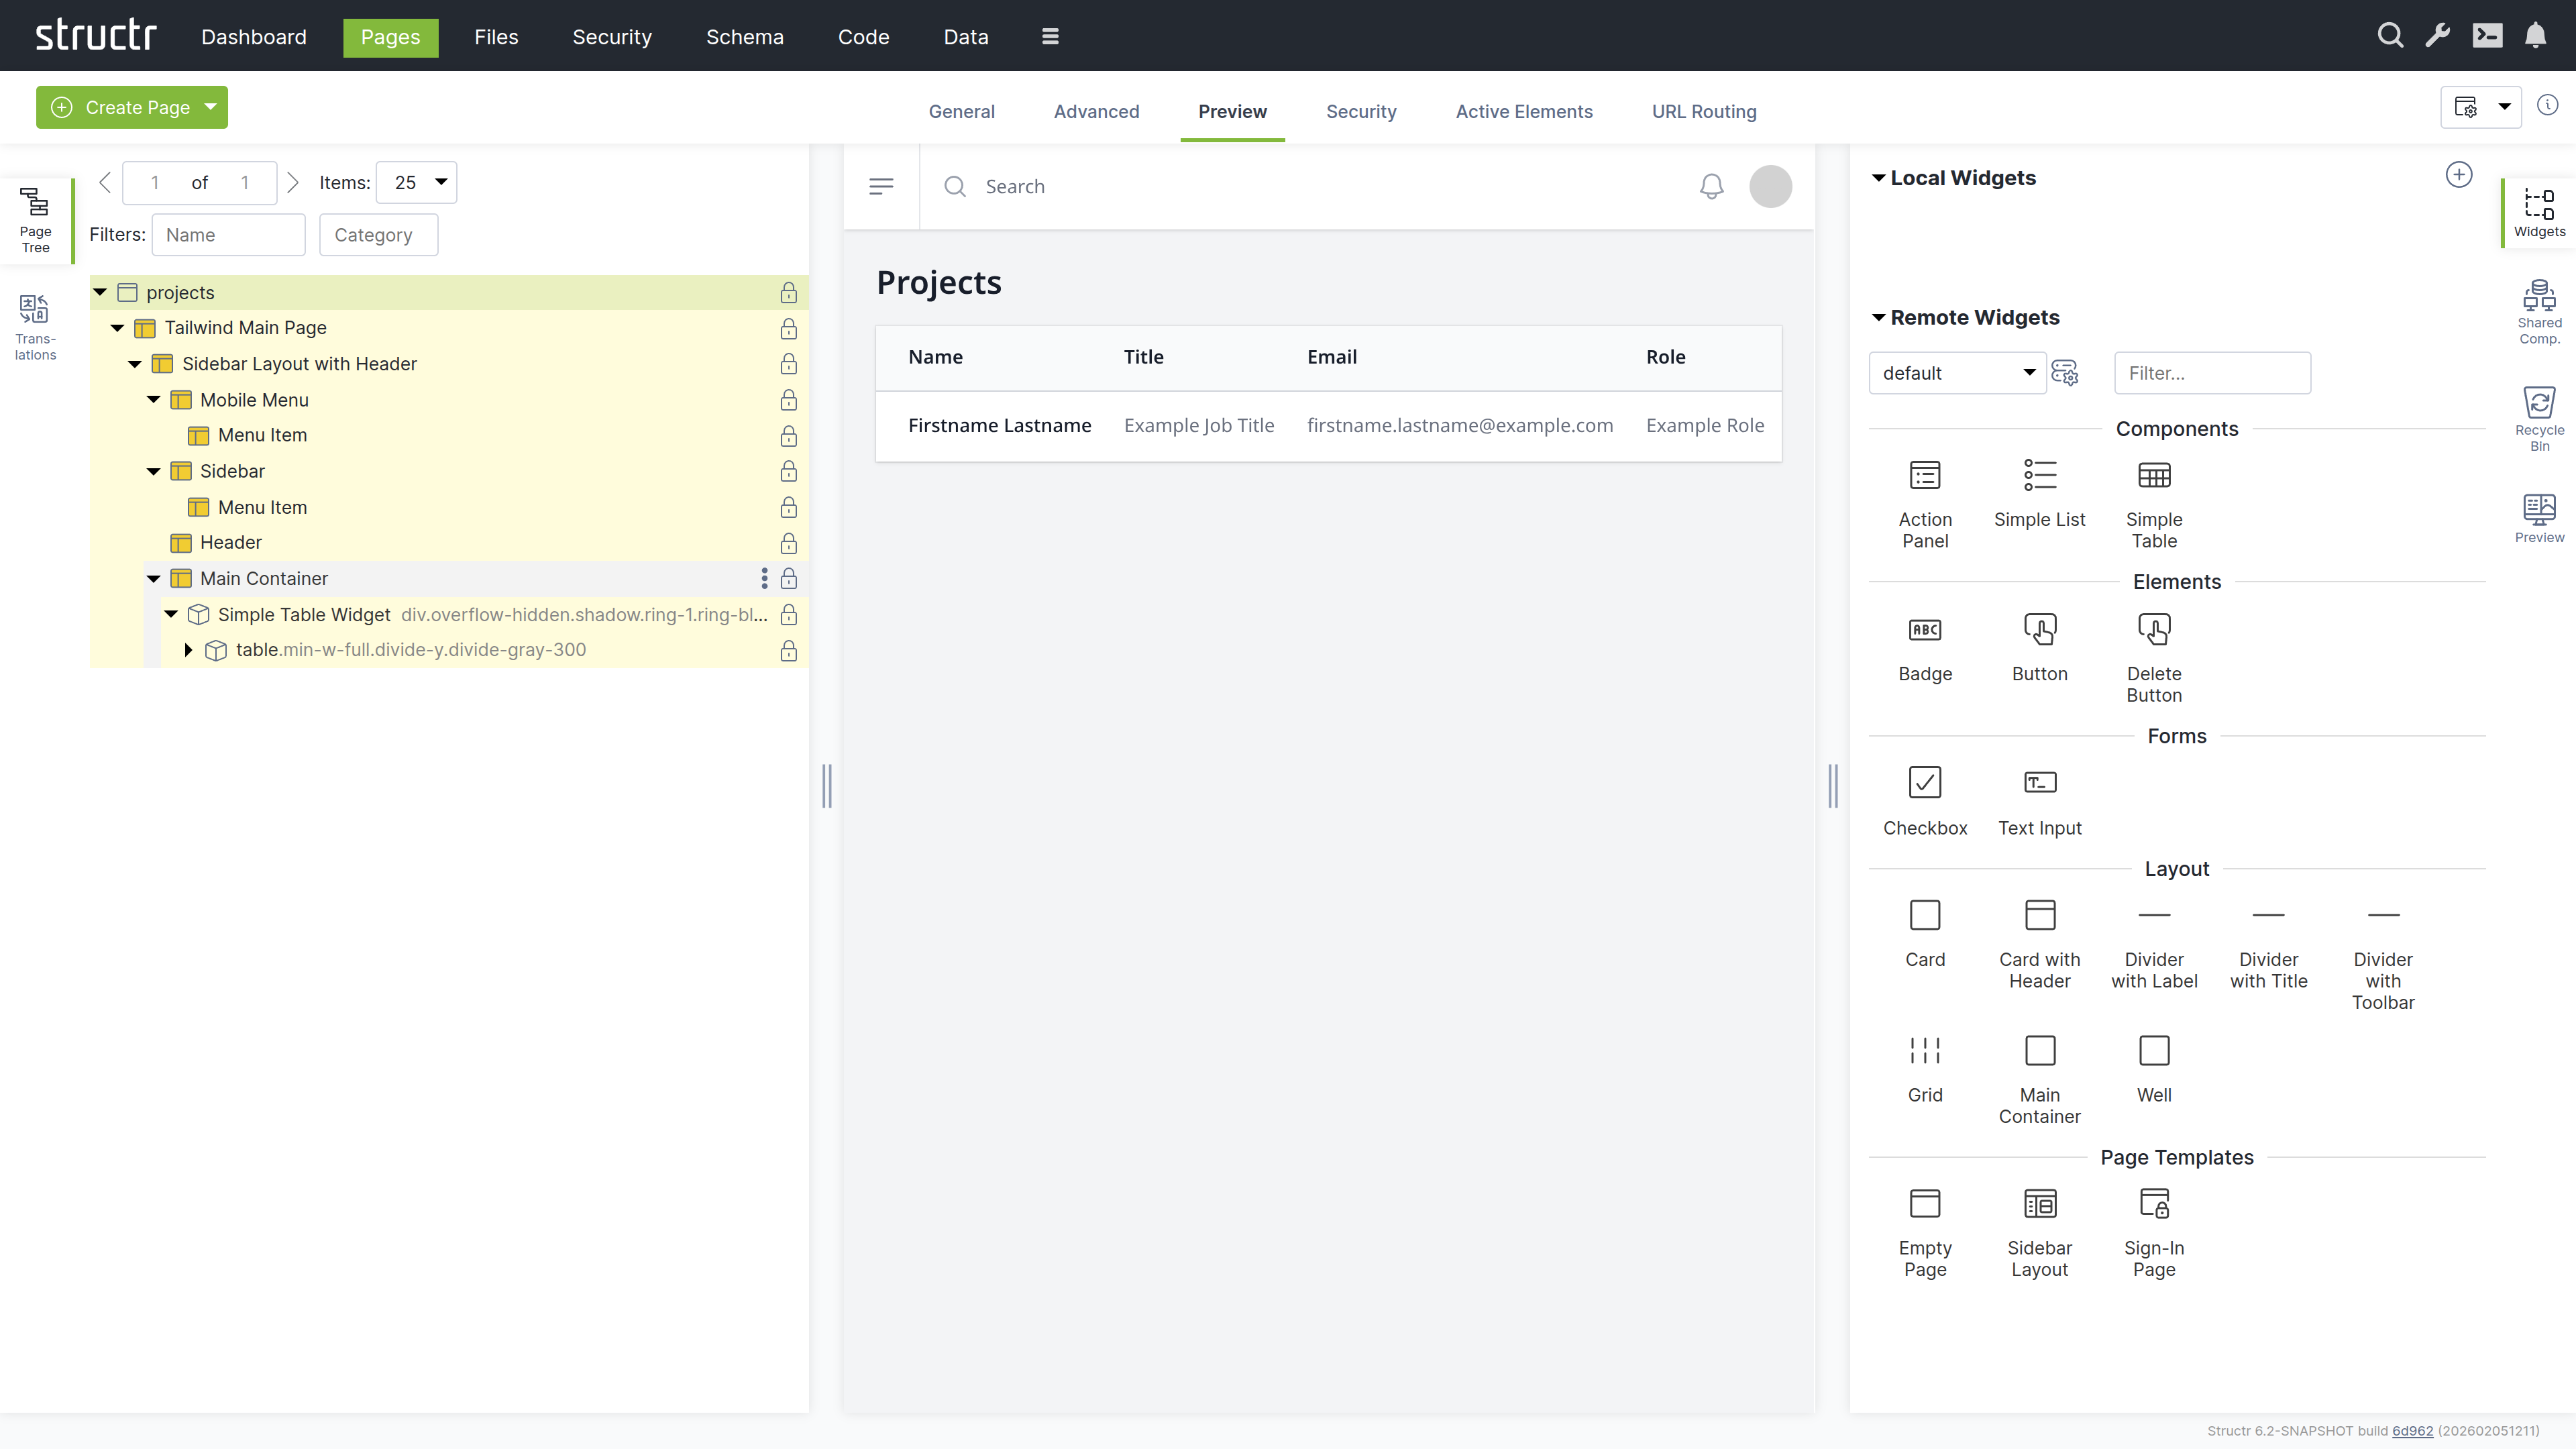
Adding a Table
- Switch to the Preview tab to see your page
- Open the tab on the right-hand side labeled “Widgets”
- Drag the “Simple Table” widget from the Widgets tab onto the Main Container
The widget is attached to the page tree as a branch of individual DOM elements that can be navigated and modified.
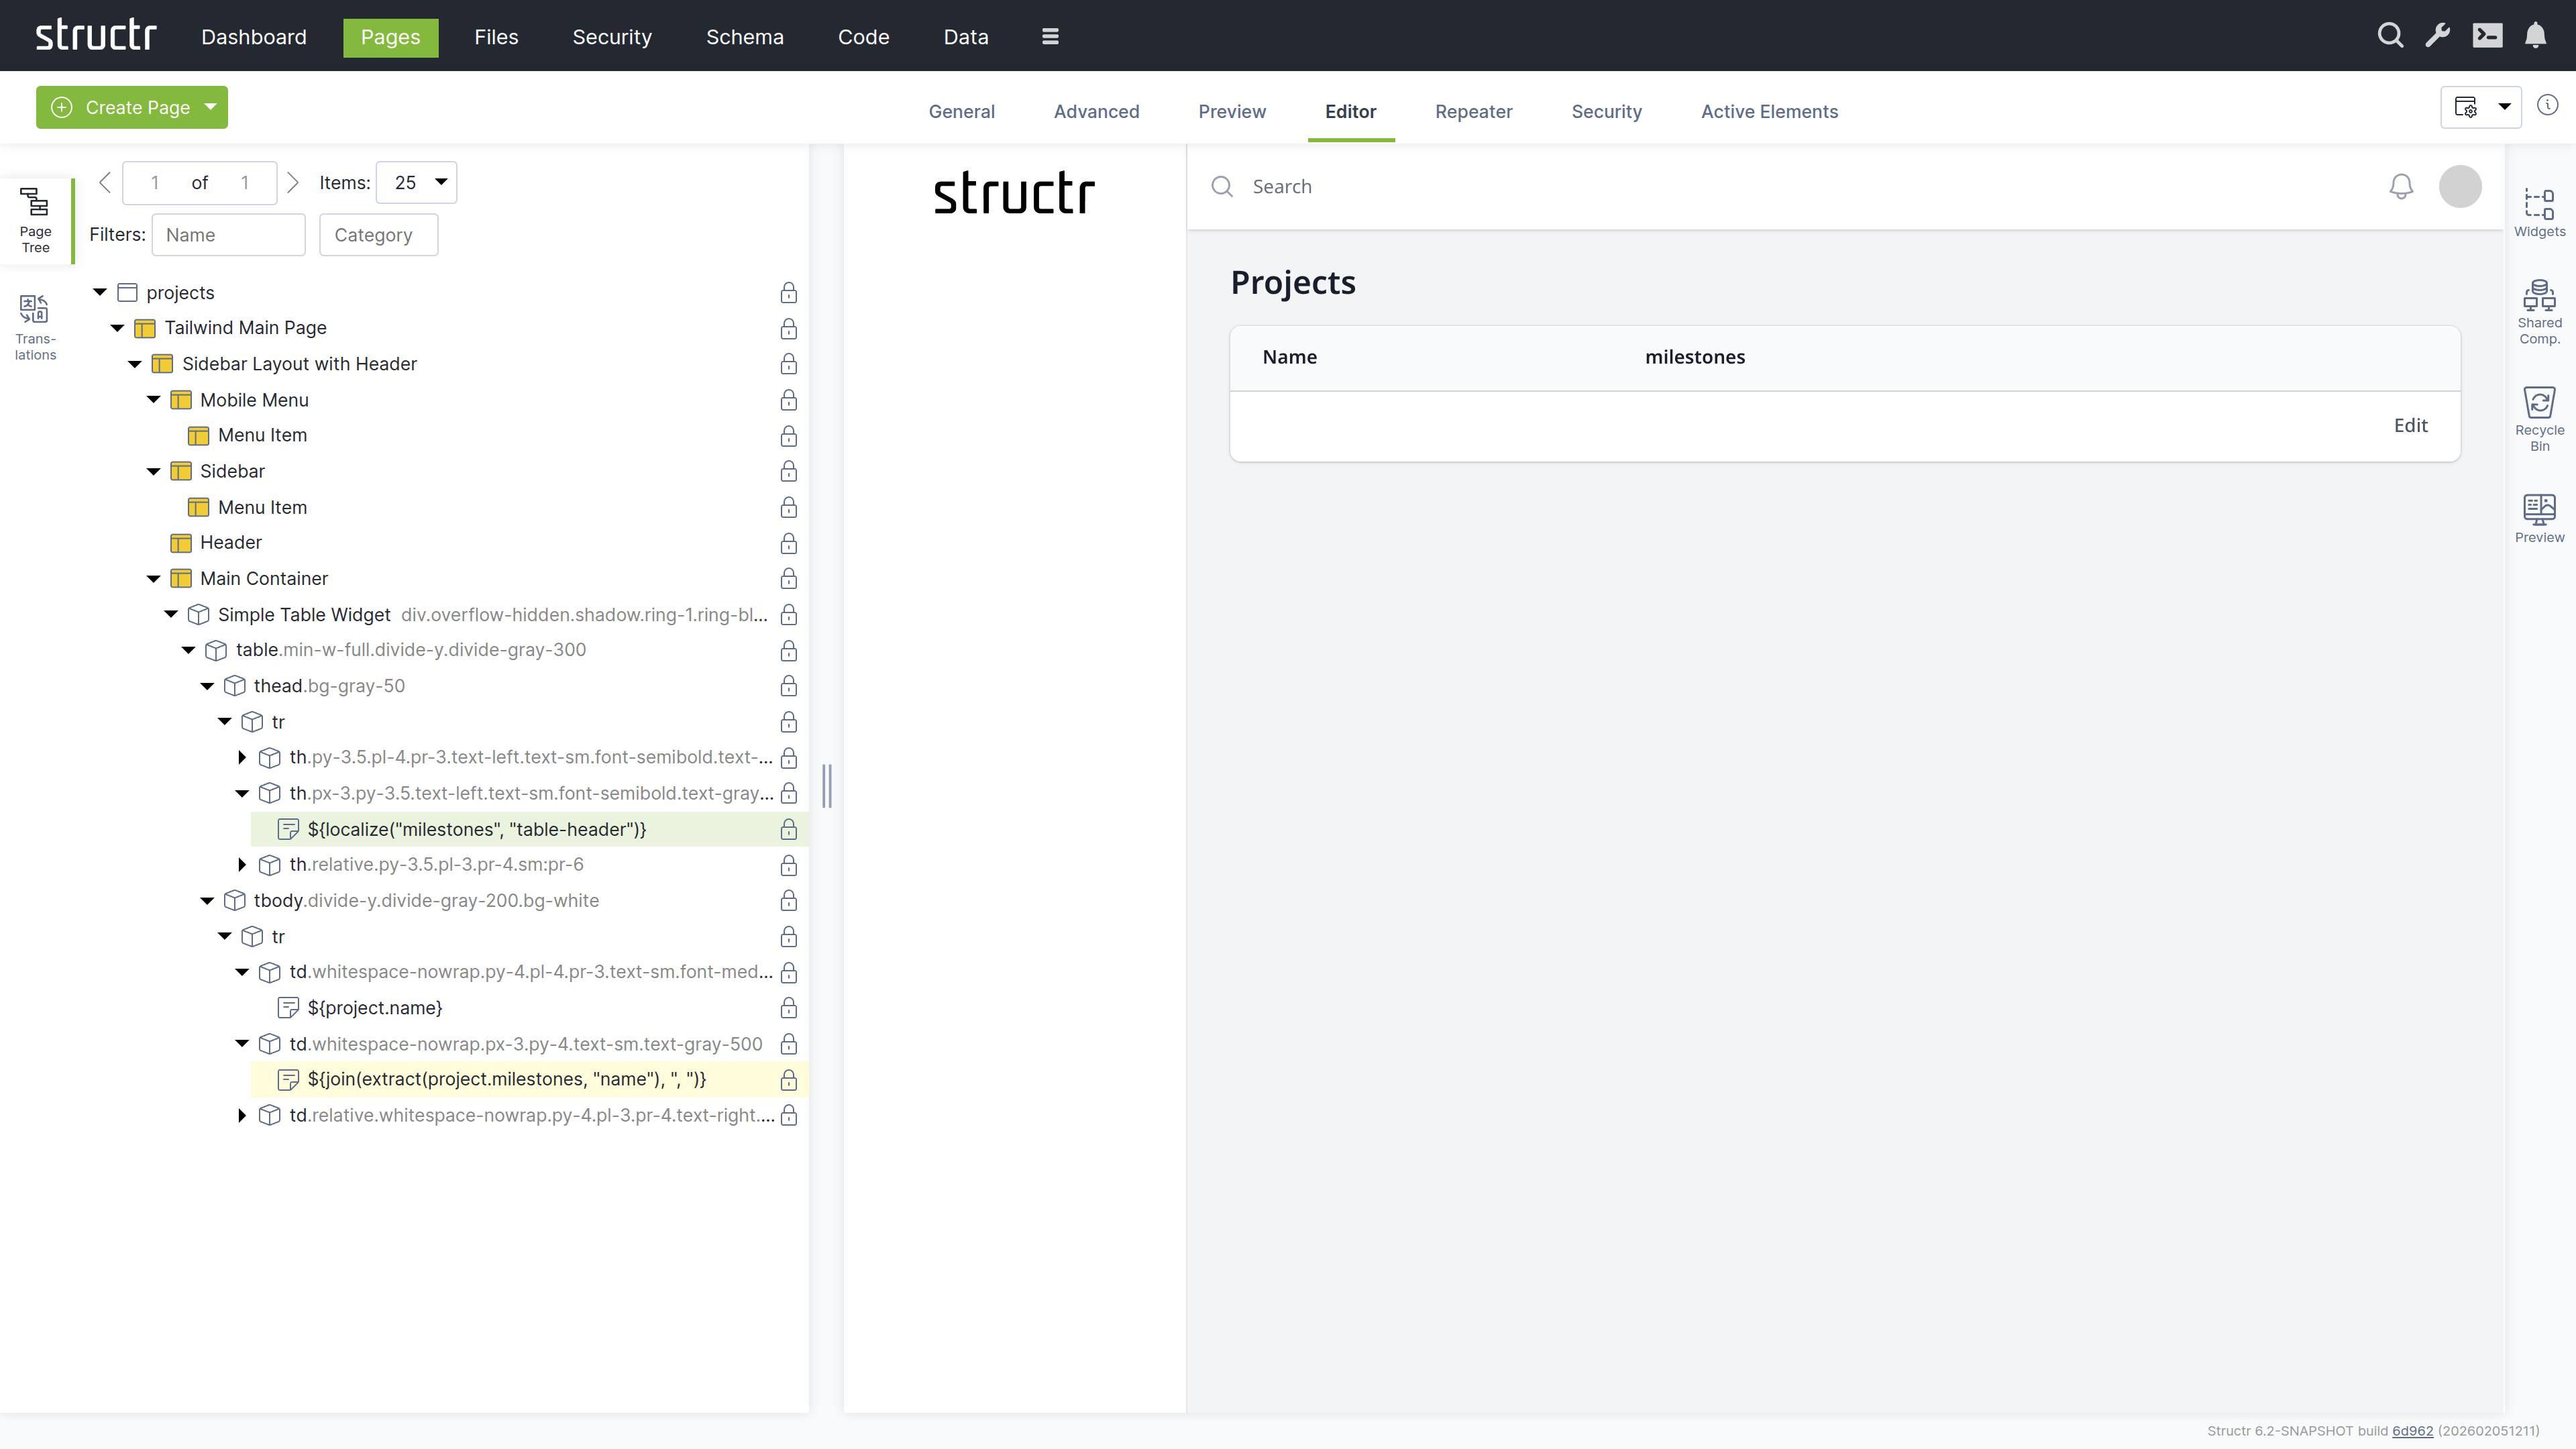
Customizing the Table
Note: In this section, we’re using template expressions which are enclosed in
${...}. See [Keywords](5-API Reference/1-Keywords.md) and [Functions](5-API Reference/2-Functions.md).
Modify the table to display project information:
-
Change the table header from “Title” to a localized header:
${localize("milestones", "table-header")} -
Replace placeholder content with dynamic project data:
- Name column:
${project.name} - Description column:
${join(extract(project.milestones, "name"), ", ")}
- Remove unnecessary columns by right-clicking and selecting “Remove Node”
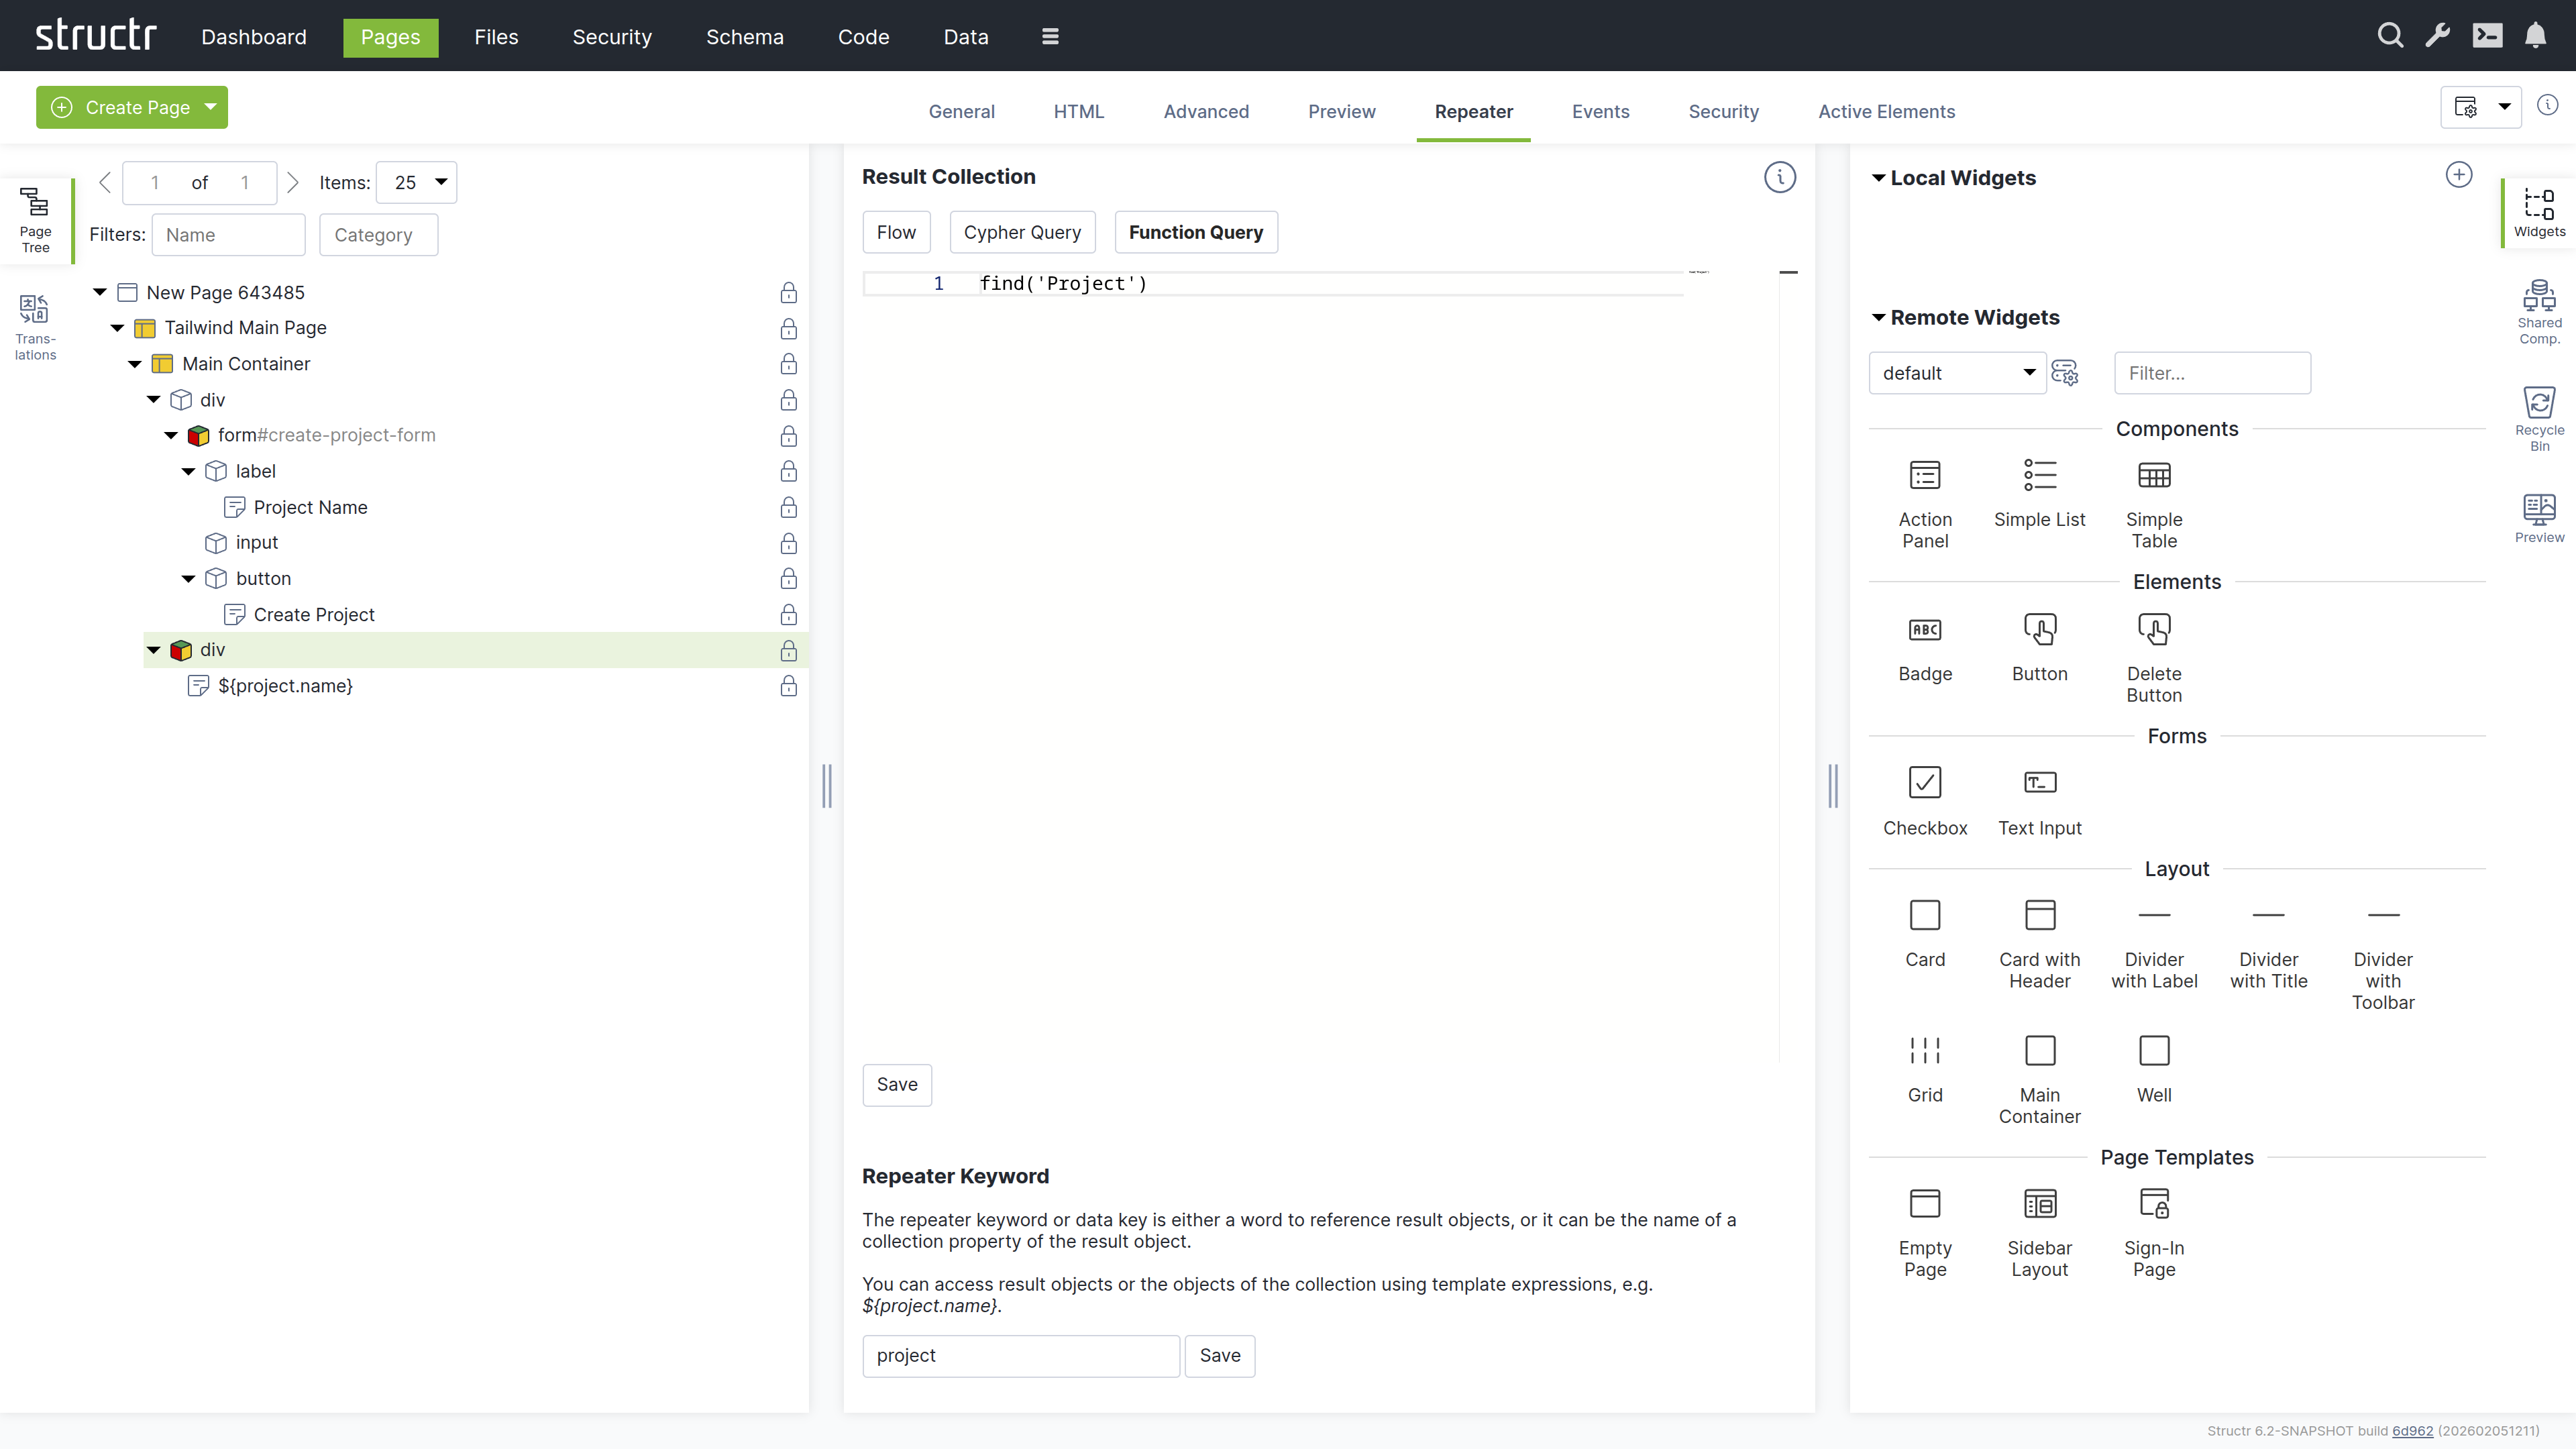
Adding Dynamic Data
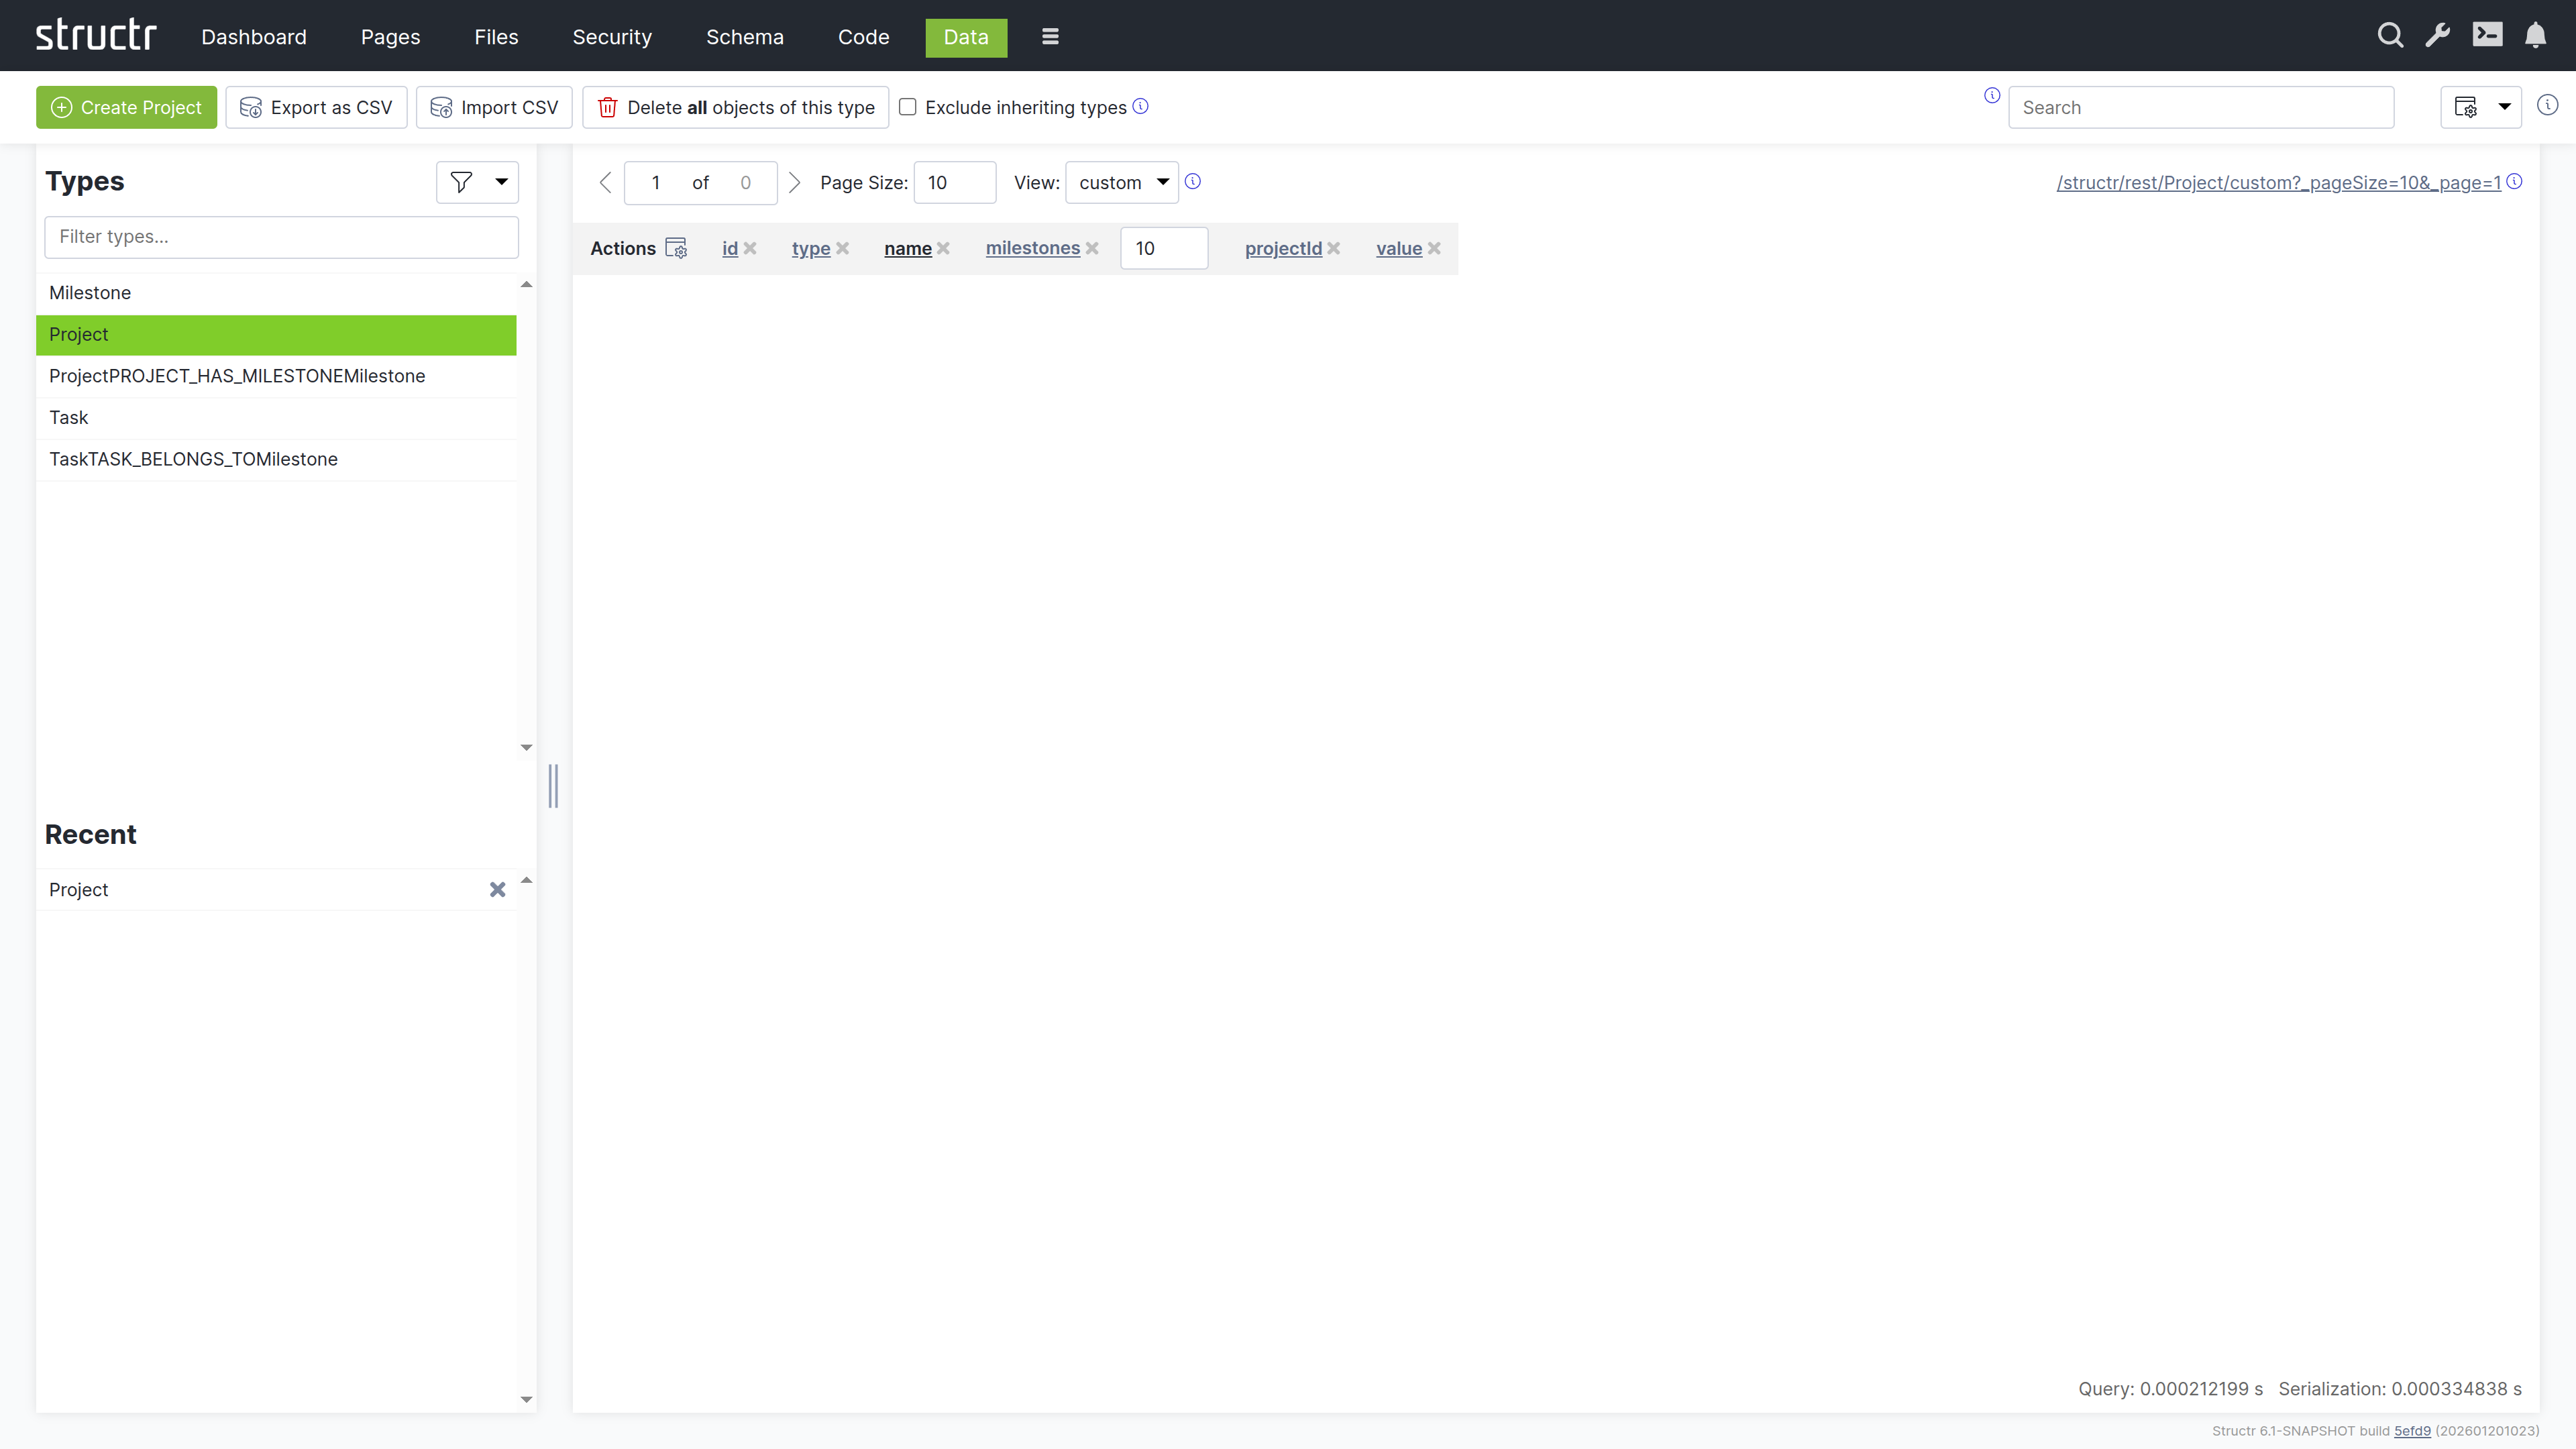
Configure the table to display all projects:
- Select the table row (
tr) element - Switch to the “Repeater” tab
- Set up a Function Query:
find('Project') - Set the data key to “project”
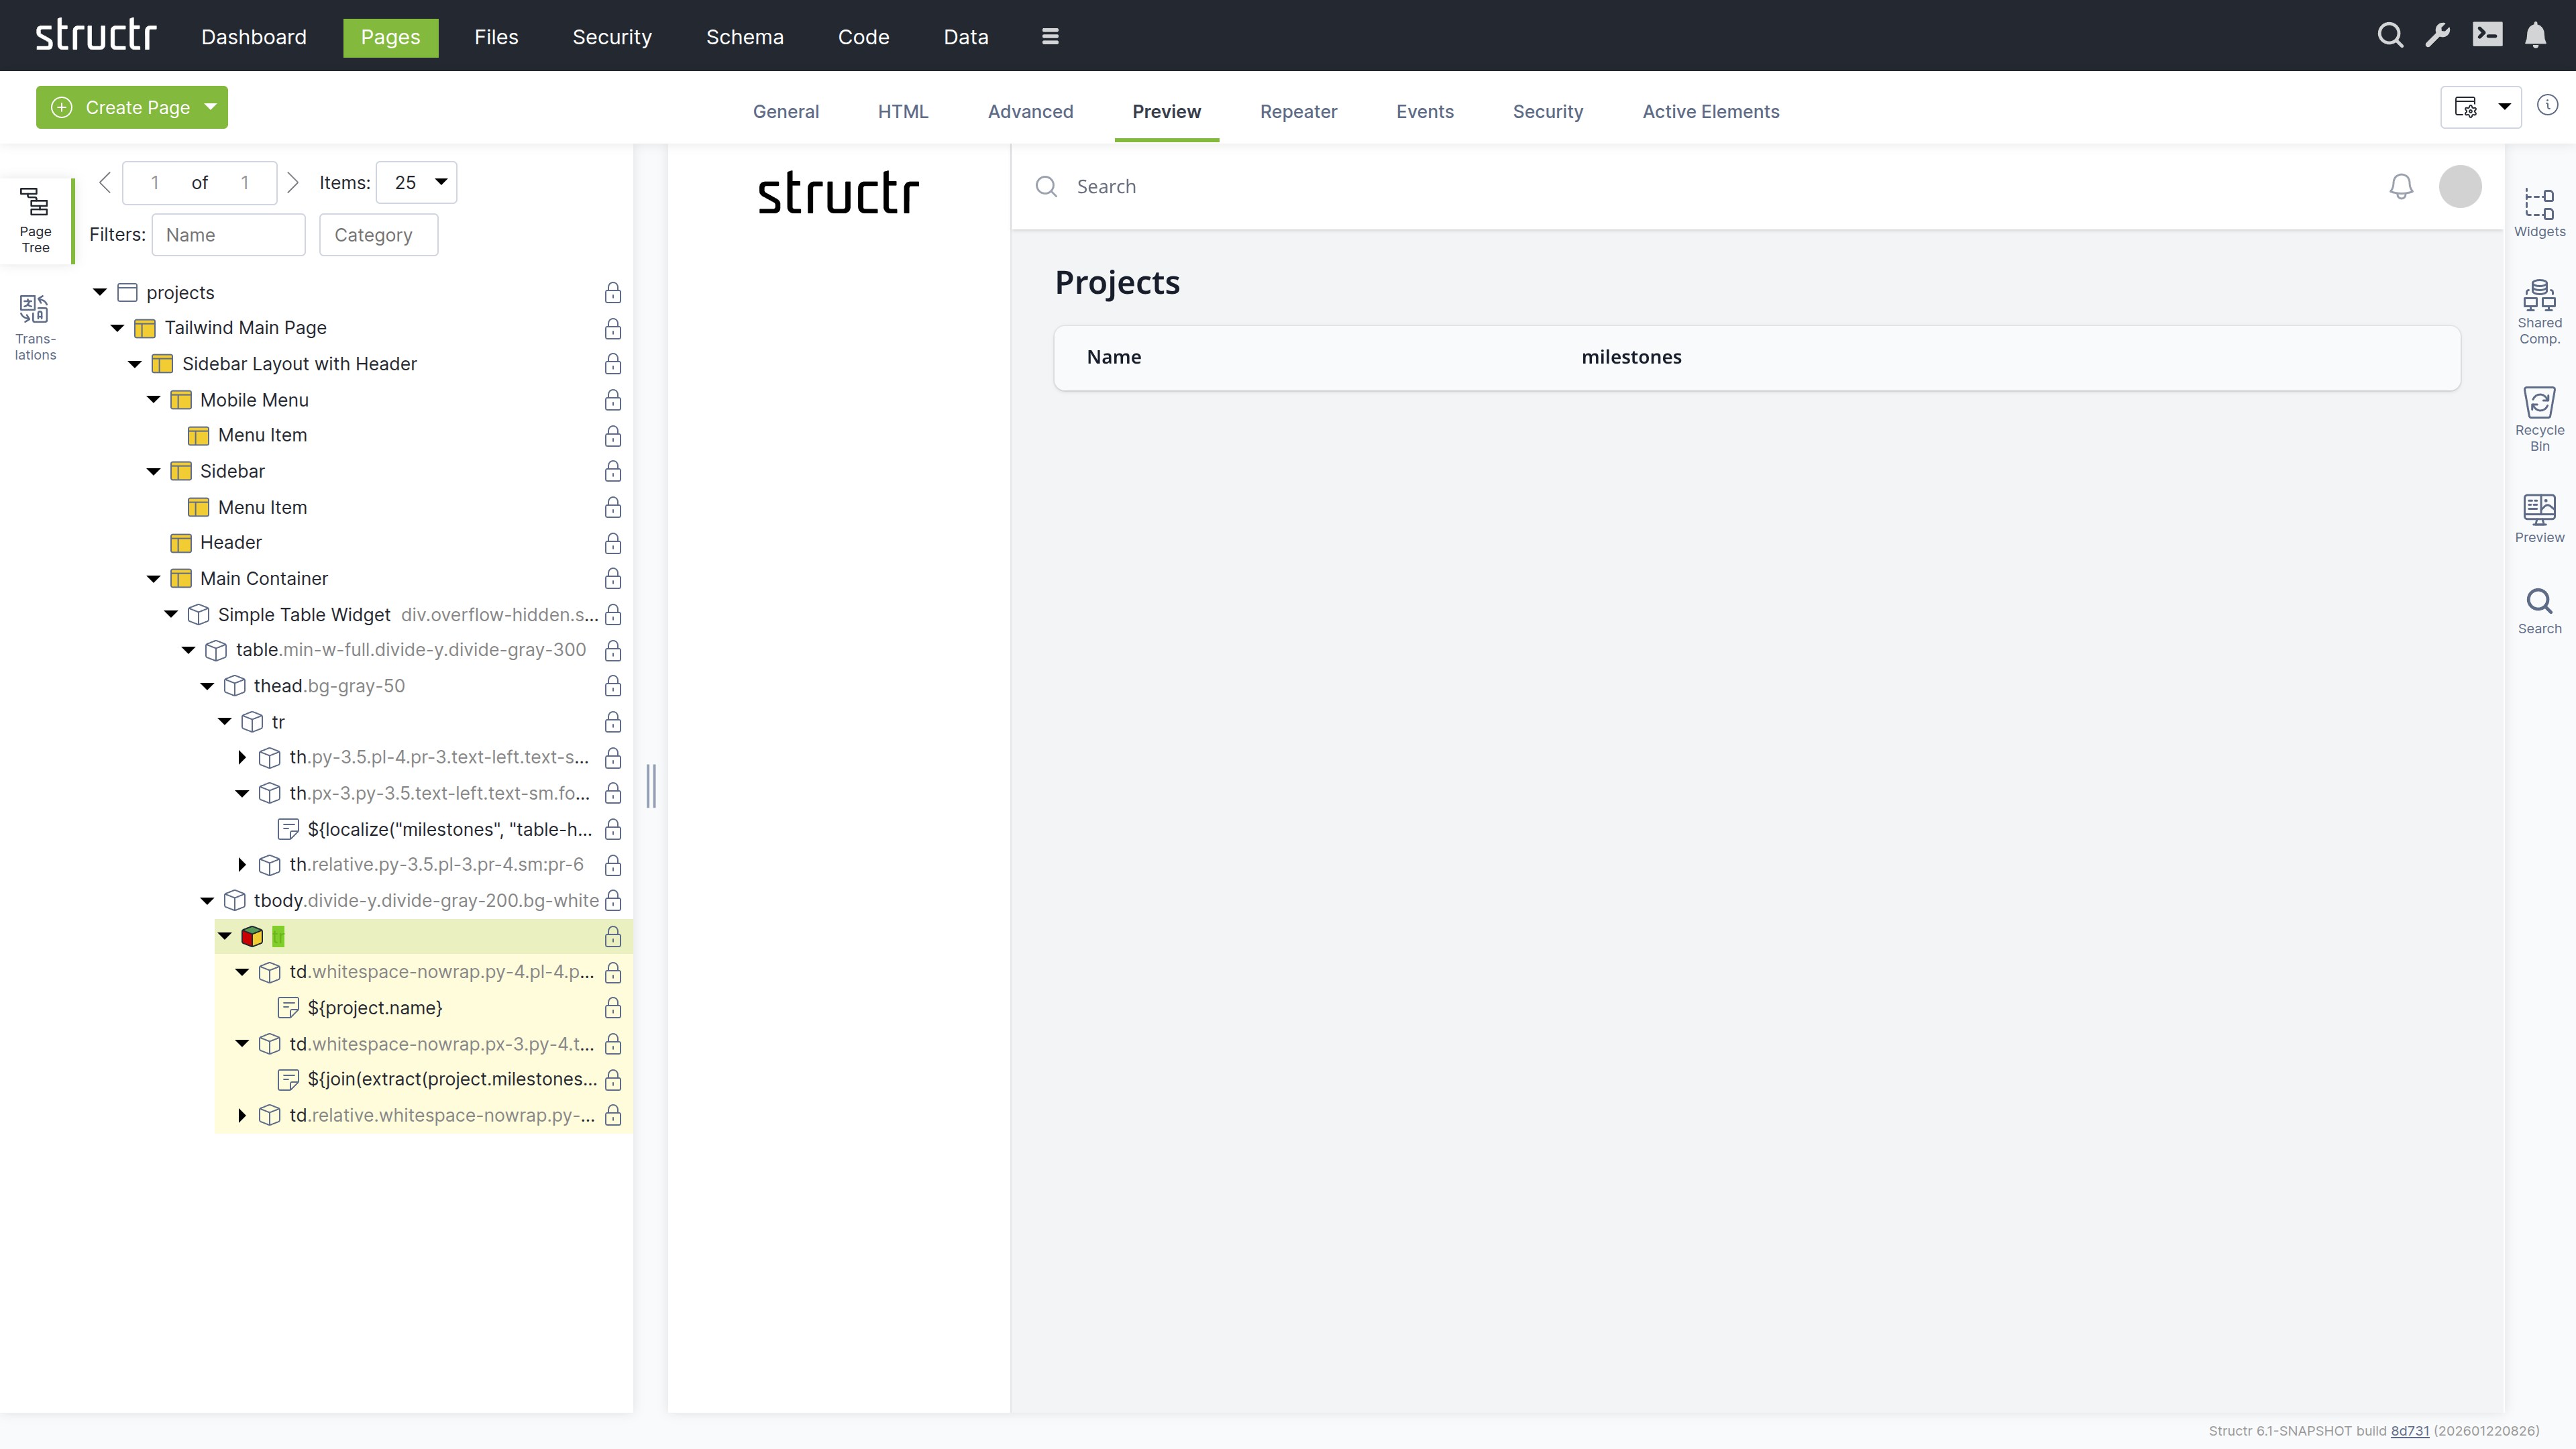
Your page now dynamically displays all projects with their associated milestones.
Chapter 4: Configuring Security
Set up user access controls to secure your project management system.
Creating Users
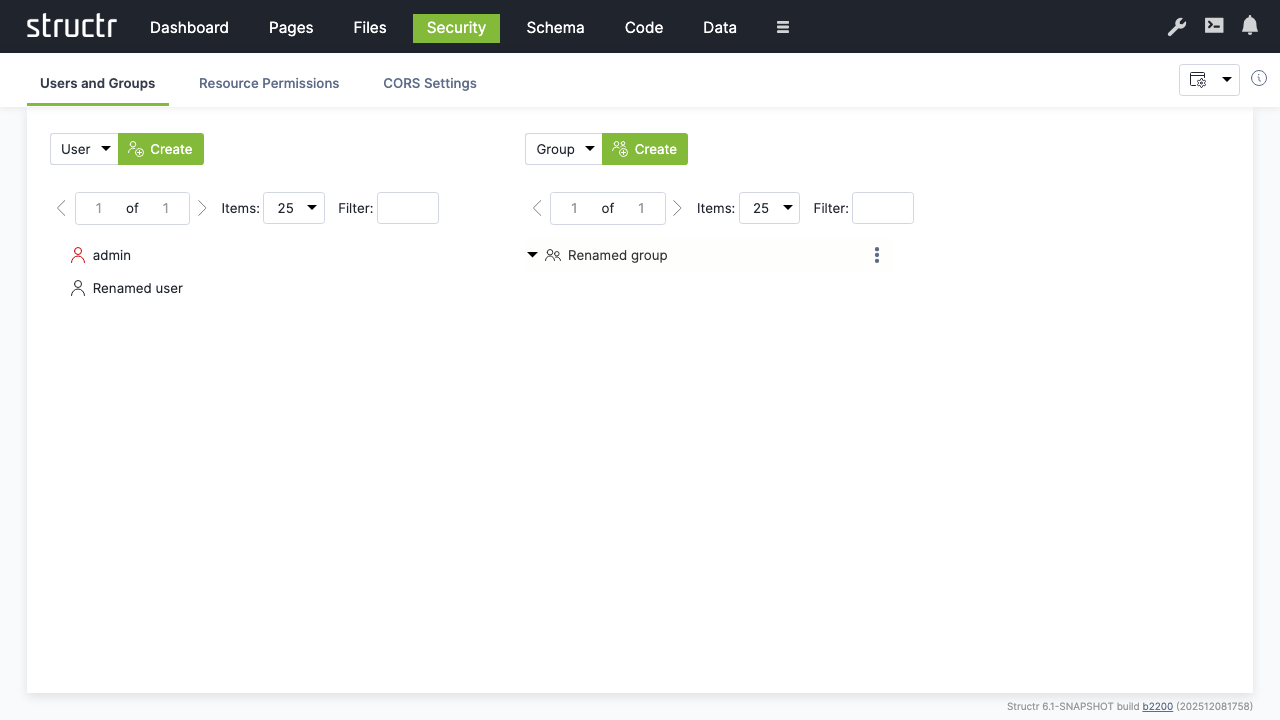
To create users, navigate to Security via the main menu.
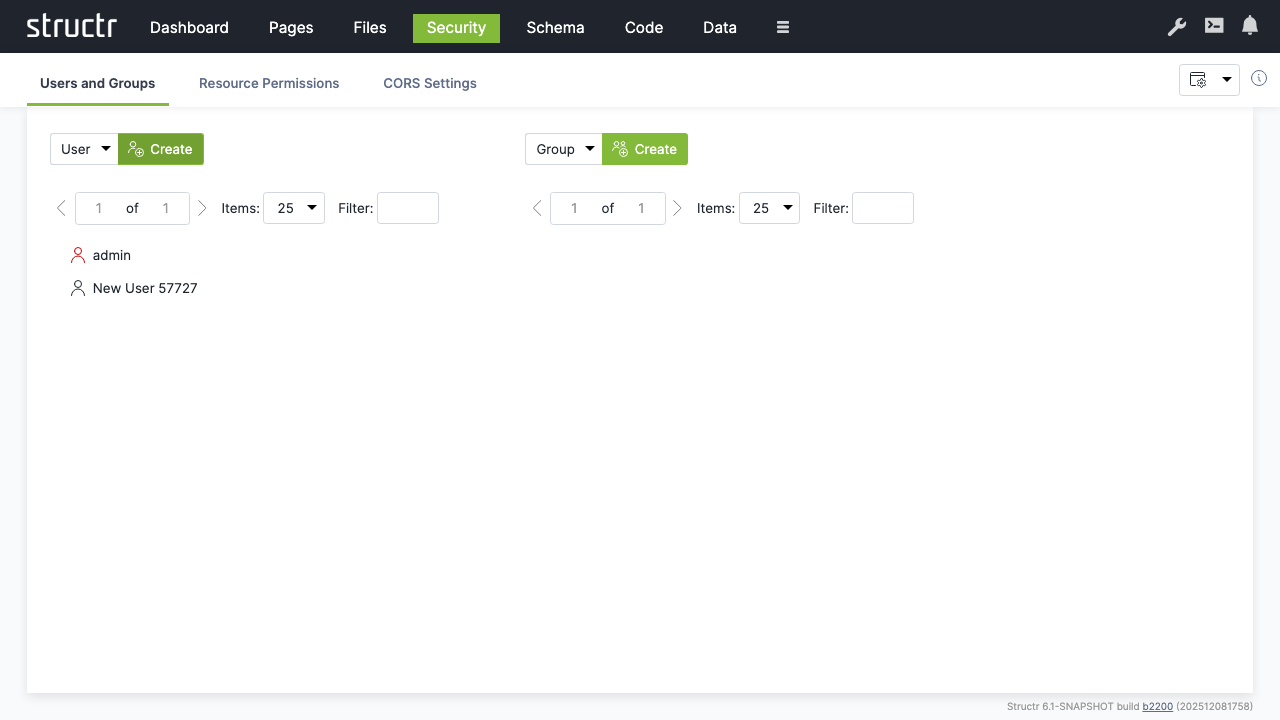
- Make sure “User” is selected and click “Create” to create a new user account
- Rename the user from “New User” to a new user name of your choice
- Right-click the user and select “General” to change the password to a new value that is difficult to guess.
Note: We recommend using a password manager to create a good password and to store it securely. Structr is compatible with most password managers.
Creating Groups
- Make sure “Group” is selected and click “Create” to create a user group
- Rename from “New Group” to a new group name of your choice

- Drag the user onto the group to add them as a member
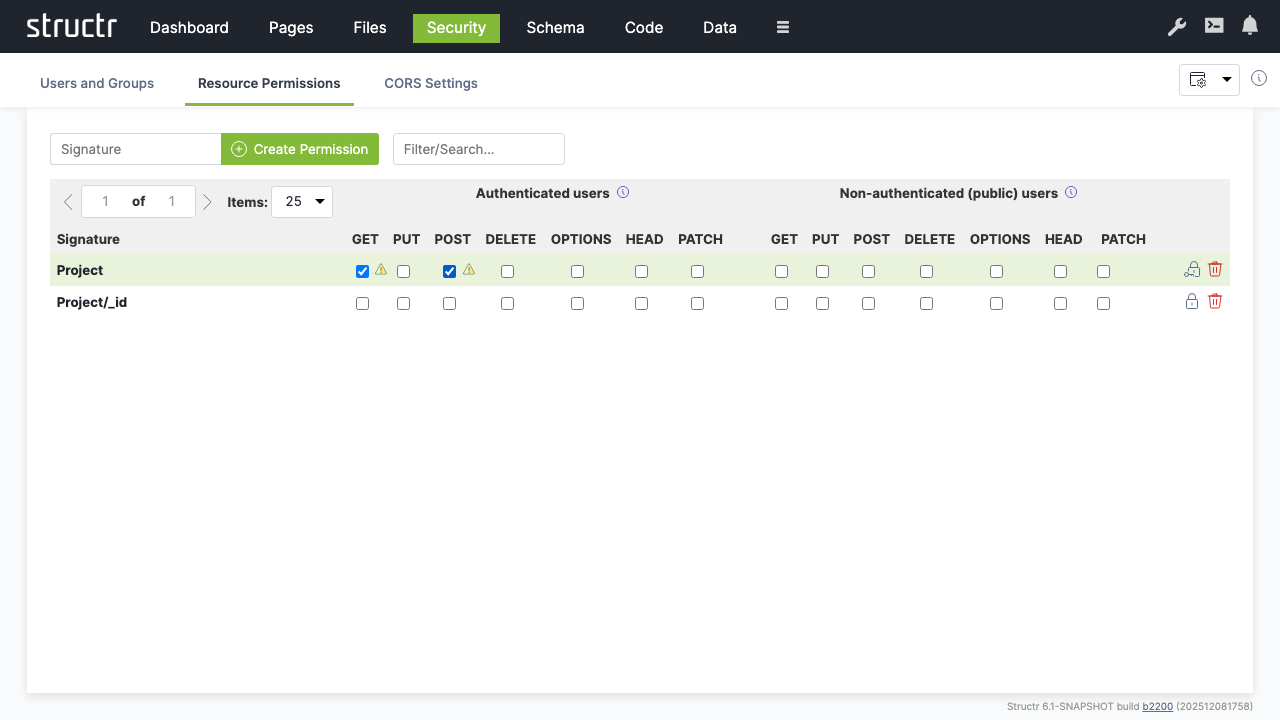
Setting Resource Permissions
Grant API access permissions for authenticated users:
- Switch to the “Resource Access” tab
- Create a permission for “Project” resources
- Enable “GET” for authenticated users to allow them read access to project data
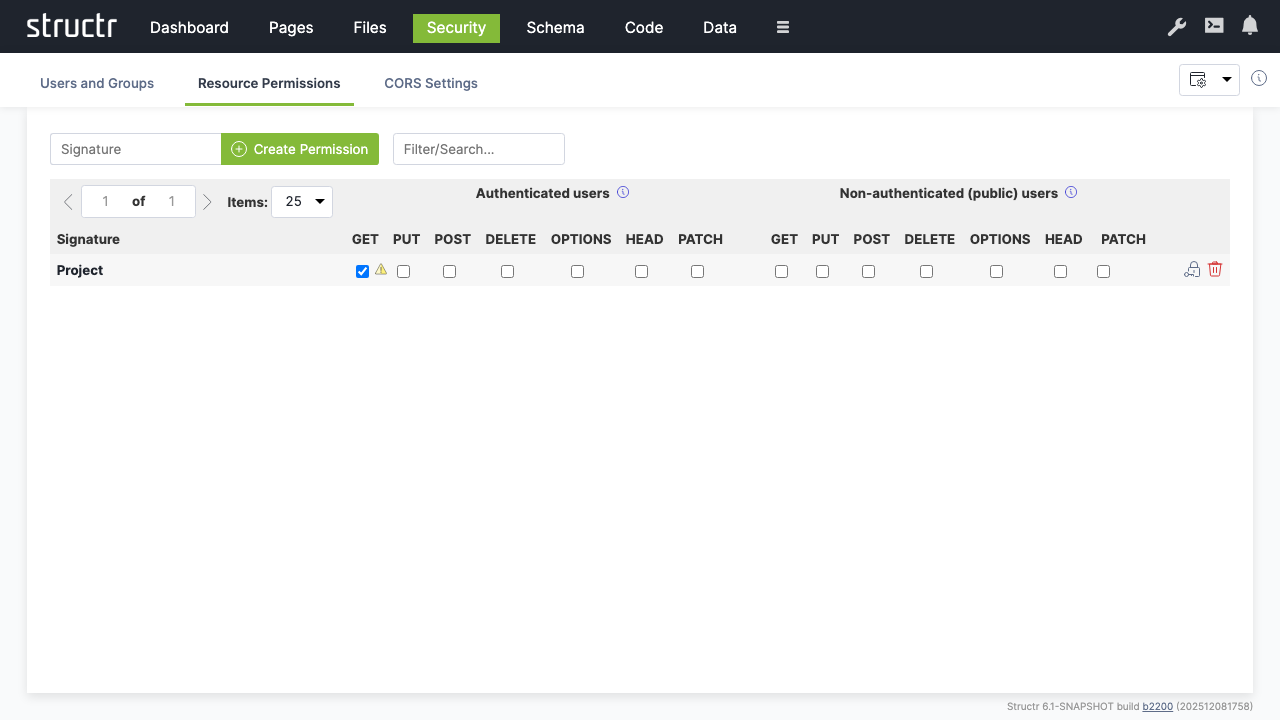
- Create an additional permission for “Project/_id” resources
- Enable “POST” to allow authenticated users to create new projects
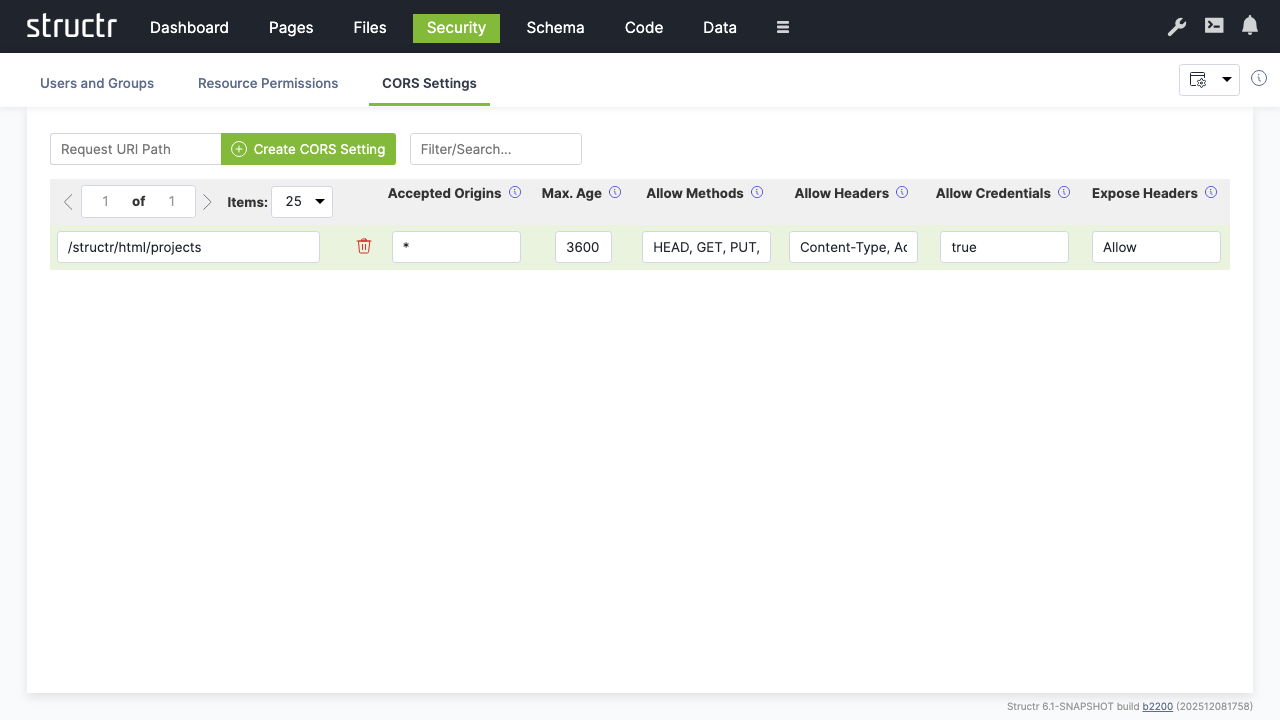
CORS Configuration
Enable cross-origin requests for web applications:
- Switch to “CORS Settings”
- Set request URI to
/structr/html/projects - Configure CORS headers:
- Accepted Origins:
* - Max Age:
3600 - Allow Methods:
HEAD, GET, PUT, POST, OPTIONS - Allow Headers:
Content-Type, Accept - Allow Credentials:
true - Expose Headers:
Allow
Conclusion
You now have a simple project management application with:
- Schema: Defined data types for Projects, Milestones, and Tasks with proper relationships
- Data: Sample data demonstrating the structure and relationships
- Pages: A web interface displaying projects and their milestones
- Security: User authentication, authorization, and API access controls
The application provides a foundation that can be extended with additional features like task management, user assignment, progress tracking, and reporting capabilities.
Core Concepts
Structr is built on a graph database foundation. Understanding this architecture helps you make better decisions when modeling data and building applications.
The Graph Data Model
All data in Structr is stored as a graph in the mathematical sense: objects are nodes, and connections between objects are relationships. Both nodes and relationships can have properties that store data, and both can have labels that indicate their type.
This differs fundamentally from relational databases, where data lives in tables and connections are established through foreign keys and join operations. In a graph database, relationships are first-class citizens stored as direct pointers between nodes, making traversal from one object to its related objects extremely efficient.
Nodes, Relationships, and Properties
Nodes represent things – users, projects, documents, products, or any other entity in your domain. Each node has a type (like User or Project) and can have any number of properties (like name, email, or createdDate).
Relationships connect nodes and represent how things relate to each other. A relationship always has a direction (from source to target), a type (like WORKS_ON or BELONGS_TO), and can also have properties. For example, a WORKS_ON relationship between a User and a Project might have a role property indicating whether the user is a developer, manager, or reviewer.
Properties store actual data values. Structr supports common types like strings, numbers, booleans, and dates, as well as arrays and encrypted strings.
Why Graphs?
Graph databases excel at handling connected data. When you need to find all projects a user works on, or all users who work on a specific project, or the shortest path between two entities, a graph database answers these questions by traversing relationships directly rather than performing expensive join operations.
The performance difference becomes significant as data grows. In relational databases, query time typically increases exponentially with the number of tables involved because joins have multiplicative cost. In graph databases, query time grows linearly with the number of nodes and relationships actually traversed – unrelated data doesn’t slow things down.
Graph Uniqueness
An important concept in graph modeling is that objects which are unique in reality should be represented by a single node in the graph. If the same person works on multiple projects, there should be one Person node connected to multiple Project nodes – not separate Person records duplicated for each project.
This differs from document databases where nested objects are often duplicated. In Structr, you model the relationship once, and the graph structure naturally reflects the real-world connections between entities.
Supported Databases
Structr supports several graph database backends:
- Neo4j – The primary supported database, recommended for production use
- Memgraph – Experimental support
- Amazon Neptune – Experimental support
- In-Memory Database – For testing only
Schema Enforcement
Structr validates all data against your schema before writing to the database. This ensures that structural and value-based constraints are never violated.
How It Works
Schema enforcement operates at multiple levels:
- Type validation – Ensures data types match the schema definition
- Required properties – Prevents creation or modification of objects if mandatory fields are missing
- Cardinality constraints – Enforces relationship multiplicities (one-to-one, one-to-many, many-to-many)
- Custom validators – Through validation expressions and format constraints
All validations run during the transaction before data is persisted. If any validation fails, the entire transaction is rolled back and no changes are saved.
Automatic Relationship Management
Structr manages relationships automatically based on the cardinality you define in the schema.
Markdown Rendering Hint: MarkdownTopic(One-to-One) not rendered because level 5 >= maxLevels (5)
Markdown Rendering Hint: MarkdownTopic(One-to-Many) not rendered because level 5 >= maxLevels (5)
Markdown Rendering Hint: MarkdownTopic(Many-to-Many) not rendered because level 5 >= maxLevels (5)
Real-Time Schema Evolution
Unlike traditional databases that require migrations and downtime for schema changes, Structr applies schema modifications instantly while the system is running. Changes take only milliseconds to propagate.
This works because the schema itself is stored as nodes and relationships in the graph database. When you modify the schema, you’re updating data like any other operation – and the new constraints apply immediately to all subsequent operations.
Schema and Data Are Loosely Coupled
However, the schema is loosely coupled to your data. When you rename a property, change a type, or restructure relationships, existing data is not automatically migrated. The old data remains as it was – a renamed property simply means existing nodes still have the old property name while new nodes get the new one. You need to migrate existing data manually, either through a script that updates all affected nodes or by handling both old and new structures in your application logic until the migration is complete.
Incremental Development
This enables a development workflow where you can model your domain incrementally: start with a basic structure, build features against it, then extend the schema as requirements evolve. There’s no migration step and no deployment process for schema changes. But keep in mind that while the schema changes instantly, bringing your existing data in line with the new schema is your responsibility.
Accessing Data
Structr provides several ways to work with data, depending on the context.
In pages and business logic, you use built-in functions like $.find(), $.create(), and $.delete(). These functions work in both StructrScript (a simple expression language for template expressions) and JavaScript (for more complex logic). They handle security checks, transactions, and type conversion automatically.
For complex graph traversals, Structr supports Cypher – the query language developed by Neo4j for pattern matching in graphs:
MATCH (p:Project)-[:HAS_TASK]->(t:Task)
WHERE p.status = 'active'
RETURN p, t
This query finds all active projects and their tasks by matching the pattern of Project nodes connected to Task nodes via HAS_TASK relationships.
External systems access data through the REST API, which provides standard CRUD operations with filtering, sorting, and pagination.
Next Steps
With these concepts in mind, you’re ready to start building. The typical workflow is:
- Design your data model in the Schema area
- Create sample data to test your model
- Build pages that display and manipulate your data
- Add business logic to enforce rules and automate processes
Each of these topics is covered in detail in the Building Applications section.
Building Applications
Overview
This chapter provides an overview of the individual steps involved in creating a Structr application.
Basics
First things first - there are some things you need to know before you start.
Admin User Interface
Only administrators can use the Structr Admin User Interface. Regular users cannot log in, and attempting to do so produces the error message User has no backend access. That means every Structr application with a user interface needs a Login page to allow non-admin users to use it. There is no built-in login option for non-admin users.
Access Levels
Access to every object in Structr must be explicitly granted - this also applies to pages and their elements. There are different access levels that play a role in application development.
- Administrators (indicated by
isAdmin = true) have unrestricted access to all database data and REST endpoints. - Each object has two visibility flags that can be set separately.
visibleToPublicUsers = trueallows the object to be read without authentication (read-only)visibleToAuthenticatedUsers = truemakes the object accessible for authenticated users (read-only)
- Each object has an ownership relationship to the user that created it.
- Each object can have one or more security relationships that control access for individual users or groups.
- Access rights for all objects of a specific type can be configured separately for individual groups in the schema.
Access Control
- The data model may only be changed by administrators, as it is a security-critical component.
- Access to pages and templates is usually controlled by visibility flags or, in rarer cases, by group membership.
- Access to files in the file system is usually controlled by visibility flags or by ownership.
Define the Data Model

Defining the data model is usually the first step in developing a Structr application. The data model controls how data is stored in the database, which fields are present in the REST endpoints and much more. It contains all information about the data types (or classes), their properties and how the objects are related, as well as their methods.
Types
The data model consists of data types that can have relationships between them. Types can have attributes to store your data, and methods to implement business logic.
Markdown Rendering Hint: MarkdownTopic(Data Modeling) not rendered because level 5 >= maxLevels (5)
Relationships
When you define a relationship between two types, it serves as a blueprint for the structures created in the database. Each type automatically receives a special attribute that manages the connections between instances of these types.
Attributes
Data types and relationships can be extended with custom attributes and constraints. Structr ensures that structural and value-based schema constraints are never violated, guaranteeing consistency and compliance with the rules defined in your schema.
For example, you can define a uniqueness constraint on a specific attribute of a type so that there can only be one object with the same attribute value in the database, or you can require that a specific attribute cannot be null.
Where To Go From Here?
There are currently two different areas in the Structr Admin User Interface where the data model can be edited: Schema and Code. The Schema area contains the visual schema editor, which can be used to manage types and relationships, while the Code area is more for developing business logic. In both areas, new types can be created and existing types can be edited.
Read more about data modeling.
Create or Import Data
If you are building an application to work with existing data, there are several ways to bring that data into the system.
Create Data Manually
You can create data in any scripting context using the built-in create() function, in the Admin Console, via REST and in the Data area.
Markdown Rendering Hint: MarkdownTopic(Using the Create Function) not rendered because level 5 >= maxLevels (5)
CSV
You can import CSV data in two different ways:
- Using the CSV Import Wizard in the Files Section. This is the preferred option, although it is somewhat difficult to find. To use it, you first have to upload a CSV file to Structr. An icon will then appear in the context menu of this file, which you can use to open the import wizard.
- Using the Simple Import Dialog in the Data Section. This importer is limited to a single type and can only process inputs of up to 100,000 lines, but it is a good option for getting started.
XML
The XML import works in the same way as the file-based CSV import. First, you need to upload an XML file, then you can access the XML Import Wizard in the context menu for this file in the Files area.
JSON
If your data is in JSON format, you can easily import individual objects or even larger amounts of data via the REST interface by using the endpoints automatically created by Structr for the individual data types in your data model.
Read more about Creating & Importing Data.
Create the User Interface
A Structr application’s user interface consists of one or more HTML pages. Each page is rendered by the page rendering engine and served at a specific URL. The Pages area provides a visual editor for those pages and allows you to configure all aspects of the user interface.
Pages and Elements
Individual pages consist of larger template blocks, nested HTML elements, or a combination of both. You can also use reusable elements called Shared Components and insertable templates known as Widgets to build your interface.
Read more about Pages & Templates.
CSS, Javascript, Images
Static resources like CSS files, JavaScript files, images and videos are stored in the integrated filesystem in the Files area and can be accessed directly via their full path, allowing you to reference them in your pages using standard HTML tags or CSS. Please note that the visibility restrictions also apply to files and folders.
Read more about the Filesystem.
Navigation and Error Handling
Pages in Structr are accessible at URLs that match their names. For example, a page named “index” is available at /index.
Markdown Rendering Hint: MarkdownTopic(Error Page) not rendered because level 5 >= maxLevels (5)
Markdown Rendering Hint: MarkdownTopic(Start Page) not rendered because level 5 >= maxLevels (5)
Dynamic Content
All content is rendered on the server and sent to the client as HTML. To create dynamic content based on your data, you can insert values from database objects into pages using template expressions. To display multiple database objects, you use repeaters, which execute a database query and render the element once for each result. For more complex logic, you can embed larger script blocks directly in your page code to perform calculations or manipulate data before rendering
Markdown Rendering Hint: MarkdownTopic(Template Expressions) not rendered because level 5 >= maxLevels (5)
Markdown Rendering Hint: MarkdownTopic(Partial Reload) not rendered because level 5 >= maxLevels (5)
User Input & Forms
To handle user input in a Structr application, you can configure Event Action Mappings (EAM) that connect DOM events to backend operations. For example, you can configure a click event on a button to create a new Project object. EAM passes values from input fields to the backend, so you can execute business logic with user input, create and update database objects with form data, or trigger custom workflows based on form submissions.
Read more about Event Action Mapping.
Implement Business Logic
Structr offers a wide range of options for implementing business logic in your application. These include time-controlled processes like scheduled imports, event-driven processes triggered through external interfaces or the application front end, and lifecycle methods that respond to data creation, modification, and deletion in the database.
Methods
You can define methods on your custom types to encapsulate type-specific logic. These methods come in two forms: instance methods and static methods.
Markdown Rendering Hint: MarkdownTopic(Instance Methods) not rendered because level 5 >= maxLevels (5)
Markdown Rendering Hint: MarkdownTopic(Static Methods) not rendered because level 5 >= maxLevels (5)
Functions
Structr provides two categories of application-wide functions: built-in functions and user-defined functions.
Markdown Rendering Hint: MarkdownTopic(Built-in Functions) not rendered because level 5 >= maxLevels (5)
Markdown Rendering Hint: MarkdownTopic(User-defined Functions) not rendered because level 5 >= maxLevels (5)
Lifecycle Methods
Lifecycle methods are optional instance methods that execute automatically in response to specific database events such as object creation, modification, or deletion. They must be added explicitly to a type in order to be executed. You can use them to validate data before it is saved, update related objects when changes occur, send notifications when specific conditions are met, or trigger workflows based on data changes.
Lifecycle methods have access to the object being modified through the this keyword, making them suitable for enforcing business rules and maintaining data consistency.
Read more about Business Logic.
Integrate With Other Systems
Structr provides integration options for external systems, including built-in authentication interfaces that you can configure. For other integrations, you can write custom business logic and interface code to connect to APIs, databases, message brokers, or other services based on your requirements.
OAuth
Structr supports OAuth 2.0 for user authentication, enabling integration with external identity providers such as Microsoft Entra ID, Google, Auth0, and other OAuth-compliant services. This allows users to authenticate using their existing organizational or social media credentials instead of maintaining separate login credentials for Structr.
Emails & SMTP
Structr allows you to send plain text or HTML emails with attachments from any business logic method. You can also retrieve emails from IMAP mailboxes and trigger automated responses to incoming messages through lifecycle methods or custom workflows.
Markdown Rendering Hint: MarkdownTopic(Example) not rendered because level 5 >= maxLevels (5)
REST Interface
The REST interface allows you to exchange data with external systems and expose business logic methods as REST endpoints. Methods accept arbitrary JSON input and return structured JSON output, making it easy to build custom APIs and integrate Structr into existing workflows or architectures.
Markdown Rendering Hint: MarkdownTopic(Views) not rendered because level 5 >= maxLevels (5)
Message Brokers
You can connect Structr to MQTT, Kafka, or Apache Pulsar by creating a custom type that extends one of Structr’s built-in client types (MQTTClient, KafkaClient, or PulsarClient) and implementing an onMessage lifecycle method to handle incoming messages.
When configured and activated, the client automatically connects to the message broker and executes your onMessage method whenever a new message arrives on the subscribed topics. This allows you to build event-driven applications that react to external events in real-time, process streaming data, or integrate with IoT devices and microservices architectures.
Read more about Message Brokers.
Other Databases
Markdown Rendering Hint: MarkdownTopic(JDBC) not rendered because level 5 >= maxLevels (5)
Markdown Rendering Hint: MarkdownTopic(Example) not rendered because level 5 >= maxLevels (5)
Markdown Rendering Hint: MarkdownTopic(MongoDB) not rendered because level 5 >= maxLevels (5)
Data Model
The process of creating a Structr application usually begins with the data model. This chapter focuses on the various steps required to define and implement your data model and serves as a guide to help you navigate the multitude of possibilities.
Data Model vs. Schema
The data model is the abstract design of your application’s data and defines the types of objects, their attributes, and how they relate to each other. The schema is the concrete implementation of that model inside Structr, defining the types, properties, relationships, methods, and constraints that the system enforces at runtime.
In Structr, the gap between the two is unusually small. Because Structr stores the schema itself as a graph in the underlying graph database, types map to nodes, relationships map to edges, and properties map to attributes on those nodes, closely mirroring the structure of the data model.
The Schema Editor is the primary tool for creating and editing the schema. Because the schema maps so directly to the data model, it effectively doubles as a data modeling tool. Throughout this chapter, we use data model when referring to the abstract design and schema when referring to the implementation in Structr.
A Primer on Data Modeling
The data model should mirror the attributes and relationships that objects have in the real world as closely as possible. A few basic rules help you determine whether an object should be modeled as a node, a relationship, or a property.
When to Use Nodes?
Most things that you would use a noun to describe should be modeled as nodes.
- real-world objects like people, companies, documents, products
- abstract objects that are distinct entities with a unique identity and one or more attributes
- properties that several objects can have in common, like an address or a category
- collections of property values (the items of a list, etc.)
- relationships between more than two objects (hyper-relationships)
When to Use Properties?
Most things that you would use an adjective to describe should be modeled as a properties.
- single values like an ID, a name, a color, etc.
- time or date values (if you are not using a time tree index)
When to Use Relationships?
Most things that you would use a verb to describe should be modeled as relationships.
- relationships between objects that are not based on a single property
- actions or activities
- facts
These rules apply at the data modeling level. When you translate them into the Structr schema, nodes become schema types, relationships become schema relationships, and properties become schema properties but the conceptual thinking stays the same.
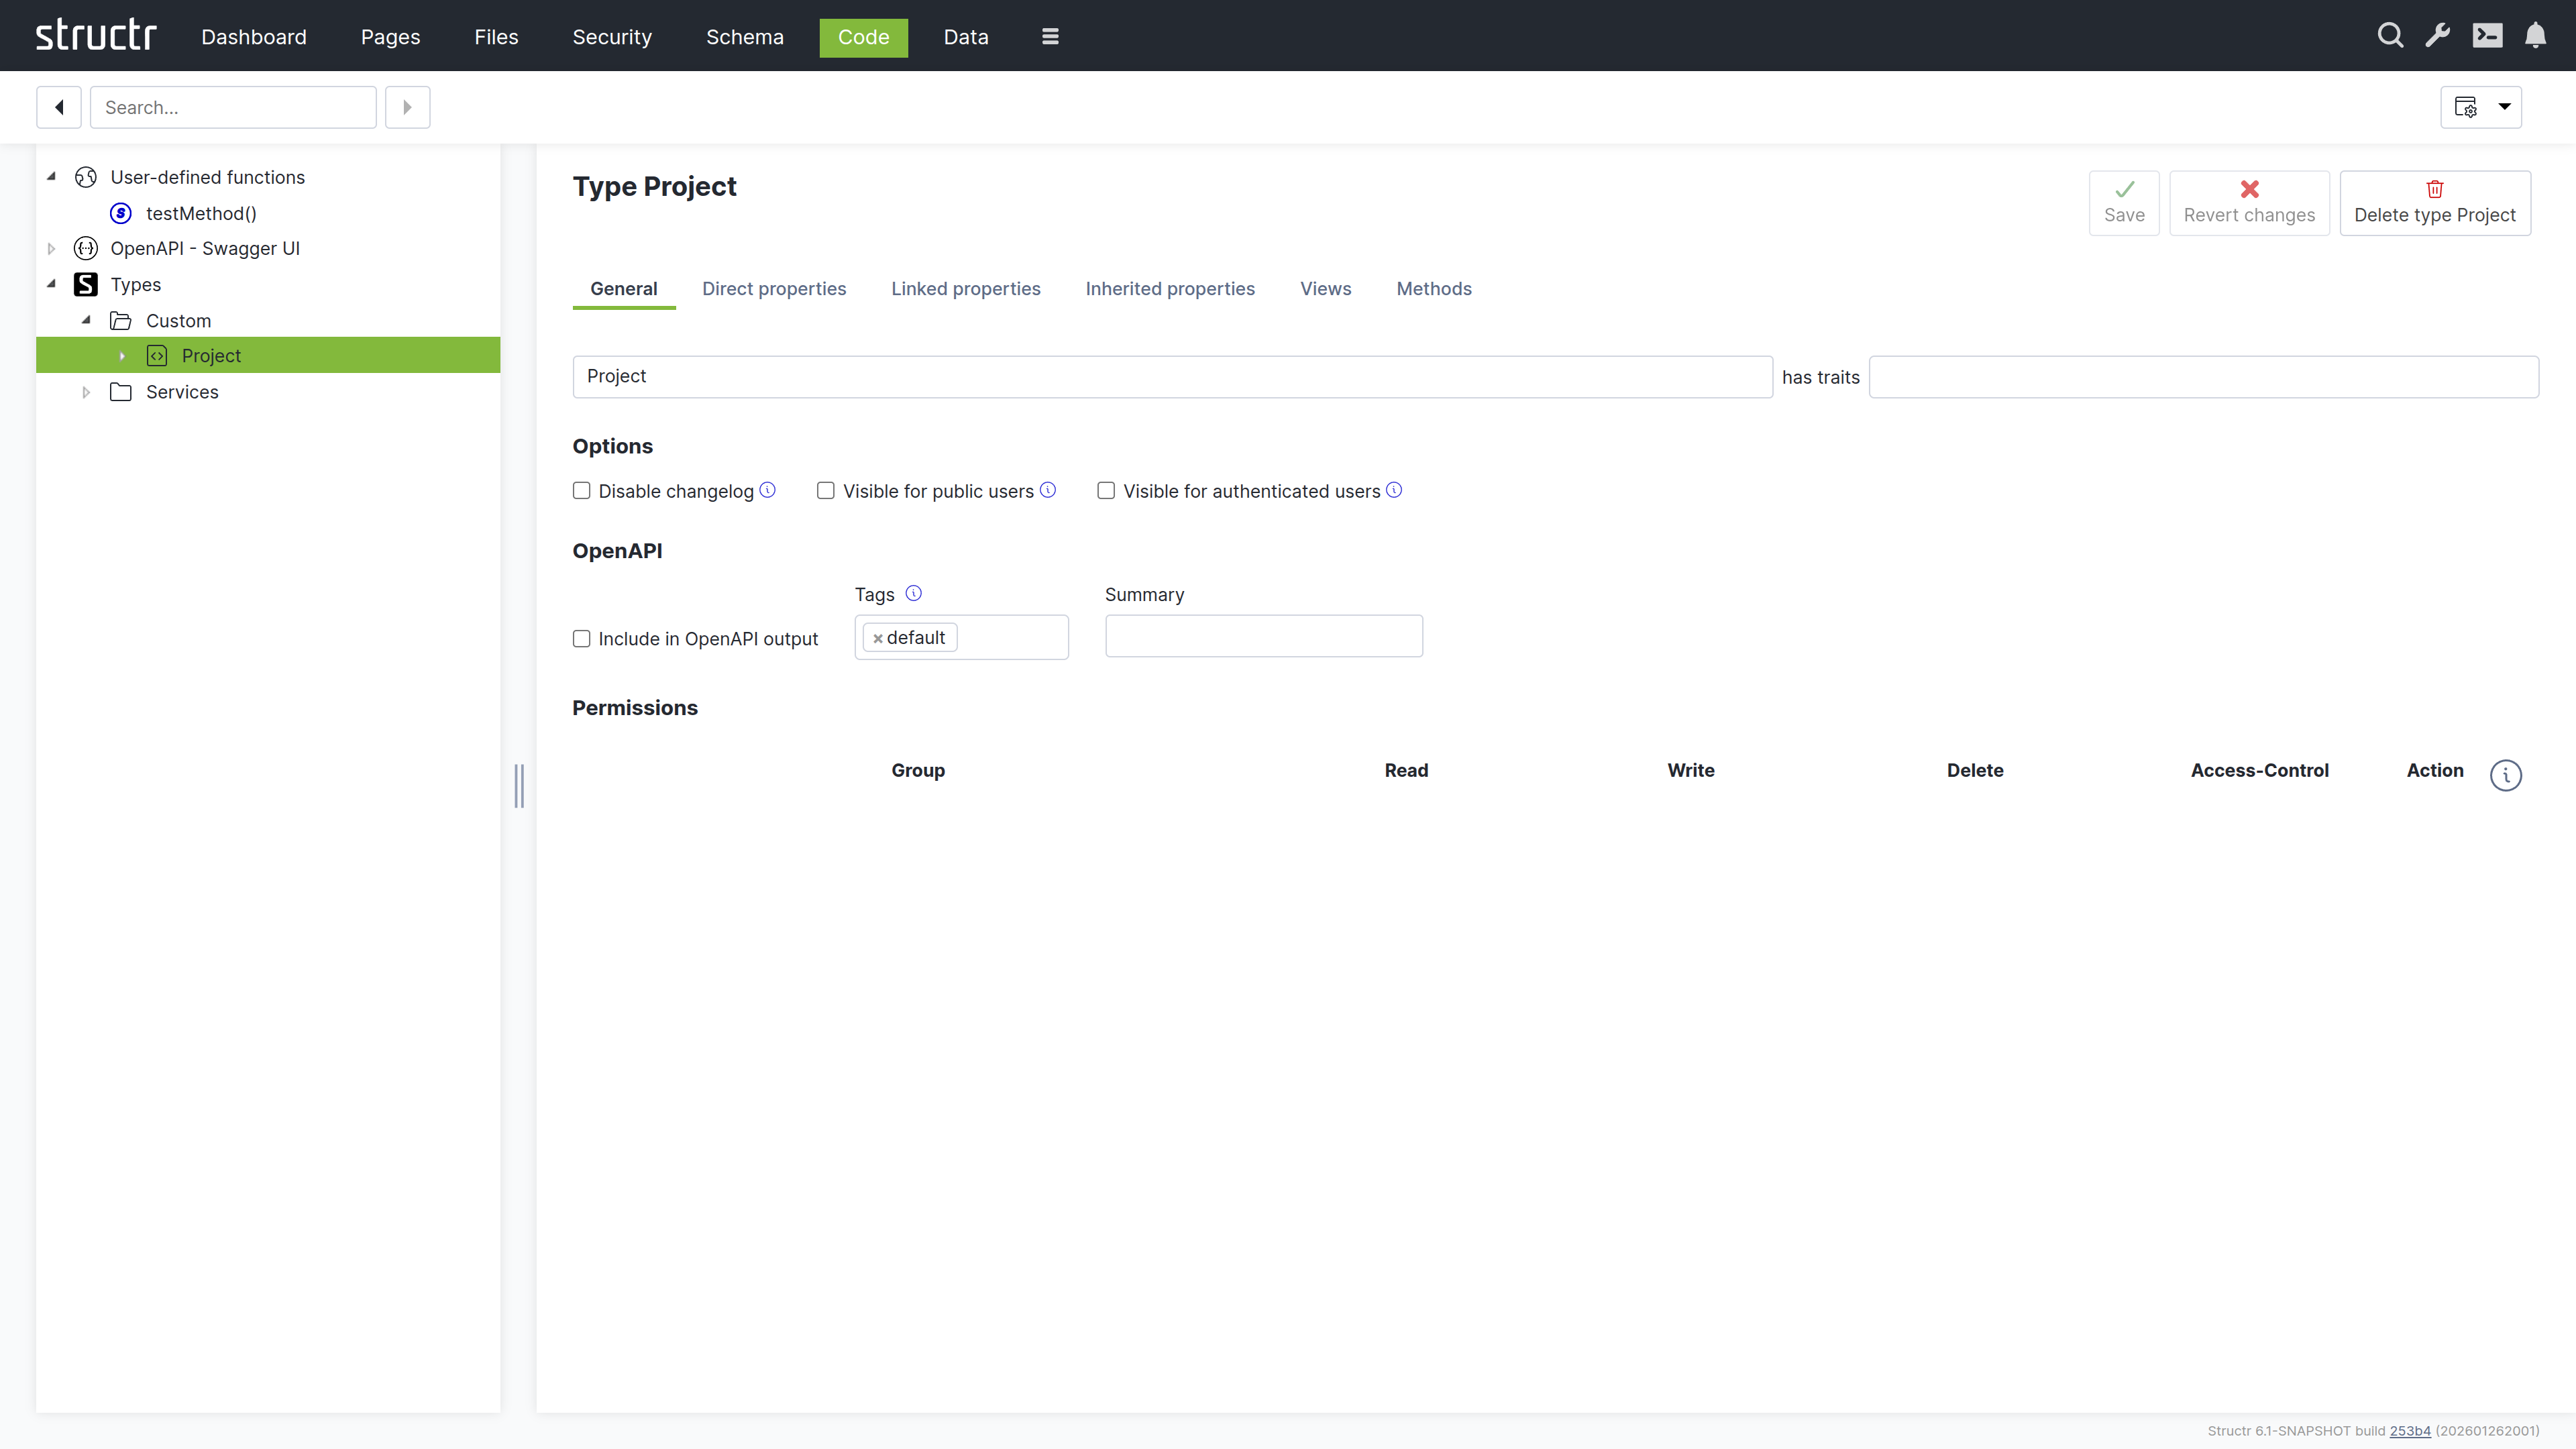
Creating a Basic Type
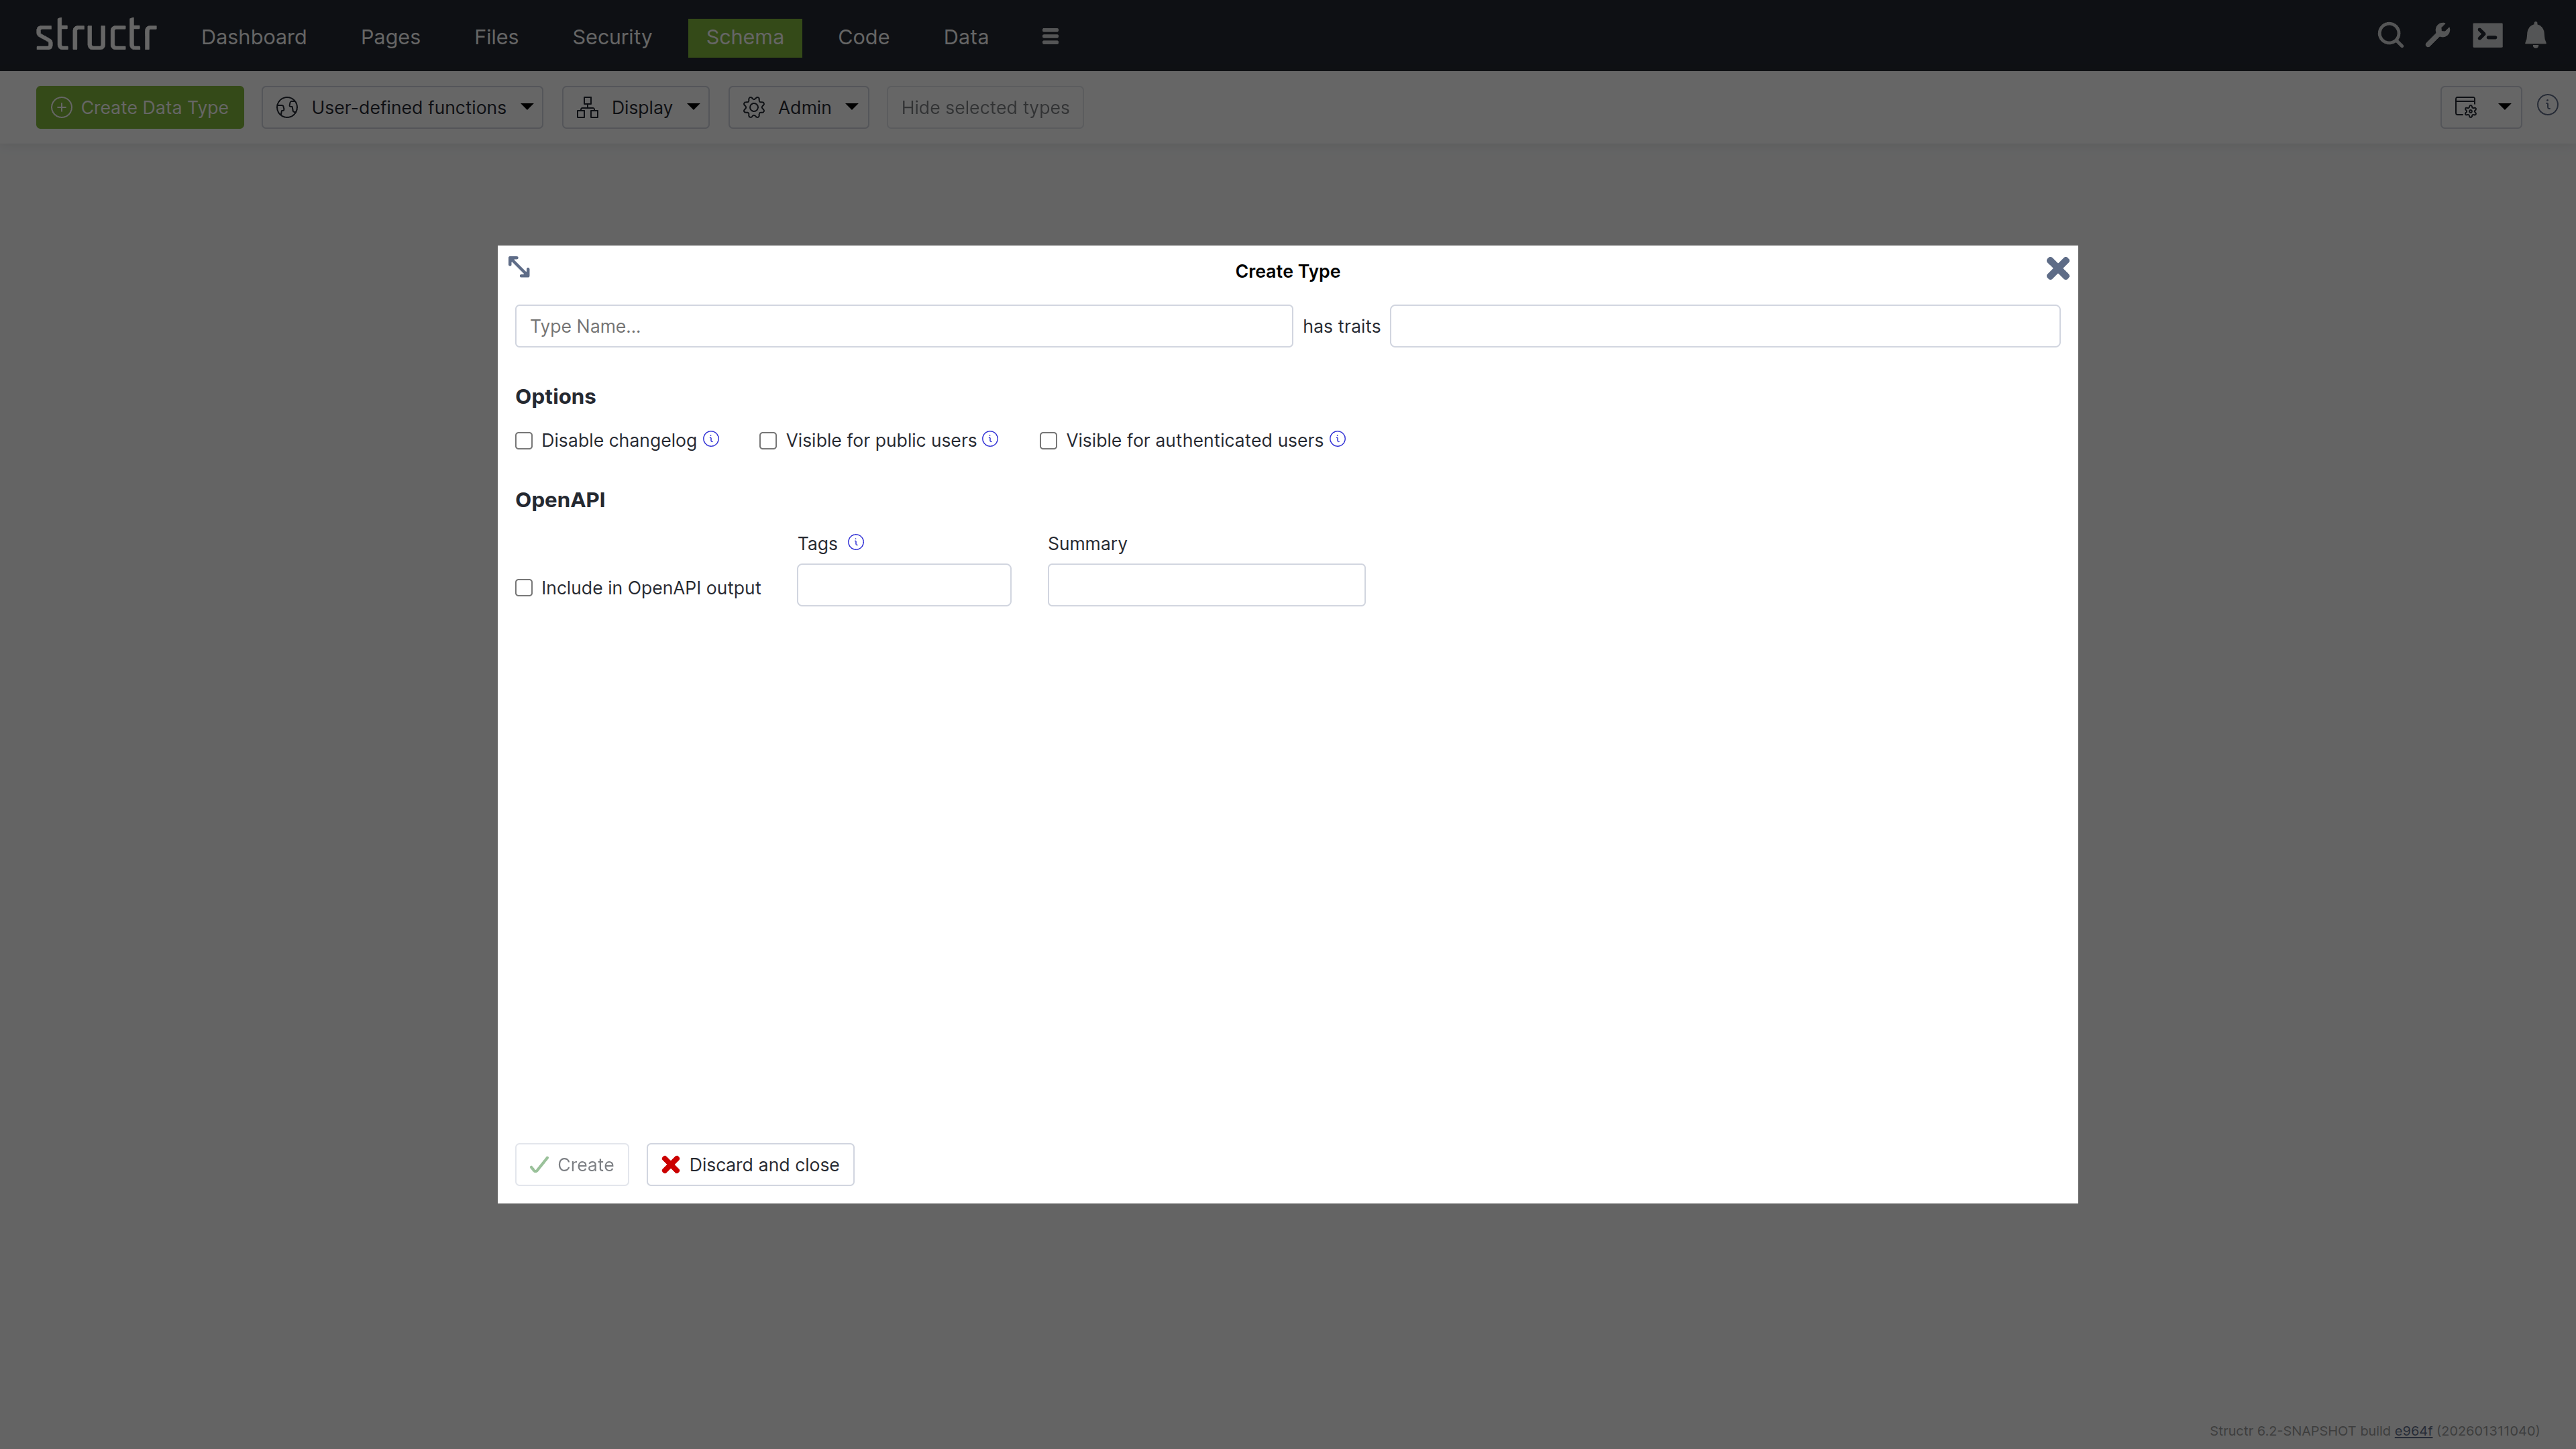
To create a new type in the schema, click the green “Create Data Type” button in the top left corner of the Schema area.
Name & Traits
When you create a new data type, you will first be asked to enter a name for the new type and, if desired, select one or more traits. You can choose from a list of built-in traits to take advantage of functionality provided by Structr.
Changelog
The Disable Changelog checkbox allows you to exclude this type from the changelog - if the changelog is activated in the Structr settings.
Read more about the Changelog.
Default Visibility
The two visibility checkboxes allow you to automatically make all instances of the new type public or visible to logged-in users. This is useful, for example, if the data is used in the application, such as the topics in a forum.
OpenAPI
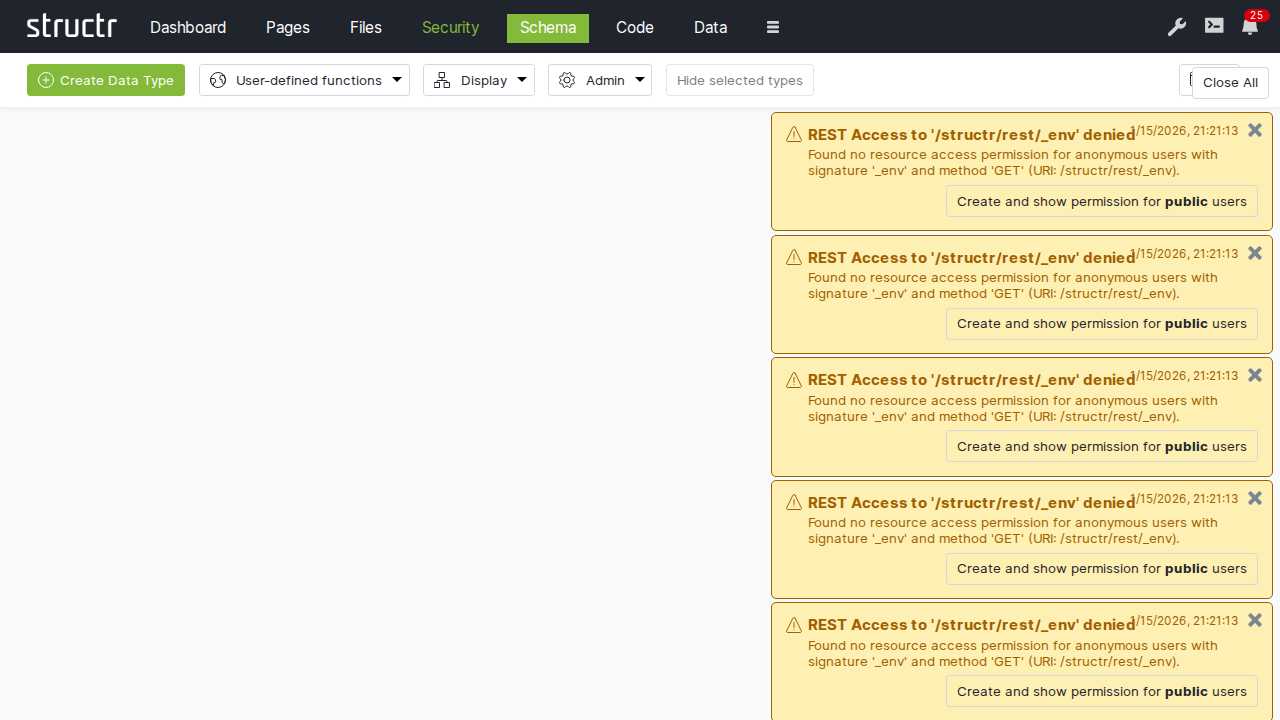
The OpenAPI settings allow you to include the new types in the automatically generated OpenAPI description provided by Structr at /structr/openapi.
All types for which you activate the “Include in OpenAPI output” checkbox and enter the same tag will be provided together with the standard endpoints for login, logout, etc. at /structr/openapi/<tag>.json.
Other Ways to Create Types in the Schema
Like all other parts of the application, the schema definition itself is stored as a graph in the database. This means you can also create new types by adding objects of type SchemaNode with the name of the desired type in the name attribute, and you can also do this from a script or method using the create() function. This is another illustration of how closely the schema and the underlying graph structure are aligned: The schema is data in the same database it describes.
Extending a Type
When you click Create in the Create Type dialog, the new type is created and the dialog switches to an Edit Type dialog. You can also open the Edit Type dialog by hovering over a type node and clicking the pencil icon.
The dialog consists of six tabs that configure type properties or display type information.
General
The General tab is similar to the Create Type dialog and provides configuration options for name, traits, changelog and visibility checkboxes, and a Permissions table. The Permissions table allows you to grant specific groups access rights to all instances of the type.
Direct Properties
Direct properties are values stored locally on the node or relationship itself, directly attached to the object in the database. They typically hold simple values like strings, numbers, dates, or booleans, but can also have more complex types like Function or Cypher properties that compute their values dynamically. The Direct Properties tab displays a table where you add and edit these attributes. Each row represents an attribute with the following configuration options.
Markdown Rendering Hint: MarkdownTopic(JSON Name & DB Name¹) not rendered because level 5 >= maxLevels (5)
Markdown Rendering Hint: MarkdownTopic(Type) not rendered because level 5 >= maxLevels (5)
Markdown Rendering Hint: MarkdownTopic(Format) not rendered because level 5 >= maxLevels (5)
Markdown Rendering Hint: MarkdownTopic(Notnull) not rendered because level 5 >= maxLevels (5)
Markdown Rendering Hint: MarkdownTopic(Comp.) not rendered because level 5 >= maxLevels (5)
Markdown Rendering Hint: MarkdownTopic(Uniq.) not rendered because level 5 >= maxLevels (5)
Markdown Rendering Hint: MarkdownTopic(Idx) not rendered because level 5 >= maxLevels (5)
Markdown Rendering Hint: MarkdownTopic(Fulltext) not rendered because level 5 >= maxLevels (5)
Markdown Rendering Hint: MarkdownTopic(Default Value) not rendered because level 5 >= maxLevels (5)
Markdown Rendering Hint: MarkdownTopic(Encrypted Properties) not rendered because level 5 >= maxLevels (5)
Linked Properties
In contrast to direct properties, linked properties are not stored on the node itself. They represent related objects that are reachable through relationships - single objects or collections of objects connected to the current node in the graph. Where direct properties hold simple values, linked properties provide access to complex objects in the vicinity of a node.
The Linked Properties tab displays a table with one row per relationship. Each row shows the property name for this side of the relationship, the relationship details, and the target type. You can edit the property name directly in the table and navigate to the target type by clicking it.
Inherited Properties
This section displays attributes inherited from traits or base classes along with their settings.
Views
The Views tab allows you to configure views for each type. A view is a named collection of attributes that can be accessed via REST and from within the scripting environment, controlling which attributes are included in REST interface output. Structr provides the following four default views.
Markdown Rendering Hint: MarkdownTopic(public) not rendered because level 5 >= maxLevels (5)
Markdown Rendering Hint: MarkdownTopic(custom) not rendered because level 5 >= maxLevels (5)
Markdown Rendering Hint: MarkdownTopic(all) not rendered because level 5 >= maxLevels (5)
Markdown Rendering Hint: MarkdownTopic(ui) not rendered because level 5 >= maxLevels (5)
Markdown Rendering Hint: MarkdownTopic(Custom Views) not rendered because level 5 >= maxLevels (5)
Methods
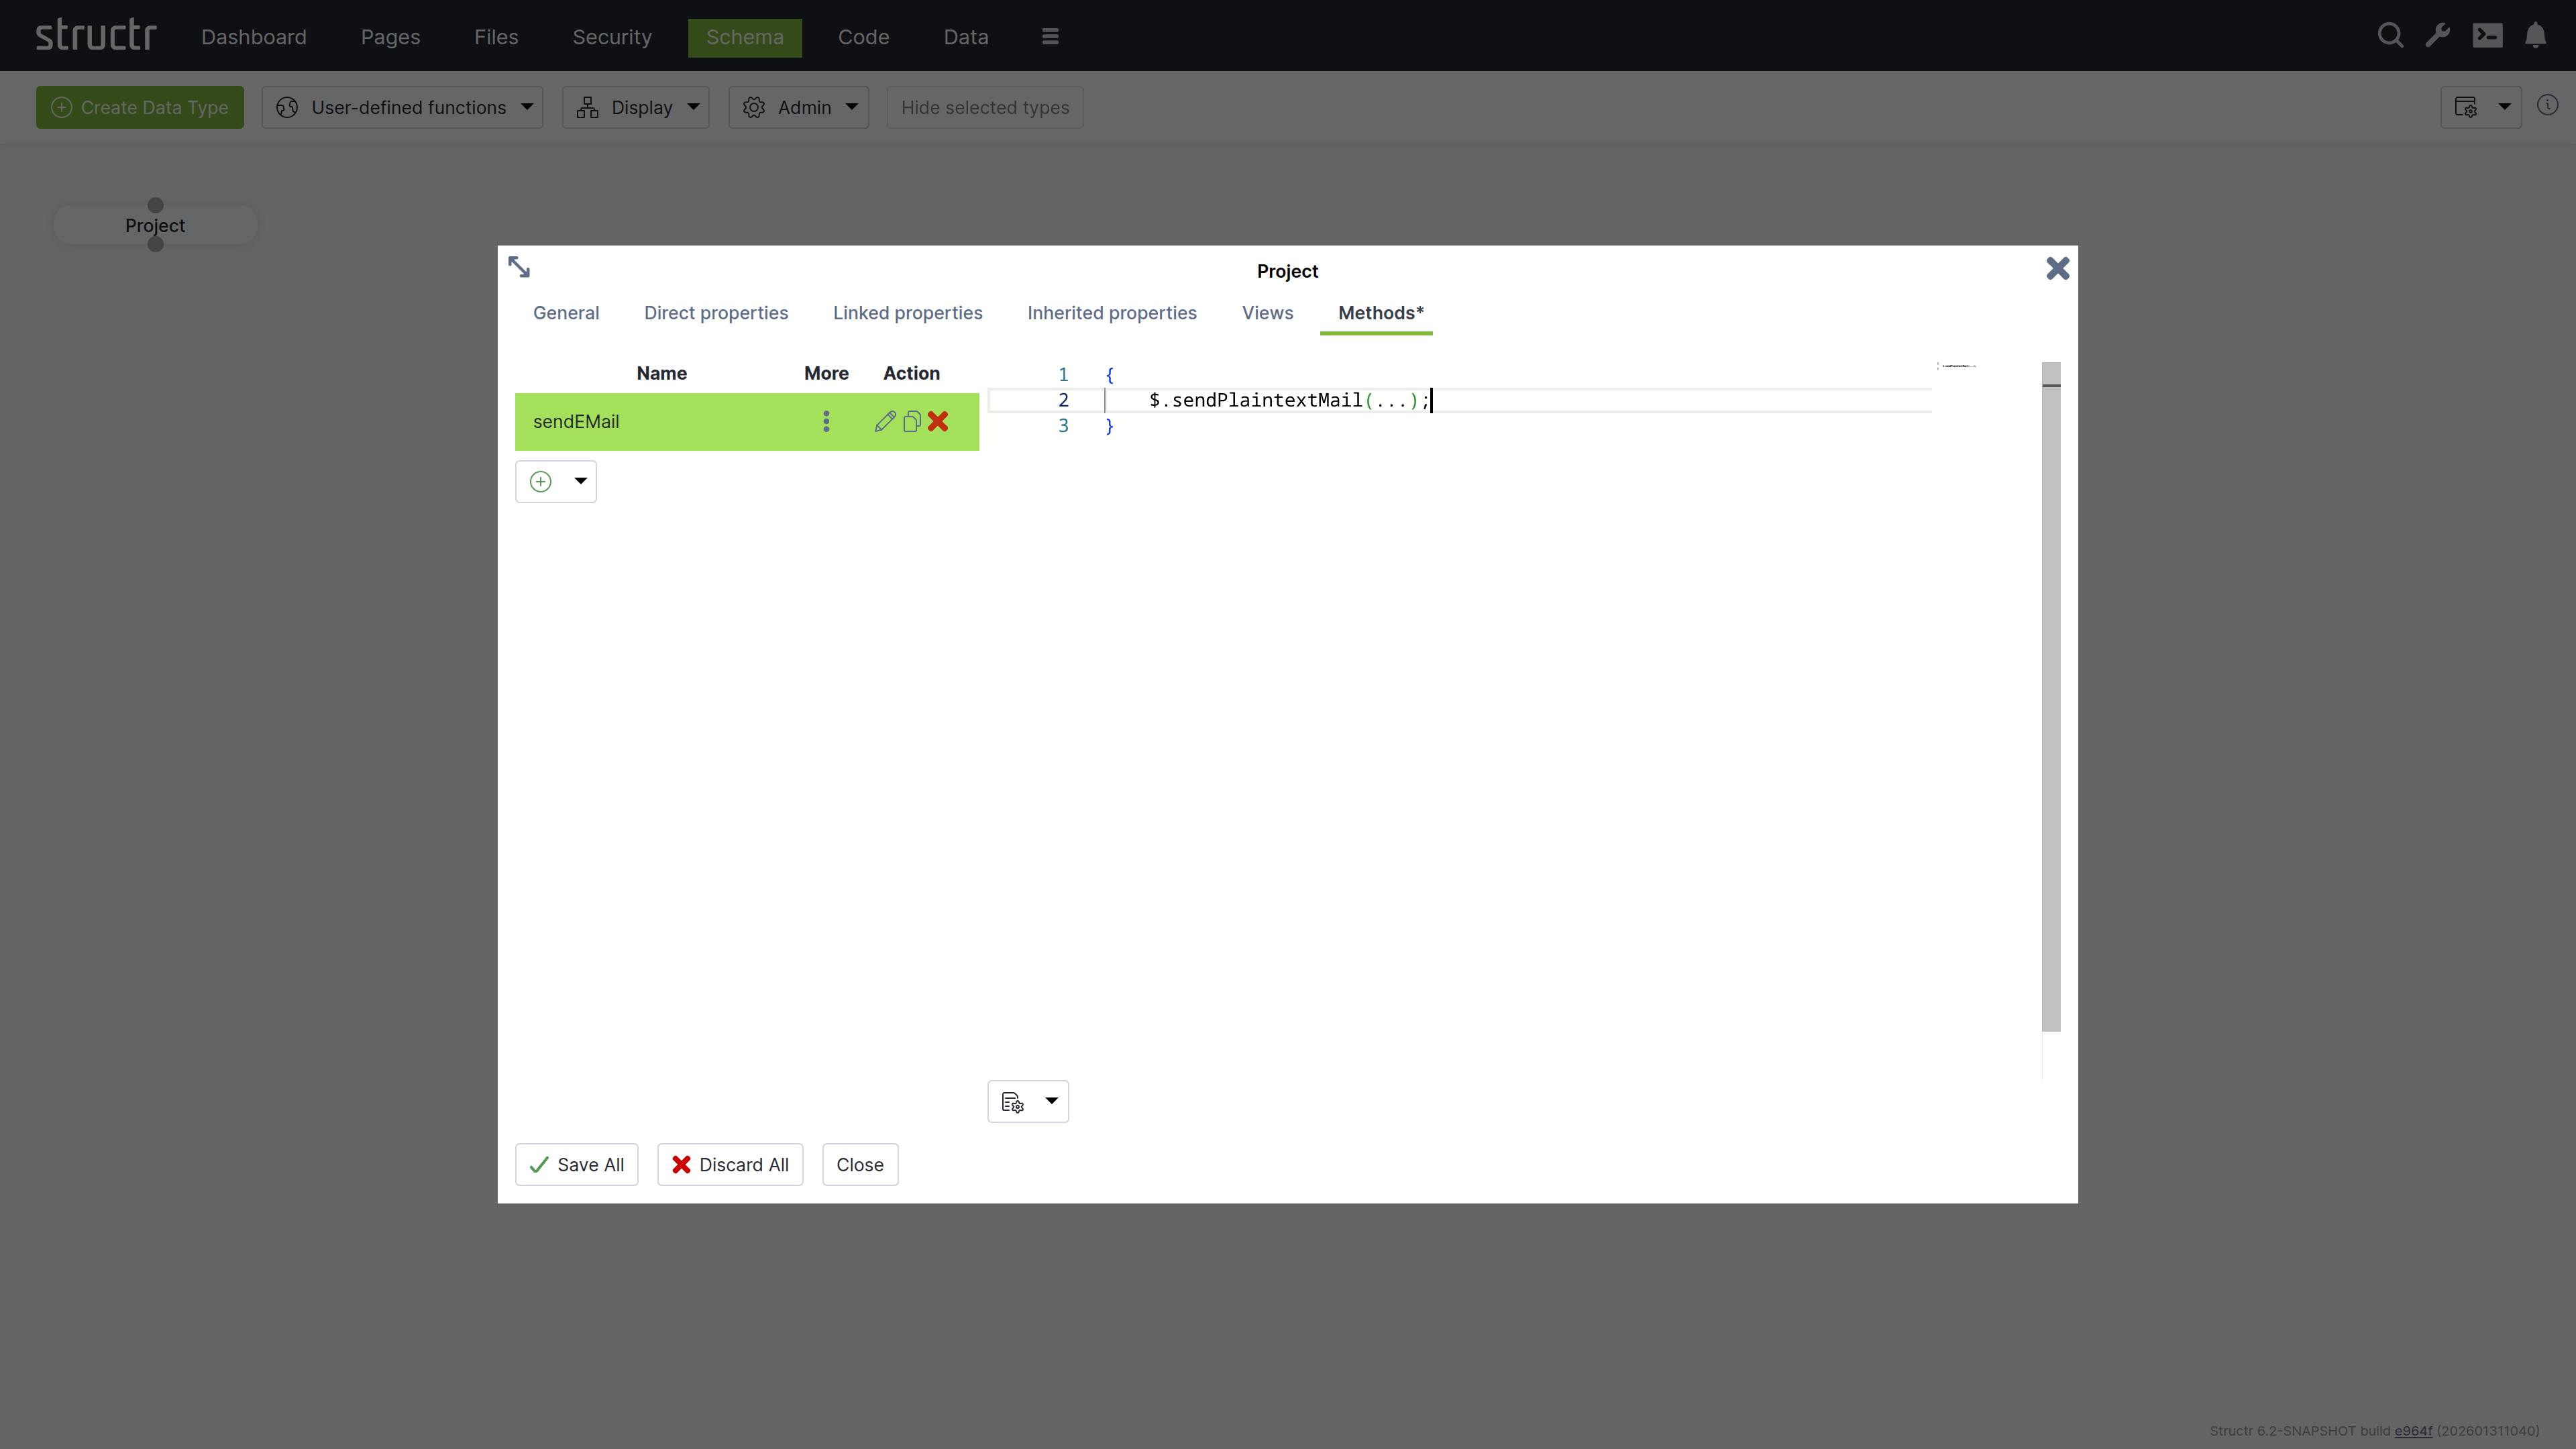
The Methods tab allows you to define custom methods and lifecycle methods for a type. The tab is divided into two sections: a method list on the left and a code editor on the right.
Markdown Rendering Hint: MarkdownTopic(Method List) not rendered because level 5 >= maxLevels (5)
Markdown Rendering Hint: MarkdownTopic(Code Editor) not rendered because level 5 >= maxLevels (5)
Computed Properties
In addition to properties that store primitive values, Structr provides computed properties that execute code when their value is requested. These properties generate values dynamically based on the current state of the object and its relationships, enabling calculated attributes without storing redundant data.
Structr provides two types of computed properties:
Function Properties
Function Properties contain both a read function and a write function, allowing you to define custom logic for both retrieving and storing values.
Markdown Rendering Hint: MarkdownTopic(Read Function) not rendered because level 5 >= maxLevels (5)
Markdown Rendering Hint: MarkdownTopic(Write Function) not rendered because level 5 >= maxLevels (5)
Cypher Properties
Cypher properties are read-only computed properties that execute Cypher queries against the graph database. These properties are useful for traversing relationships, aggregating data, or performing complex graph queries. The result of the Cypher query becomes the property’s value when accessed.
Linking Two Types
To create a relationship between two types, click the lower dot on the start type and drag the green connector to the upper dot on the target type. This will open the Create Relationship dialog.
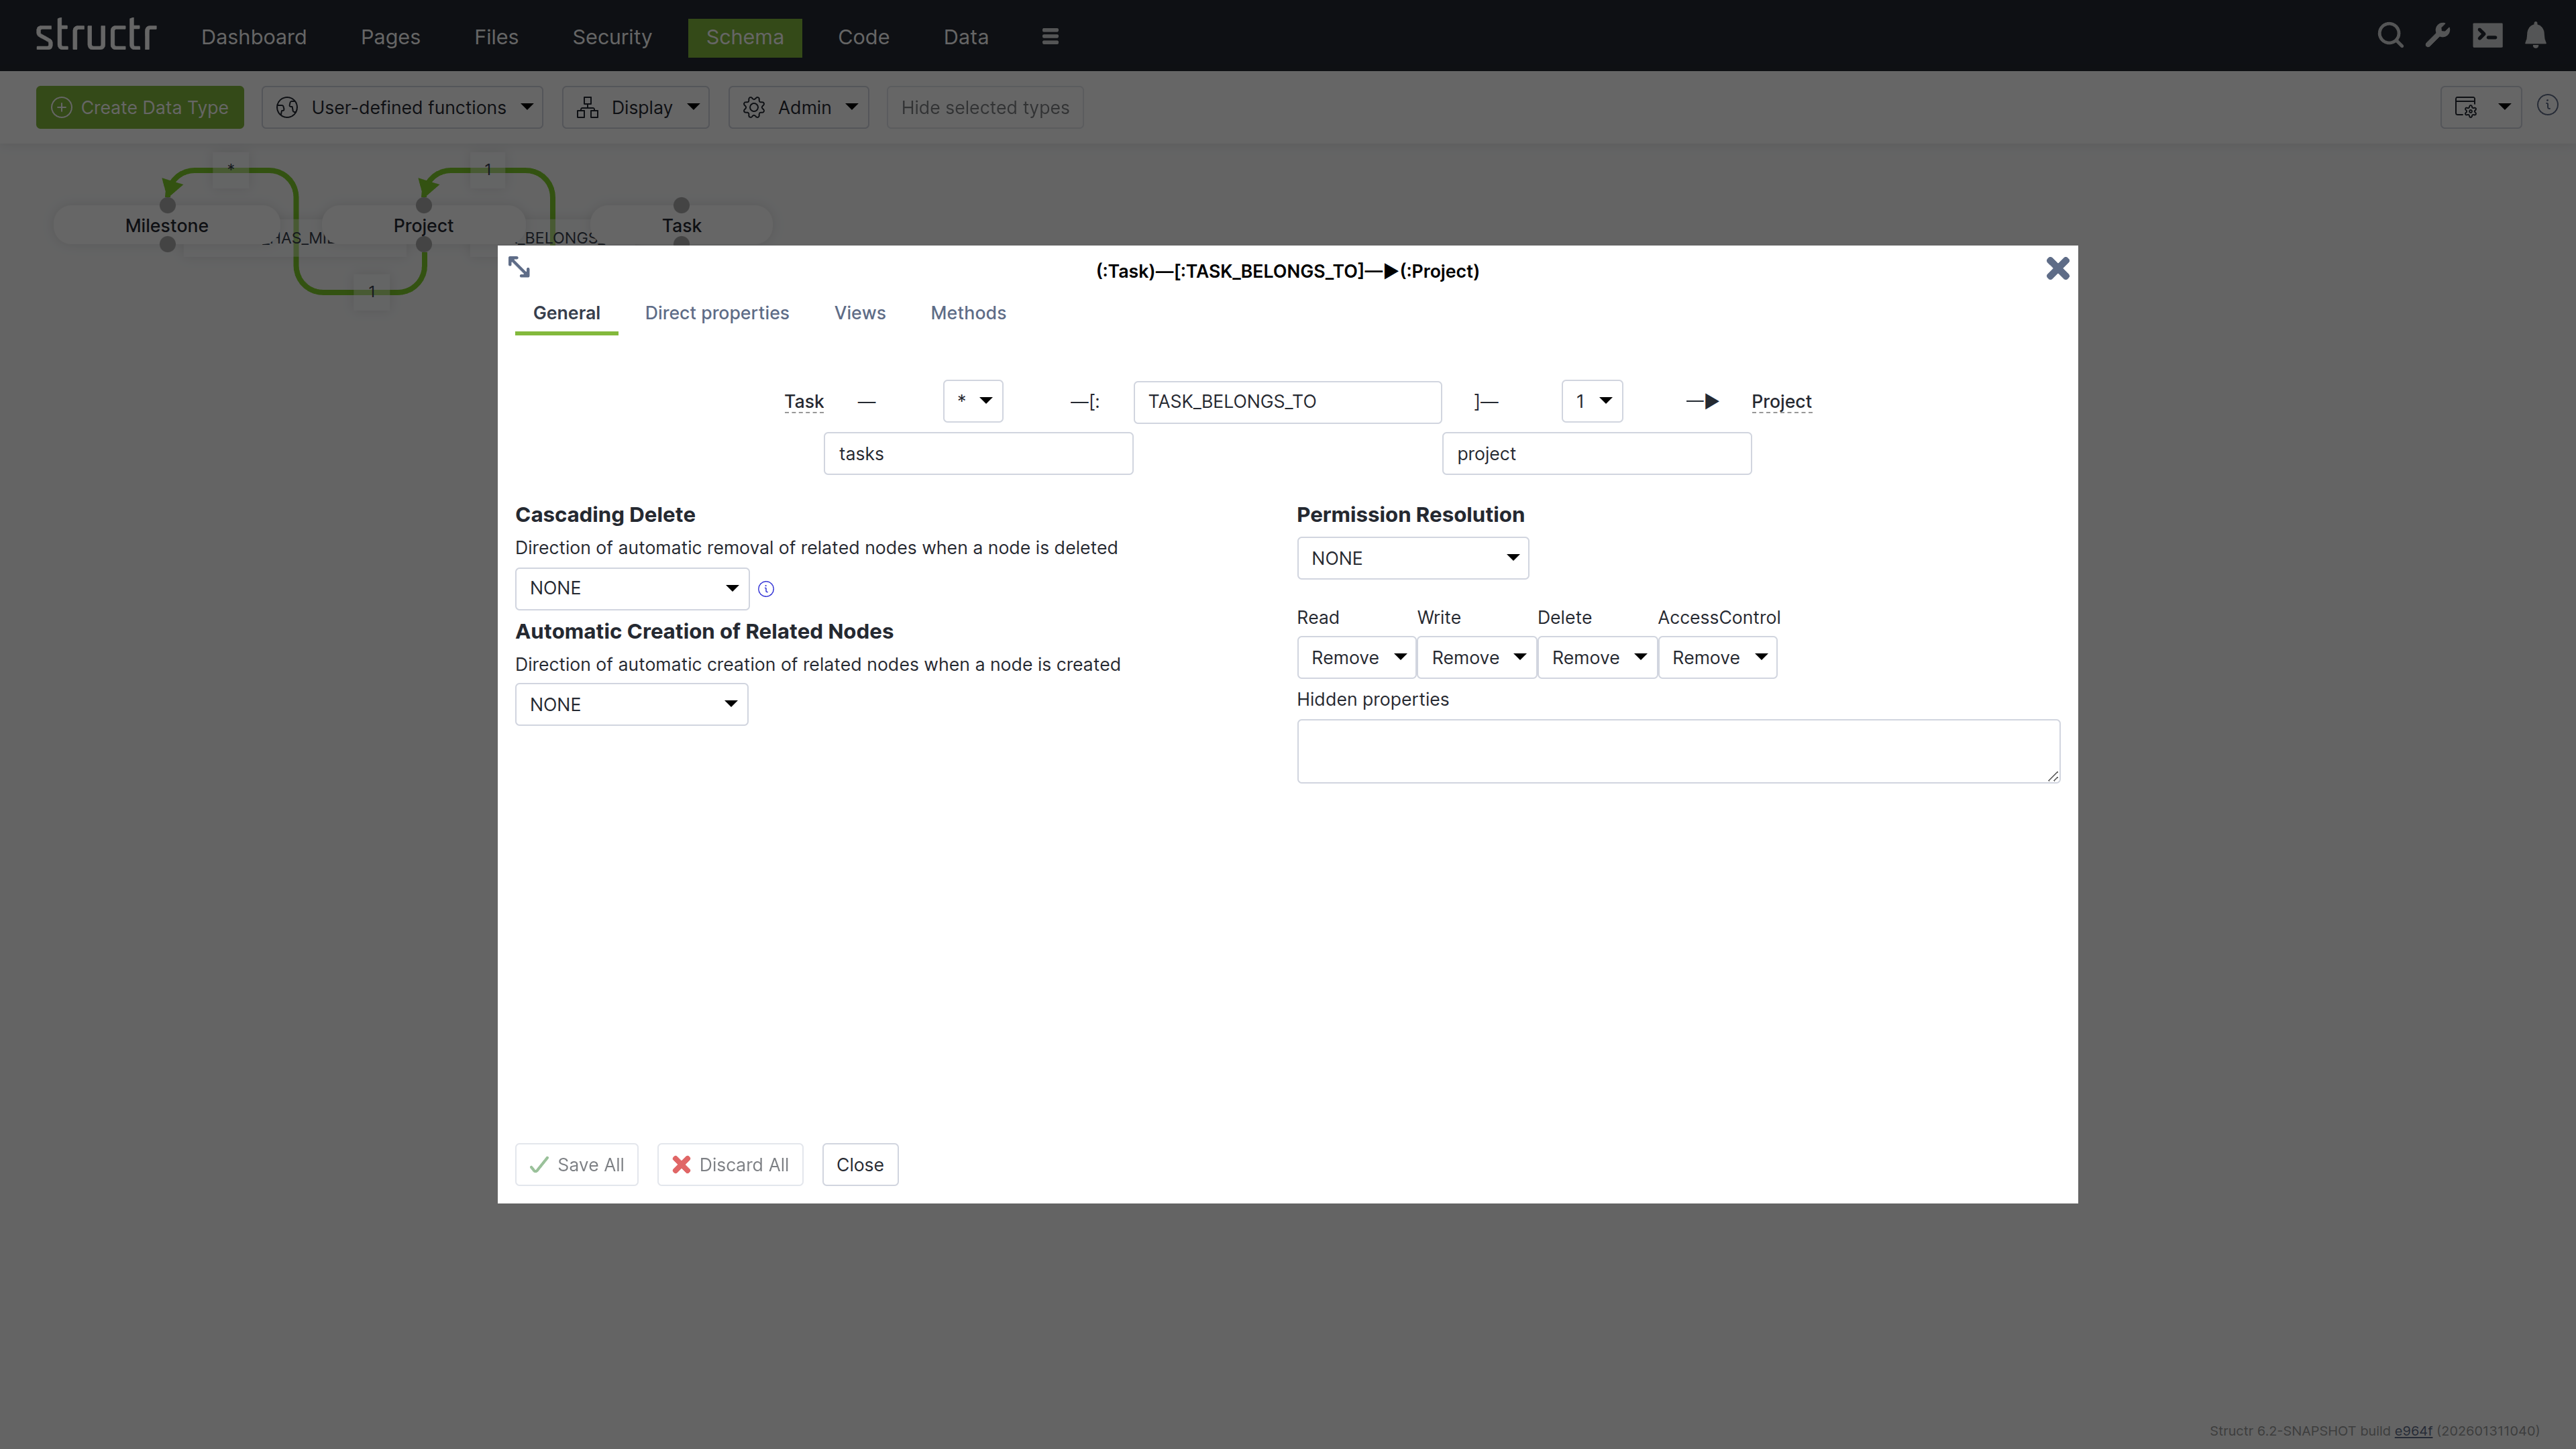
The Create Relationship Dialog consists of four areas.
Basic Relationship Properties
At the top of the dialog, you can configure the source cardinality, the relationship type, and the target cardinality. Below the cardinality selectors, you define the property names that determine how you access the relationship from each type in your code.
Markdown Rendering Hint: MarkdownTopic(Cardinality) not rendered because level 5 >= maxLevels (5)
Markdown Rendering Hint: MarkdownTopic(Relationship Type) not rendered because level 5 >= maxLevels (5)
Markdown Rendering Hint: MarkdownTopic(Property Names) not rendered because level 5 >= maxLevels (5)
Cascading Delete
The Cascading Delete dropdown controls deletion behavior for related objects. When you delete an object that has relationships to other objects, this setting determines whether those related objects are also deleted and how the deletion propagates through the relationship chain. When resolving cascading deletes, the system evaluates the access rights of each object to ensure that only objects you have permission to delete are affected.
Cascading Delete Options
The following cascading delete options exist.
| Name | Description |
|---|---|
NONE | No cascading delete |
SOURCE_TO_TARGET | If source is deleted, target will be deleted automatically. |
TARGET_TO_SOURCE | If target is deleted, source will be deleted automatically. |
ALWAYS | If any of the two nodes is deleted, the other will be deleted automatically. |
CONSTRAINT_BASED | Delete source or target node if deletion of the other side would result in a constraint violation on the node (e.g. not-null constraint). |
Automatic Creation of Related Nodes
The dropdown controls the automatic creation of related nodes. This feature allows Structr to function as a document database, transforming JSON documents into graph database structures based on your data model. When you send a JSON document that matches your schema, Structr creates the necessary objects and relationships in the graph database.
You can reference objects in your JSON using stub objects with any property that has a uniqueness constraint. The dropdown controls whether Structr creates the object if it doesn’t exist. Within a single document, the first reference to a unique property value creates the object and subsequent references to the same value use the newly created object. The dropdown determines how this automatic creation behavior propagates through nested relationships.
Markdown Rendering Hint: MarkdownTopic(Example) not rendered because level 5 >= maxLevels (5)
Permission Resolution
Permission Resolution controls how access rights propagate between objects through relationships. This lets users access objects indirectly through relationships without needing direct permissions on those objects.
Markdown Rendering Hint: MarkdownTopic(Propagation Direction) not rendered because level 5 >= maxLevels (5)
Markdown Rendering Hint: MarkdownTopic(Permission Types) not rendered because level 5 >= maxLevels (5)
Markdown Rendering Hint: MarkdownTopic(Hidden Properties) not rendered because level 5 >= maxLevels (5)
Markdown Rendering Hint: MarkdownTopic(Visual Indication in The Schema Editor) not rendered because level 5 >= maxLevels (5)
Inheritance
Structr supports multiple inheritance through traits. When you create a type, you select one or more traits for it to inherit from, or leave the selection empty to inherit from the base trait AbstractNode by default. You can change the trait selection later when editing the type.
Order of Inherited Traits
The inheritance order is determined by the order in which you specify the traits. This is especially important when resolving properties or methods that exist on both traits.
Property Inheritance
Inherited properties are automatically visible on subtypes. All properties defined in parent traits become available on the inheriting type. You can override inherited properties by defining a property with the same name, which replaces the inherited property definition. The system detects conflicting properties and prevents their creation.
Markdown Rendering Hint: MarkdownTopic(Default Properties) not rendered because level 5 >= maxLevels (5)
View Inheritance
Views are inherited from parent traits to child types. All views defined in parent traits become available on the child type. You can override inherited views by defining a view with the same name, which replaces the inherited view definition.
Method Inheritance
Schema methods are inherited from parent traits to child types. All methods defined in parent traits become available on the child type. You can override inherited methods by defining a method with the same name. Overridden methods are not called automatically, only your override executes.
You can call parent methods from child implementations using the syntax $.SuperType.methodName(), where SuperType is the name of the parent trait. For example, if your type Article inherits from a trait Content with a validate() method, you call $.Content.validate() from your Article.validate() method to execute the parent validation before adding your own.
Lifecycle Method Inheritance
Lifecycle methods follow different inheritance rules than regular methods. All lifecycle methods in the type hierarchy are called automatically, regardless of whether child types override them. This ensures that initialization, validation, and cleanup logic defined in parent traits always executes.
The Access Control dialog is a standardized interface used across nearly all data types in Structr, with only minor variations based on the specific type you’re working with.
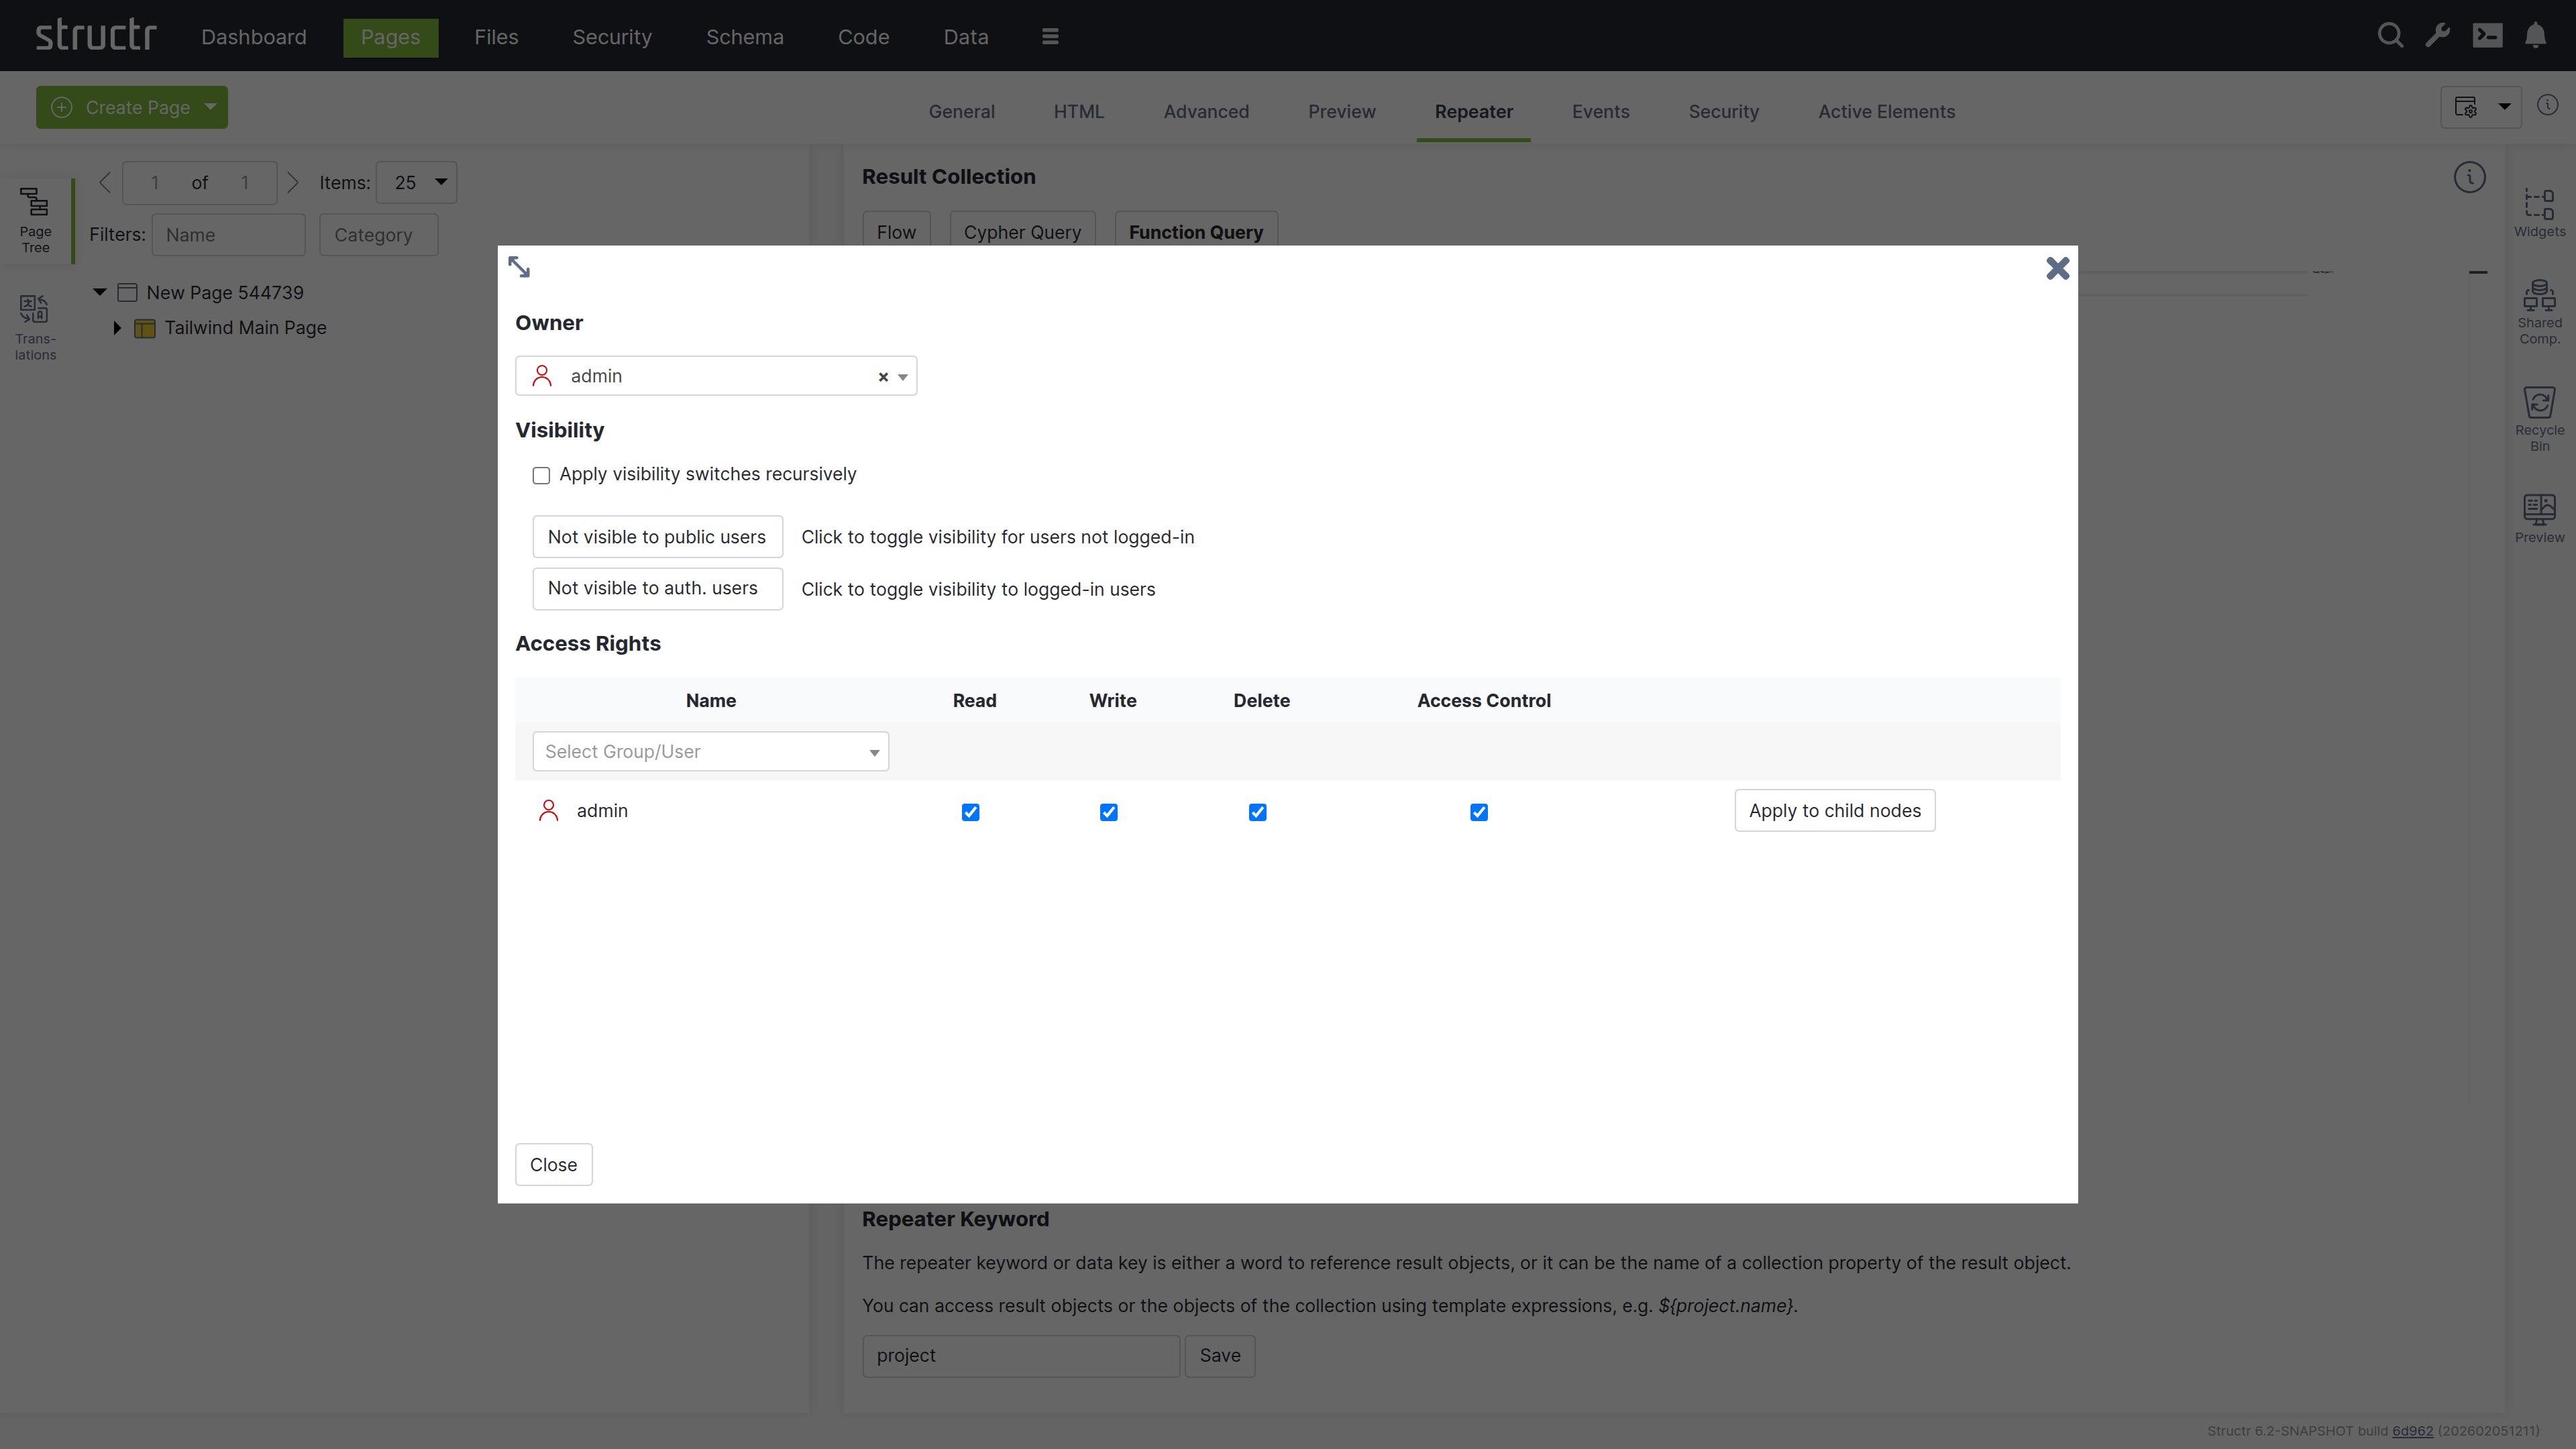
Owner
At the top of the dialog, you’ll see the current owner of the object. Use the dropdown to either assign a new owner or remove ownership entirely. These changes affect only the selected object by modifying its OWNS relationship in the database.
Visibility
The visibility section lets you control who can see the current object and its children using the familiar visibility flags for authenticated and unauthenticated users. If you check “Apply visibility switches recursively”, Structr propagates your visibility settings down through the entire hierarchy, which is especially useful when working with Pages, HTML elements, Templates, and Folders.
Permissions
The permissions table at the bottom lets you grant read, write, delete, and access control permissions to specific users or groups. Use the dropdown in the first row to add permissions for additional users or groups. In certain contexts, you can apply these permissions recursively to child objects as well. Remove a permission by unchecking the last checkbox in its row. These changes affect only the selected object by modifying its SECURITY relationships in the database.
Transactions & Indexing
All database operations in Structr follow ACID principles, ensuring your data remains consistent even in complex scenarios.
All-or-Nothing Operations
Transactions in Structr follow an all-or-nothing model. Either all changes within a transaction are committed to the database, or the entire transaction is rolled back and no changes are persisted. This prevents partial updates that could leave your data in an inconsistent state.
Thread-Level Transaction Handling
Structr handles each incoming request in a top-level transaction per thread. All operations performed during request processing occur within this transaction context, ensuring related changes are grouped together atomically.
Transaction Isolation
Structr transactions provide read-your-own-writes isolation. Within a transaction, you immediately see changes you’ve made, but you cannot see uncommitted changes from other concurrent transactions. Data from other transactions only becomes visible after those transactions are committed successfully. This isolation ensures concurrent operations don’t interfere with each other.
Two-Step Transaction Process
Structr uses a two-step transaction model:
Markdown Rendering Hint: MarkdownTopic(Step 1: Pre-Commit Lifecycle Methods and Validation) not rendered because level 5 >= maxLevels (5)
Markdown Rendering Hint: MarkdownTopic(Step 2: Post-Commit Lifecycle Methods) not rendered because level 5 >= maxLevels (5)
The Modifications Object
In onSave methods, you can access the modifications keyword to see exactly what changed. This read-only object contains four elements:
| Key | Contents |
|---|---|
before | Previous values of changed local properties |
after | New values of changed local properties |
added | Relationships that were added |
removed | Relationships that were removed |
Example – checking what changed in onSave:
{
    let modifications = $.retrieve('modifications');

    if (modifications.after.status === 'published') {
        // Status was changed to published
        $.log('Object published by ' + $.me.name);
    }
}
Example modifications object when visibility flags were changed:
{
    "before": {"visibleToAuthenticatedUsers": false, "visibleToPublicUsers": false},
    "after": {"visibleToAuthenticatedUsers": true, "visibleToPublicUsers": true},
    "added": {},
    "removed": {}
}
Example when a relationship was removed (note that removed contains UUIDs):
{
    "before": {},
    "after": {},
    "added": {},
    "removed": {"owner": "5ba37699ca8f4a8b92ded77c93629f0e"}
}
For “to-many” relationships, the values are arrays of UUIDs. For “to-one” relationships, the value is a single UUID string.
Multiple Lifecycle Methods
You can define multiple lifecycle methods of the same type on a single type by adding a suffix. For example, onCreate01, onCreate02, and onCreateValidation are all called when an object is created. This allows you to organize complex initialization or validation logic into separate methods.
onDelete Limitations
In onDelete methods, the object has already been deleted from the database. Using the this keyword results in an error. If you need to access object data during deletion, store the relevant values before the delete operation or use the modifications object.
Passive Indexing
Passive indexing is the term for reading a dynamic value from a property (e.g. Function Property or Boolean Property) at application level, and writing it into the database at the end of each transaction, so the value is visible to Cypher. This is important for BooleanProperty, because its getProperty() method returns false instead of null even if there is no actual value in the database. Hence a Cypher query for this property with the value false would not return any results. Structr resolves this by reading all passively indexed properties of an entity, and writing them into the database at the end of a transaction.
Processing Large Datasets
When processing large amounts of data, keeping everything in a single transaction can cause memory issues and long-running locks. Structr provides $.doInNewTransaction() to split work into smaller, independent transactions.
Markdown Rendering Hint: MarkdownTopic(Why Use Separate Transactions?) not rendered because level 5 >= maxLevels (5)
Markdown Rendering Hint: MarkdownTopic(Basic Pattern) not rendered because level 5 >= maxLevels (5)
Markdown Rendering Hint: MarkdownTopic(Iterative Pattern with Return Value) not rendered because level 5 >= maxLevels (5)
Markdown Rendering Hint: MarkdownTopic(Choosing a Batch Size) not rendered because level 5 >= maxLevels (5)
Data Creation & Import
This chapter provides an overview of the different ways in which data can be created or imported into Structr.
Note: Before you can import data into Structr, you need to define a schema. Structr can only access and manage objects that it can identify (using a UUID in the
idproperty) and map to a type in the schema (using thetypeproperty).
Importing CSV Data
You can import CSV data in two different ways:
- with the simple import dialog in the Data section
- with the CSV Import Wizard in the Files section
Simple Import Dialog
The simple CSV import dialog in the Data section is a tool to quickly import a limited dataset, based on very simple rules. The import is limited to a single type, the input can have a maximum size of 100,000 characters, and the columns in the CSV file must exactly match the property names of the target type. If you need more options, you can use the CSV Import Wizard in the Files section.
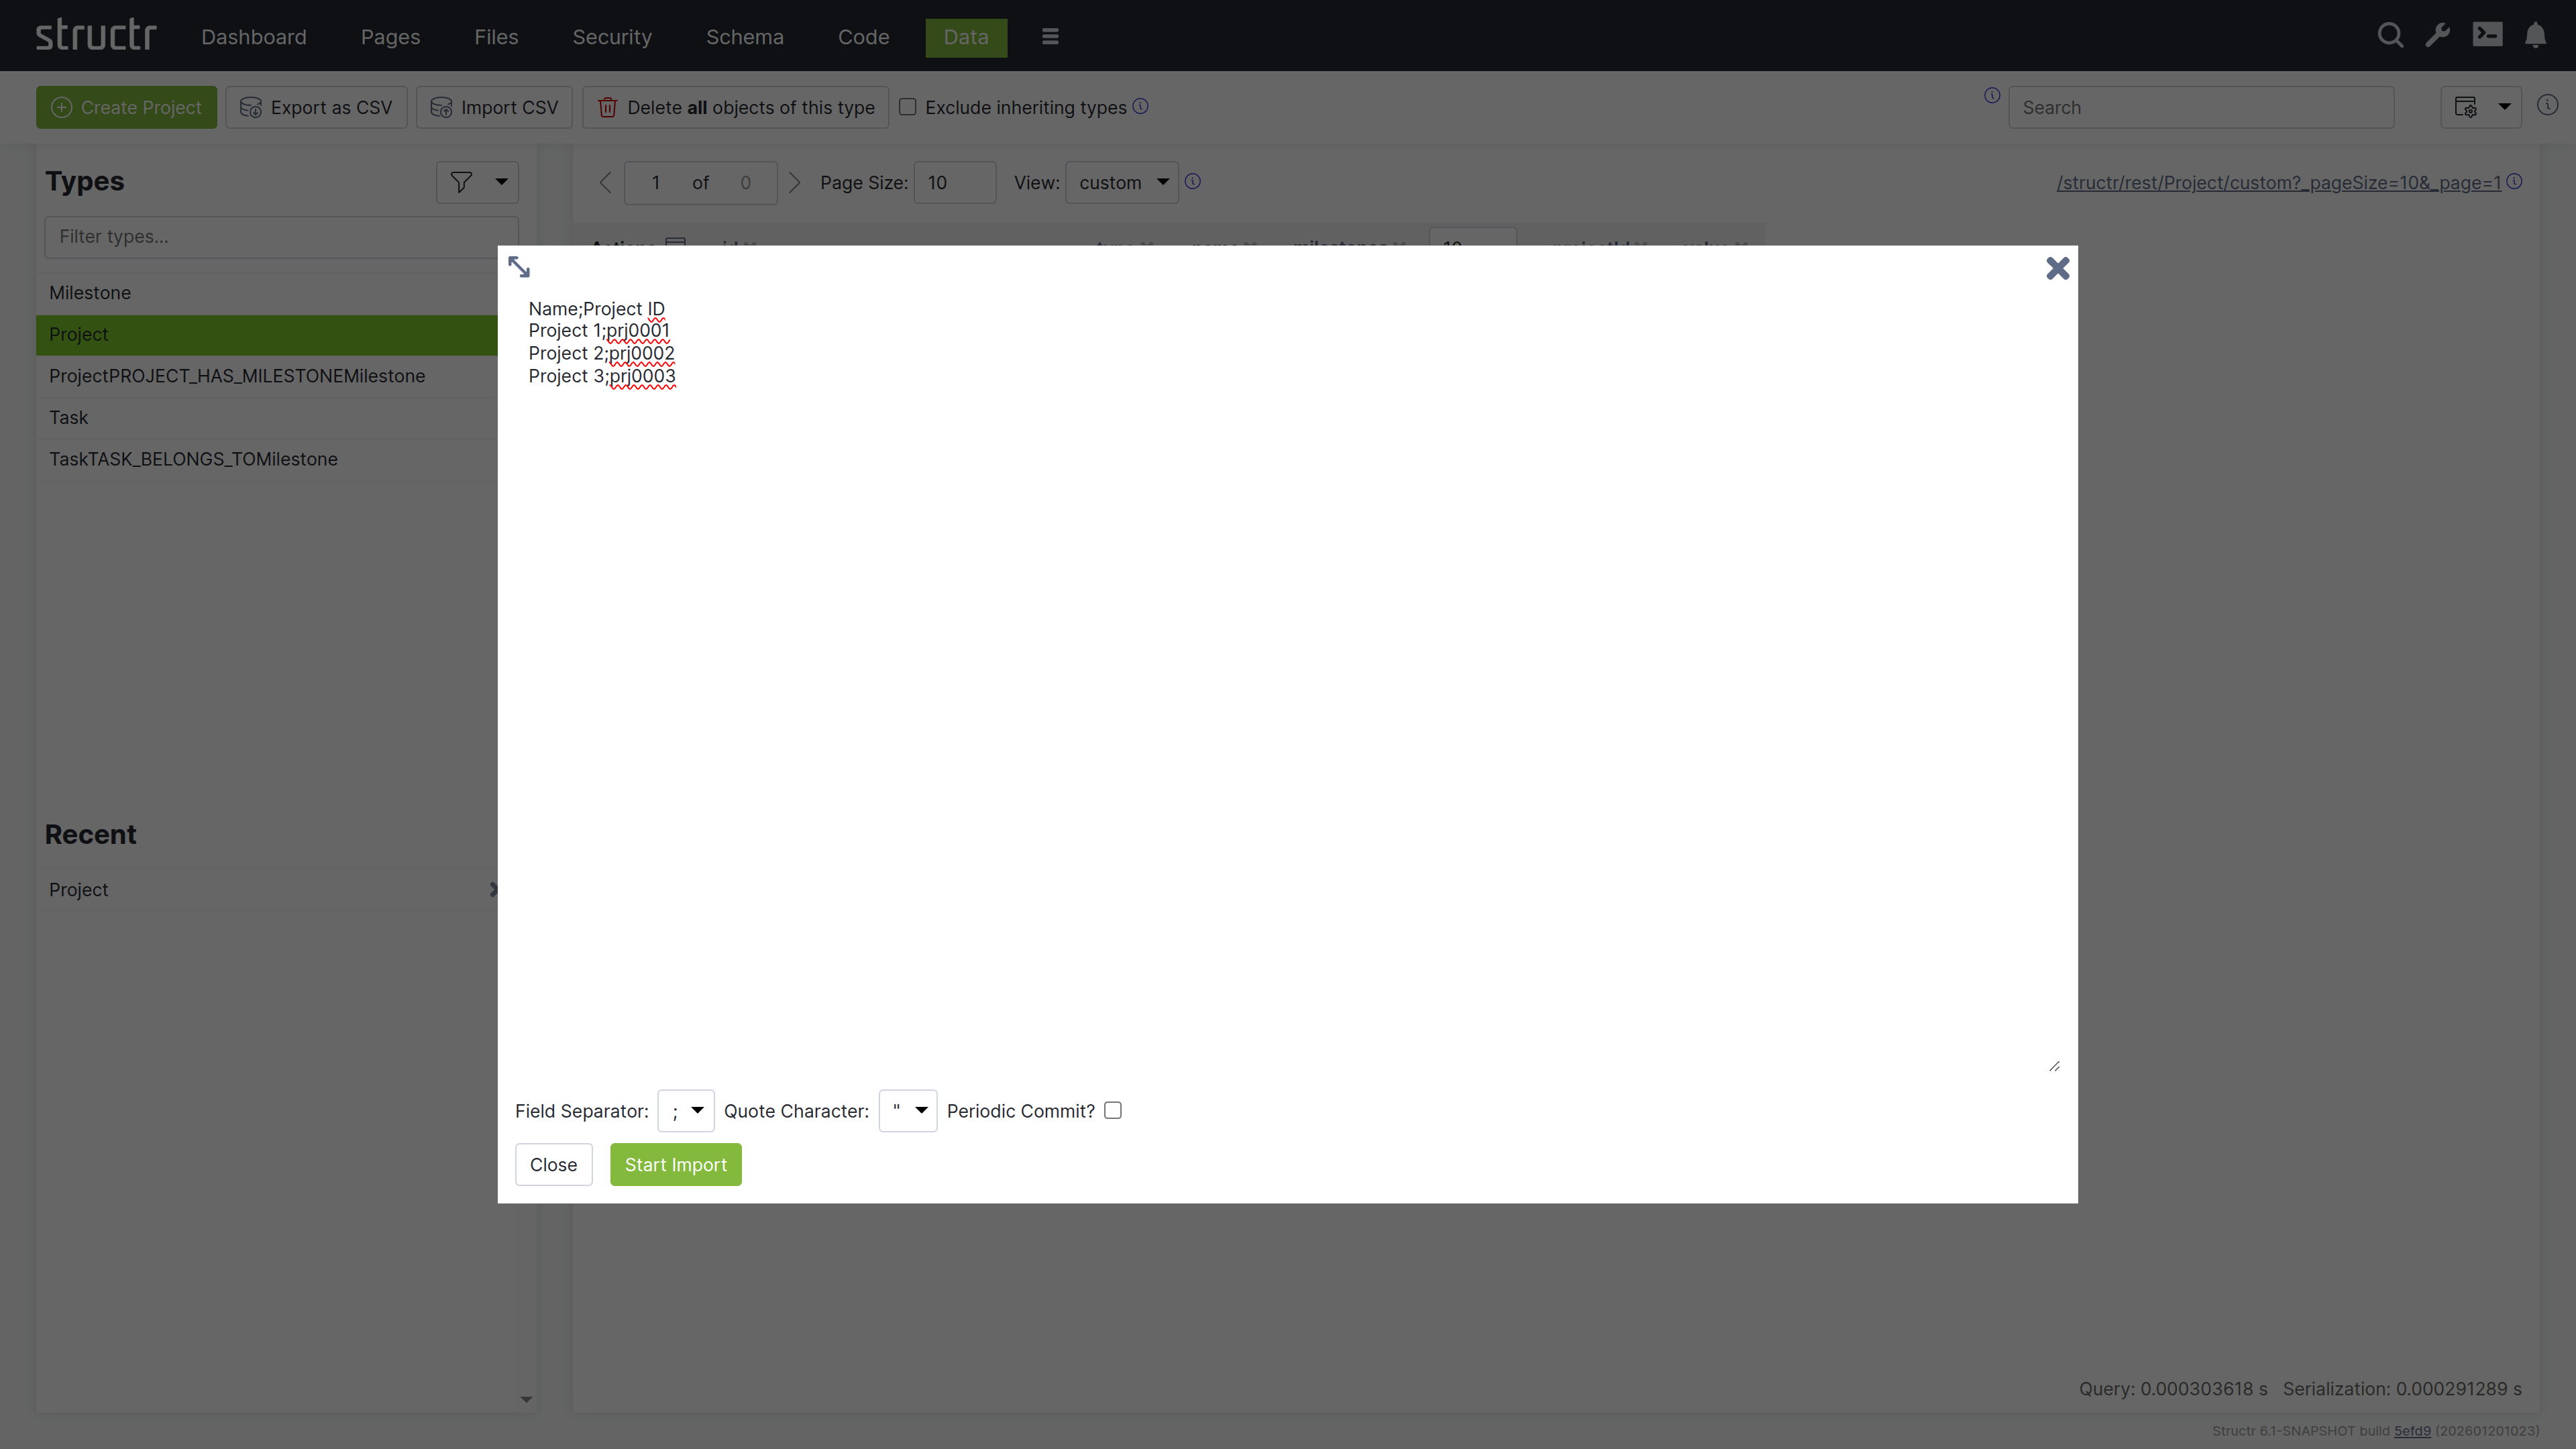
Import Wizard
The CSV Import Wizard allows you to import large and complex CSV files by mapping fields from the input document to properties of one or more schema types. You can also use a transformation function to modify values before the importing. The wizard recognizes fields with similar or identical names in the data to be imported and automatically selectes the corresponding target field in the data model.
The import wizard can be found in the Files section, because it is based on files in Structr Filesystem. This means that you need to upload the CSV file to Structr before you can import the data. The reason for that is that it is not possible to handle large amounts of data using copy & paste in your browser.
Once you uploaded a CSV file, you can open the Import Wizard by clicking on the “Import CSV” button in the context menu of the file. If the menu item is not there, you probably need to change the content type of the file to text/csv in the “General” settings.
Markdown Rendering Hint: MarkdownTopic(The Import Wizard) not rendered because level 5 >= maxLevels (5)
Markdown Rendering Hint: MarkdownTopic(Mixed Import Mode) not rendered because level 5 >= maxLevels (5)
Markdown Rendering Hint: MarkdownTopic(Storing Import Configurations for Later) not rendered because level 5 >= maxLevels (5)
Importing XML Data
Structr also offers an import wizard for XML documents, with a configurable mapping of XML structures to database objects. The XML Importer allows mapping of XML attributes to fields of the data model, but also allows mapping of entire XML elements (tags) to schema types. A nested object structure stored in an XML element can be transferred directly to a corresponding graph structure. The same applies to RDF triples stored in an XML document; these can be imported very easily with the appropriate data model.
The XML Import Wizard
The following screenshot shows the import dialog for an XML file that contains some sample projects. You can see and navigate the document structure on the left side, and configure the mapping actions on the right.
Note: Just like for CSV, the XML Import Wizard can be found in the context menu of XML files in the Files section, but only if the content type is
text/xmlorapplication/xml.
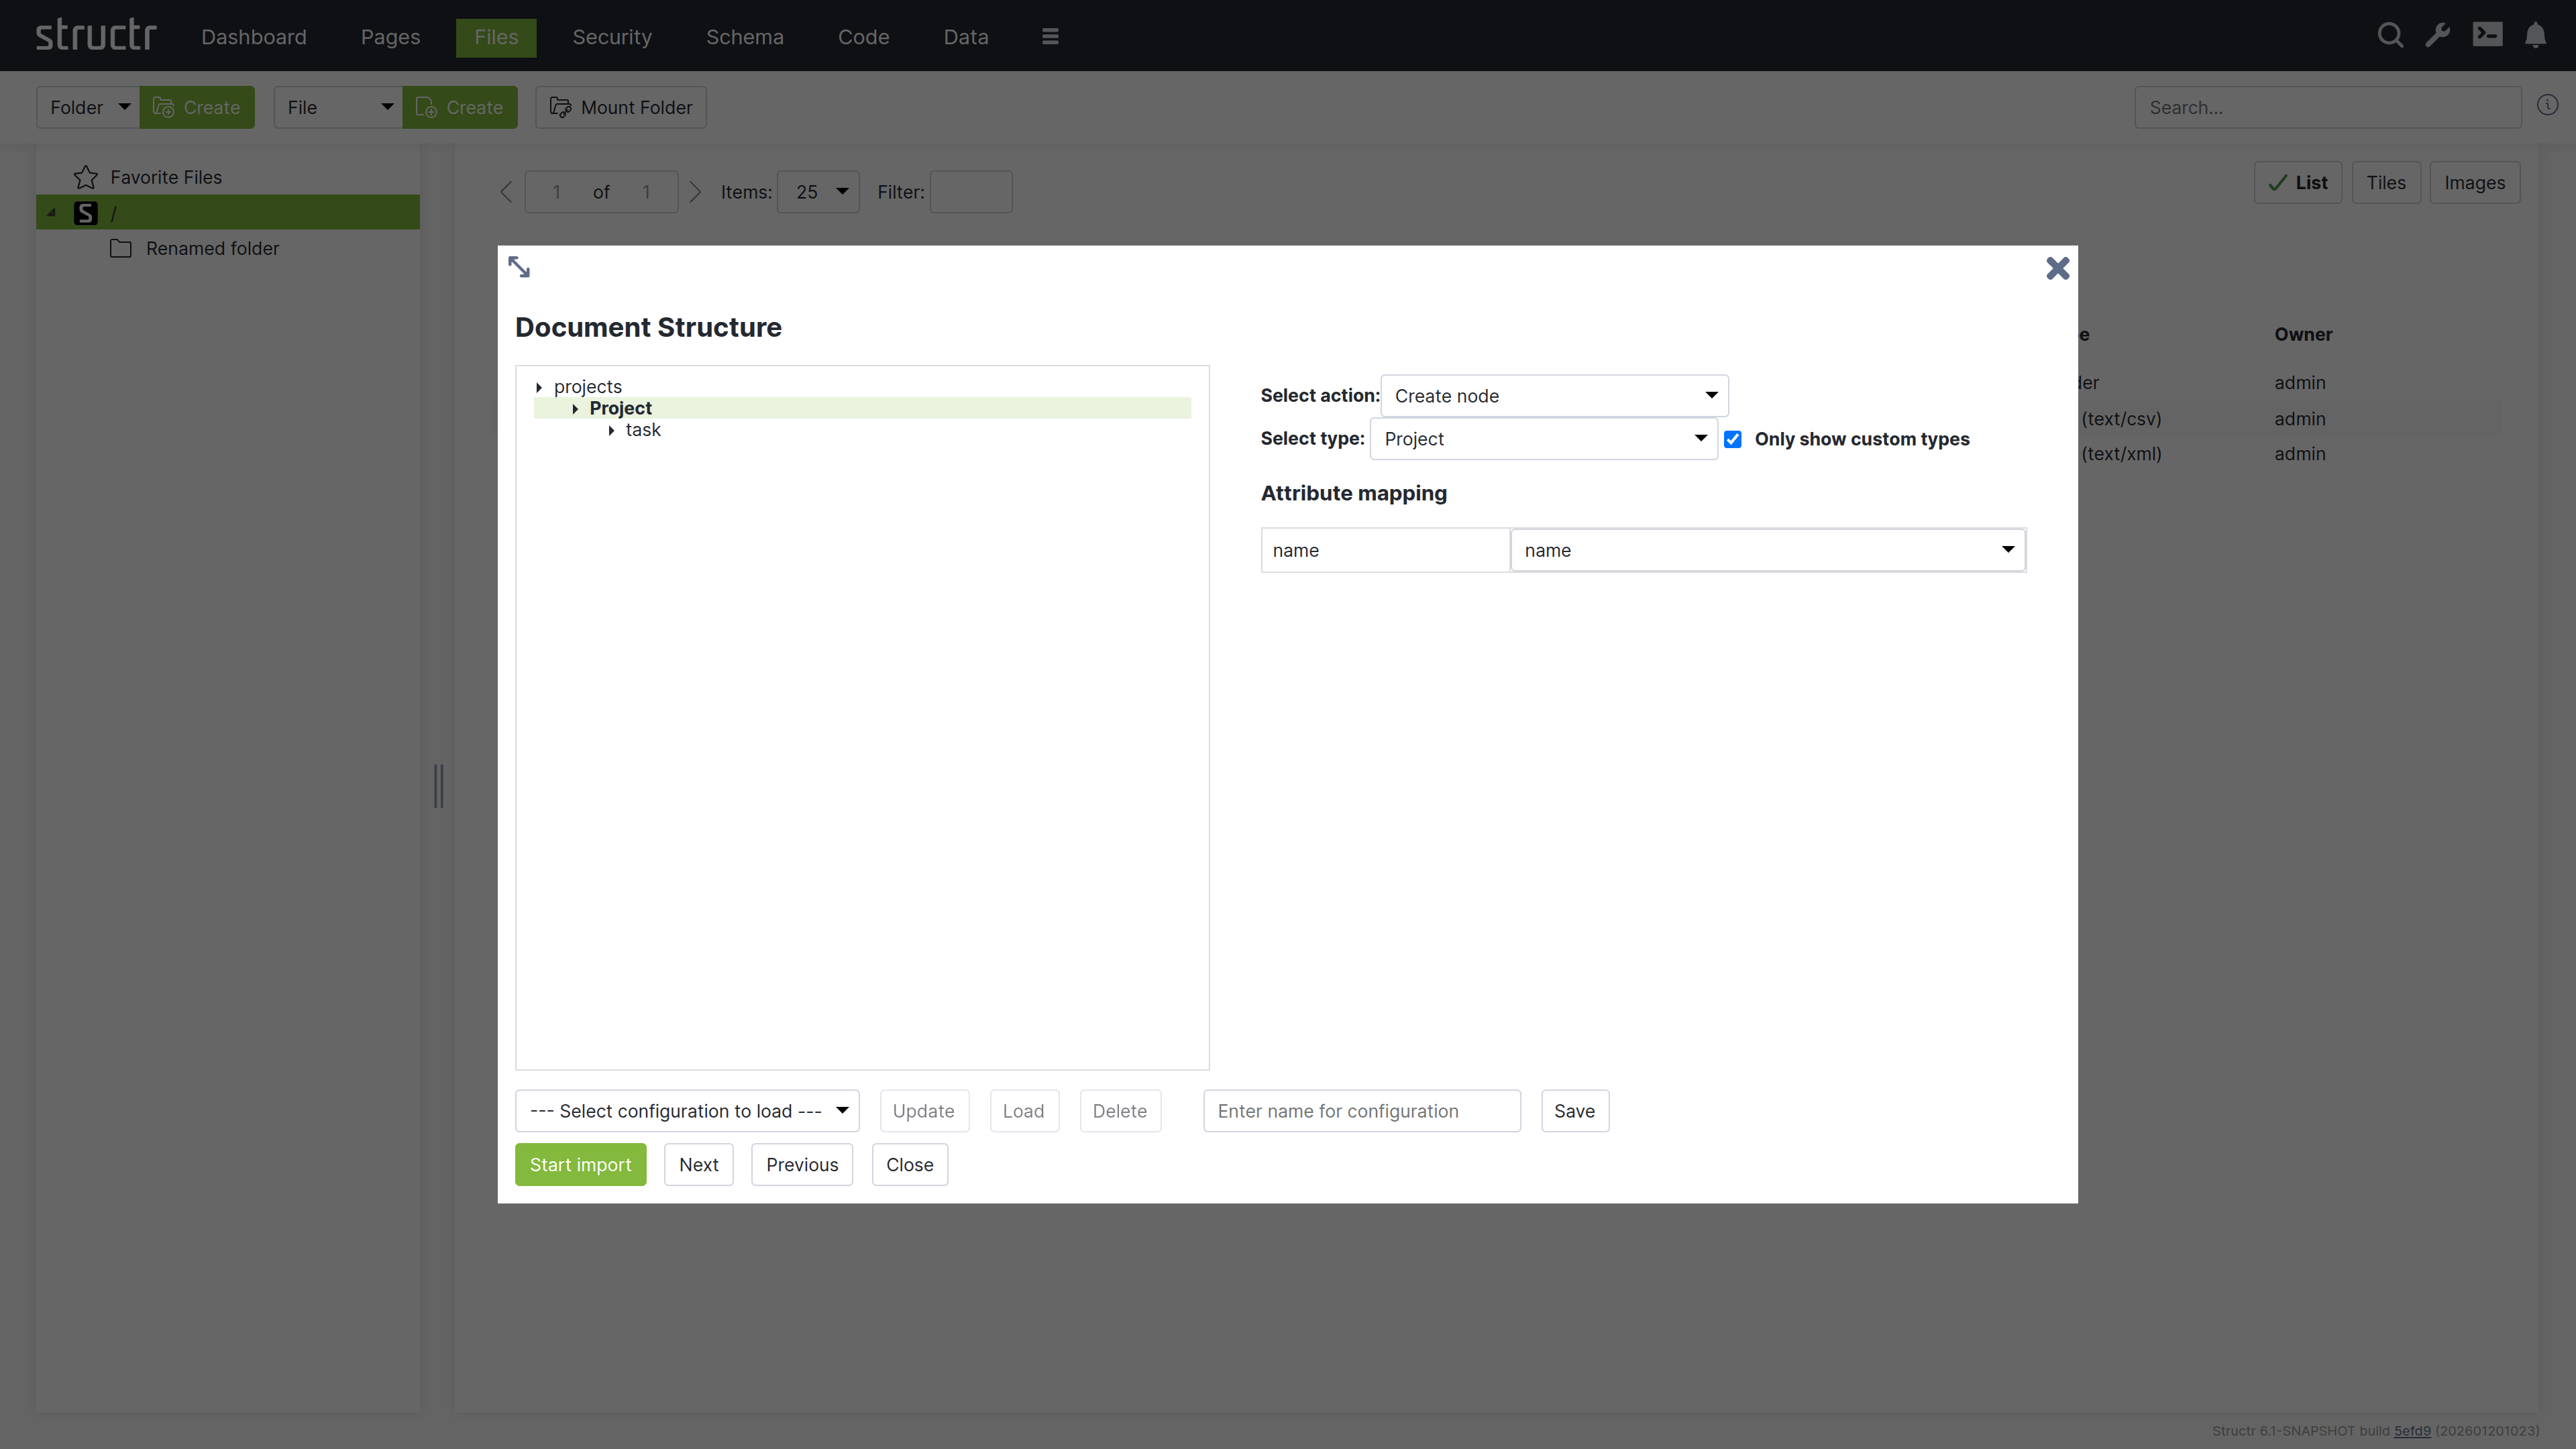
You can click on an element in the structure of the XML file to select one of the following actions.
- create a node
- set a property on a node that was created on a higher level
- skip this element
- ignore the whole branch
Markdown Rendering Hint: MarkdownTopic(Create Nodes) not rendered because level 5 >= maxLevels (5)
Markdown Rendering Hint: MarkdownTopic(Set Properties) not rendered because level 5 >= maxLevels (5)
Markdown Rendering Hint: MarkdownTopic(Create Connected Nodes) not rendered because level 5 >= maxLevels (5)
Markdown Rendering Hint: MarkdownTopic(Start Import) not rendered because level 5 >= maxLevels (5)
Markdown Rendering Hint: MarkdownTopic(Storing Import Configurations for Later) not rendered because level 5 >= maxLevels (5)
Importing JSON Data
Since Javascript Object Notation (JSON) is the default format for all data going over the REST interface, you can import JSON data very easily using REST. You can find more information about that in the REST Guide and in the REST API section of the Fundamental Concepts document.
Create Nodes
To create data in Structr, you can use the HTTP POST verb with a JSON document in the request body. The target URL for the POST request is determined by the type of object you want to create. Structr automatically creates corresponding REST Endpoints for all types in the data model and makes them available under /structr/rest/<Type>. In the following example, we create a new Project node, so the REST URL is /structr/rest/Project, which addresses the Collection Resource for that type.
Markdown Rendering Hint: MarkdownTopic(Request) not rendered because level 5 >= maxLevels (5)
Markdown Rendering Hint: MarkdownTopic(Response) not rendered because level 5 >= maxLevels (5)
Markdown Rendering Hint: MarkdownTopic(Result) not rendered because level 5 >= maxLevels (5)
Create Relationships
In most cases, relationships in the database can be managed automatically by Structr, using Contextual Properties. A contextual property is a property that manages the association between two objects. In the following example, the tasks property on the type Project is such a property.
Contextual properties use information from the data model to automatically create relationship in the database when objects are assigned.
You can manage the relationships between a project and its tasks by simply assigning one or more tasks to the project.
Markdown Rendering Hint: MarkdownTopic(Request) not rendered because level 5 >= maxLevels (5)
Result
You can examine the result of the two operations above by making a GET request to the Projects Collection Resource.
$ curl -HX-User:admin -HX-Password:admin http://localhost:8082/structr/rest/Project?sort=name
{
    "result": [
        {
            "name": "Project #1",
            "type": "Project",
            "id": "46b4cbfce4624f4a98578148229b77c2",
            "description": "My first project",
            "tasks": []
        },
        {
            "name": "Project #2",
            "type": "Project",
            "id": "897a3ad3b2b8441f898d41a1179a06b7",
            "description": "Another project",
            "tasks": [
                {
                    "id": "960f8b7acde14528a14bdcc812500eef",
                    "type": "Task",
                    "name": "Task #1"
                },
                {
                    "id": "0ea250b7743b46ed9b7e24411caafe06",
                    "type": "Task",
                    "name": "Task #2"
                }
            ]
        }
    ],
    "query_time": "0.000090662",
    "result_count": 2,
    "page_count": 1,
    "result_count_time": "0.000092554",
    "serialization_time": "0.000454289"
}
Please note that this example needs the setting “Automatic Creation of Related Nodes” to be active on the relationship between Project and Task to work.
If you want to create a relationship between two objects directly, you can use the Collection Resource for the corresponding relationship type and provide the UUIDs of the source and target nodes in the sourceId and targetId properties of the request. This allows you to set properties on the relationship object.
Learn More
If you want to learn more about the REST API, please read the REST Guide or the section about the REST API in the Fundamental Concepts document.
Using Scripting to Create Data
The Structr Scripting Engine provides a number of built-in functions to create, modify and delete nodes and relationships in the database.
Create Nodes
To create nodes in a scripting environment, you can use the create() function. The create function uses a syntax very similar to the request body of a REST POST request as shown in the following Javascript example.
${{
    // create new project
    let newProject = $.create('Project', {
        "name": "Project #1",
        "description": "My first project"
    });

    // change the description
    newProject.description = "This project was updated.";
}}
After creating the object, you can use it in your script as if it were a normal object. You can use dot-notation to read and write properties, and you can even assign other objects like in the next example.
Create Relationships
To create relationships in a scripting environment, you can use the contextual properties that were introduced in the JSON section above. In the example below, we create a Project and two Task objects and use the contextual attribute tasks to let Structr create the relationships.
${{
    // create new project
    let project = $.create('Project', {
        "name": "Project #2",
        "description": "My second project"
    });

    let task1 = $.create('Task', { "name": "Task #1" });
    let task2 = $.create('Task', { "name": "Task #2" });

    project.tasks = [ task1, task2 ];
}}
Contextual properties use information from the data model to automatically create relationship in the database when objects are assigned.
Importing Data From Webservices
Structr provides a number of built-in functions to access external data sources and transform the data: GET, PUT, POST, from_csv, from_json, from_xml. You can then use JavaScript to process the results and create objects using the create() function mentioned in the previous section.
The following example shows how to use built-in functions in a schema method to consume a webservice and process the results.
{
    let url = "https://example.datasource.url/customers.json";
    let json = $.GET(url, "application/json");
    let data = $.fromJson(json);

    data.entries.forEach(entry => {

        $.create("Customer", {
            name: entry.name,
            title: entry.title
        });
    });
}
Using Cypher to Create Data
You can use your own Cypher queries to create data in the underlying database as long as you make sure that the type attribute always contains the name of the target type in the Structr data model.
Please note that the data will not be visible immediately, because it first needs to be initialized with a UUID and the type labels of the inheritance hierarchy.
To initialize the data for use with Structr, please refer to the next section, “Initializing existing data in Neo4j”.
Accessing Existing Data in Neo4j
Data in a Neo4j database is available in Structr if the following requirements are met:
- For all data types in Neo4j that should be accessed through Structr, data types must exist in Structr that match the node label. Create these types in the Schema Editor.
- The
typeattribute of every node instance is set to the primary type (=simple class name). This is necessary because Neo4j labels don’t have a reliable order. - Nodes and relationships have an
idString property with a UUID as value. Use the “Add UUIDs” function from Schema section -> Admin -> Indexing. - The primary type (simple class name) as well as the supertypes and implementing interfaces have to be set as labels in Neo4j. Use the maintenance command “Create Labels” from Schema -> Admin -> Indexing to set all necessary labels.
It is recommended to rebuild the index and flush the caches after running the above maintenance commands.
Importing Data from JDBC Sources
Importing data from a SQL database is possible via the jdbc() function in the Structr scripting engine. You can execute an SQL query on a server and process or display the result in your application. The code for that is essentially the same as for the “Import from Webservices” example above.
{
    let url = "jdbc:mysql://localhost:3306/customer";
    let query = "SELECT name, title FROM Customer";
    let data = $.jdbc(url, query);

    data.entries.forEach(entry => {

        $.create("Customer", {
            name: entry.name,
            title: entry.title
        });
    });
}
You can provide the fully-qualified class name (FQCN) of your preferred JDBC driver as a third parameter to the jdbc() function, and Structr will use that driver to make the connection. Please note that the driver JAR is most likely not shipped with the Structr distribution, so you have to put it in the lib directory of your Structr installation manually.
Pages & Templates
After defining a first version of the data model, the next step is usually to build a user interface. This can be done in the Pages area.
Working with Pages
A page in Structr consists of HTML elements, template blocks, content elements, or a combination of these. Pages are rendered on the server, so the browser receives fully rendered HTML rather than JavaScript that builds the page client-side.
Why Server-Side Rendering
Modern web development often defaults to client-side frameworks where JavaScript builds the page in the browser. This approach has trade-offs: users wait for JavaScript to load and execute before seeing content, build pipelines add complexity, and search engines may not index pages correctly.
In Structr, the server renders complete HTML and sends it to the browser, ready to display. There is no build step, no hydration, no waiting for JavaScript to construct the page. When something looks wrong, you debug in one place rather than tracing through client-side state management and component lifecycles.
From Design to Application
The Structr way of building applications is to start with an HTML structure or design template and make it dynamic by adding repeaters and data bindings. This approach lets you convert a page layout directly into a working application – the design stays intact while you add functionality. It works especially well with professionally designed web application templates from sources like ThemeForest.
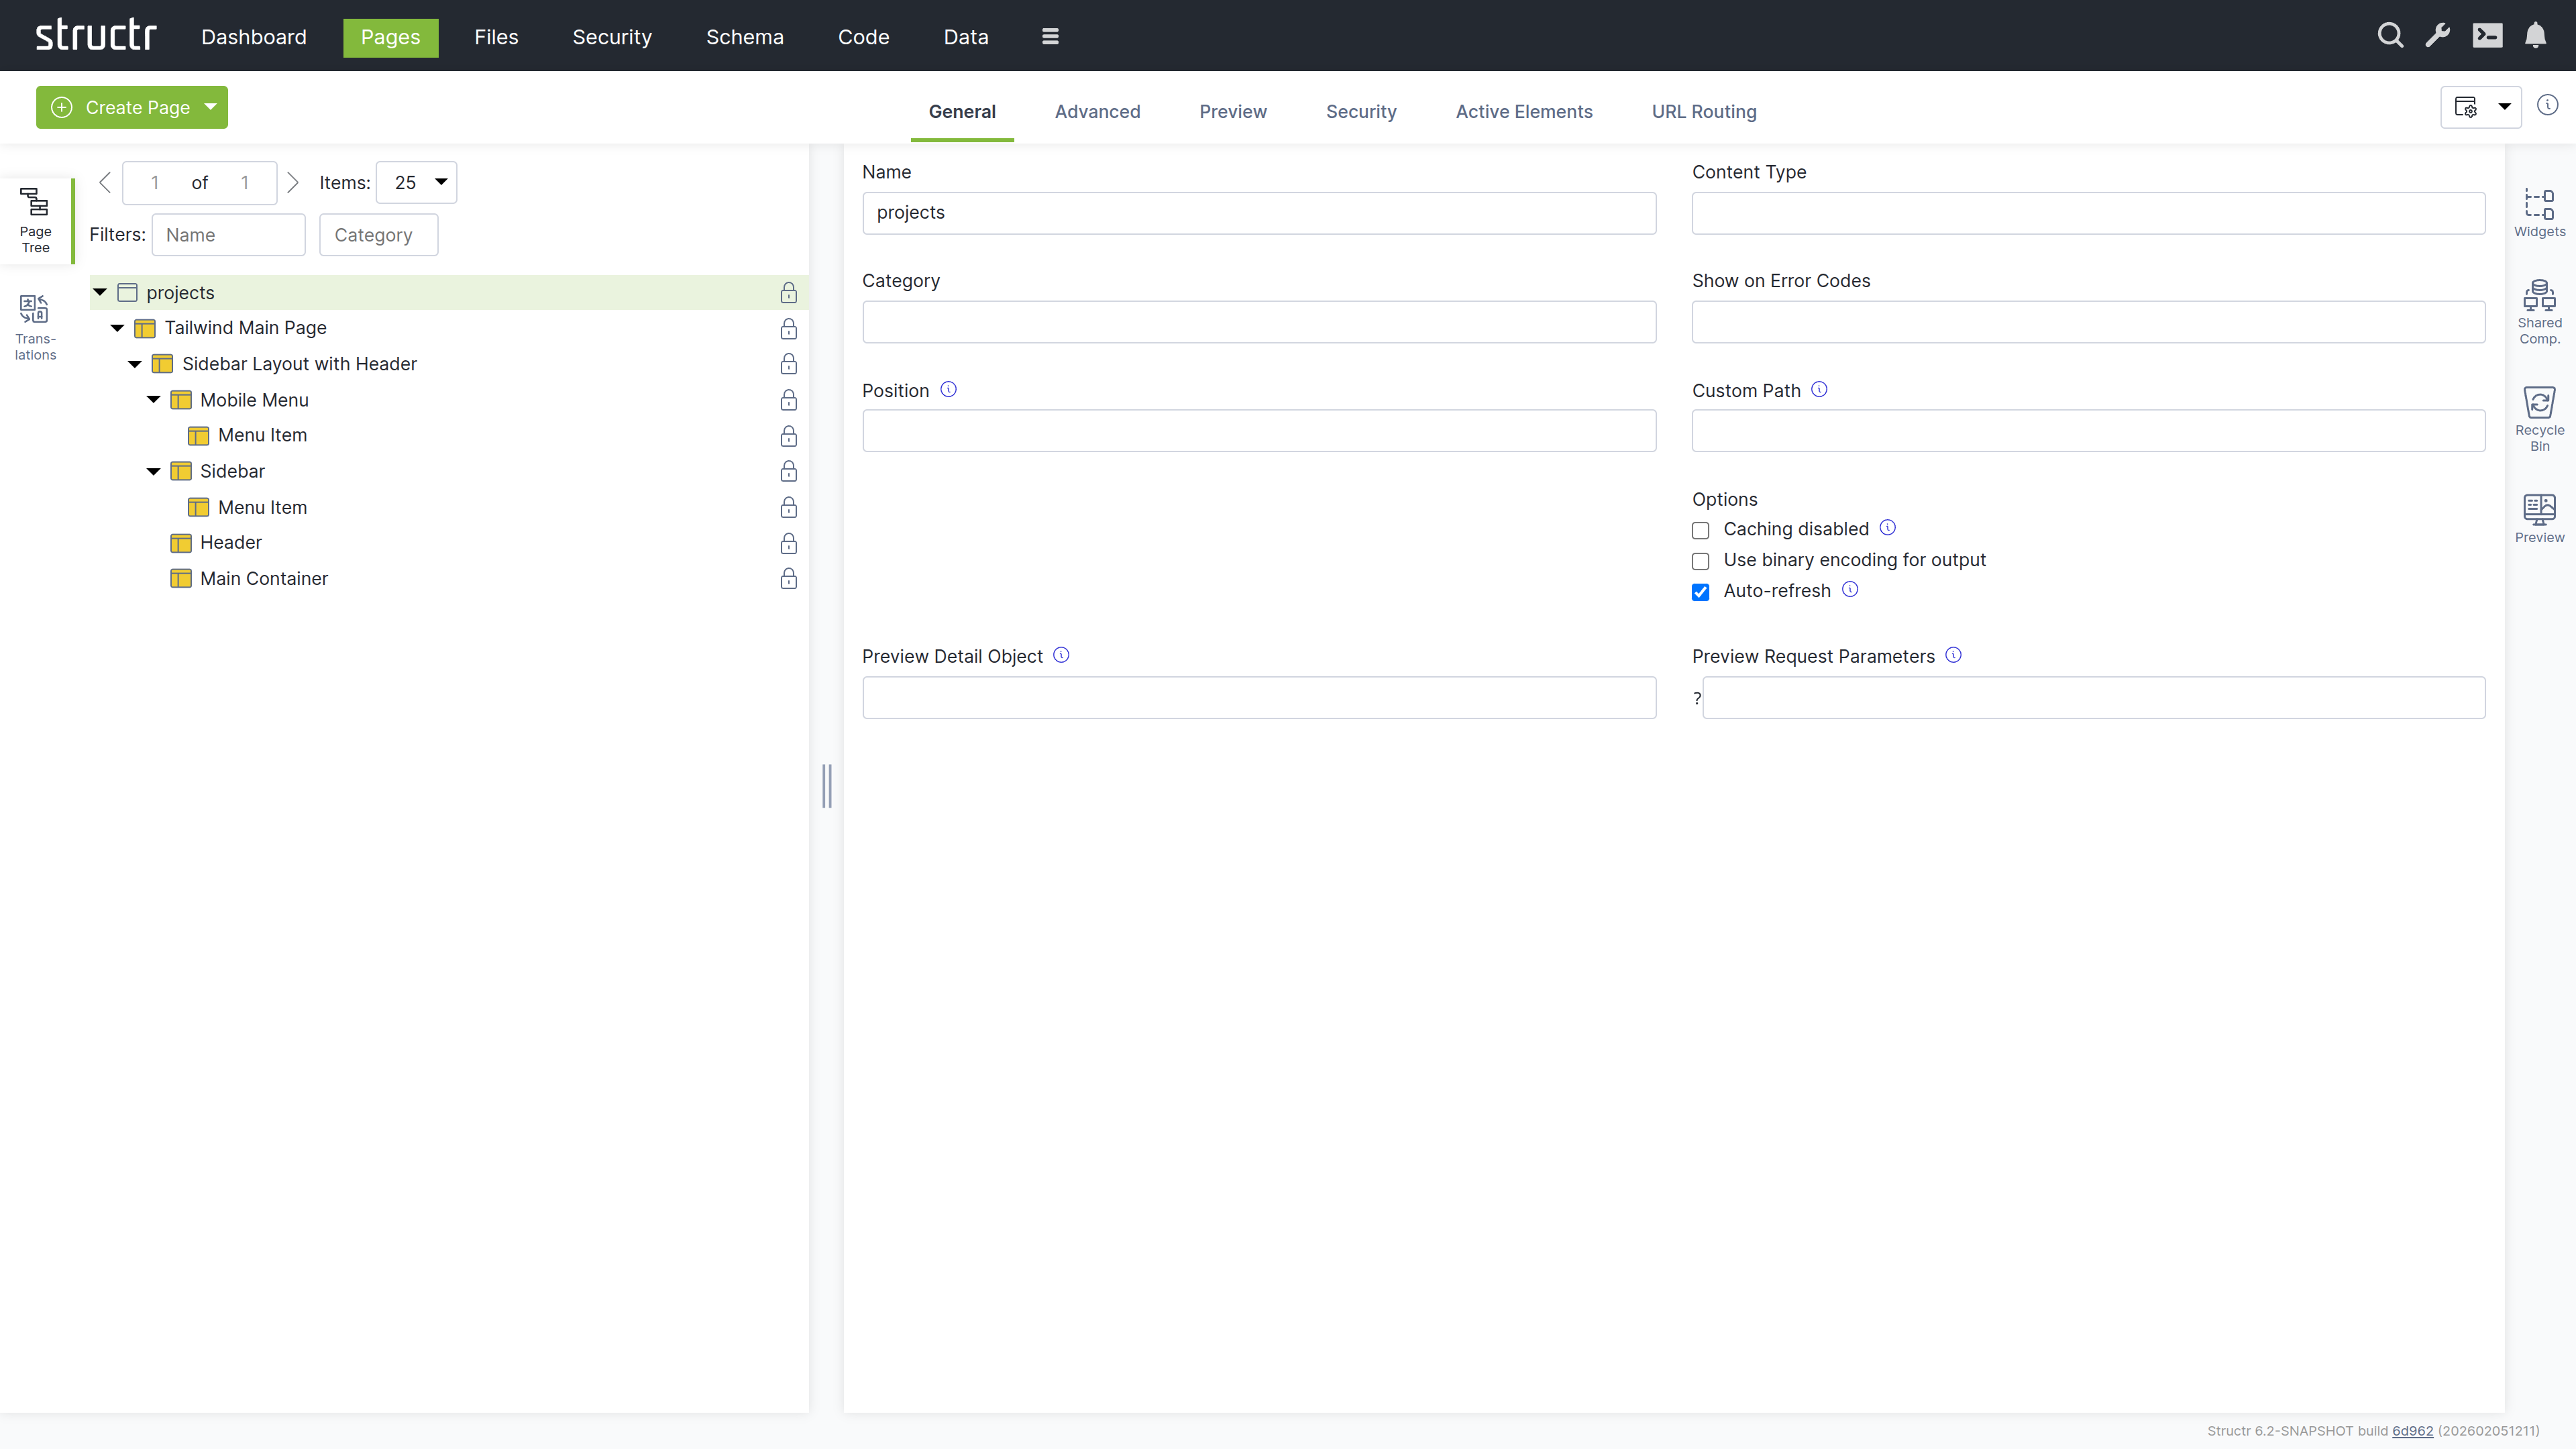
Modifying the Page Tree
Once you have created a page, you can modify it by adding and arranging elements in the page tree. Add elements by right-clicking and selecting from the context menu, or by dragging widgets from the Widgets flyout into the page.
Element Types
HTML elements provide the familiar tag-based structure - <div>, <section>, <article>, and other standard tags. Template elements contain larger blocks of markup and can include logic that pre-processes data for use further down the page. Content elements insert text or dynamic values wherever text appears: in headings, labels, table cells, or paragraphs. Widgets are pre-built page fragments that you can drag into your page to add common functionality. Shared components are reusable elements that you define once and reference across multiple pages. Changes to a shared component are reflected everywhere it is used.
Static Resources
Static resources like CSS files, JavaScript files, and images are stored in the Structr file system and can be included in your pages by referencing their path. For details on how to work with files, including dynamic file content with template expressions, see the Files chapter.
Dynamic Content
Pages can produce static output or dynamic content that changes based on data, user permissions, or request parameters. Template expressions let you insert dynamic values in content elements, HTML attributes, or template markup.
Repeaters
To display collections of database objects - such as a list of users or a product catalog - configure an element as a repeater. The repeater retrieves a collection of objects and renders the element once for each result. For example, a <tr> element configured as a repeater produces one table row for each object in the collection. You can call methods on your types to retrieve the data, or call flows if you use Flows.
Partial Reload
For updates without full page reloads, you can configure individual elements to refresh independently - after a delay, when they become visible, or at regular intervals. Event action mappings can also trigger partial reloads in response to user interactions, updating specific parts of the page while keeping the rest intact.
Controlling Visibility
Show and hide conditions determine whether a part of the page appears in the output, based on runtime data or user state. Visibility flags and permissions offer another layer of control - you can make entire branches of the page tree visible only to specific users or groups, for example an admin menu that only administrators can see.
Preview and Testing
The preview tab shows how your page is rendered. You can assign a preview detail object and request parameters in the page settings to test how your page behaves with different data. The preview also allows you to edit content directly - clicking on text in the preview selects the corresponding content element, where you can modify it in place.
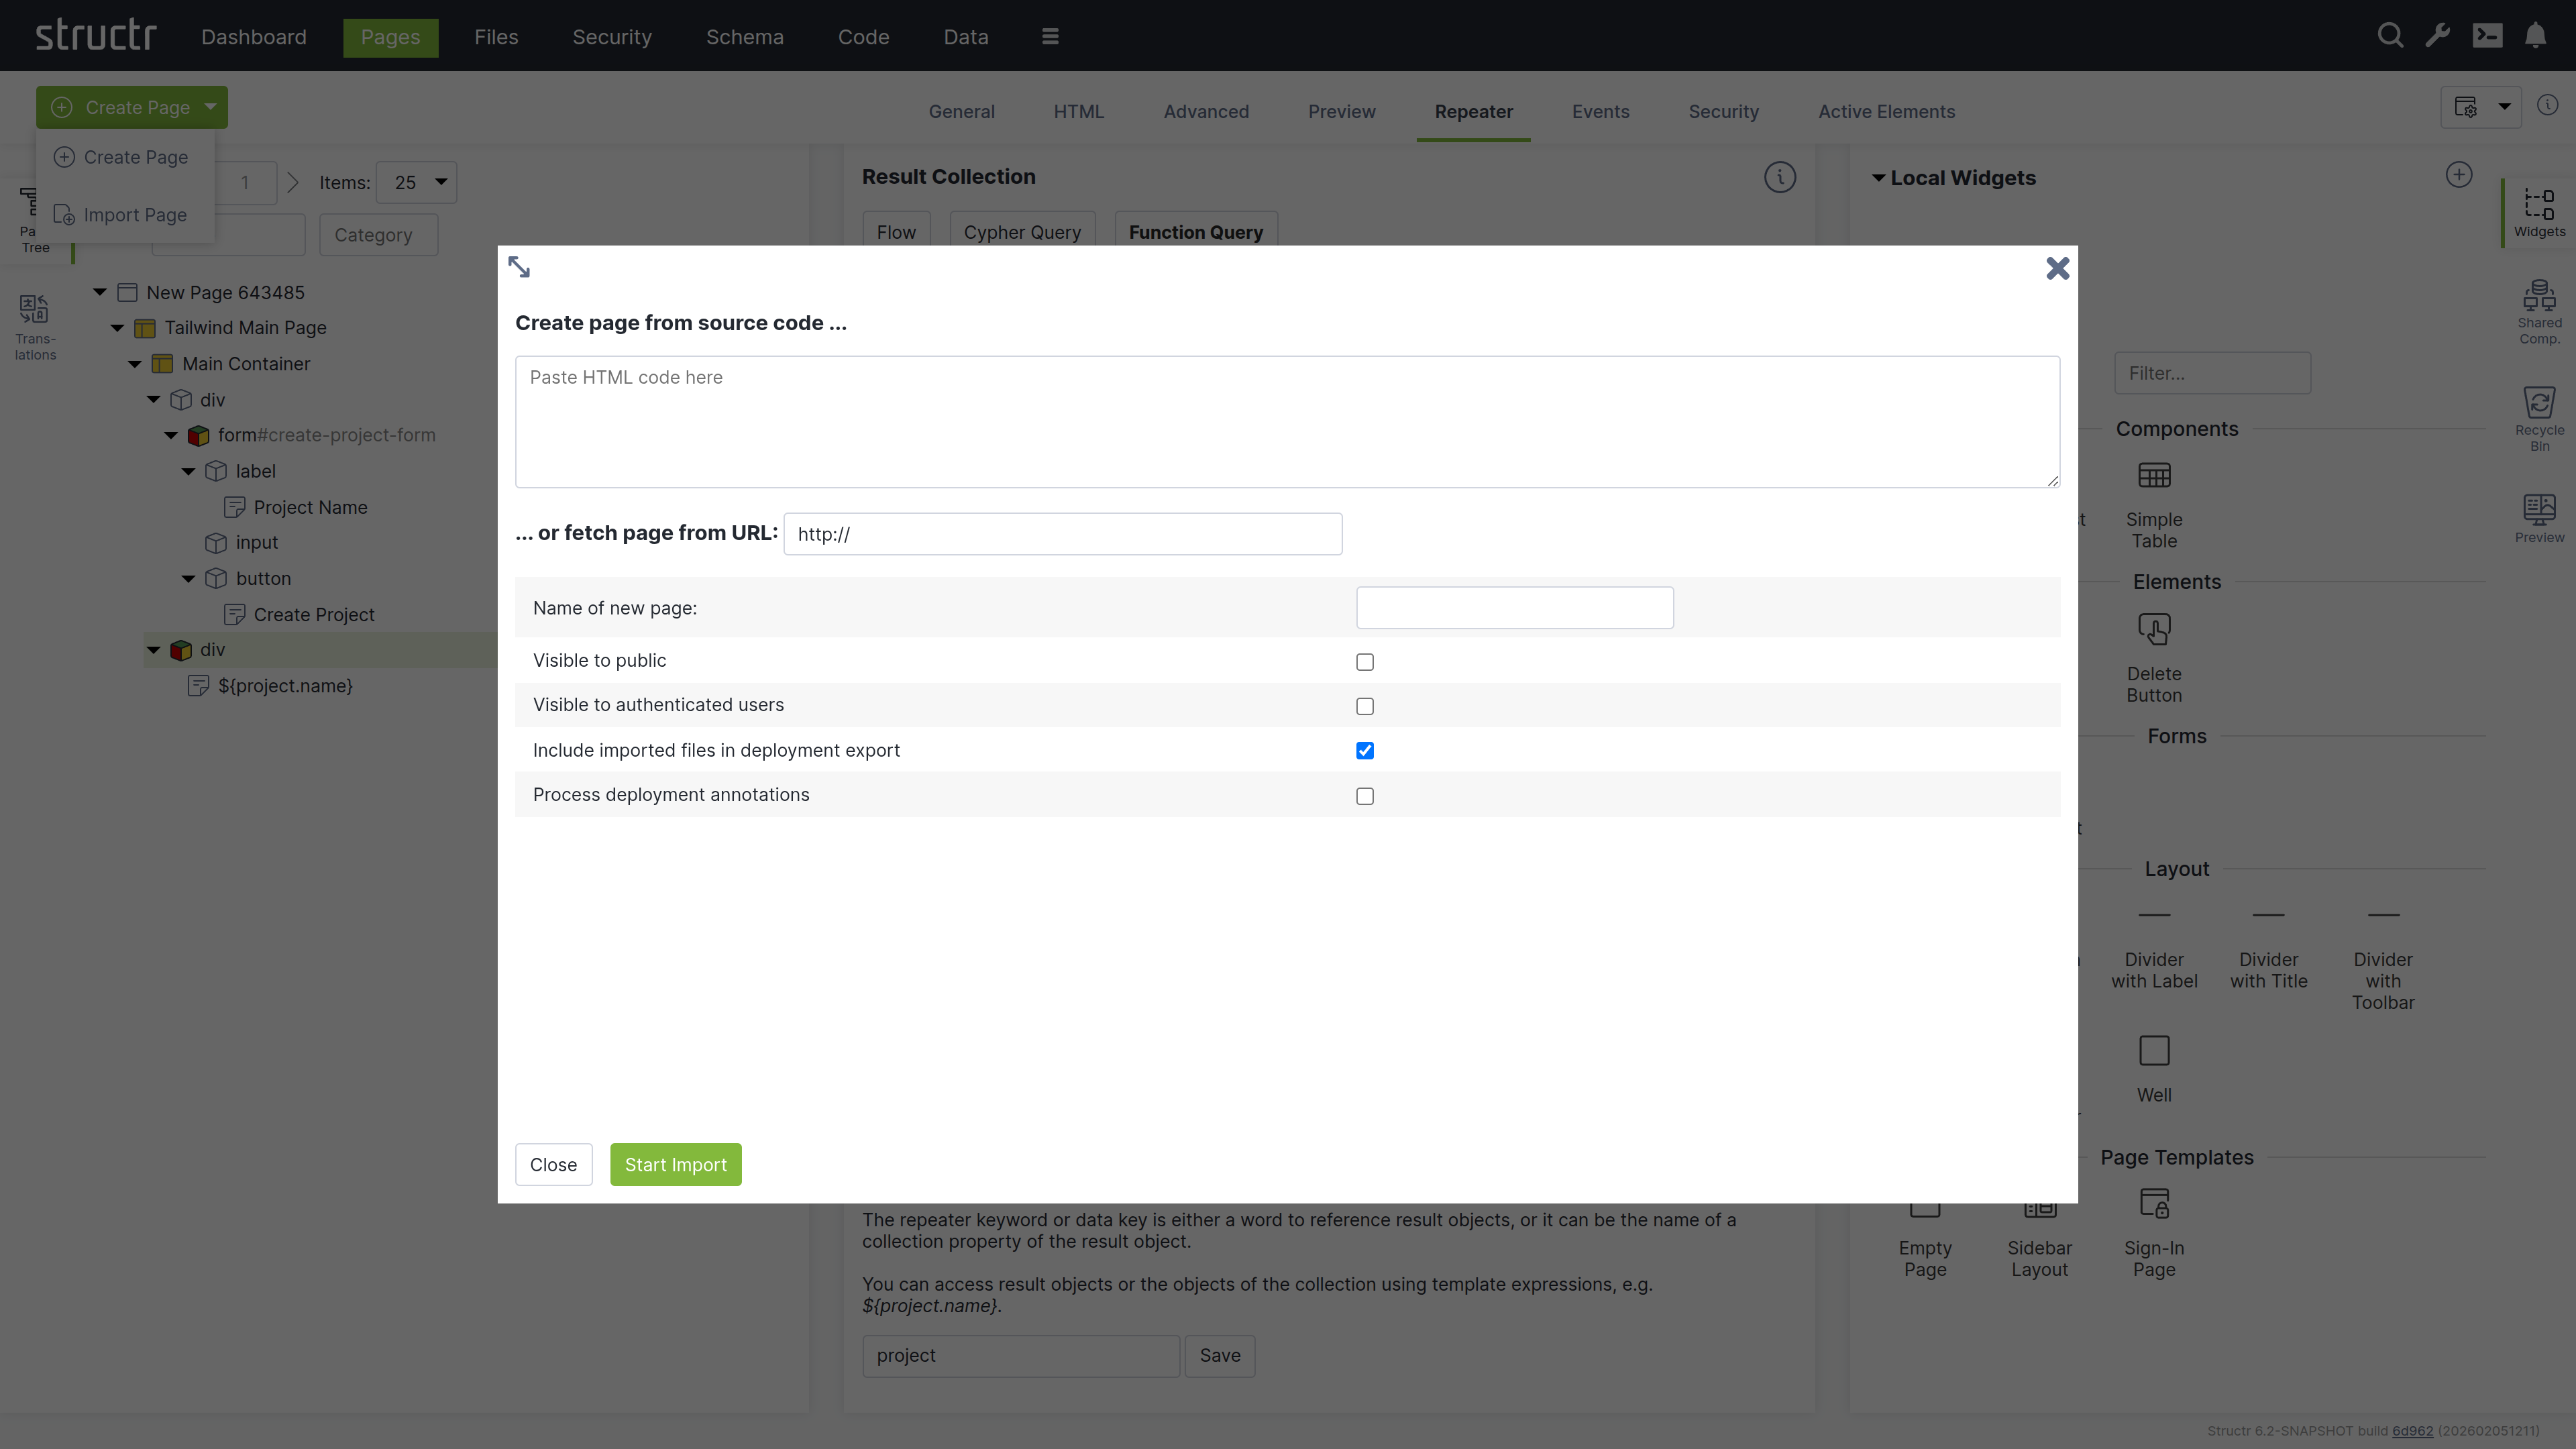
Creating a Page
When you click the green “Create Page” button in the upper left corner of the Pages section, you can choose whether to create a page from a template or import one from a URL.
Create Page Dialog
Markdown Rendering Hint: MarkdownTopic(Templates) not rendered because level 5 >= maxLevels (5)
Markdown Rendering Hint: MarkdownTopic(Page Templates Are Widgets) not rendered because level 5 >= maxLevels (5)
Import Page Dialog
The Import Page dialog lets you create pages from HTML source code or by importing from external URLs.
Markdown Rendering Hint: MarkdownTopic(Create Page From Source Code) not rendered because level 5 >= maxLevels (5)
Markdown Rendering Hint: MarkdownTopic(Fetch Page From URL) not rendered because level 5 >= maxLevels (5)
Markdown Rendering Hint: MarkdownTopic(Configuration Options) not rendered because level 5 >= maxLevels (5)
Markdown Rendering Hint: MarkdownTopic(Deployment Annotations) not rendered because level 5 >= maxLevels (5)
The Page Element
The Page element sits at the top of a page’s element tree and represents the page itself. Below the Page element, there is either a single Template element (the Main Page Template) or an <html> element containing <head> and <body> elements. Templates can also be used to create non-HTML pages: by setting the content type to application/json, text/xml, or text/plain, you can make the page return any content you want.
Appearance
Page elements appear as an expandable tree item with a little window icon, the page name and optional position attribute on the left, and a lock icon on the right. Click the lock icon to open the Access Control dialog. The icon’s appearance indicates the visibility settings: no icon means both visibility flags are enabled, while a lock icon with a key means only one flag is enabled.
Interaction
When you hover over the Page element with your mouse, two additional icons appear: one opens the context menu (described below) and one opens the live page in a new tab. Note that you can also open the context menu by right-clicking the page element. Left-clicking the Page element opens the detail settings in the main area of the screen in the center.
Access Control Dialog
Clicking the lock icon on the page element opens the access control dialog for that page. The Access Control dialog is a standardized interface used across nearly all data types in Structr, with only minor variations based on the specific type you’re working with.
Owner
At the top of the dialog, you’ll see the current owner of the object. Use the dropdown to either assign a new owner or remove ownership entirely. These changes affect only the selected object by modifying its OWNS relationship in the database.
Visibility
The visibility section lets you control who can see the current object and its children using the familiar visibility flags for authenticated and unauthenticated users. If you check “Apply visibility switches recursively”, Structr propagates your visibility settings down through the entire hierarchy, which is especially useful when working with Pages, HTML elements, Templates, and Folders.
Permissions
The permissions table at the bottom lets you grant read, write, delete, and access control permissions to specific users or groups. Use the dropdown in the first row to add permissions for additional users or groups. In certain contexts, you can apply these permissions recursively to child objects as well. Remove a permission by unchecking the last checkbox in its row. These changes affect only the selected object by modifying its SECURITY relationships in the database.
Permissions Influence Rendering
Visibility flags and permissions don’t just control database access, they also determine what renders in the page output. You can make entire branches of the HTML tree visible only to specific user groups or administrators, allowing you to create permission-based page structures. For example, an admin navigation menu can be visible only to users with administrative permissions.
For conditional rendering based on runtime conditions, see the Show and Hide Conditions section in the Dynamic Content chapter.
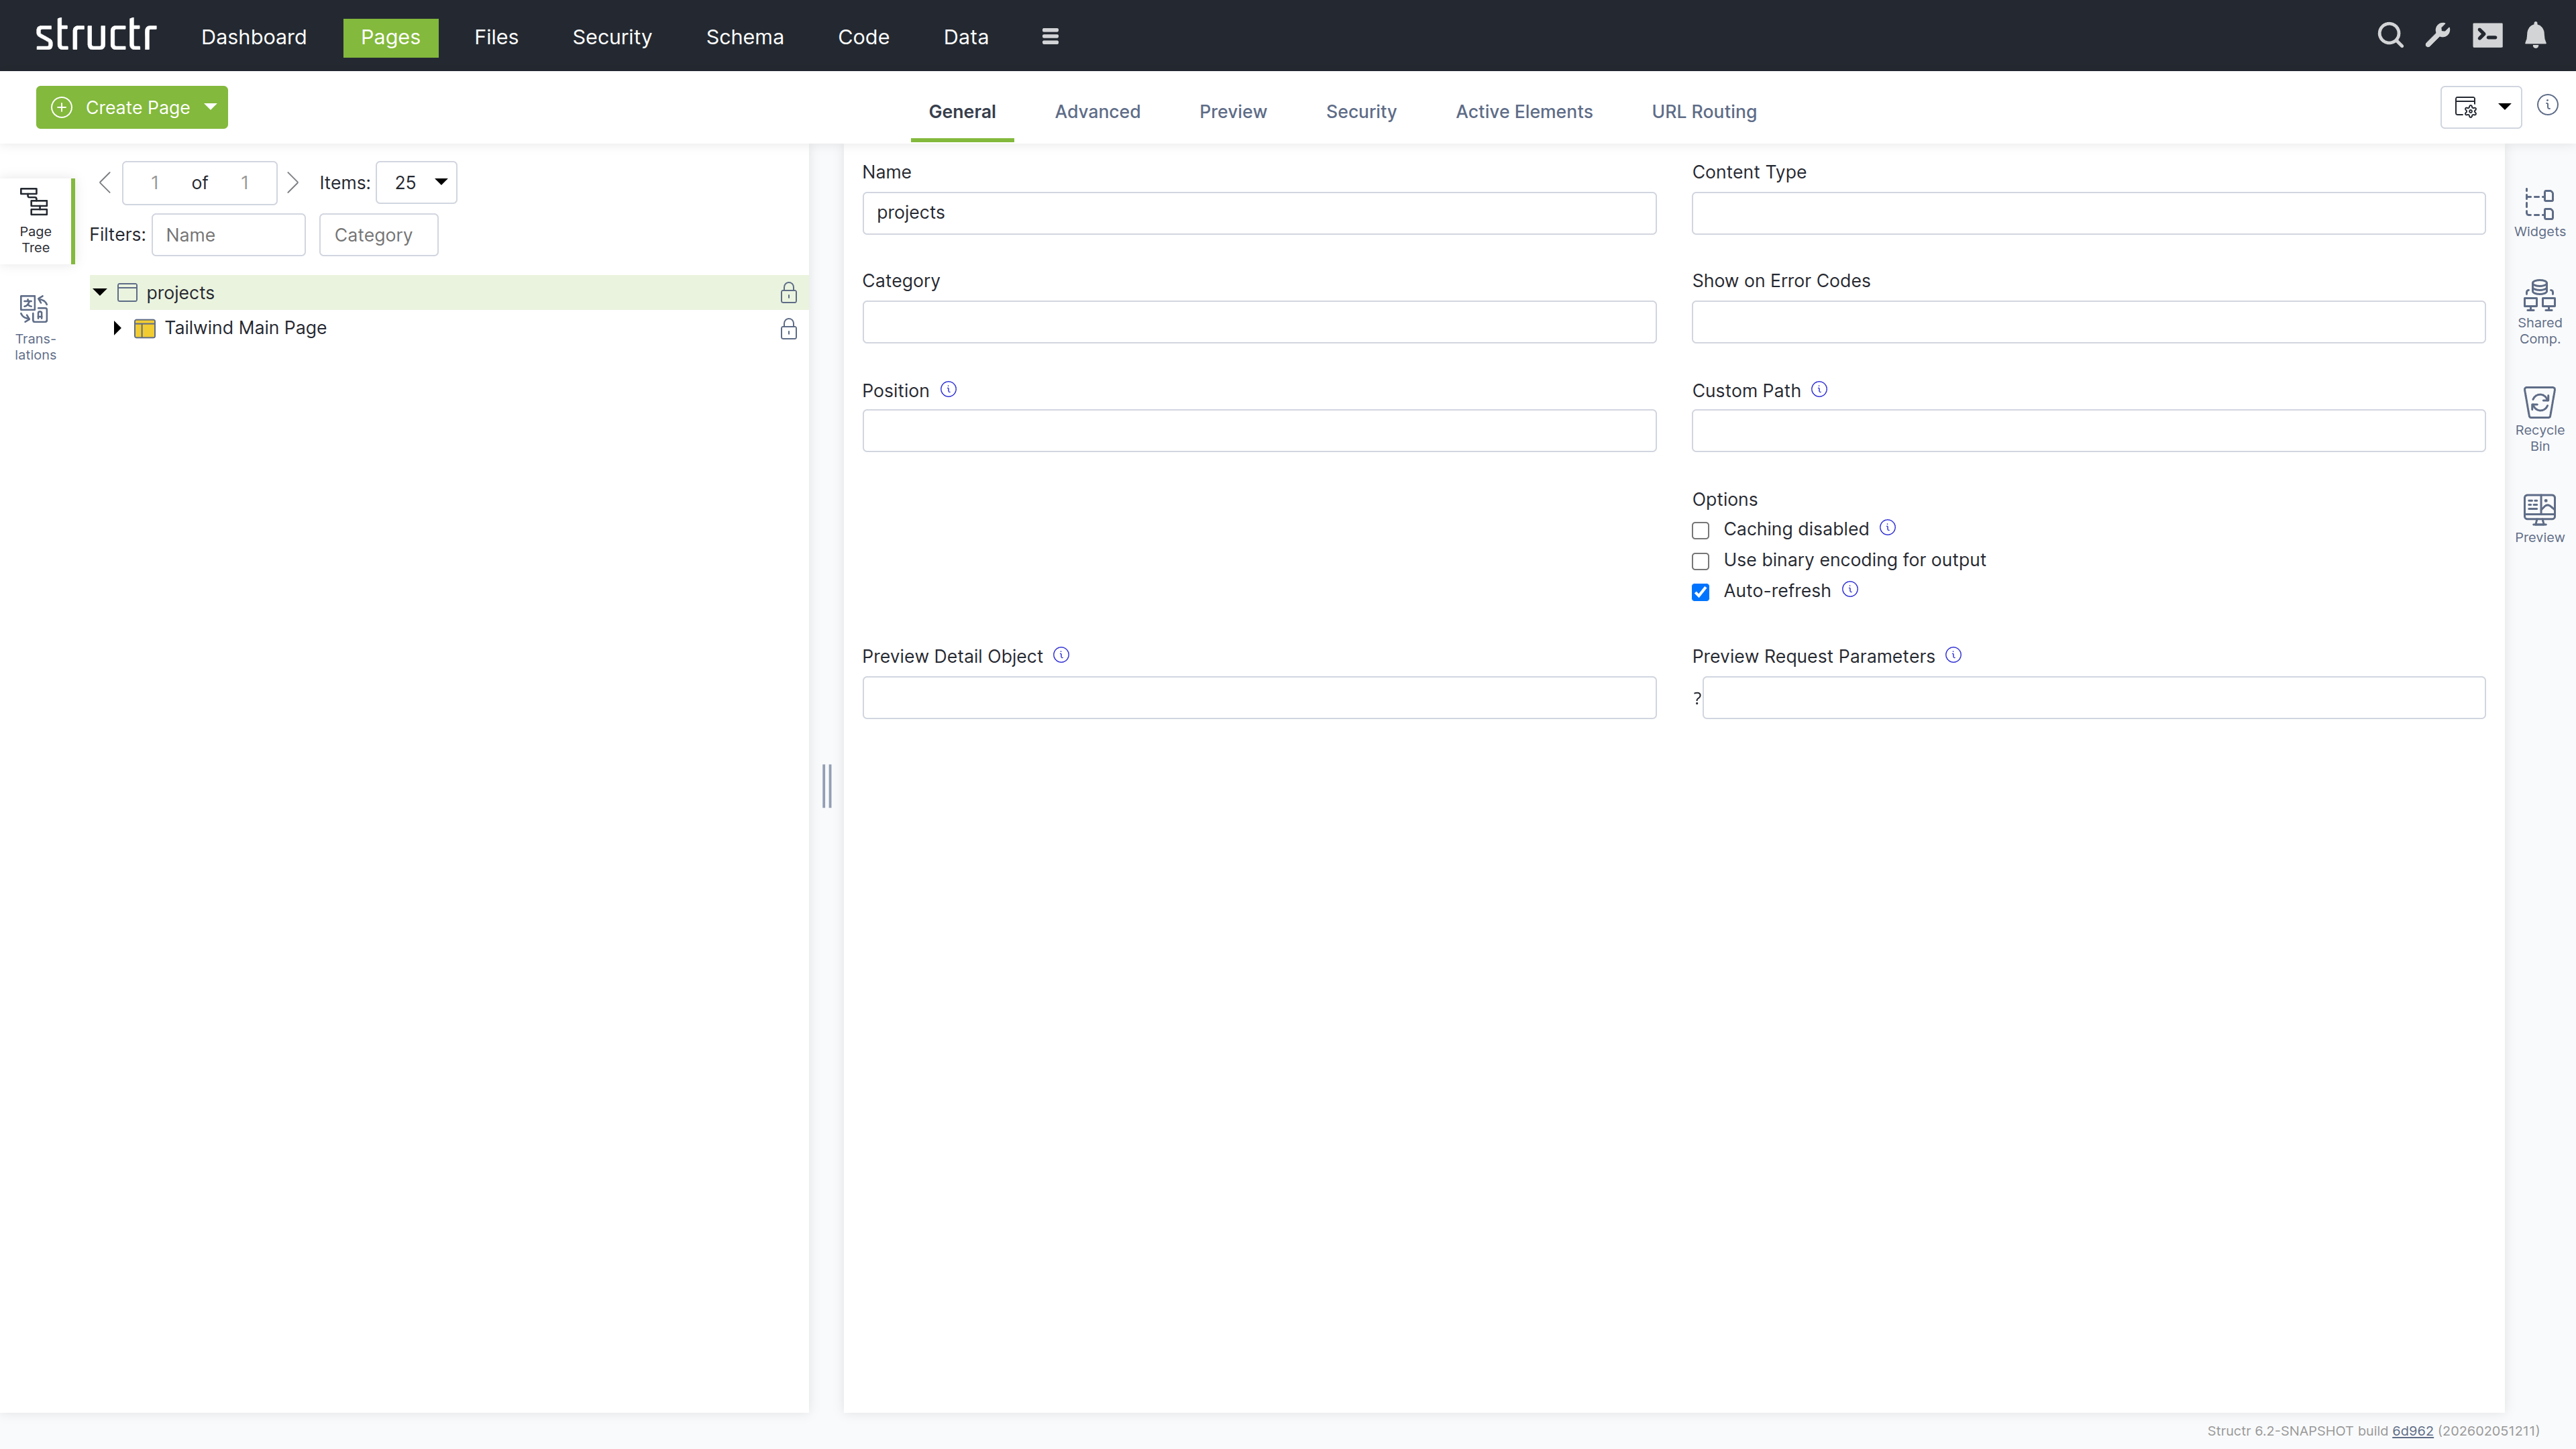
The General Tab
The General tab of a page contains important settings that affect how the page is rendered for users and displayed in the preview.
Markdown Rendering Hint: MarkdownTopic(Name) not rendered because level 5 >= maxLevels (5)
Markdown Rendering Hint: MarkdownTopic(Content Type) not rendered because level 5 >= maxLevels (5)
Markdown Rendering Hint: MarkdownTopic(Category) not rendered because level 5 >= maxLevels (5)
Markdown Rendering Hint: MarkdownTopic(Show on Error Codes) not rendered because level 5 >= maxLevels (5)
Markdown Rendering Hint: MarkdownTopic(Position) not rendered because level 5 >= maxLevels (5)
Markdown Rendering Hint: MarkdownTopic(Custom Path) not rendered because level 5 >= maxLevels (5)
Markdown Rendering Hint: MarkdownTopic(Caching disabled) not rendered because level 5 >= maxLevels (5)
Markdown Rendering Hint: MarkdownTopic(Use binary encoding for output) not rendered because level 5 >= maxLevels (5)
Markdown Rendering Hint: MarkdownTopic(Autorefresh) not rendered because level 5 >= maxLevels (5)
Markdown Rendering Hint: MarkdownTopic(Preview Detail Object) not rendered because level 5 >= maxLevels (5)
Markdown Rendering Hint: MarkdownTopic(Preview Request Parameters) not rendered because level 5 >= maxLevels (5)
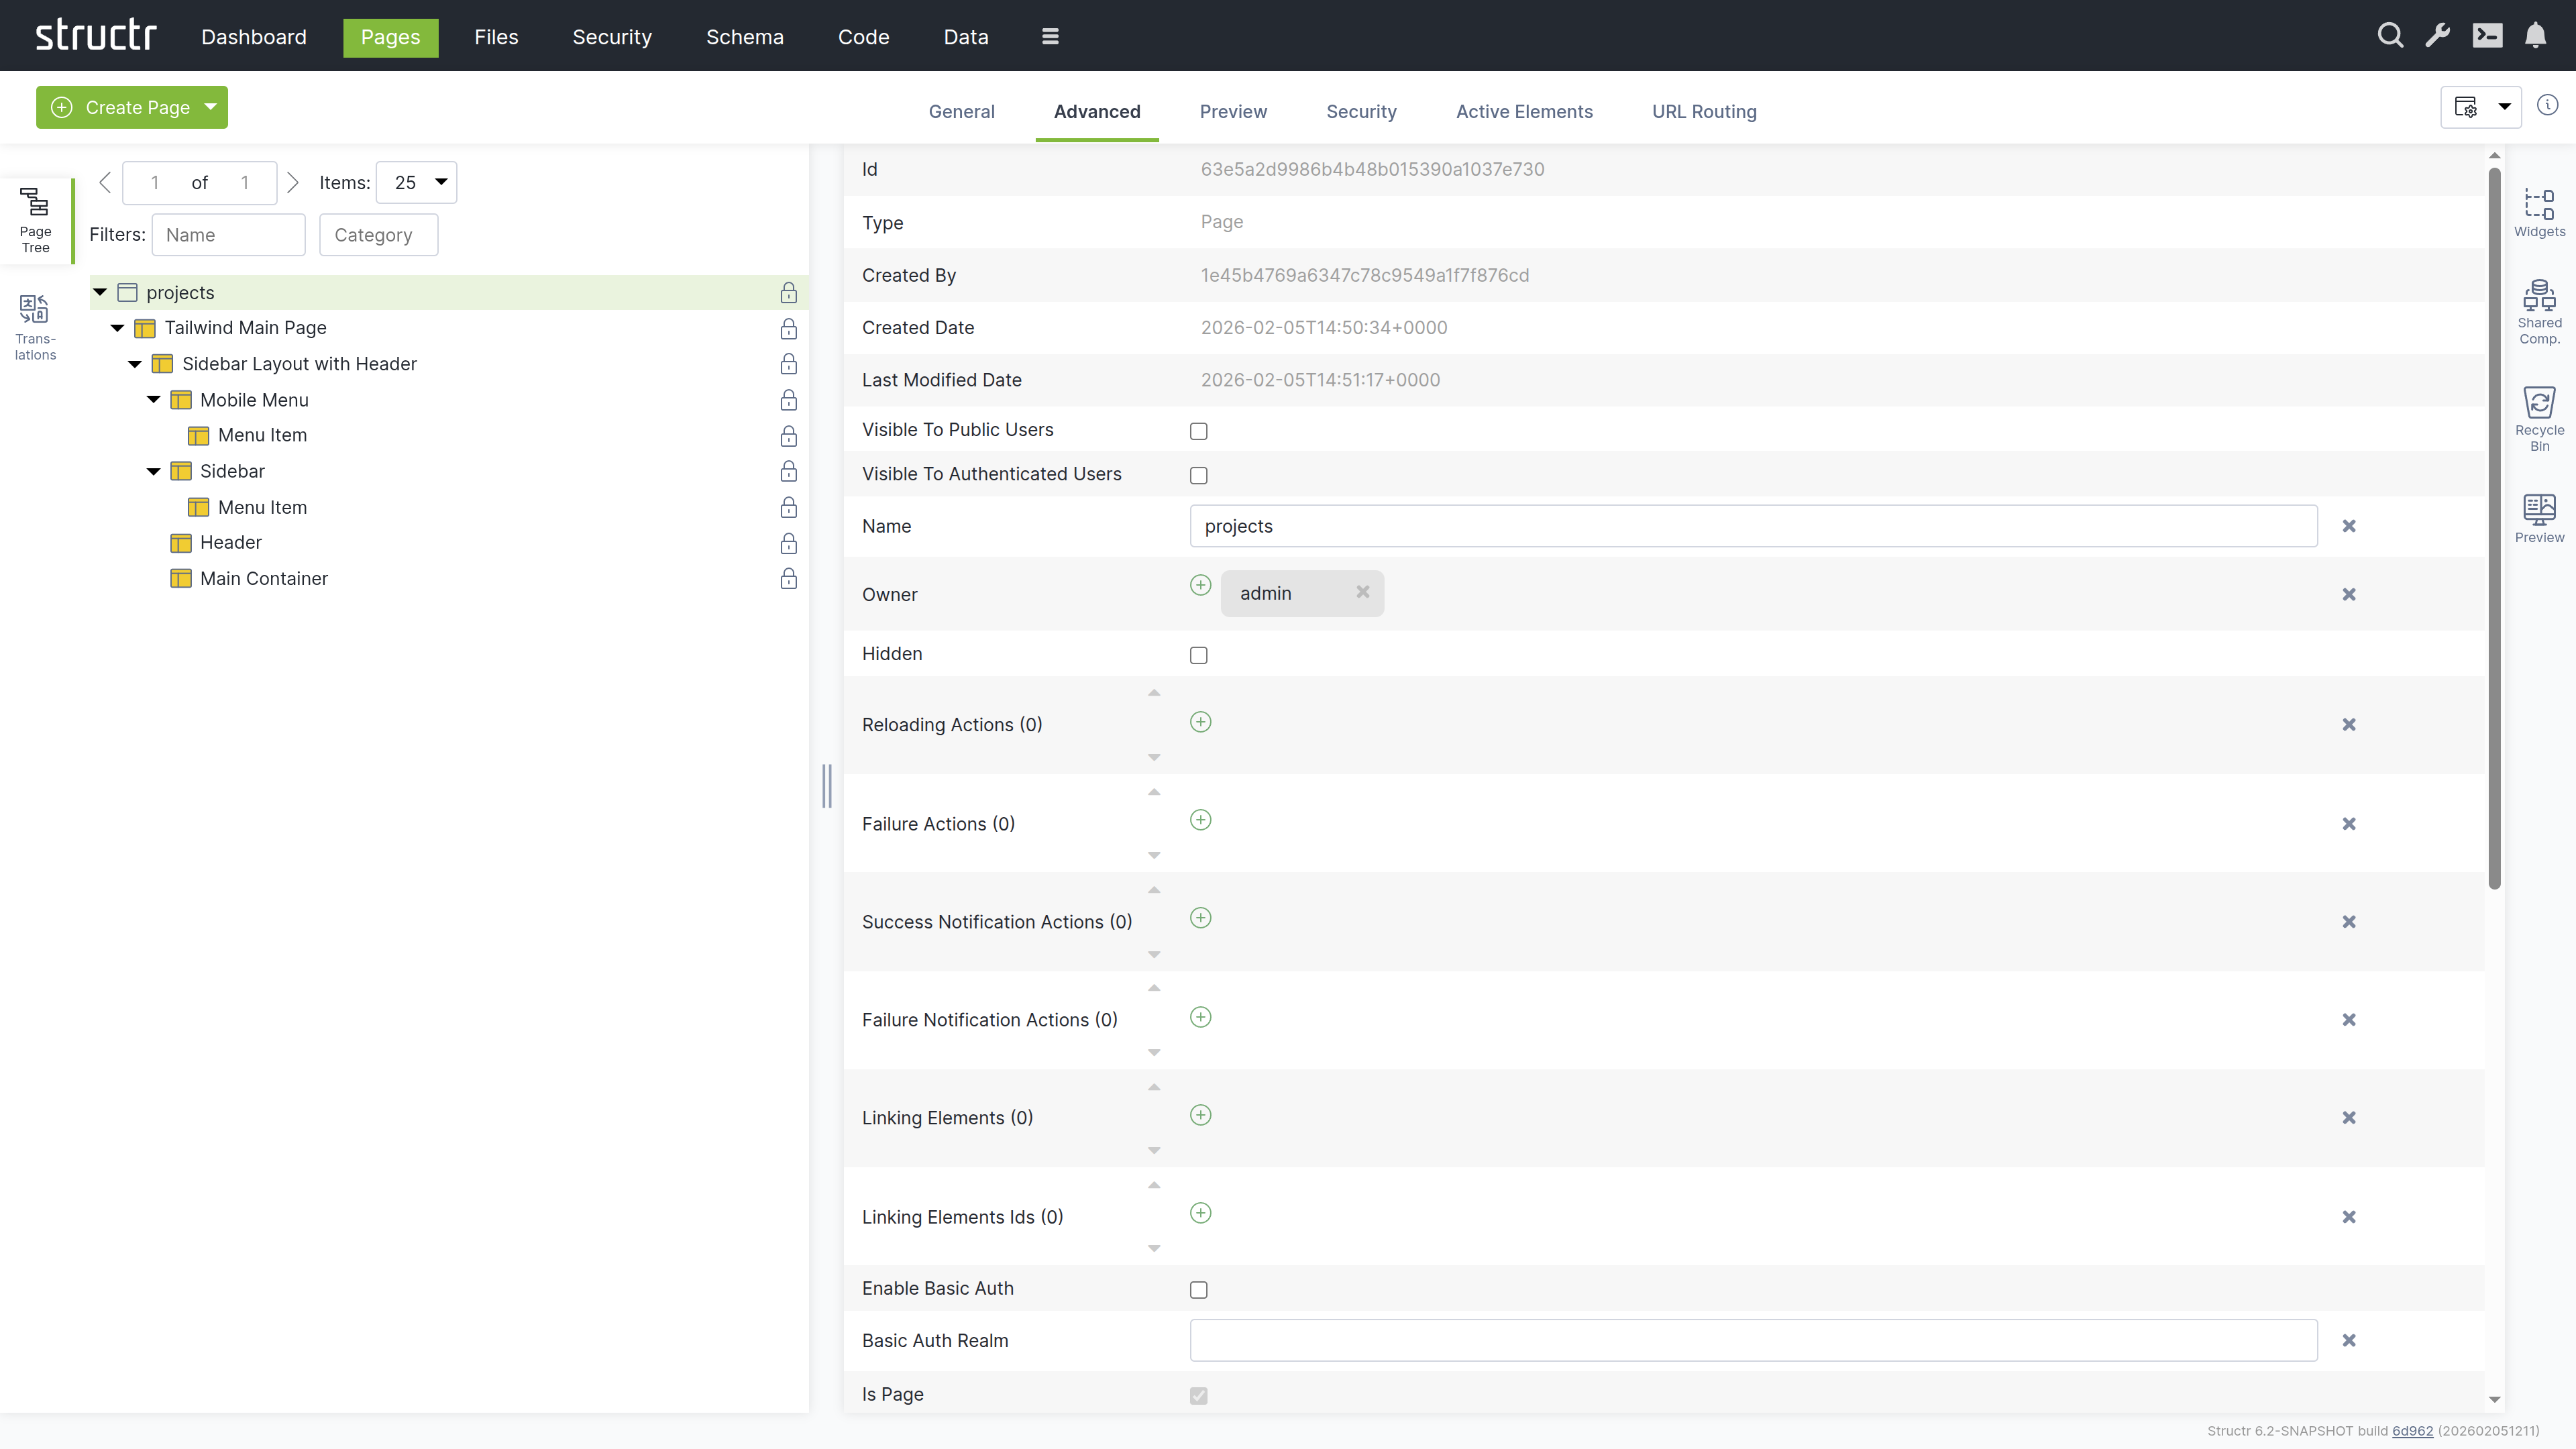
The Advanced Tab
The Advanced tab provides a raw view of the current object, showing all its attributes grouped by category, in an editable table for quick access. This tab includes the base attributes like id, type, createdBy, createdDate, lastModifiedDate, and hidden that are not available elsewhere.
Markdown Rendering Hint: MarkdownTopic(Hidden Flag) not rendered because level 5 >= maxLevels (5)
The Preview Tab
The Preview tab displays how your page appears to visitors, while also allowing you to edit text content directly. Hovering over elements highlights them in both the preview and the page tree. You can click highlighted elements to edit them inline or select them in the tree for detailed editing. This inline editing capability is especially valuable for repeater-generated lists or tables, where you can access and modify the underlying template expressions directly in context.
Markdown Rendering Hint: MarkdownTopic(Preview Settings) not rendered because level 5 >= maxLevels (5)
The Security Tab
The Security tab contains the Access Control settings for the current page, with owner, visibility flags and individual user / group access rights, just as the Access Control dialog.
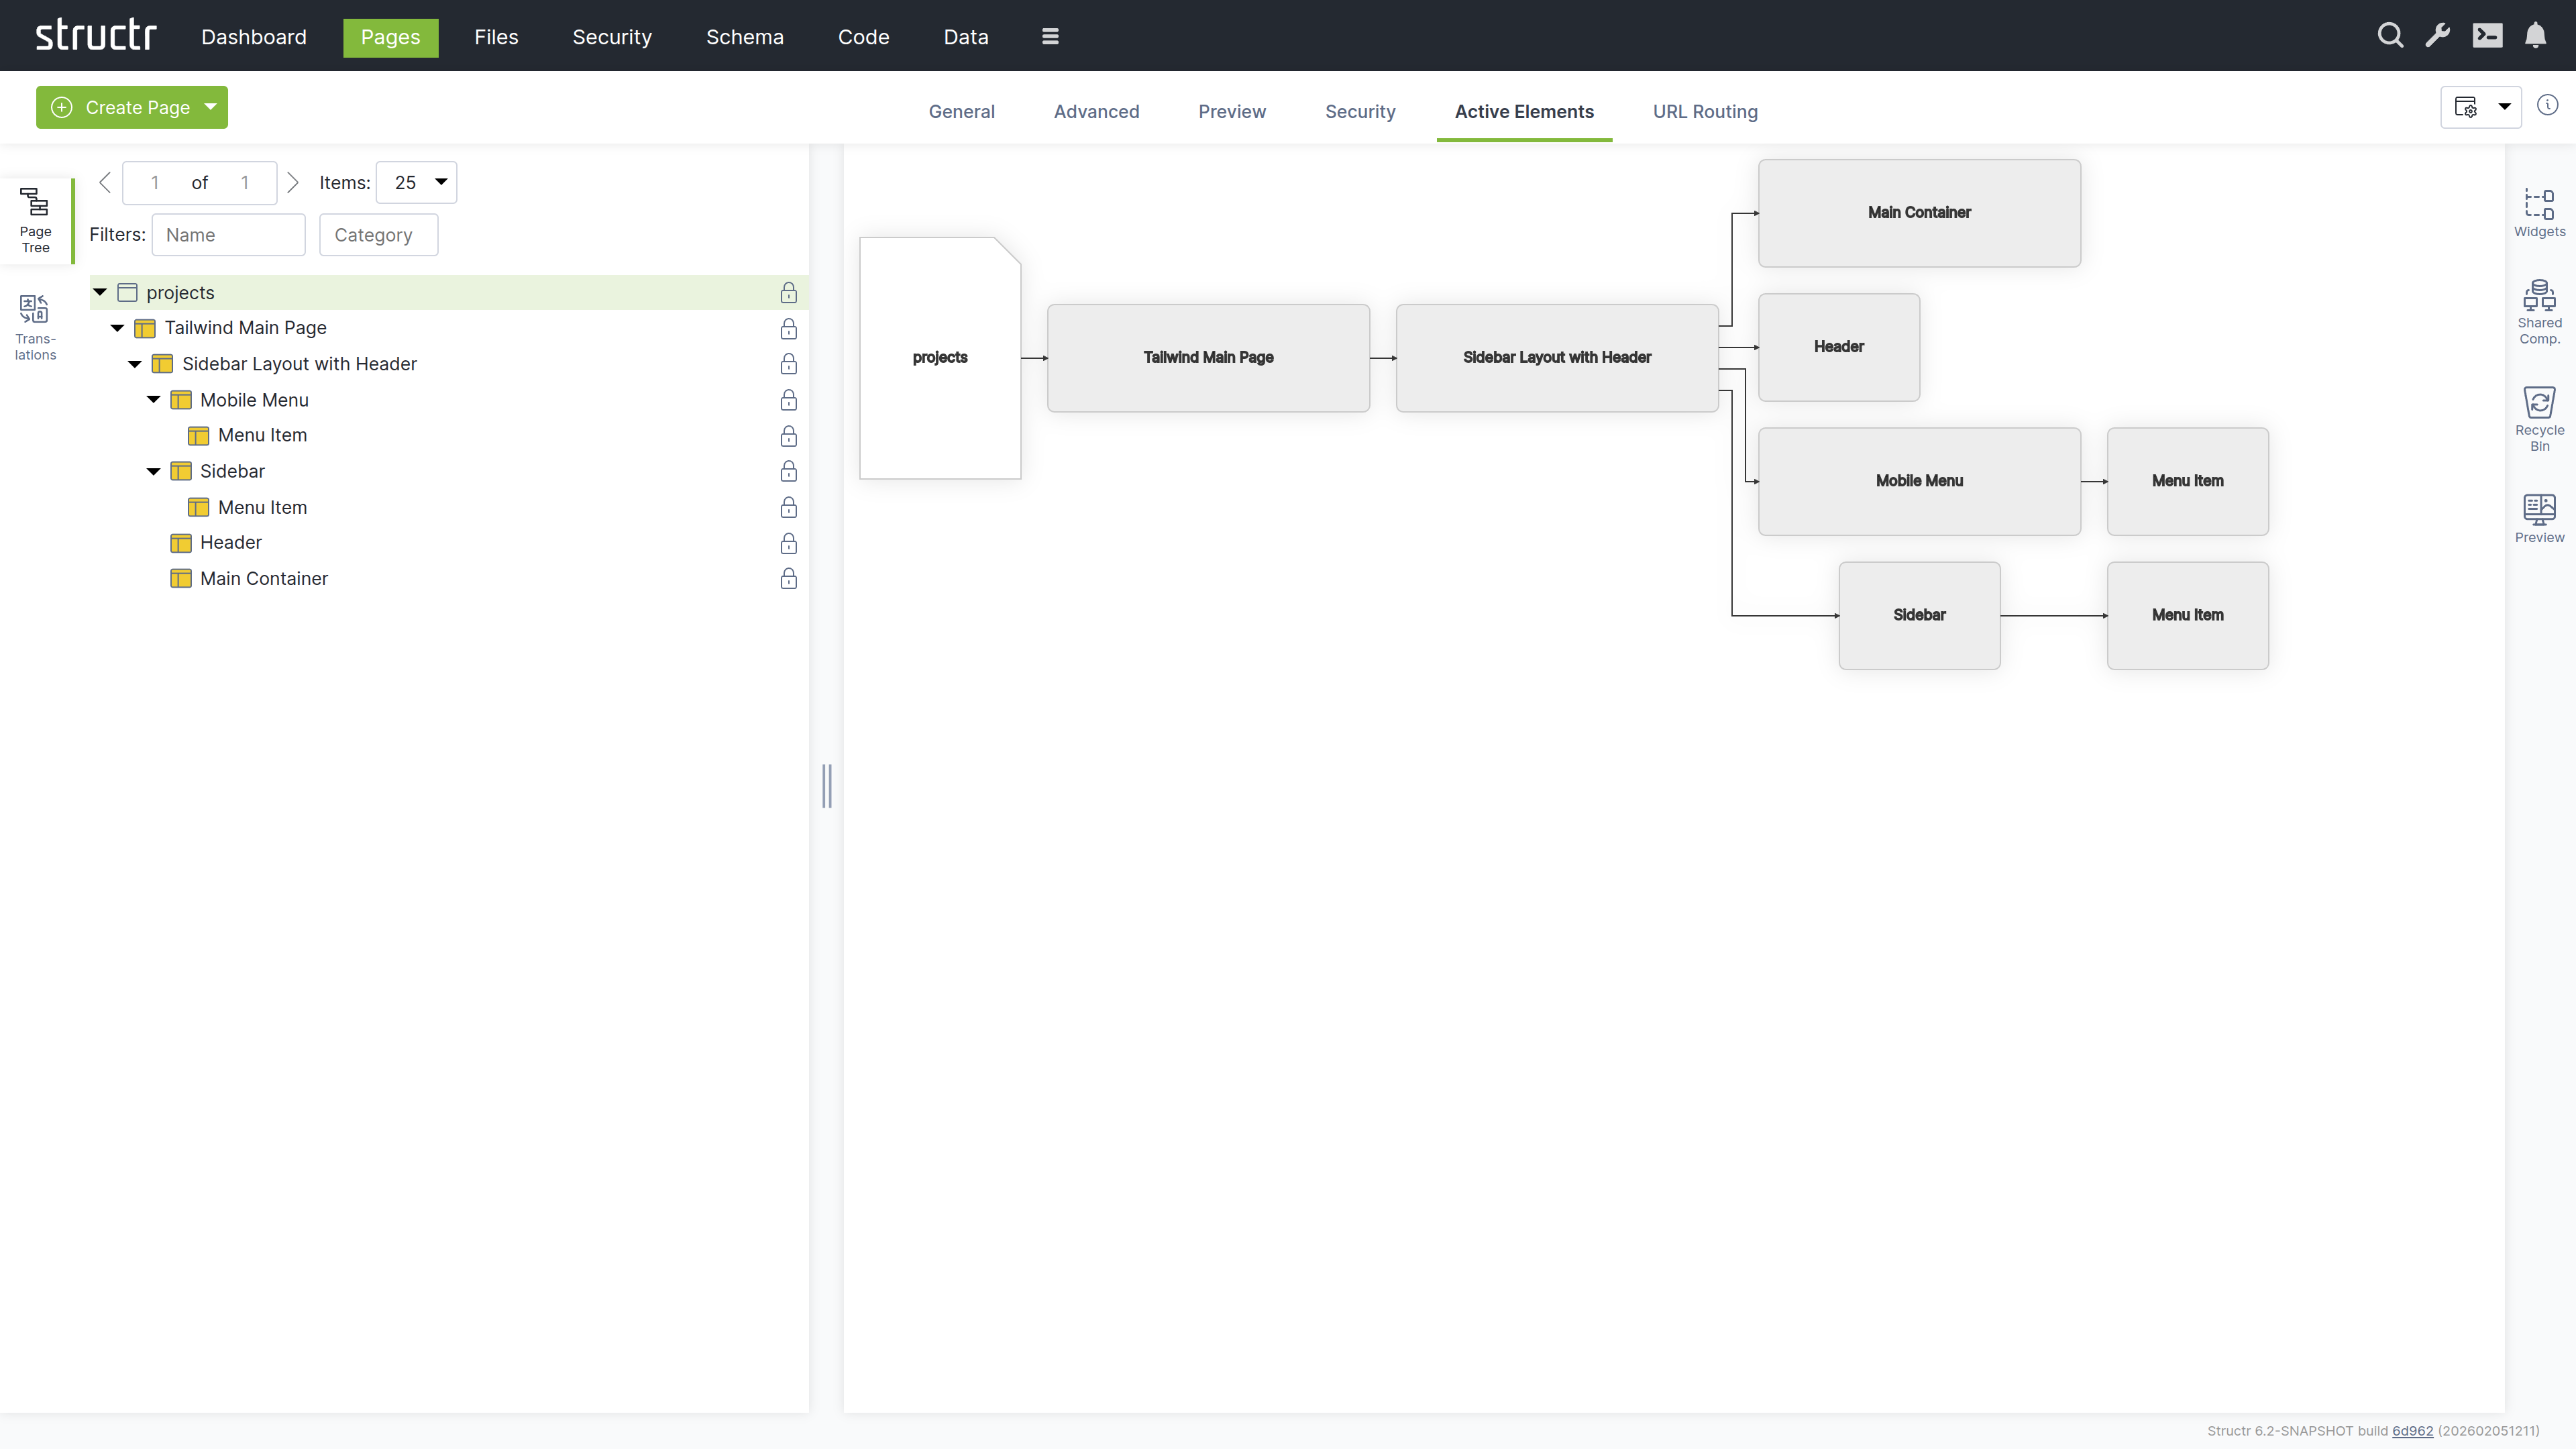
The Active Elements Tab
The Active Elements tab provides a structural overview of the page. Key page components are highlighted, such as templates, repeaters and elements with event action mappings. Clicking a component jumps directly to its location in the page tree.
The URL Routing Tab
The URL Routing tab allows you to configure additional URL paths under which the page is made available. You can define typed parameters in the path that Structr automatically validates and makes available in the page under the corresponding key.
Markdown Rendering Hint: MarkdownTopic(How it works) not rendered because level 5 >= maxLevels (5)
The HTML Element
HTML elements form the structured content of a page. An element always has a tag and can include both global attributes like id, class, and style, additional tag-specific attributes defined by the HTML specification, and custom data attributes. HTML elements can be inserted anywhere in the page tree, as Structr does not strictly enforce valid HTML.
HTML elements automatically render their tag, all attributes with non-null values, and their children. An empty string causes the attribute to be output as a boolean attribute without a value (e.g., <option selected>).
Appearance
HTML elements appear as expandable tree items with a box icon, showing their tag name and CSS classes. You can rename HTML elements to better communicate their purpose - when renamed, the custom name is displayed in the tree instead of the tag. Elements configured as repeaters display a colored box icon with red, green, and yellow instead of the standard box. The lock icon on the right indicates visibility settings: no icon means both visibility flags are enabled, a lock icon with a key means only one flag is enabled.
Interaction
When you hover over an HTML element with your mouse, the context menu icon appears. You can also open the context menu by right-clicking the element. Left-clicking the HTML element selects it in the page tree and opens the detail settings in the main area of the screen in the center. Clicking the lock icon opens the Access Control dialog.
The General Tab
The General tab of an HTML element contains important settings that affect how the element is rendered and displayed in the page tree.

Markdown Rendering Hint: MarkdownTopic(Name) not rendered because level 5 >= maxLevels (5)
Markdown Rendering Hint: MarkdownTopic(CSS Class) not rendered because level 5 >= maxLevels (5)
Markdown Rendering Hint: MarkdownTopic(HTML ID) not rendered because level 5 >= maxLevels (5)
Markdown Rendering Hint: MarkdownTopic(Style) not rendered because level 5 >= maxLevels (5)
Markdown Rendering Hint: MarkdownTopic(Function Query) not rendered because level 5 >= maxLevels (5)
Markdown Rendering Hint: MarkdownTopic(Data Key) not rendered because level 5 >= maxLevels (5)
Markdown Rendering Hint: MarkdownTopic(Show Conditions) not rendered because level 5 >= maxLevels (5)
Markdown Rendering Hint: MarkdownTopic(Hide Conditions) not rendered because level 5 >= maxLevels (5)
Markdown Rendering Hint: MarkdownTopic(Load / Update Mode) not rendered because level 5 >= maxLevels (5)
The HTML Tab
The HTML tab enables management of HTML-specific attributes for an element. In addition to the global attributes (class, id, and style), the tab displays the type-specific attributes for each element. For example, <option> elements have the selected and value attributes.
There is a button that allows you to add custom attributes that will be included in the HTML output. We recommend prefixing custom attributes with data-, though this is not required. You can also use attributes required by JavaScript frameworks, such as is.
At the end of each row is a small cross icon that allows you to remove the attribute’s value (i.e., set it to null).
Markdown Rendering Hint: MarkdownTopic(Show All) not rendered because level 5 >= maxLevels (5)
Markdown Rendering Hint: MarkdownTopic(REST API Representation) not rendered because level 5 >= maxLevels (5)
The Advanced Tab
Like the Advanced tab for Page elements, this tab provides a raw view of the current HTML element, showing all its attributes grouped by category in an editable table for quick access.
The Preview Tab
Like the Preview tab for Page elements, this tab displays the same rendered output for all elements within a page, as the preview always renders from the root of the page hierarchy. This means whether you are viewing the Page element itself or any child element, you will see the complete page output here.
The Repeater Tab
The Repeater tab allows you to configure an element to render dynamically based on a data source, repeating its output for each object in a collection.
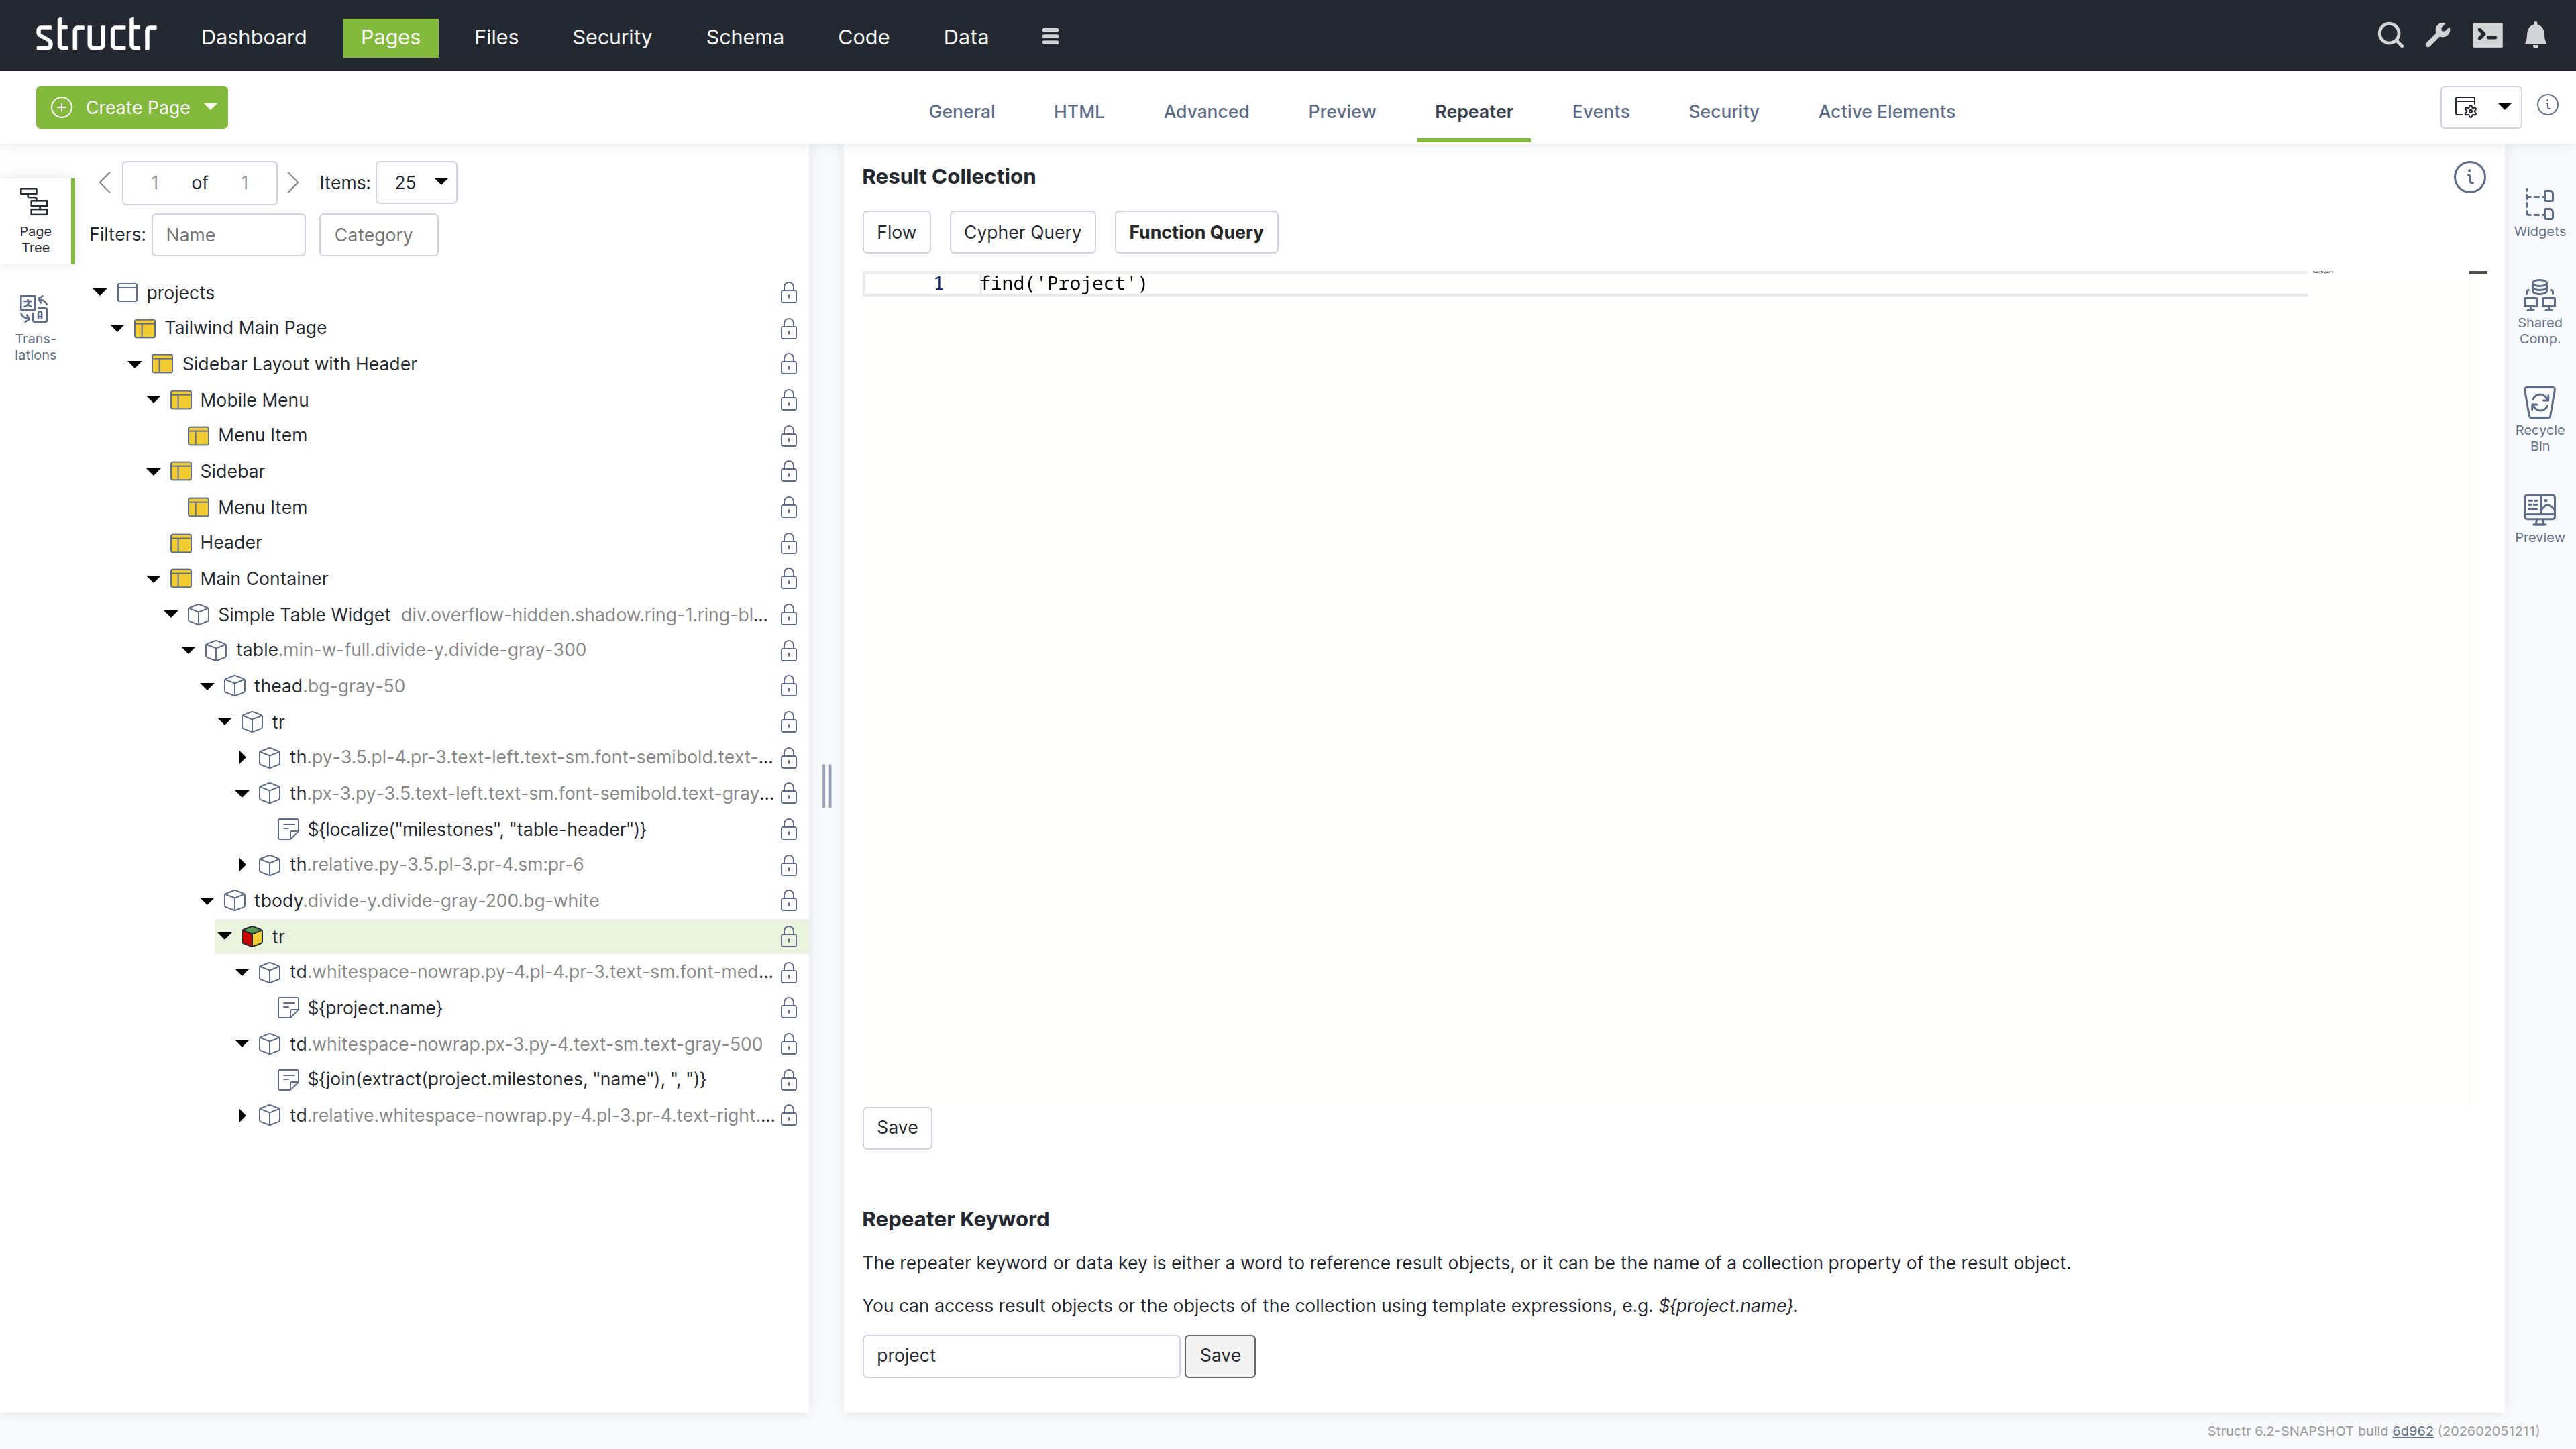
Markdown Rendering Hint: MarkdownTopic(Result Collection) not rendered because level 5 >= maxLevels (5)
Markdown Rendering Hint: MarkdownTopic(Repeater Keyword) not rendered because level 5 >= maxLevels (5)
Markdown Rendering Hint: MarkdownTopic(How it works) not rendered because level 5 >= maxLevels (5)
Markdown Rendering Hint: MarkdownTopic(Example) not rendered because level 5 >= maxLevels (5)
The Events Tab
The Events tab allows you to configure Event Action Mappings for individual elements.
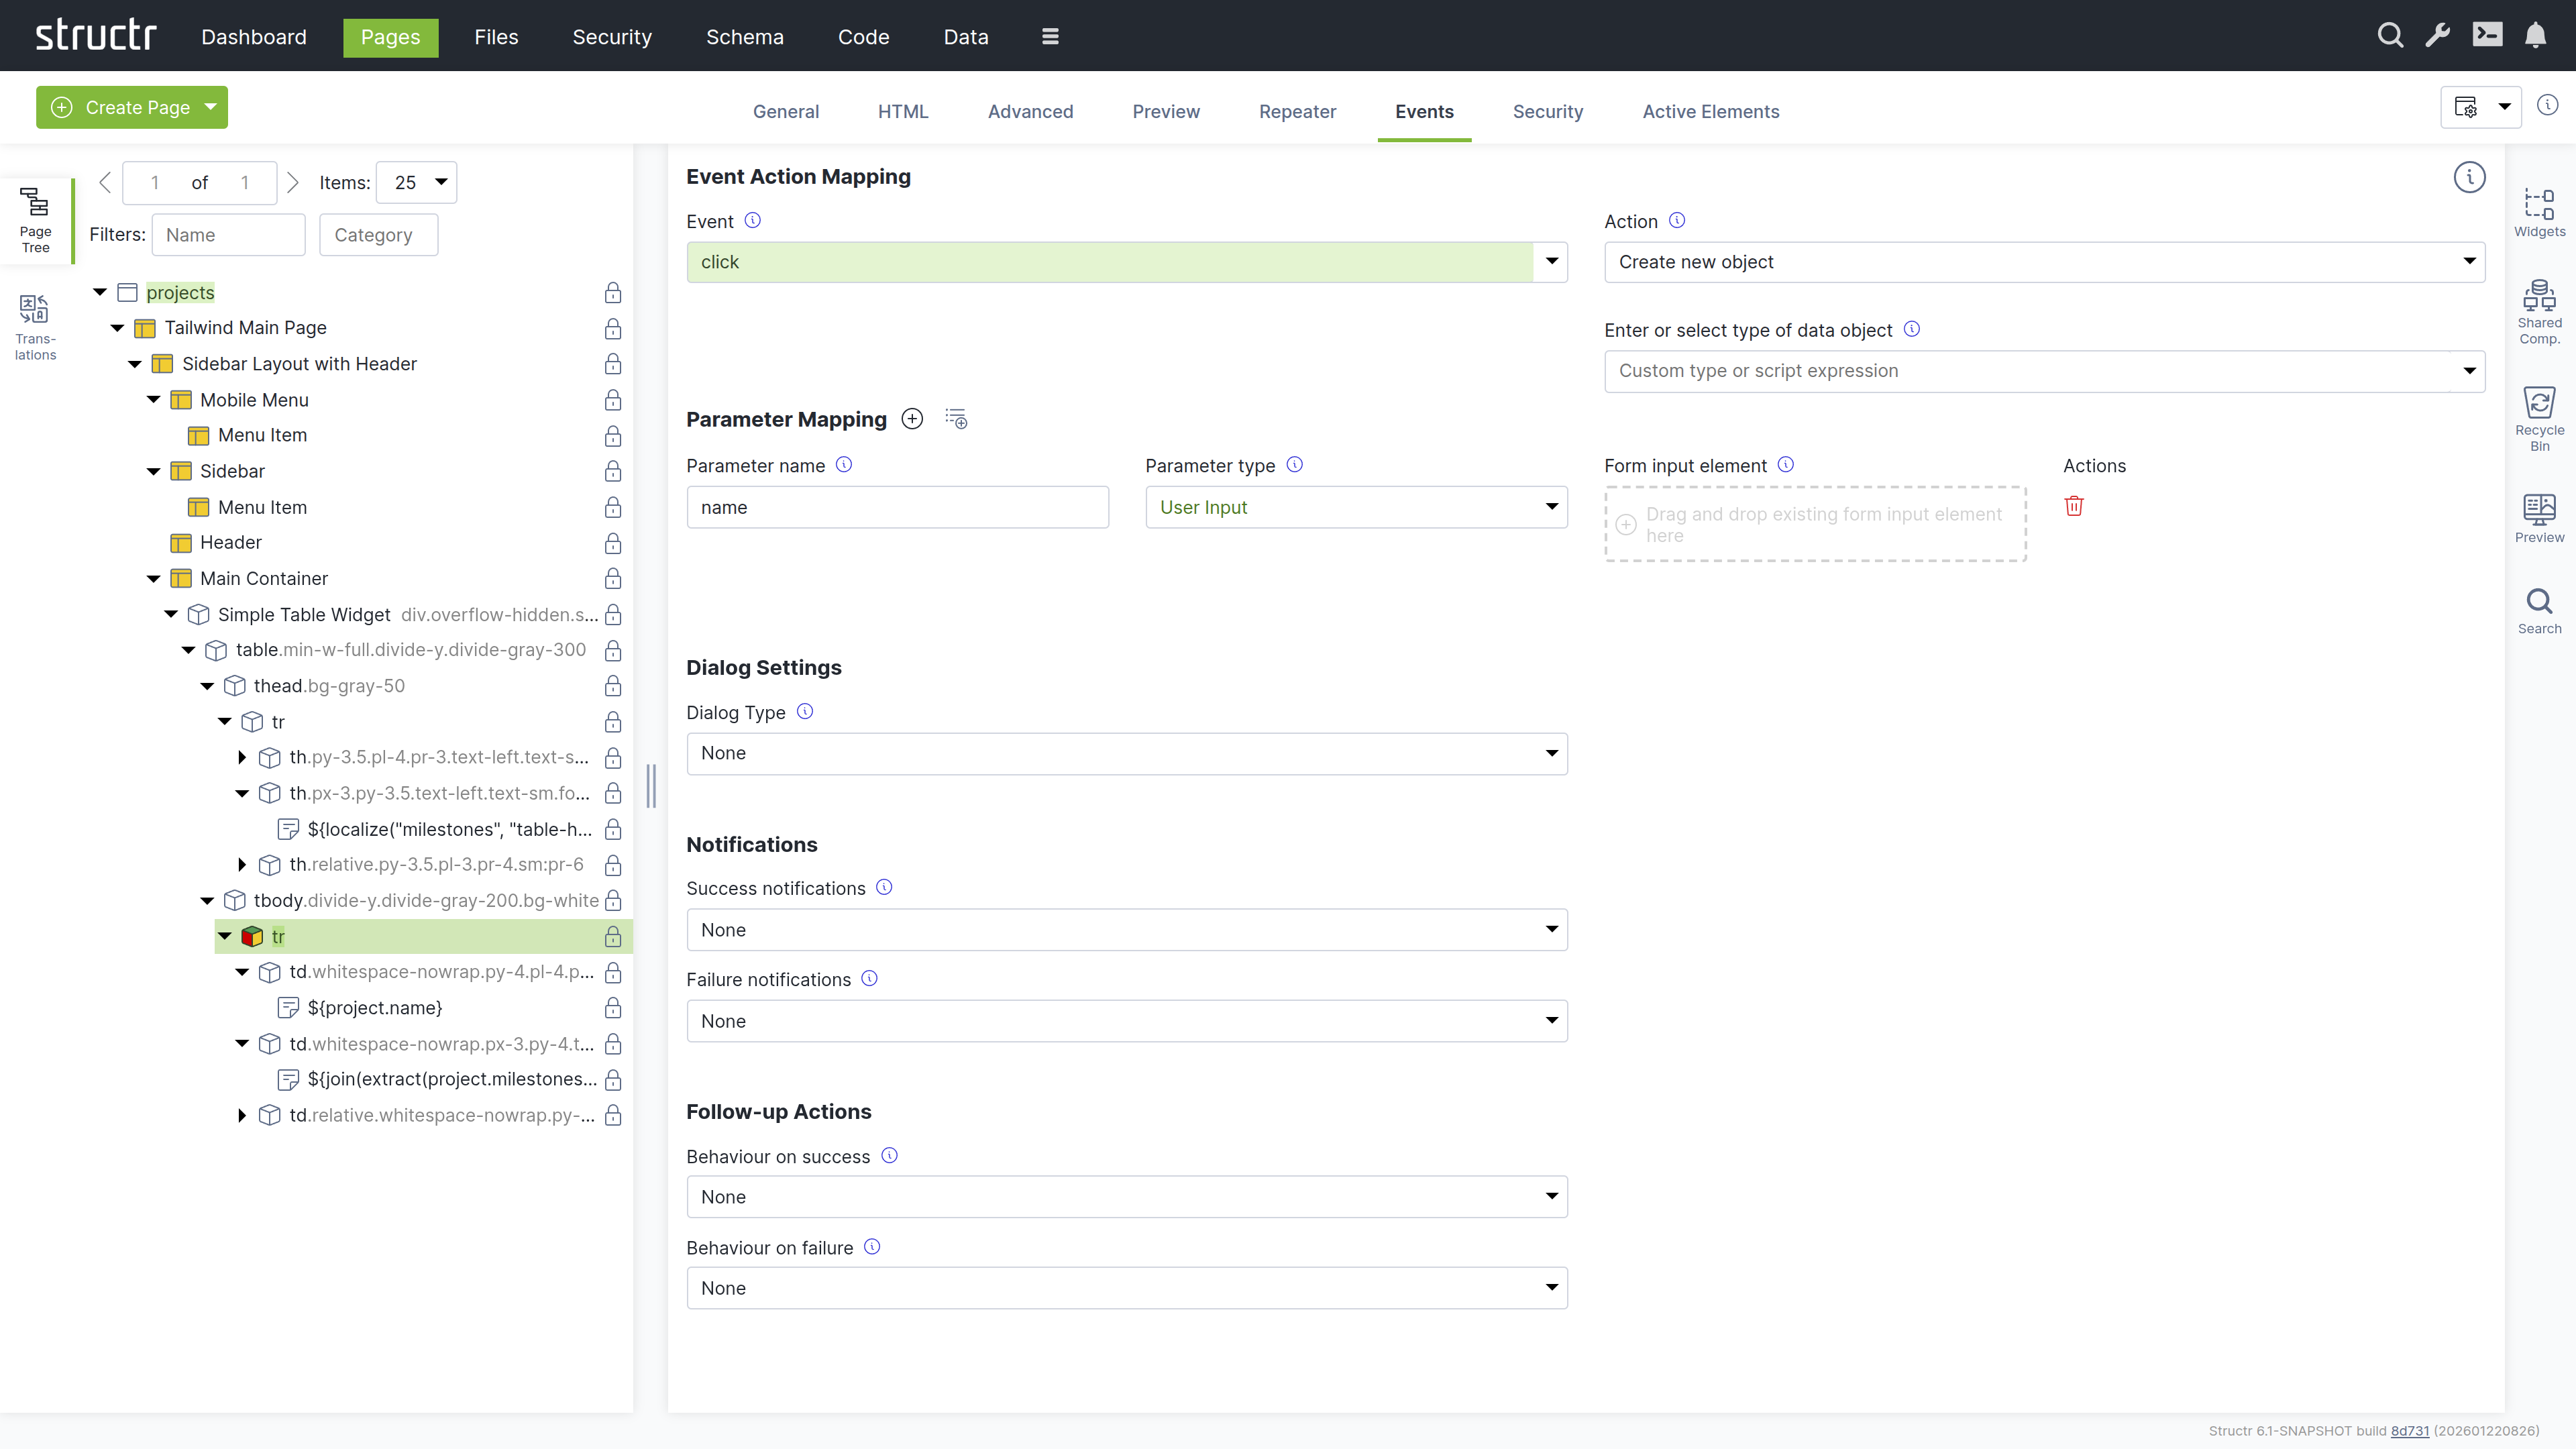
Markdown Rendering Hint: MarkdownTopic(How it works) not rendered because level 5 >= maxLevels (5)
Markdown Rendering Hint: MarkdownTopic(Parameter Mapping) not rendered because level 5 >= maxLevels (5)
Markdown Rendering Hint: MarkdownTopic(Confirmation Dialog) not rendered because level 5 >= maxLevels (5)
Markdown Rendering Hint: MarkdownTopic(Notifications) not rendered because level 5 >= maxLevels (5)
Markdown Rendering Hint: MarkdownTopic(Follow-up Actions) not rendered because level 5 >= maxLevels (5)
Markdown Rendering Hint: MarkdownTopic(Further Information) not rendered because level 5 >= maxLevels (5)
The Security Tab
The Security tab contains the Access Control settings for the current element, with owner, visibility flags and individual user / group access rights.
The Active Elements Tab
The Active Elements tab displays the same structural overview as its counterpart on page elements, but scoped to the current element and its descendants.
Templates and Content Elements
Template and content elements contain text or markup that is output directly into the page, instead of building structure from nested HTML elements. They have a content type setting that controls how the text is processed before rendering - Markdown, AsciiDoc, and several other markup dialects are automatically converted to HTML, while plaintext, XML, JSON, and other formats are output as-is.
Content elements are the simpler variant: they output their text and cannot have children. Template elements can have children, but this is where they differ fundamentally from HTML elements.
Note that when using a template element as the root of a page, it must include the DOCTYPE declaration that an HTML element would output automatically.
Composable Page Structures
Unlike HTML elements, templates do not render their children automatically. If you don’t explicitly call render(children), the children exist in the page tree but produce no output. This is intentional as it gives you full control over placement rather than forcing a fixed parent-child rendering order.
The result is a composable system. A template can define a layout with multiple insertion points - a sidebar, a navigation area, a main content section - and then render specific children into each slot. Using the render() function, you control exactly where each child appears in the output. This lets you build complex page structures from reusable, composable building blocks.
Including External Content
You can also use include() or includeChild() in a template to pull content from other parts of the page tree or from objects in the database.
Appearance
Template elements appear as expandable tree items with an application icon, showing their name or #template when unnamed. Content elements are not expandable because they cannot have children - they display a document icon and show the first few words of their content, or #content when empty. Elements configured as repeaters display a yellow icon. Rename template elements to better communicate their purpose.
Interaction
The lock icon on the right indicates visibility settings: no icon means both visibility flags are enabled, a lock icon with a key means only one flag is enabled. When you hover over a template or content element, the context menu icon appears. You can also open the context menu by right-clicking the element. Left-clicking selects it in the page tree and opens the detail settings in the main area. Clicking the lock icon opens the Access Control dialog.
The General Tab
The General tab of template and content elements contains the name field and the following four configuration options, which work the same as on HTML elements:
Markdown Rendering Hint: MarkdownTopic(Function Query) not rendered because level 5 >= maxLevels (5)
Markdown Rendering Hint: MarkdownTopic(Data Key) not rendered because level 5 >= maxLevels (5)
Markdown Rendering Hint: MarkdownTopic(Show Conditions) not rendered because level 5 >= maxLevels (5)
Markdown Rendering Hint: MarkdownTopic(Hide Conditions) not rendered because level 5 >= maxLevels (5)
The Advanced Tab
Like the Advanced tab for HTML elements, this tab provides a raw view of the current template element, showing all its attributes grouped by category in an editable table for quick access.
The Preview Tab
Like the Preview tab for Page elements, this tab displays the same rendered output for all elements within a page, as the preview always renders from the root of the page hierarchy. This means whether you are viewing the Page element itself or any child element, you will see the complete page output here.
The Editor Tab
The Editor tab is where you edit the actual content of template and content elements. It provides a full-featured code editor based on Monaco (the editor from VS Code) with syntax highlighting and autocompletion. At the bottom of the tab, the content type selector controls how the text is processed before rendering. Select Markdown or AsciiDoc to have your content converted to HTML, or choose plaintext, XML, JSON, or other formats for direct output. For HTML templates like the Main Page Template, set the content type to text/html to output the markup directly.
The Repeater Tab
The Repeater tab provides the same configuration options as on HTML elements, allowing you to configure the element as a repeater with a data source and data key.
The Security Tab
The Security tab contains the Access Control settings for the current element, with owner, visibility flags and individual user / group access rights.
The Active Elements Tab
The Active Elements tab displays the same structural overview as its counterpart on page elements, but scoped to the current element and its descendants.
The Context Menu
The context menu provides quick access to common operations on page elements. Open it by right-clicking an element in the page tree or by clicking the context menu icon that appears when hovering over an element.
The context menu varies depending on the element type. For page elements, it only allows inserting an <html> element or a template element, cloning the page, expanding or collapsing the tree, and deleting the page. For content elements, the insert options are limited to Insert Before and Insert After, since content elements cannot have children. The following sections describe the full context menu available for HTML and template elements.
Suggested Widgets (when available)
This menu item appears when a local or remote Widget exists whose selectors property matches the current element. Selectors are written like CSS selectors, for example table to match table elements or div.container to match div elements with the container class. This provides quick access to Widgets that are designed to work with the selected element type, allowing you to insert them directly as children.
Suggested Elements (when available)
This menu item appears for elements that have commonly used child elements. For example, when you open the context menu on a <table> element, Structr suggests <thead>, <tbody>, <tr>, and other table-related elements. Similarly, a <ul> element suggests <li>, a <select> suggests <option>, and so on. This speeds up page building by offering the most relevant elements for your current context.
Insert HTML Element
This submenu lets you insert an HTML element as a child of the selected element. It contains submenus with alphabetically grouped tag names and includes an option to insert a custom element with a tag name you specify.
Insert Content Element
This submenu lets you insert a template or content element as a child of the selected element.
Insert Div Element
Quickly inserts a <div> element as a child of the selected element.
Insert Before
This submenu lets you insert a new element as a sibling before the selected element. It contains the same options as the main insert menu: Insert HTML Element, Insert Content Element, and Insert Div Element.
Insert After
This submenu lets you insert a new element as a sibling after the selected element. It contains the same options as the main insert menu: Insert HTML Element, Insert Content Element, and Insert Div Element.
Clone
Creates a copy of the selected element including all its children and inserts it immediately after the original.
Wrap Element In
This submenu lets you wrap the selected element in a new parent element. It contains Insert HTML Element, Insert Template Element, and Insert Div Element options. Content elements are not available here because they cannot have children. The selected element becomes a child of the newly created element.
Replace Element With
This submenu lets you replace the selected element with a different element type while preserving its children. It contains Insert HTML Element, Insert Template Element, and Insert Div Element options. Content elements are not available here because they cannot have children.
Select / Deselect Element
Selects or deselects the element. A selected element displays a dashed border in the page tree and can be cloned or moved to a different location using the context menu.
Clone Selected Element Here (when available)
This menu item appears when an element is selected. It clones the selected element and inserts the copy as a child of the element where you opened the context menu.
Move Selected Element Here (when available)
This menu item appears when an element is selected. It moves the selected element from its current position and inserts it as a child of the element where you opened the context menu.
Convert to Shared Component (when available)
This menu item appears for HTML and template elements. It converts the element and its children into a Shared Component that can be reused across multiple pages. Changes to the Shared Component are reflected everywhere it is used.
Expand / Collapse
This submenu controls the visibility of children in the page tree. It offers three options: expand subtree, expand subtree recursively, and collapse subtree.
Remove Node
Removes the selected element and all its children from the page. Removed elements are moved to the Recycle Bin and can be restored from there.
Translations
Structr supports building localized frontends, allowing you to serve content in multiple languages. Instead of hardcoded text, you use the localize() function in content elements or templates to reference translations stored in the database. Structr then looks up the translation for the current locale and displays it. If no translation is found, the key itself is returned.
The typical workflow is to first add localize() calls in your page, then open the Translations flyout to create the corresponding translations for each language.
For example, to translate a table header for a list of database objects, create a content element inside the <th> element with the following content:
${localize('column_name')}
Using domains
If the same key needs different translations in different contexts, add a domain as second parameter:
${localize('title', 'movies')}
${localize('title', 'books')}
Managing translations
The Structr Admin UI provides two places to manage translations: the Translations flyout in the Pages area and the dedicated Localization area. The Translations flyout allows you to manage translations per page and shows which translations are used in a specific page. The Localization area is for managing translations independent of pages.
Using the Translations flyout
Select a page from the dropdown at the top, enter a language code, and click the refresh button to load the translations. Structr scans the selected page for occurrences of the localize() function and lists them. For each translation, the flyout shows the key, domain, locale, and the localized text. You can create, edit, and delete translations directly here. When you change the page or language, click the refresh button to update the list.
Note that the list is empty until you use the localize() function in your page.
How it works
Translations are stored as Localization objects in the database. Each object has four values: the key, the domain, the locale, and the translated text.
When you call localize(), Structr searches for a matching translation in the following order:
- Key, domain, and full locale (e.g.
en_US) - Key and full locale, without domain
- Key, domain, and language only (e.g.
en) - Key and language only, without domain
Structr stops searching as soon as it finds a match. If no translation is found, Structr can try again with a fallback locale (configurable in structr.conf). If there is still no match, the function returns the key itself.
Locale resolution
Structr determines the current locale in the following order of priority:
- Request parameter
locale - User locale
- Cookie
locale - Browser locale
- Default locale of the Java process
Widgets
Widgets are reusable building blocks for your pages. They can range from simple HTML snippets to complete, configurable components with their own logic and styling. You can use Widgets in several ways:
- Drag Widgets from the flyout to insert them into your pages
- Create page templates from Widgets to provide starting points for new pages
- Configure Widgets with variables that are filled in when inserting them
- Make Widgets appear as suggestions in the context menu for specific element types
- Share Widgets across applications using remote Widget servers
Using Widgets
To add a Widget to your page, drag it from the Widgets flyout into the page tree. If the Widget has configuration options, a dialog appears where you can fill in the required values before the Widget is inserted.
Widgets can also appear in the context menu as suggested Widgets. When a Widget’s selector matches the current element, it appears under “Suggested Widgets” and can be inserted directly as a child element.
Markdown Rendering Hint: MarkdownTopic(Page Templates) not rendered because level 5 >= maxLevels (5)
How it works
Widgets are stored as objects in the database with an HTML source code field. When you insert a Widget into a page, Structr parses the source code and creates the corresponding page elements. If the Widget contains template expressions in square brackets like [variableName], Structr checks the configuration for matching entries and displays a dialog where you fill in the values before insertion.
Widgets can contain deployment annotations that preserve Structr-specific attributes like content types and visibility settings. Enable processDeploymentInfo in the Widget configuration to use this feature.
The Widgets flyout
The Widgets flyout is divided into two sections: local Widgets stored in the database, and remote Widgets fetched from external servers.
Markdown Rendering Hint: MarkdownTopic(Local Widgets) not rendered because level 5 >= maxLevels (5)
Markdown Rendering Hint: MarkdownTopic(Remote Widgets) not rendered because level 5 >= maxLevels (5)
Editing Widgets
The Widget editor has five tabs: Source, Configuration, Description, Options, and Help.
Markdown Rendering Hint: MarkdownTopic(Source) not rendered because level 5 >= maxLevels (5)
Markdown Rendering Hint: MarkdownTopic(Configuration) not rendered because level 5 >= maxLevels (5)
Markdown Rendering Hint: MarkdownTopic(Description) not rendered because level 5 >= maxLevels (5)
Markdown Rendering Hint: MarkdownTopic(Options) not rendered because level 5 >= maxLevels (5)
Widgets can define Shared Components
Widgets can define reusable Shared Components that are created when the Widget is inserted. Use <structr:shared-template name="..."> to define a Shared Component, and <structr:template src="..."> to insert a reference to it.
The Widget source has two parts: first the definitions of the Shared Components, then the structure that references them.
Example:
<!-- Define Shared Components -->
<structr:shared-template name="Layout">
    <div class="layout">
        ${render(children)}
    </div>
</structr:shared-template>

<structr:shared-template name="Header">
    <header>
        ${render(children)}
    </header>
</structr:shared-template>

<!-- Reference and nest them -->
<structr:template src="Layout">
    <structr:template src="Header">
	    <h1>Welcome</h1>
    </structr:template>
</structr:template>
This Widget defines two Shared Components: “Layout” and “Header”. At the bottom, it references them and nests “Header” inside “Layout”. When you insert this Widget again, Structr reuses the existing Shared Components instead of creating duplicates.
Shared Components
A Shared Component is a reusable structure of HTML elements that you can insert into any page via drag and drop. Unlike a Widget, where Structr copies the content into the page, inserting a Shared Component creates a reference to the original. When you edit a Shared Component, the changes are immediately visible on all pages that use it. A typical example is the Main Page Template, which defines the overall layout and is shared across all pages of an application.
How it works
When you drag a Shared Component onto a page, Structr creates a copy of the root element that is linked to the original via a SYNC relationship. This link ensures that changes to the original Shared Component are automatically propagated to all copies.
This has two important consequences:
-
Single source of truth: The Shared Component exists only once. Any changes you make to it are immediately reflected everywhere it is used.
-
Smaller page trees: Pages that use Shared Components contain only the linked root element, not copies of the entire element structure.
Creating Shared Components
To create a Shared Component, select an element in the page tree, right-click, and select “Create Shared Component”. Structr moves the element and all its children into a new Shared Component and replaces it with a reference.
Alternatively, you can drag an element from the page tree into the Shared Components area to convert it into a Shared Component.
Once created, you can work with Shared Components the same way you work with elements in the page tree, including context menus and all editing features.
Deleting Shared Components
To delete a Shared Component, remove it in the Shared Components area. The reference elements on the pages where it was used are converted into regular elements and keep their children.
To remove a Shared Component from a page without deleting the original, simply delete the reference element in the page tree.
Rendering children
Like templates, Shared Components do not automatically render their children. You must call render(children) to define where child elements appear. This gives you full control over the layout and lets you create components with multiple insertion points.
<header>
    <nav>
        <a href="/">Home</a>
        <a href="/about">About</a>
    </nav>
    <div class="page-title">
        ${render(children)}
    </div>
</header>
This Shared Component defines a header with navigation. The render(children) call marks where child elements appear when the component is used on a page.
Customization at render time
To customize a Shared Component before rendering, you can use the sharedComponentConfiguration property on the reference element. If present, Structr evaluates this expression before rendering continues with the Shared Component.
This is useful when you need to adapt a Shared Component based on the context where it is used. For example, you can pass data to a generic table component:
$.store('data', $.find('Customer', $.predicate.sort('name')));
The Shared Component retrieves the data with $.retrieve('data') and displays the results. This way, the same table component can show different data on each page.
Synchronization of Attributes
The SYNC relationship connects the reference element in the page with the root element of the Shared Component. When you rename a reference element in a page, the change is automatically applied to the original Shared Component. When you change the visibility of a Shared Component, Structr asks whether the changes should be applied to the reference elements as well.
Note that Widgets reference Shared Components by name. If you rename a Shared Component, Widgets that use the old name will create a new Shared Component instead of reusing the existing one.
Shared Components vs. Widgets
| Aspect | Widget | Shared Component |
|---|---|---|
| Storage | External source code | Part of your application |
| Insertion | Creates a copy | Creates a reference |
| Changes | Only affect new insertions | Immediately visible everywhere |
| Use case | Starting points, boilerplate | Consistent layouts, headers, footers |
Additional Tools
The Pages area includes several additional tools for managing and searching page elements.
Recycle Bin
When you remove an element from a page, Structr does not delete it permanently. Instead, it moves the element to the Recycle Bin. This soft-delete approach allows you to restore elements that were removed by accident.
Pages are not soft-deleted. When you delete a page, Structr removes the page itself but moves all its child elements to the Recycle Bin.
The Recycle Bin flyout shows all elements that have been removed from pages, including their children. To restore an element, drag it back into the page tree on the left. The context menu lets you permanently delete individual elements. At the top of the flyout, the “Delete All” button permanently deletes all elements in the Recycle Bin.
The Recycle Bin is not cleared automatically, but its contents are not included in deployment exports. The flyout is located on the right side of the Pages area.
Preview
The Preview flyout shows a preview of the current page, just like the Preview tab in the center panel. This allows you to keep the preview visible while working with other tabs in the center panel. The flyout is located on the right side of the Pages area.
Navigation & Routing
Pages in Structr are accessible at URLs that match their names. A page named “about” is available at /about, a page named “products” at /products. This simplicity is intentional: in Structr, the URL is not just an address – it determines what is displayed and which data is available.
Why URLs Matter in Structr
In client-side frameworks, URLs are often an afterthought. The application manages its own state, and the URL is updated to reflect it – or sometimes ignored entirely. This leads to applications where the back button breaks, bookmarks don’t work, and sharing a link doesn’t show the same content.
Structr takes the opposite approach. The URL is the source of truth. When a user navigates to /projects/a3f8b2c1-..., Structr resolves that UUID, makes the object available under current, and renders the page with that context. No client-side state management, no hydration, no synchronization problems.
This has practical benefits: every application state has a unique, shareable URL. The back button works as expected. Users can bookmark any page, including detail views. And because the server knows exactly what to render from the URL alone, debugging becomes straightforward – you can see the entire application state in the address bar.
URLs as Entry Points
Because Structr resolves objects directly from URLs, every page can serve as an entry point. Users don’t have to navigate through your application to reach a specific record – they can go there directly. This is particularly valuable for applications where users share links, receive notifications with deep links, or return to specific items via bookmarks.
The current keyword makes this seamless. You build your detail pages using current.name, current.price, or any other attribute, and Structr populates them automatically based on the URL. The same page works whether the user clicked through from a list or arrived via a direct link.
How Structr resolves pages
When a request comes in, Structr determines which page to display based on several factors:
-
URL Routing: Structr first checks if any page has a URL route that matches the request path. If a match is found, that page is displayed.
-
Page Name: If no route matches, Structr looks for a page whose name matches the URL path.
-
Visibility and Permissions: The page must be visible to the current user. For public users,
visibleToPublicUsersmust be enabled. For authenticated users, eithervisibleToAuthenticatedUsersor specific permissions must grant access.
If multiple pages have the same name and the same permissions, Structr cannot distinguish between them and only one will be displayed.
Pages vs. static files
It is important to understand the difference between dynamic pages and static files when it comes to URL resolution.
For dynamic pages (Page nodes with their tree of Template and DOM elements), Structr uses the first path segment to determine which page to display. Everything after the second slash is treated as additional data for that page. For example, /product, /product/, and /product/index.html all resolve to the page named product. A URL like /product/a3f8b2c1... where the second part is a UUID, also resolves to the product page, and the second segment (the UUID) is automatically looked up in the database and the resolved object made available under the current keyword (see “The current keyword” below). If htmlservlet.resolveproperties is configured, the second segment can also be a non-UUID value, e.g. a human-readable parameter like a name or slug instead of a UUID. This is the standard behavior unless custom URL routing is configured.
For static files served from the virtual filesystem, Structr resolves paths exactly. A request to /product or /product/ resolves to the folder named product, not to a file like index.html inside it. Unlike traditional web servers such as Apache or Nginx, Structr does not automatically map directory paths to index files.
This distinction matters when migrating static websites into Structr’s virtual filesystem. If your static HTML files use directory-style links like href="/product/", those links will resolve to the folder rather than to an index.html file within it. You need to use explicit file references like href="/product/index.html" instead.
The start page
When users navigate to the root URL (/), Structr displays a start page based on one of two configurations:
- A page with the lowest
positionvalue among all visible pages - A page with “404” configured in
showOnErrorCodes
If neither configuration exists, Structr returns a standard 404 error. The start page must be visible to public users, otherwise they also receive a 404 error – Structr does not distinguish between non-existent pages and pages without access to avoid leaking information.
Error pages
You can configure a page to be displayed when specific HTTP errors occur. Set the showOnErrorCodes attribute to a comma-separated list of status codes, for example “404” for pages not found or “403” for access denied.
If no error page is configured, Structr returns a standard HTTP error response.
The current keyword
Structr can automatically resolve objects from URLs and make them available under the current keyword. This is one of Structr’s core features and enables detail pages without additional configuration.
Note that UUID resolution only works on direct page URLs and partials, not on URL routes. URL routing and UUID resolution are independent mechanisms.
UUID resolution
When you append a UUID to a page URL, Structr automatically recognizes it and looks up the corresponding object in the database. If the object exists and is visible to the current user, it becomes available under current.
For example, navigating to /products/a3f8b2c1-d4e5-f6a7-b8c9-d0e1f2a3b4c5 makes the Product object with that ID available as current. You can then use ${current.name}, ${current.price}, and other attributes in your template expressions.
This is useful for populating forms with data. Create a form that uses current to fill its input fields, then call the page with the object UUID appended to load that object’s data into the form.
Resolving by other attributes
By default, Structr only resolves objects by UUID. To enable resolution by other attributes, configure htmlservlet.resolveproperties in structr.conf. The format is a comma-separated list of Type.attribute entries:
htmlservlet.resolveproperties = Product.name, Article.title, Project.urlPath
With this configuration, navigating to /products/my-product-name resolves the Product with that name and makes it available as current.
URL Routing
By default, Structr automatically maps pages to URLs based on their name. URL Routing extends this by allowing you to define custom routing schemes with typed parameters that Structr validates and makes available in the page. This gives you full control over your URL structure beyond the built-in automatic routing.
How it works
A page can have multiple routes. Structr evaluates URL routes before checking page names, so custom routes take priority over the default name-based resolution. If a route matches, the corresponding page is rendered and the matched parameters are available in template expressions and scripts.
Parameters are optional. If a path segment is missing, the parameter value is null. If a value does not match the expected type (for example "abc" for an Integer parameter), the page is still rendered but the parameter value is null and Structr logs an error.
Multiple routes can point to the same page, allowing a single page to serve different URL patterns. For example, a product page could be reachable via both /product/{id} and /shop/{category}/{id}.
Defining routes
In the URL Routing tab of a page, you define path expressions using placeholders following the pattern /<page>/<param1>/<param2>/.../<paramN> that allow URL parameters to be mapped to a page and multiple parameters.
The parameters are then available in the page context using their placeholder names. In StructrScript, parameters are accessed with single braces ${paramName}, while JavaScript blocks use double braces ${{ ... }}.
Note: Do not use parameter names that are also used as data keys in repeaters, as they will not work.
Parameter types and validation
For each placeholder, you can select a type that determines how Structr validates and converts the input value. The available types are:
- String
- Integer
- Long
- Double
- Float
- Date
- Boolean
Markdown Rendering Hint: MarkdownTopic(String) not rendered because level 5 >= maxLevels (5)
Markdown Rendering Hint: MarkdownTopic(Integer and Long) not rendered because level 5 >= maxLevels (5)
Markdown Rendering Hint: MarkdownTopic(Float and Double) not rendered because level 5 >= maxLevels (5)
Markdown Rendering Hint: MarkdownTopic(Boolean) not rendered because level 5 >= maxLevels (5)
Markdown Rendering Hint: MarkdownTopic(Date) not rendered because level 5 >= maxLevels (5)
Examples
Markdown Rendering Hint: MarkdownTopic(A single parameter) not rendered because level 5 >= maxLevels (5)
Markdown Rendering Hint: MarkdownTopic(Multiple parameters) not rendered because level 5 >= maxLevels (5)
Markdown Rendering Hint: MarkdownTopic(Blog-style URLs) not rendered because level 5 >= maxLevels (5)
Use cases
URL Routing is particularly useful for:
- SEO-friendly URLs - using human-readable object names or slugs instead of UUIDs (e.g.
/product/ergonomic-keyboardinstead of/product?id=a3f8...) - Multilingual sites - including the language code as a path segment (e.g.
/en/about,/de/about) to serve localized content from a single page - Detail pages - passing identifiers via the URL so a single page template can render different content (e.g.
/user/{username},/order/{orderId}) - Hierarchical content - modeling category and subcategory structures directly in the URL (e.g.
/docs/{section}/{topic}) - Clean API-style endpoints - combining URL Routing with page methods to create RESTful-style interfaces served by Structr pages
Building navigation
This section covers different ways to implement navigation in your application.
Links between pages
Navigation between pages works like in any other web application: you use standard HTML links with the href attribute.
<a href="/about">About Us</a>
<a href="/products">Products</a>
If you need links that automatically update when a page is renamed, you can retrieve the page object via scripting and use its name attribute as the link target. This is uncommon – most applications use simple string-based links.
Navigation after actions
Event Action Mappings can navigate to another page after an action completes. This is commonly used to redirect users to a detail page after creating a new object. You specify the target page name in the follow-up action configuration.
For details on configuring navigation in Event Action Mappings, see the Event Action Mapping chapter.
Dynamic navigation menus
A common pattern in Structr is to generate navigation menus automatically. You implement the menu as a repeater that iterates over pages and creates a link for each one.
To control which pages appear in the menu, you can use visibility settings to include only pages visible to the current user, or add a custom attribute to the Page type (for example showInMenu) and filter by it.
<nav>
    <ul>
        <li data-structr-meta-function-query="find('Page', equals('showInMenu', true))" data-structr-meta-data-key="page">
            <a href="/${page.name}">${page.name}</a>
        </li>
    </ul>
</nav>
Request parameters
Request parameters from the URL query string are available via $.request in any scripting context.
For example, with the URL /products?category=electronics&sort=price:
$.request.category  // "electronics"
$.request.sort      // "price"
You can use request parameters in template expressions, show/hide conditions, function queries, and any other scripting context.
Redirects and periodic reloads
The Load/Update Mode settings on the General tab of a page control automatic redirects and periodic reloads. You can configure the page to redirect to another URL when it loads, or to refresh at regular intervals.
Partials
Every element in a page is directly accessible via its UUID. This allows you to render individual elements independently from their page, which is useful for AJAX requests, dynamic updates, and partial reloads.
Rendering partials
To render a partial, simply use the element’s UUID as the URL:
/a3f8b2c1-d4e5-f6a7-b8c9-d0e1f2a3b4c5
Structr returns only the HTML of that element and its children. The content type is determined by any content or template elements contained in the partial.
Organizing partials
You can organize partials in two ways: create a separate page for each partial, or collect all partials in a single page. Since partials are addressed directly by UUID, their location does not matter. Keeping them in a single page can simplify maintenance.
Partials and the current keyword
UUID resolution for the current keyword also works with partials. Append an object UUID to the partial URL to make that object available under current when the partial renders.
When a URL contains two UUIDs, Structr resolves the first one as the partial and the second one as the detail object:
/a3f8b2c1-d4e5-f6a7-b8c9-d0e1f2a3b4c5/b4c5d6e7-f8a9-b0c1-d2e3-f4a5b6c7d8e9
In this example, the first UUID addresses the partial and the second UUID is resolved as the current object.
Partial reloads
Instead of reloading the entire page, you can update individual elements independently. Configure this via Event Action Mapping by specifying the target element either by its CSS ID or by linking it directly in the mapping configuration.
For details on configuring partial reloads, see the Event Action Mapping chapter.
Dynamic Content
Structr renders all page content on the server. To display data from the database or other sources, you use template expressions and scripting. Template expressions let you insert dynamic values into your pages, while scripting gives you full control over data retrieval and processing. This chapter builds on the concepts introduced in the Pages & Templates chapter.
How Structr Differs from Client-Side Frameworks
If you are familiar with client-side frameworks like React, Vue, or Angular, Structr’s approach to dynamic content may feel different at first. Understanding these differences helps you work with Structr effectively.
Server-Side by Default
Structr is not a rich-client stack. Like other server-side rendering approaches, most of the work happens on the server. Structr follows principles similar to the ROCA style (Resource-Oriented Client Architecture): the server renders HTML, the URL identifies resources, and the server controls the application logic.
Everything is Accessible
What sets Structr apart is how accessible everything is. All the layers of a typical web application exist – data model, business logic, rendering, user interaction – but they are thin and within reach. You sit in a control room where everything is at your fingertips, rather than having to dig through separate codebases for each concern.
The data model can be changed live without migrations – existing data immediately gets the new attributes. Repeaters give you direct access to query results. Template expressions let you bind data to elements without intermediate layers. Event Action Mappings connect user input directly to backend operations.
State on the Server
Structr does have state management, but it happens on the server by default. The URL determines what is displayed, and the current keyword gives you the object resolved from the URL. For user-specific state, you can store values directly on the user object via me, or create dedicated Settings objects in the database.
A Different Mindset
Structr brings data and frontend closer together than traditional frameworks. You access data directly in your page elements through template expressions and repeaters, without the need for client-side state management or passing data through component hierarchies. This directness can feel unfamiliar at first, but once you embrace it, you may find that many common tasks require less code than you expect.
Template Expressions

Template expressions allow you to insert dynamic values anywhere in your pages. You can use them in content elements, template elements, and HTML attributes.
StructrScript vs. JavaScript
Structr supports two scripting syntaxes: StructrScript and JavaScript.
Markdown Rendering Hint: MarkdownTopic(StructrScript) not rendered because level 5 >= maxLevels (5)
Markdown Rendering Hint: MarkdownTopic(JavaScript) not rendered because level 5 >= maxLevels (5)
Keywords
Template expressions have access to built-in keywords that provide context about the current request, user, and page. The most commonly used keywords are:
current– the object resolved from the URL (see Navigation & Routing)me– the current userpage– the current pagerequest– HTTP request parametersnow– the current timestamp
For a complete list of available keywords, see the Keyword Reference.
Functions
Structr provides a wide range of built-in functions for string manipulation, date formatting, collections, logic, and more. Some commonly used functions include:
empty()– checks if a value is null or emptyis()– returns a value if a condition is true, null otherwiseequal()– compares two valuesif()– conditional expressionfind()– queries the databasedateFormat()– formats dates
For a complete list of available functions, see the Function Reference.
Dynamic Attribute Values
You can use template expressions in any HTML attribute. This allows you to create elements that change their appearance or behavior based on data, such as dynamic CSS classes, inline styles, or link URLs.
<a href="/projects/${project.id}">${project.name}</a>
The is() function is useful for conditionally adding values. It returns null when the condition is false, which means the value is omitted from the output.
<tr class="project-row ${is(project.isUrgent, 'urgent')}">
Structr handles attribute values as follows: attributes with null values are not rendered at all, and attributes with an empty string are rendered as boolean attributes without a value.
The examples above show complete HTML markup as you would write it in a Template element. For regular HTML elements like Div or Link, you enter only the expression (e.g., /projects/${project.id}) in the attribute field in the properties panel.
Auto-Script Fields
Some input fields in the Structr UI are marked as auto-script fields. These fields automatically interpret their content as script expressions, so you do not need the ${...} wrapper. Auto-script fields include Function Query, Show Conditions, and Hide Conditions. You can recognize auto-script fields in the Admin User Interface by their characteristic ${} prefix displayed next to the input field.
Auto-script fields are a natural fit for StructrScript expressions since they are typically single-line inputs.
Repeaters
To display collections of data, you configure an element as a repeater. The repeater executes a query and renders the element once for each result. This is the primary way to display lists, tables, and other data-driven content in Structr.
Repeater Basics
A repeater has two essential settings: a data source and a data key. The data key is the variable name under which each object is available during rendering.
For the data source, you can choose one of three options:
- Flow: A Structr Flow that returns a collection
- Cypher Query: A Neo4j Cypher query
- Function Query: A script expression
Only one data source can be active at a time.
Filtering and Sorting
In JavaScript, you can refine your query by passing an object with filter criteria to $.find(). For sorting, use the $.predicate.sort() function.
$.find('Project', { status: 'active' }, $.predicate.sort('name'))
This returns all projects with status “active”, sorted by name.
Pagination
For large result sets, use pagination to limit the number of items displayed. Structr provides a page() predicate that works with request parameters.
In StructrScript:
find('Project', page(1, 25))
In JavaScript:
$.find('Project', $.predicate.sort('name'), $.predicate.page(1, 25))
The first argument is the page number (starting at 1), the second is the page size. You can make the page number dynamic using request parameters:
find('Project', sort('name'), page(request.page!1))
This reads the page number from the URL (e.g., /projects?page=2) and defaults to page 1 if not set.
Performance Considerations
Structr can render thousands of objects and generate several megabytes of HTML without problems. However, displaying large amounts of data rarely makes sense for users. A page with thousands of table rows is difficult to navigate and slow to load in the browser.
Best practices:
- Always limit result sets with pagination or a reasonable maximum
- Use filtering to show only relevant data
- Consider whether users really need to see all data at once, or whether search and filters are more appropriate
Nested Repeaters
Repeaters can be nested to display hierarchical data. The inner repeater can use relationships from the outer repeater’s data key as its function query.
For example, to display a list of projects with their tasks, you create an outer repeater with find('Project') and data key project. Inside, you add an inner repeater with project.tasks and data key task. The outer repeater iterates over all projects, and for each project, the inner repeater iterates over its tasks.
Note that data keys in nested repeaters must be unique. If you use the same data key in a nested repeater, the inner value overwrites the outer one.
Empty Results
When a repeater query returns no results, the element is not rendered at all. If you want to display a message when there are no results, add a sibling element with a show condition that checks for empty results:
empty(find('Project', { status: 'active' }))
This element only appears when there are no active projects.
Static Data
A Function Query can also return static data directly by defining a JavaScript object or array. This is useful for prototyping or for data that does not come from the database:
${{ [{ name: 'Draft' }, { name: 'Active' }, { name: 'Completed' }] }}
Show and Hide Conditions
Show and hide conditions control whether an element appears in the page output. Structr evaluates these conditions at render time, before the element and its children are rendered.
How It Works
Each element can have a show condition, a hide condition, or both. The element is rendered only when the show condition evaluates to true (if set) and the hide condition evaluates to false (if set). If both are set, both must be satisfied for the element to render.
Show and hide conditions are auto-script fields. You write the expression directly without the ${...} wrapper.
Complex Conditions
For conditions with multiple criteria, use the and() and or() functions:
and(not(empty(current)), equal(current.status, 'active'))
This shows the element only when current exists AND has status “active”.
or(equal(me.role, 'admin'), equal(current.owner, me))
This shows the element when the user is an admin OR is the owner of the current object.
You can nest these functions for more complex logic:
and(not(empty(current)), or(equal(me.role, 'admin'), equal(current.owner, me)))
Show Conditions vs. Permissions
Show and hide conditions control visual output only. They are not a security mechanism. To restrict access to data, use visibility flags and permissions instead. For details, see the Access Control section in the Overview chapter.
Combining List and Detail View
A common pattern in Structr is to implement both a list view and a detail view on the same page. You control which view is displayed using show and hide conditions based on the current keyword.
When a user navigates to /projects, no object is resolved and current is empty – the list view is displayed. When a user navigates to /projects/a3f8b2c1-..., Structr resolves the Project object and makes it available as current – the detail view is displayed.
To implement this, you create two sibling elements: one for the list view with a show condition of empty(current), and one for the detail view with a show condition of not(empty(current)). Only one of them is rendered, depending on whether an object was resolved from the URL.
Side-by-Side Layout
A more advanced version displays both views side by side, similar to an email inbox. The list remains visible on the left, and the detail view appears on the right when an item is selected. You can highlight the selected item in the list by adding a dynamic CSS class that compares each item with current:
${is(equal(project, current), 'selected')}
This layout is easy to build using card components or similar block-level elements. Each card has a header and content area, one for the project list and one for the project details. This eliminates the need for separate pages and routing logic that you would typically write in other frameworks.
Page Functions
Structr provides several functions that are specifically designed for use in pages and templates.
render()
The render() function outputs child elements at a specific position. Templates and Shared Components do not render their children automatically, so you use render(children) to control where they appear. You can also render specific children using render(first(children)) or render(nth(children, 2)).
include()
The include() function lets you include content from other elements or objects. You can include elements from other parts of the page tree or render objects from the database.
includeChild()
The includeChild() function works like include(), but specifically for child elements. It allows you to include a child element by name or position.
localize()
The localize() function returns a translated string for the current locale. You pass a key and optionally a domain. For details on translations, see the Translations section in the Pages & Templates chapter.
Next Steps
This chapter covered how to display dynamic content: template expressions for values, repeaters for collections, and show/hide conditions for conditional rendering.
To handle user input – forms, button clicks, and other interactions – see the Event Action Mapping chapter.
Event Action Mapping
Event Action Mapping is Structr’s declarative approach to handling user interactions. It connects DOM events directly to backend operations. When a user clicks a button, submits a form, or changes an input field, Structr can respond by creating, updating, or deleting data, calling methods, or navigating to another page.
Basics
An Event Action Mapping defines a flow: when an event fires (like click or submit), Structr executes an action (like creating an object or calling a method) with the configured parameters (mapped from input fields or expressions), and then performs a follow-up action (like navigating to another page or refreshing part of the UI).
Elements with Event Action Mappings are marked with an orange icon in the Active Elements tab. The icon resembles a process diagram, reflecting the flow-based nature of the mapping.
Why Event Action Mapping
In traditional web development, handling user interactions requires multiple layers: JavaScript event listeners on the client, API endpoints on the server, and code to connect them. Frameworks help manage this complexity, but you still need to understand their abstractions, maintain the code, and keep client and server in sync.
Event Action Mapping takes a different approach. You configure what should happen when an event fires, and Structr handles the communication between client and server. This keeps the simplicity of server-side rendering while adding the interactivity users expect from modern web applications. Because the configuration is declarative, you can see at a glance what each element does - the behavior is defined directly on the element in the Pages area, not scattered across separate code files.
Debouncing
Event Action Mapping automatically debounces requests. When multiple events fire in quick succession, Structr waits until the events stop before sending the request. This prevents duplicate submissions when a user accidentally double-clicks a button or types quickly in an input field with a change or input event.
The Frontend Library
To enable Event Action Mapping, your page must include the Structr frontend library:
<script type="module" defer src="/structr/js/frontend/frontend.js"></script>
This script listens for configured events and sends the corresponding requests to the server. The page templates included with Structr already include this library, so you only need to add it manually if you create your own page template from scratch.
Events
Events are DOM events that trigger an action. You configure which event to listen for on each element.
Configuring an Event
To add an Event Action Mapping, select an element in the page tree and open the Event Action Mapping panel. Select the event you want to react to - for example click for a button or submit for a form. Then configure the action, parameters, and follow-up behavior.
Available Events
The input field provides suggestions for commonly used events like click, submit, change, input, keydown, and mouseover. You are not limited to these suggestions - the event field accepts any DOM event name, giving you full flexibility to react to any event the browser supports.
Choosing the Right Event
The choice of event depends on the element and the desired behavior. For buttons, click is the typical choice. For forms, you usually listen for submit on the form element rather than click on the submit button. For checkboxes and radio buttons, use change instead of click - the value only updates after the click event completes.
Auto-Save Input Fields
Event Action Mapping does not require a <form> element. You can wire up individual input fields to save their values independently, for example by listening for change on each field and triggering an update action. This allows for auto-save interfaces where each field saves immediately when the user makes a change.
When you bind an Event Action Mapping directly to an input field, you do not need to configure parameter mapping. If the field has a name attribute, it automatically sends its current value with that name as the parameter. This makes auto-save setups particularly simple - just set the field’s name to match the property you want to update.
For example, consider a project detail page with two independently saving fields:
<input type="text" name="name" value="${current.name}">
<input type="text" name="description" value="${current.description}">
Each input gets its own Event Action Mapping: set the event to change, the action to “Update object”, and the UUID to ${current.id}. No parameter mapping is needed - Structr reads the field’s name attribute and current value automatically. When the user changes a field and moves to the next one, the value is saved immediately.
Actions
Actions define what happens when an event fires. Each action type has its own configuration options. Most actions require parameters to specify which data to send to the server.
Data Operations
Data operations create, modify, or delete objects in the database.
Markdown Rendering Hint: MarkdownTopic(Create New Object) not rendered because level 5 >= maxLevels (5)
Markdown Rendering Hint: MarkdownTopic(Update Object) not rendered because level 5 >= maxLevels (5)
Markdown Rendering Hint: MarkdownTopic(Edit Forms with Other Input Types) not rendered because level 5 >= maxLevels (5)
Markdown Rendering Hint: MarkdownTopic(Delete Object) not rendered because level 5 >= maxLevels (5)
Markdown Rendering Hint: MarkdownTopic(Creating Related Objects Inline) not rendered because level 5 >= maxLevels (5)
Authentication
Authentication actions manage user sessions.
Markdown Rendering Hint: MarkdownTopic(Sign In) not rendered because level 5 >= maxLevels (5)
Markdown Rendering Hint: MarkdownTopic(Sign Out) not rendered because level 5 >= maxLevels (5)
Markdown Rendering Hint: MarkdownTopic(Sign Up) not rendered because level 5 >= maxLevels (5)
Markdown Rendering Hint: MarkdownTopic(Reset Password) not rendered because level 5 >= maxLevels (5)
Pagination
Pagination actions navigate through paged data. They work together with the “Request Parameter for Page” parameter type to control which page of results is displayed.
To use pagination, you first need a repeater configured with paging. The function query uses the page() function with a request parameter:
find('Project', page(request.page!1, 10))
This query finds all projects, displays 10 per page, and reads the current page number from the page request parameter. The !1 specifies a default value of 1 if the parameter is not set.
To configure a pagination action, add a parameter with type “Request Parameter for Page” and set the parameter name to match the request parameter used in your function query (e.g. page). Configure a follow-up action to reload the element containing the paginated data.
Markdown Rendering Hint: MarkdownTopic(Next Page) not rendered because level 5 >= maxLevels (5)
Markdown Rendering Hint: MarkdownTopic(Previous Page) not rendered because level 5 >= maxLevels (5)
Markdown Rendering Hint: MarkdownTopic(First Page) not rendered because level 5 >= maxLevels (5)
Markdown Rendering Hint: MarkdownTopic(Last Page) not rendered because level 5 >= maxLevels (5)
Custom Logic
Custom logic actions execute your own code.
Markdown Rendering Hint: MarkdownTopic(Execute Method) not rendered because level 5 >= maxLevels (5)
Markdown Rendering Hint: MarkdownTopic(Execute Flow) not rendered because level 5 >= maxLevels (5)
Parameters
Parameters define which data is sent with an action. To add a parameter, click the plus button next to the “Parameter Mapping” heading. Each parameter has a name and a type that determines where the value comes from.
For Create New Object and Update Object actions, there is an additional button “Add parameters for all properties”. When you have selected a type, this button automatically creates parameter mappings for all properties of that type. This saves time when you need to map many fields at once.
User Input
Links to an input field on the page. When you select this type, a drop area appears where you can drag and drop an input element from the page tree. Structr automatically establishes the connection between the parameter and the input field.
When the action fires, Structr reads the current value from the input field. If the input field is inside a repeater, Structr automatically finds the correct element within the current repeater context.
Constant Value
A fixed value that is always sent with the action. Template expressions are not supported here, but you can use special keywords to send structured data:
json(...)- sends a JSON object, for examplejson({"status": "active", "count": 5})data()- sends data from the DataTransfer object of a drag and drop event, useful when handlingdropevents where the dragged element has attached JSON data
Evaluate Expression
A template expression that is evaluated on the server when the page renders. This allows you to include data that was already known at page render time - for example, the ID of the current object or request parameters. The field supports mixed content, so you need to use the ${...} syntax for expressions.
Request Parameter for Page
Used for pagination actions. When you select this type, the parameter name specifies which request parameter controls the page number. This works together with the pagination actions (Next Page, Previous Page, First Page, Last Page) to navigate through paged data.
When Parameters Are Evaluated
Understanding when each parameter type is evaluated is important for choosing the right type:
| Parameter Type | Evaluated | Use Case |
|---|---|---|
| User Input | When action fires | Form fields, user-entered data |
| Constant Value | Never (static) | Fixed values, JSON data |
| Evaluate Expression | When page renders | Object IDs, request parameters |
| Request Parameter for Page | When action fires | Pagination |
This distinction explains why the object UUID uses ${current.id} in the “UUID of object to update” field (evaluated at render time) while field values use “User Input” (evaluated at submit time).
Notifications
Notifications provide visual feedback to the user about whether an action succeeded or failed. You configure success notifications and failure notifications separately - each can use a different notification type, or none at all. If you do not configure a failure notification, failed actions fail silently without any feedback to the user.
None
No notification is shown. This is the default for both success and failure.
System Alert
Displays a browser alert dialog with a status message. The message includes the HTTP status code and the server’s response message if available:
✅ Operation successful (200)
❌ Operation failed (422: Unable to commit transaction)
Inline Text Message
Displays the status message on the page, directly after the element that triggered the action. You can configure the display duration in milliseconds, after which the message disappears automatically.
For validation errors, the specific error messages are included:
❌ Operation failed (422: Unable to commit transaction, validation failed)
test must not be empty
Additionally, the input element for each invalid property receives a red border and a data-error attribute containing the error type. On success, these error indicators are cleared automatically.
Custom Dialog Element Defined by CSS Selector
Shows an element selected by a CSS selector by removing its hidden class. The element is hidden again after 5 seconds. You need to define the hidden class in your CSS, for example with display: none.
You can specify multiple selectors separated by commas - each selector is processed separately. Note that for each selector, only the first matching element is shown. If you use a class selector like .my-dialog and multiple elements have this class, only the first one will be displayed.
This option does not have access to the result data - it simply shows and hides the element. Result placeholders like {result.id} are not available in the selector.
Custom Dialog Element Defined by Linked Element
Same as above, but instead of entering a CSS selector, you drag and drop an element from the page tree onto the drop target that appears when this option is selected.
Raise a Custom Event
Dispatches a custom DOM event that you can handle with JavaScript. You specify the event name in an input field. See the section “Custom Events” under Custom JavaScript Integration for details.
Notifications Display Fixed Messages
The built-in notification types (system alert, inline text message, custom dialog) display fixed messages and cannot include data from the action result. If you need to show result data in a notification - for example, displaying the name of a newly created object - use “Raise a Custom Event” and handle the display logic in JavaScript.
In contrast, follow-up actions support result placeholders like {result.id}. See the section “Accessing Result Properties” for details.
Follow-up Actions
Follow-up actions define what happens after an action completes. In the UI, these are labeled “Behavior on Success” and “Behavior on Failure”. You configure success and failure behavior separately - each can use a different follow-up action type, or none at all.
None
No follow-up action. This is the default for both success and failure.
Reload the Current Page
Reloads the entire page. This is the simplest way to ensure the page reflects any changes made by the action, but it loses any client-side state and may feel slow for users.
Refresh Page Sections Based on CSS Selectors
Reloads specific parts of the page selected by CSS selectors. Only the matched elements are re-rendered on the server and replaced in the browser. This is useful for updating a list after creating or deleting an item without reloading the entire page.
You can specify multiple selectors separated by commas. Unlike notifications, all matching elements are reloaded - if you use a class selector like .my-list and multiple elements have this class, all of them will be refreshed.
Result placeholders like {result.id} are not available here - the selectors are static and cannot depend on the action result.
Refresh Page Sections Based on Linked Elements
Same as above, but instead of entering CSS selectors, you drag and drop elements from the page tree onto the drop target that appears when this option is selected.
Navigate to a New Page
Navigates to another page. You enter a URL which can include result placeholders like {result.id}. A common pattern is to navigate to the detail page of a newly created object with a URL like /project/{result.id}.
Markdown Rendering Hint: MarkdownTopic(Accessing Result Properties) not rendered because level 5 >= maxLevels (5)
Raise a Custom Event
Dispatches a custom DOM event that you can handle with JavaScript. You specify the event name in an input field. See the section “Custom Events” under Custom JavaScript Integration for details.
Sign Out
Ends the current user session and reloads the page. This is useful as a failure follow-up action when an action requires authentication - if the session has expired, the user is signed out and can log in again.
How Partial Reload Works
When you use “Refresh Page Sections”, only the selected elements are re-rendered on the server and replaced in the browser. Event listeners are automatically re-bound to the new content, and request parameters (for example from pagination) are preserved.
After a partial reload, the element dispatches a structr-reload event. You can listen for this event to run custom JavaScript after the content updates. If an input field had focus before the reload, Structr attempts to restore focus to the same field in the new content.
Validation
There are two approaches to validating user input: client-side validation before the request is sent, and server-side validation when the data is processed.
Client-Side Validation
For client-side validation, you can use standard HTML5 validation attributes on your form fields. Event Action Mapping automatically checks these constraints before sending the request - if validation fails, the browser shows an error message and the action is not executed.
Markdown Rendering Hint: MarkdownTopic(HTML5 Validation Attributes) not rendered because level 5 >= maxLevels (5)
Markdown Rendering Hint: MarkdownTopic(Validation Events) not rendered because level 5 >= maxLevels (5)
Markdown Rendering Hint: MarkdownTopic(Validation CSS Pseudo-Classes) not rendered because level 5 >= maxLevels (5)
Server-Side Validation
Server-side validation happens when the data reaches the backend. Structr validates the data against the constraints defined in your data model. If validation fails, the server returns an error response that you can display to the user using a failure notification.
Markdown Rendering Hint: MarkdownTopic(Schema Constraints) not rendered because level 5 >= maxLevels (5)
Markdown Rendering Hint: MarkdownTopic(Lifecycle Methods) not rendered because level 5 >= maxLevels (5)
Markdown Rendering Hint: MarkdownTopic(Handling Validation Errors) not rendered because level 5 >= maxLevels (5)
Custom JavaScript Integration
Event Action Mapping covers the most common interaction patterns, but sometimes you need more control. Structr provides several ways to integrate custom JavaScript logic with Event Action Mapping.
Custom Events
The “Raise a Custom Event” option in notifications and follow-up actions allows you to break out of the Event Action Mapping framework. When configured, Structr dispatches a DOM event that you can listen for in your own JavaScript code.
You specify the event name in an input field. The event bubbles up through the DOM and includes a detail object with three properties:
result- the result returned by the actionstatus- the HTTP status codeelement- the DOM element that triggered the action
Example:
document.addEventListener('project-created', (event) => {
    console.log('New project ID:', event.detail.result.id);
    console.log('Status:', event.detail.status);
});
This lets you combine the simplicity of Event Action Mapping with custom logic - for example, using Event Action Mapping to handle form submission and data creation, then raising a custom event to trigger a complex animation, update a third-party component, or perform additional client-side processing.
Built-in Events
Structr automatically fires several events during action execution that you can listen for.
Markdown Rendering Hint: MarkdownTopic(structr-action-started) not rendered because level 5 >= maxLevels (5)
Markdown Rendering Hint: MarkdownTopic(structr-action-finished) not rendered because level 5 >= maxLevels (5)
Markdown Rendering Hint: MarkdownTopic(structr-reload) not rendered because level 5 >= maxLevels (5)
CSS Class During Execution
While an action is running, the triggering element receives the CSS class structr-action-running. This class is added when the action starts and removed when it finishes. You can use this to style elements during execution - for example, to show a loading indicator or disable a button:
.structr-action-running {
    opacity: 0.5;
    pointer-events: none;
}

.structr-action-running::after {
    content: ' Loading...';
}
Advanced Example
The examples earlier in this chapter show simple forms that map input fields to primitive properties like strings and dates. In practice, most forms also need to set relationships to other objects. This section shows how to build a form that handles all four relationship cardinalities.
The Data Model
The example uses a project management scenario with the following types and relationships:
| Type | Relationship | Target Type | Cardinality | Meaning |
|---|---|---|---|---|
| Project | manager | Employee | many-to-one | Each project has one manager, but an employee can manage multiple projects. |
| Project | client | Client | one-to-one | Each project has exactly one client, and each client has exactly one project. |
| Project | tags | Tag | many-to-many | A project can have multiple tags, and a tag can be assigned to multiple projects. |
| Project | tasks | Task | one-to-many | A project has multiple tasks, but each task belongs to exactly one project. |
How Relationship Properties Work in Forms
To set a relationship property in a form, you pass the UUID of the related object as the parameter value. Structr uses the UUID to find the target object and creates or updates the relationship.
For to-one relationships (many-to-one and one-to-one), you pass a single UUID. A <select> element is the natural choice here because the user picks one item from a list. Each <option> has the UUID of a related object as its value.
For to-many relationships (one-to-many and many-to-many), you pass multiple UUIDs. A <select> element with the multiple attribute is the natural choice here. Each <option> has the UUID of a related object as its value, and the browser collects all selected values into an array.
Structr manages relationships completely. When you submit the form, Structr sets the relationship to exactly the objects you pass. Old relationships that are no longer in the submitted data are removed automatically.
The Form
The following form contains relationship selectors for all four cardinalities on a Project. The page is accessible at /advanced/{id} where {id} is the project’s UUID.
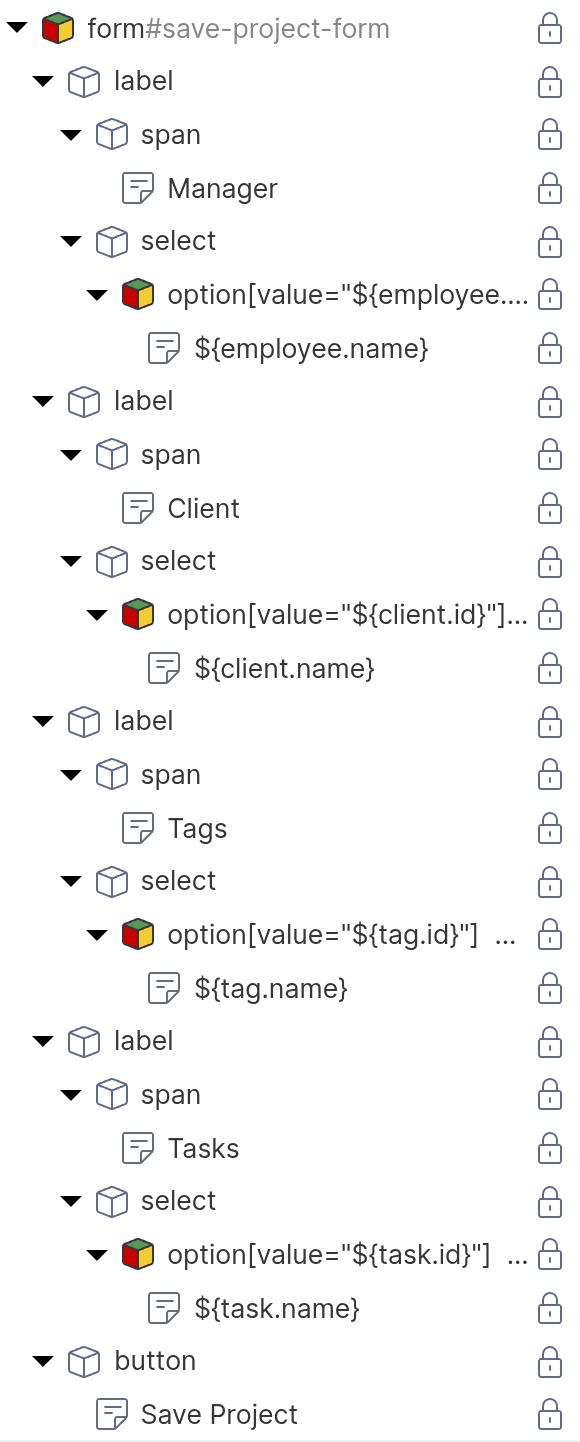
<form id="advanced-project-form">
    <label>
        <span>Manager</span>
        <select name="manager">
            <!-- repeater: find('Employee'), data key: employee -->
            <option value="${employee.id}">
                ${employee.name}
            </option>
        </select>
    </label>
    <label>
        <span>Client</span>
        <select name="client">
            <!-- repeater: find('Client'), data key: client -->
            <option value="${client.id}">
                ${client.name}
            </option>
        </select>
    </label>
    <label>
        <span>Tags</span>
        <select name="tags" multiple>
            <!-- repeater: find('Tag'), data key: tag -->
            <option value="${tag.id}">
                ${tag.name}
            </option>
        </select>
    </label>
    <label>
        <span>Tasks</span>
        <select name="tasks" multiple>
            <!-- repeater: find('Task'), data key: task -->
            <option value="${task.id}">
                ${task.name}
            </option>
        </select>
    </label>
    <button type="submit">Save Project</button>
</form>
Each <option> element is configured as a repeater that iterates over the available objects of the respective type. The HTML shows only one <option> per <select>, but at runtime, the repeater produces one option for each object returned by its function query. For details on repeaters and function queries, see the Dynamic Content chapter.
Configuring the Event Action Mapping
Select the form element in the page tree and configure the Event Action Mapping:
- Set the Event to
submit. - Select “Update object” as the Action.
- In the UUID field, enter
${current.id}. - In the type field, enter
Project. - Under Parameter Mapping, add a parameter for each property:
| Parameter Name | Parameter Type | Mapped Element | Purpose |
|---|---|---|---|
| manager | User Input | manager select | To-one: sends one UUID |
| client | User Input | client select | To-one: sends one UUID |
| tags | User Input | tags select | To-many: sends array of UUIDs |
| tasks | User Input | tasks select | To-many: sends array of UUIDs |
- Under Behavior on Success, select “Reload the current page”.
The Action Mapping configuration looks like this:
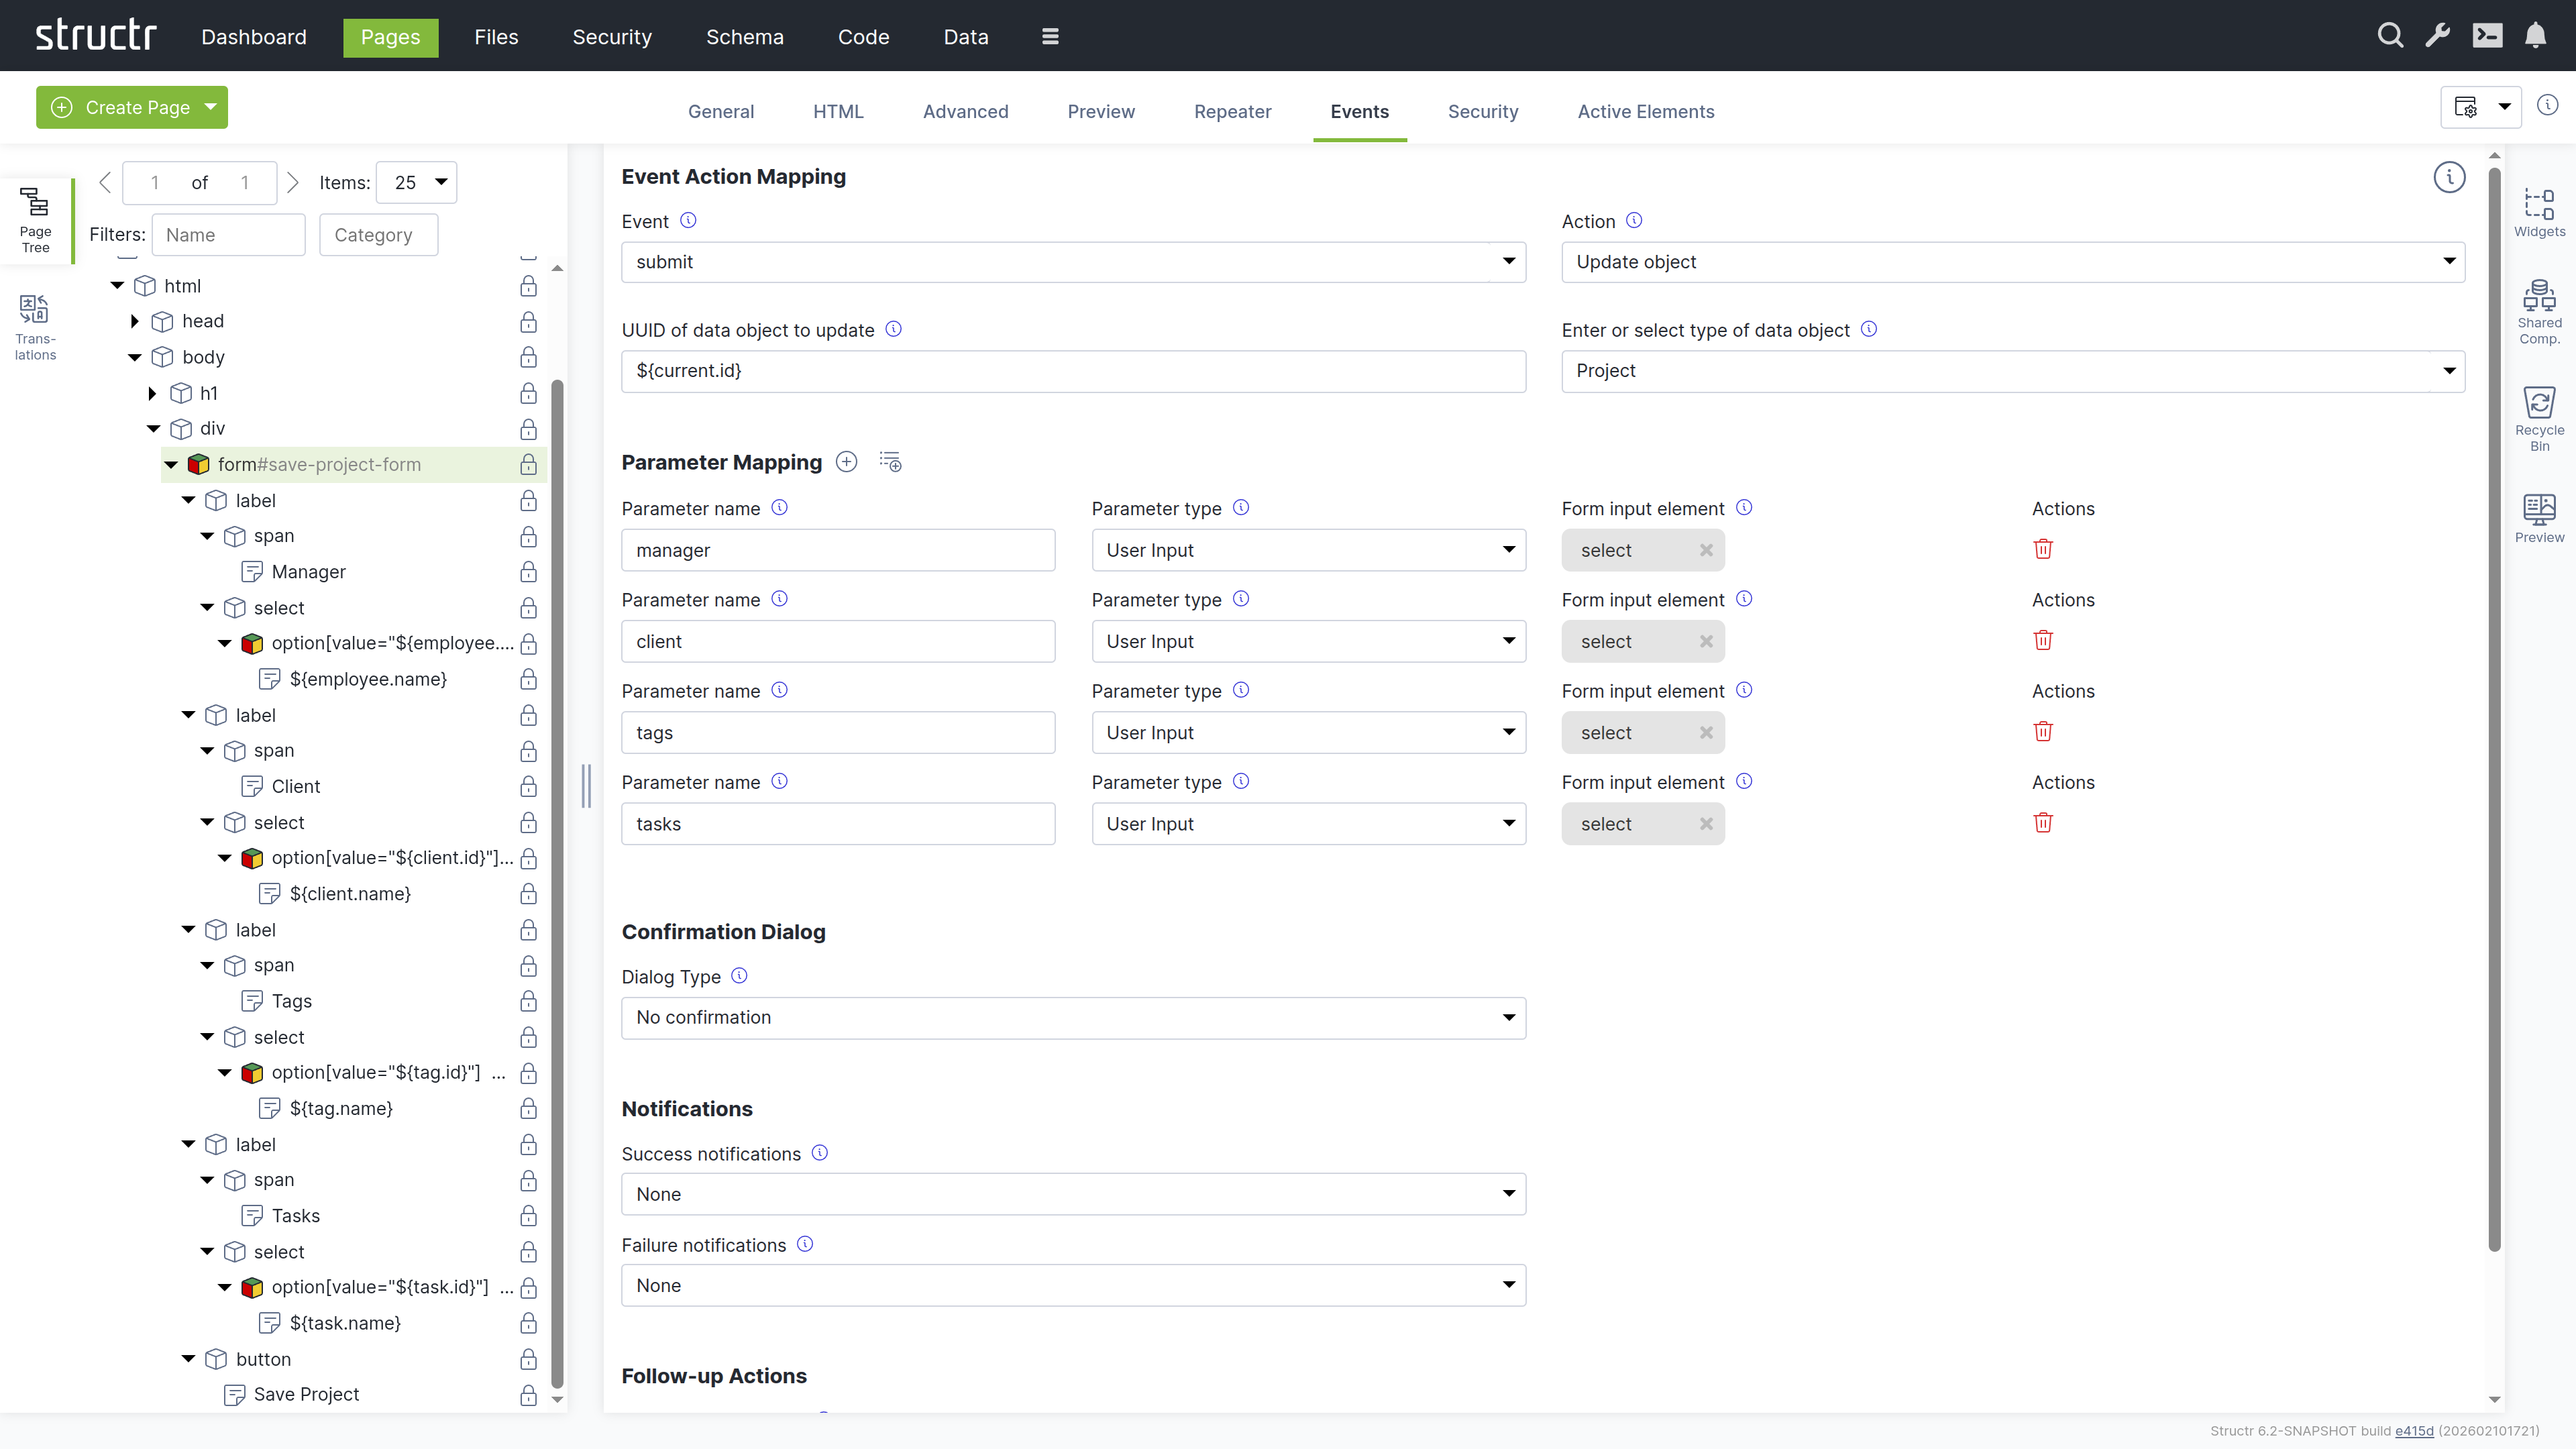
Each <option> element needs to know whether it should be pre-selected when the form loads. As described earlier in this chapter, Structr provides the Selected Values Expression field on the General tab of <option> elements for this purpose. The field contains a template expression that resolves to the current value of the property, for example current.manager or current.tags. Structr compares each option’s value attribute against the result and sets the selected attribute on matching options.
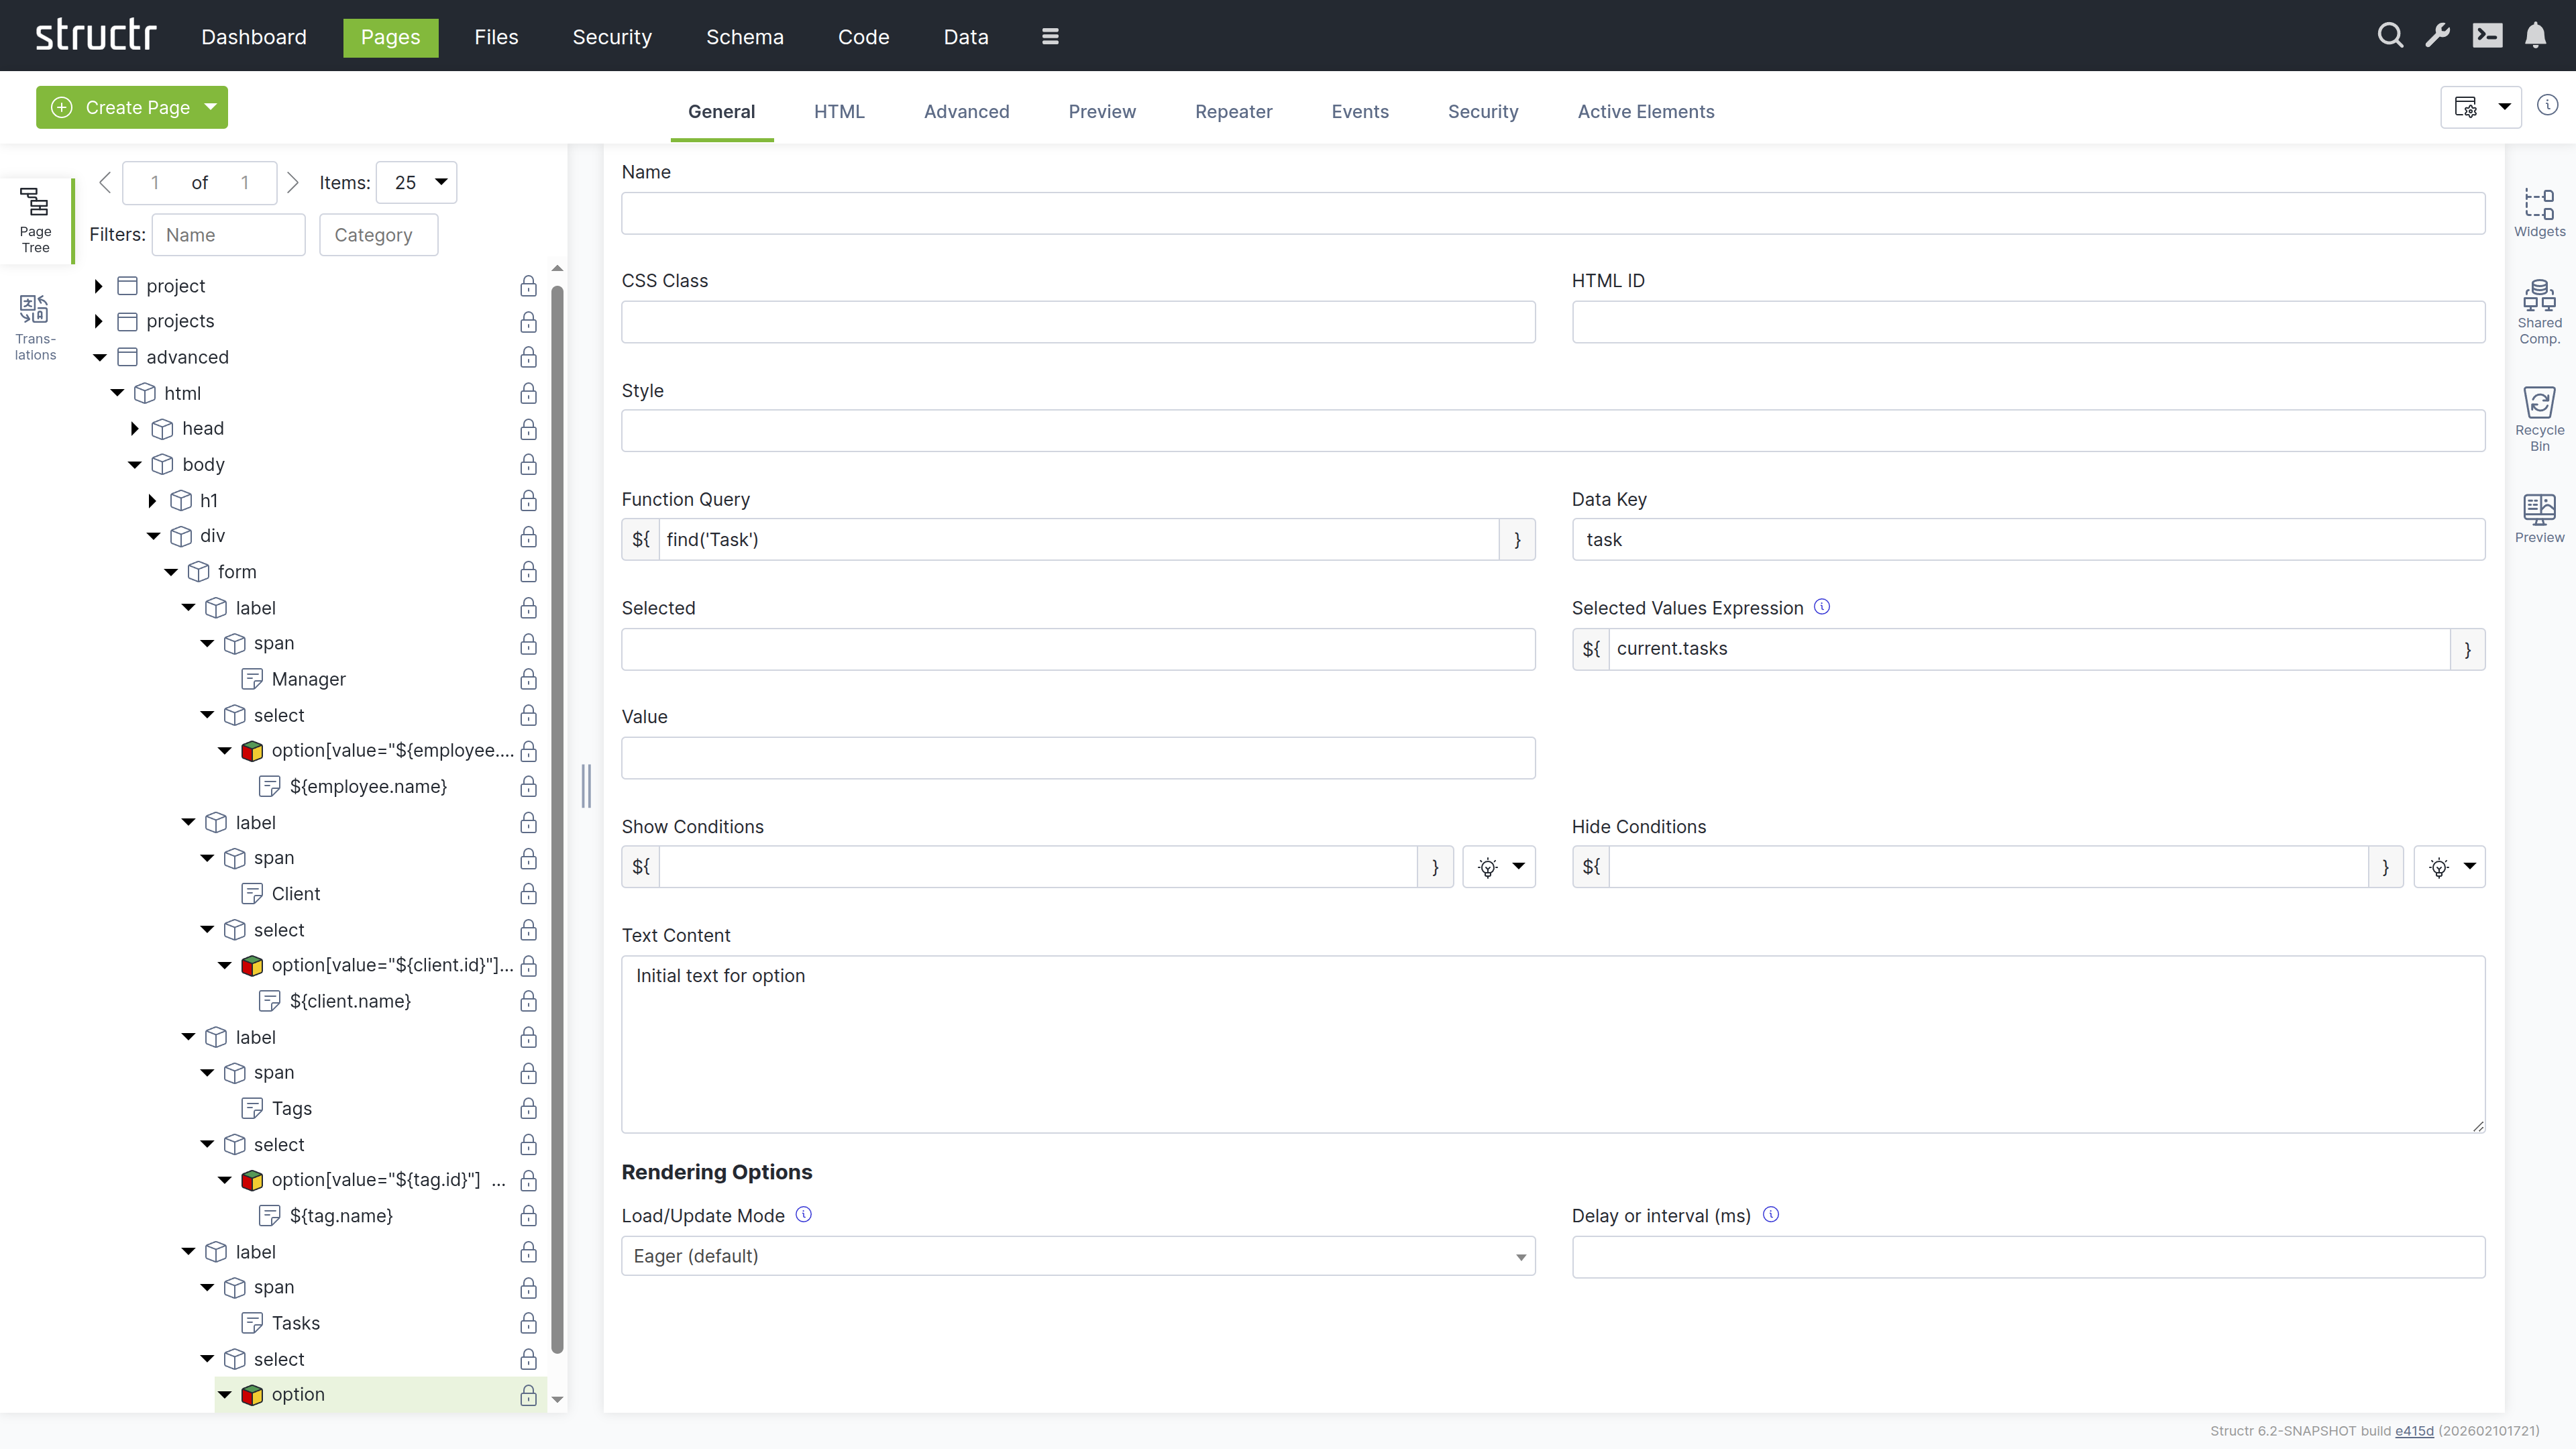
What Happens for Each Cardinality
Markdown Rendering Hint: MarkdownTopic(Many-to-One (Manager)) not rendered because level 5 >= maxLevels (5)
Markdown Rendering Hint: MarkdownTopic(One-to-One (Client)) not rendered because level 5 >= maxLevels (5)
Markdown Rendering Hint: MarkdownTopic(Many-to-Many (Tags)) not rendered because level 5 >= maxLevels (5)
Markdown Rendering Hint: MarkdownTopic(One-to-Many (Tasks)) not rendered because level 5 >= maxLevels (5)
Business Logic
Business logic in Structr is event-driven. Code runs in response to data changes, scheduled times, user interactions, or external requests. You implement this logic in the schema – as methods on your types or as user-defined functions.
Why Event-Driven?
This architecture follows the ROCA style (Resource-Oriented Client Architecture): the server holds all business logic and state, while the client remains thin and focused on presentation. The frontend triggers events, but the logic itself lives in the schema, ensuring business rules are enforced consistently regardless of whether changes come from the UI, the REST API, or an external integration.
Building From the Data Model
Structr applications grow from the data model outward. You model your domain first, then add logic incrementally. Structr’s schema-optional graph database supports this approach: you can focus on one aspect, get it working, and add new types or relationships later without disrupting existing functionality. This makes Structr well-suited for rapid prototyping that evolves directly into production applications.
Implementing Logic
You define all business logic in the Code area of the Admin User Interface. Methods are organized by type, and user-defined functions appear in their own section. Structr provides a large library of built-in functions for common tasks like querying data, sending emails, making HTTP requests, and working with files.
Structr provides three mechanisms: lifecycle methods that react to data changes, schema methods that you call explicitly, and user-defined functions for application-wide logic.
Lifecycle Methods
To run code when data changes, you add lifecycle methods to your type. Open your type in the Code area, click the method dropdown below the method list, and select the event you want to handle.
Markdown Rendering Hint: MarkdownTopic(Example: Setting Defaults on Create) not rendered because level 5 >= maxLevels (5)
Markdown Rendering Hint: MarkdownTopic(Available Lifecycle Methods) not rendered because level 5 >= maxLevels (5)
Markdown Rendering Hint: MarkdownTopic(Example) not rendered because level 5 >= maxLevels (5)
Markdown Rendering Hint: MarkdownTopic(Other Callbacks) not rendered because level 5 >= maxLevels (5)
Schema Methods
To create operations that users or external systems can trigger, you add schema methods to your types. These are custom methods that you call explicitly – via Event Action Mapping, REST, or from other code.
Markdown Rendering Hint: MarkdownTopic(Instance Methods) not rendered because level 5 >= maxLevels (5)
Markdown Rendering Hint: MarkdownTopic(Static Methods) not rendered because level 5 >= maxLevels (5)
Markdown Rendering Hint: MarkdownTopic(Service Classes) not rendered because level 5 >= maxLevels (5)
Markdown Rendering Hint: MarkdownTopic(Calling Methods on Objects) not rendered because level 5 >= maxLevels (5)
Markdown Rendering Hint: MarkdownTopic(Calling Methods on System Types) not rendered because level 5 >= maxLevels (5)
Markdown Rendering Hint: MarkdownTopic(Calling Methods from the Frontend) not rendered because level 5 >= maxLevels (5)
User-Defined Functions
User-defined functions provide application-wide logic that isn’t tied to a specific type. Create them in the Code area under “User-defined functions”.
Markdown Rendering Hint: MarkdownTopic(Scheduled Execution) not rendered because level 5 >= maxLevels (5)
Markdown Rendering Hint: MarkdownTopic(Deferred Execution) not rendered because level 5 >= maxLevels (5)
External Events
External systems can trigger your business logic in several ways:
Markdown Rendering Hint: MarkdownTopic(REST API) not rendered because level 5 >= maxLevels (5)
Markdown Rendering Hint: MarkdownTopic(Message Brokers) not rendered because level 5 >= maxLevels (5)
Markdown Rendering Hint: MarkdownTopic(Email) not rendered because level 5 >= maxLevels (5)
Choosing the Right Mechanism
| If you need to… | Use… |
|---|---|
| Enforce rules whenever data changes | Lifecycle methods |
| Provide operations users can trigger | Schema methods |
| Run code on a schedule | User-defined functions with cron |
| Create reusable utilities | User-defined functions |
| Group related operations | Service classes |
Writing Code
You write business logic in the code editor in the Code area. When you select a method or function in the tree on the left, the editor opens on the right. The editor provides syntax highlighting and autocompletion for both JavaScript and StructrScript.

Structr supports two scripting languages: JavaScript and StructrScript. To use JavaScript, enclose your code in curly braces {…}. Code without curly braces is interpreted as StructrScript, a simpler expression language designed for template expressions.
The $ Object
In JavaScript, you access Structr’s functionality through the $ object:
{
    // Query data
    let projects = $.find('Project', { status: 'active' });

    // Create objects
    let task = $.create('Task', { name: 'New task', project: this });

    // Access the current user
    let user = $.me;

    // Call built-in functions
    $.log('Processing complete');
    $.sendPlaintextMail(...);
}
In StructrScript, you access functions directly without the $ prefix.
Calling Methods from Templates
You can call static methods from template expressions in your pages:
<span>${$.ReportingService.getActiveProjectCount()} active projects</span>
This lets you keep complex query logic in your schema methods while using the results in your templates.
Security
All code runs in the security context of the current user. Objects without read permission are invisible – they don’t appear in query results. Attempting to modify objects without write permission returns a 403 Forbidden error.
Admin Access
The admin user has full access to everything. Keep this in mind during development: if you only test as admin, permission problems won’t surface until a regular user tries the application. Test with non-admin users early.
Elevated Permissions
Sometimes you need to perform operations the current user isn’t allowed to do directly. Structr provides several functions for this.
Markdown Rendering Hint: MarkdownTopic(Privileged Execution) not rendered because level 5 >= maxLevels (5)
Markdown Rendering Hint: MarkdownTopic(Executing as Another User) not rendered because level 5 >= maxLevels (5)
Markdown Rendering Hint: MarkdownTopic(Separate Transactions) not rendered because level 5 >= maxLevels (5)
Markdown Rendering Hint: MarkdownTopic(Context Boundaries) not rendered because level 5 >= maxLevels (5)
Error Handling
When an error occurs, Structr rolls back the transaction and returns an HTTP error status – typically 422 Unprocessable Entity for validation errors.
Throwing Errors
To abort an operation with an error message:
{
    if (this.endDate < this.startDate) {
        $.error('endDate', 'invalidRange', 'End date must be after start date.');
    }
}
Or use $.assert() for simple condition checks:
{
    $.assert(this.endDate >= this.startDate, 422, 'End date must be after start date.');
}
Catching Errors
To handle errors without aborting the transaction:
{
    try {
        $.POST('https://external-api.example.com/notify', JSON.stringify(data));
    } catch (e) {
        $.log('Notification failed: ' + e.message);
    }
}
Errors During Development
In the Admin UI, scripting errors appear as pop-up notifications, making it easy to spot problems as they occur.
Development Tools
Logging
Write messages to the server log with $.log():
{
    $.log('Processing: ' + this.name);
}
Debugging
You can debug Structr’s JavaScript using Chrome DevTools. Enable remote debugging in the Dashboard settings, then connect with Chrome to set breakpoints and step through your code.
Code Search
The Code area provides a search function to find text across all methods and functions. Structr also has a global search that spans all areas of the application.
Testing
Structr applications are best tested with integration tests that exercise the complete system. Unit testing individual methods isn’t directly supported because methods depend on the Structr runtime.
In practice, you write tests that create real objects, trigger operations, and verify results through the REST API. The tight integration between data model and business logic makes integration tests more meaningful than isolated unit tests.
Exposing Data
A significant part of business logic involves preparing data for consumers – your frontend, mobile apps, external systems, or reports.
Views
Views control which attributes appear when objects are serialized to JSON. The default public view contains only id, type, and name. You can customize it or create additional views:
GET /api/projects              → public view
GET /api/projects/summary      → summary view (custom)
GET /api/projects/all          → all attributes
Views are defined in the schema – they declare which attributes to include without any code.
Methods as API Endpoints
All schema methods are automatically exposed via REST. To call an instance method:
POST /api/Project/<uuid>/calculateTotal
To call a static method:
POST /api/Project/findOverdue
Markdown Rendering Hint: MarkdownTopic(Configuring Methods) not rendered because level 5 >= maxLevels (5)
OpenAPI
Structr automatically generates OpenAPI documentation for your endpoints at /structr/openapi. To include a type, enable “Include in OpenAPI output” and assign a tag. Types with the same tag are grouped at /structr/openapi/<tag>.json.
See the OpenAPI chapter for details.
Transforming Data
You can transform query results in JavaScript before returning them:
{
    let projects = $.find('Project', { status: 'active' });

    // Group by client
    let byClient = {};

    for (let project of projects) {
        let name = project.client.name;

        if ($.empty(byClient[name])) {
            byClient[name] = { client: name, projects: [], total: 0 };
        }

        byClient[name].projects.push({ name: project.name, budget: project.budget });
        byClient[name].total += project.budget || 0;
    }

    return Object.values(byClient);
}
Traversing the Graph
The graph database lets you follow relationships across multiple levels efficiently:
{
    // Collect all team members across all projects
    let members = new Set();

    for (let project of this.projects) {
        for (let member of project.team) {
            members.add(member);
        }
    }

    return [...members].map(m => ({ id: m.id, name: m.name, email: m.email }));
}
For complex traversals, use Cypher queries with $.cypher(). Results are automatically instantiated as Structr entities.
Building External Interfaces
When external systems need your data, create a service class that handles the transformation:
{
    // Static method on "ERPExportService"
    let projects = $.find('Project', { status: 'active' });

    return projects.map(p => ({
        externalId: p.erpId,
        title: p.name,
        customerNumber: p.client.erpCustomerNumber,
        startDate: p.startDate.toISOString().split('T')[0]
    }));
}
This keeps transformation logic in one place, making it easy to adjust when requirements change.
Scheduled Tasks
Some tasks need to run automatically at regular intervals: cleaning up temporary data, sending scheduled reports, synchronizing with external systems, or performing routine maintenance. Structr’s CronService executes global schema methods on a schedule you define, without requiring external tools like system cron or task schedulers.
How It Works
The CronService runs in the background and monitors configured schedules. When a scheduled time is reached, it executes the corresponding global schema method. To use scheduled tasks, you need two things: a global schema method that performs the work, and a cron expression that defines when it runs.
Scheduled tasks start running only after Structr has fully started. If a scheduled time passes during startup or while Structr is shut down, that execution is skipped - Structr does not retroactively run missed tasks.
Configuring Tasks
Register your tasks in structr.conf using the CronService.tasks setting. This accepts a whitespace-separated list of global schema method names:
CronService.tasks = cleanupExpiredSessions dailyReport weeklyMaintenance
For each task, define a cron expression that determines when it runs:
cleanupExpiredSessions.cronExpression = 0 0 * * * *
dailyReport.cronExpression = 0 0 8 * * *
weeklyMaintenance.cronExpression = 0 0 3 * * 0
Note that structr.conf only contains settings that differ from Structr’s defaults. The CronService is active by default, so you only need to add your task configuration - no additional setup is required.
Applying Configuration Changes
The CronService reads its configuration only at startup. When you add, edit, or remove a scheduled task in structr.conf, you must restart the CronService for the changes to take effect.
To restart the CronService:
- Open the Configuration Interface
- Navigate to the Services tab
- Find “CronService” in the list
- Click “Restart”
Alternatively, restart Structr entirely. Simply saving changes to structr.conf is not sufficient - the service must be restarted.
Note: Forgetting to restart the CronService is a common reason why newly configured tasks do not run. If your task is not executing at the expected time, verify that you restarted the service after changing the configuration.
Execution Context
Scheduled tasks run as the superuser in a privileged context. This means:
- The task has full access to all data and operations
$.merefers to the superuser (displayed asSuperUser(superadmin, 00000000000000000000000000000000)in logs)$.thisis not available since there is no “current object” - the method is not attached to an instance
The superuser object has only a name and ID, no additional attributes. If your task needs user-specific information, query for the relevant user objects explicitly rather than relying on $.me.
Since tasks run with full privileges, they bypass all permission checks. This is intentional - maintenance tasks typically need to access and modify data across the entire system. However, it also means you should be careful about what your scheduled tasks do.
Creating a Scheduled Task
A scheduled task is simply a global schema method. Create it like any other method:
- Open the Schema area
- Select “Global Schema Methods”
- Create a new method with a descriptive name (this name goes into
CronService.tasks) - Write the method logic
The method runs without parameters and any return value is ignored. Use logging to track what the task does.
Example: Cleanup Expired Sessions
This example deletes sessions that have been inactive for more than 24 hours:
{
    let cutoff = $.date_add($.now, 'P-1D');
    let expiredSessions = $.find('Session', { lastActivity: $.predicate.lt(cutoff) });

    $.log('Cleanup: Found ' + $.size(expiredSessions) + ' expired sessions');

    for (let session of expiredSessions) {
        $.delete(session);
    }

    $.log('Cleanup: Deleted expired sessions');
}
Example: Daily Summary
This example logs a daily summary of new registrations:
{
    let yesterday = $.date_add($.now, 'P-1D');
    let newUsers = $.find('User', { createdDate: $.predicate.gte(yesterday) });

    $.log('Daily Summary: ' + $.size(newUsers) + ' new users registered in the last 24 hours');

    if ($.size(newUsers) > 0) {
        for (let user of newUsers) {
            $.log('  - ' + user.name + ' (' + user.eMail + ')');
        }
    }
}
Testing
You can test a scheduled task before configuring it in the CronService. Since scheduled tasks are regular global schema methods, you can execute them manually using the Run button in the Schema area. This lets you verify that the method works correctly before scheduling it for automatic execution.
When testing, keep in mind that the manual execution also runs in a privileged context, so the behavior should be identical to scheduled execution.
Logging and Debugging
The CronService does not automatically log when a task starts or completes. If you want to track executions, add logging statements to your method:
{
    $.log('Starting scheduled task: cleanupExpiredSessions');

    // ... task logic ...

    $.log('Completed scheduled task: cleanupExpiredSessions');
}
Log output appears in the server log, which you can view in the Dashboard under “Server Log” or directly in the log file on the server.
Identifying Cron Log Entries
Log entries from scheduled tasks show the thread name in brackets. Cron tasks run on threads named Thread-NN:
2026-02-02 08:00:00.123 [Thread-96] INFO org.structr.core.script.Scripting - Starting scheduled task: cleanupExpiredSessions
This helps you distinguish scheduled task output from other log entries.
Error Handling
When a scheduled task throws an exception, Structr logs the error and continues with the next scheduled execution. The failed task is not retried immediately - it simply runs again at the next scheduled time.
Error log entries look like this:
2026-02-02 11:41:10.664 [Thread-96] WARN  org.structr.core.script.Scripting - myCronJob[static]:myCronJob:2:8: TypeError: Cannot read property 'this' of undefined
2026-02-02 11:41:10.666 [Thread-96] WARN  org.structr.cron.CronService - Exception while executing cron task myCronJob: FrameworkException(422): Server-side scripting error (TypeError: Cannot read property 'this' of undefined)
The log shows both the script error (with line and column number) and the CronService wrapper exception. Use this information to debug failing tasks.
If you need more sophisticated error handling - such as sending notifications when tasks fail - implement it within the task itself using try-catch blocks.
Parallel Execution
By default, Structr prevents a scheduled task from starting while a previous execution is still running. If a task is still running when its next scheduled time arrives, Structr logs a warning and skips that execution:
2026-02-02 11:45:10.664 [CronService] WARN org.structr.cron.CronService - Prevented parallel execution of 'myCronJob' - if this happens regularly you should consider adjusting the cronExpression!
If you see this warning regularly, your task is taking longer than the interval between runs. You should either optimize the task to run faster, or increase the interval in the cron expression.
If your use case requires parallel execution, enable it in structr.conf:
cronservice.allowparallelexecution = true
Use this setting with caution. Parallel executions of the same task can lead to race conditions or duplicate processing if your method is not designed for it. For example, a cleanup task that deletes old records might process the same records twice if two instances run simultaneously.
Cron Expression Syntax
A cron expression consists of six fields that specify when the task should run:
<seconds> <minutes> <hours> <day-of-month> <month> <day-of-week>
| Field | Allowed Values |
|---|---|
| Seconds | 0–59 |
| Minutes | 0–59 |
| Hours | 0–23 |
| Day of month | 1–31 |
| Month | 1–12 |
| Day of week | 0–6 (0 = Sunday) |
Each field supports several notations:
| Notation | Meaning | Example |
|---|---|---|
* | Every possible value | * * * * * * runs every second |
x | At the specific value | 0 30 * * * * runs at minute 30 |
x-y | Range from x to y | 0 0 9-17 * * * runs hourly from 9 AM to 5 PM |
*/x | Every multiple of x | 0 */15 * * * * runs every 15 minutes |
x,y,z | At specific values | 0 0 8,12,18 * * * runs at 8 AM, noon, and 6 PM |
Common Patterns
| Expression | Schedule |
|---|---|
0 0 * * * * | Every hour at minute 0 |
0 */15 * * * * | Every 15 minutes |
0 0 0 * * * | Every day at midnight |
0 0 8 * * 1-5 | Every weekday at 8 AM |
0 0 3 * * 0 | Every Sunday at 3 AM |
0 0 0 1 * * | First day of every month at midnight |
Complete Configuration Example
This example configures three scheduled tasks: a cleanup that runs every hour, a daily report at 8 AM, and weekly maintenance on Sundays at 3 AM:
# Register tasks (global schema method names)
CronService.tasks = cleanupExpiredSessions dailyReport weeklyMaintenance

# Every hour
cleanupExpiredSessions.cronExpression = 0 0 * * * *

# Every day at 8 AM
dailyReport.cronExpression = 0 0 8 * * *

# Every Sunday at 3 AM
weeklyMaintenance.cronExpression = 0 0 3 * * 0
Related Topics
- Business Logic - Creating global schema methods that scheduled tasks can execute
- Configuration - Managing Structr settings in structr.conf
- Logging - Viewing and configuring server logs
Best Practices
Structr gives you a lot of freedom in how you build applications. The schema is optional, the data model can change at any time, and there are often multiple ways to achieve the same result. This flexibility is powerful, but it also means that Structr doesn’t force you into patterns that other frameworks impose by default.
This chapter collects practices that have proven useful in real projects. None of them are strict rules – Structr will happily let you do things differently. But if you’re unsure how to approach something, these recommendations are a good starting point.
Security
Security requires attention at multiple levels. A system is only as strong as its weakest link.
Enable HTTPS
All production deployments should use HTTPS. Structr integrates with Let’s Encrypt for free SSL certificates:
- Configure
letsencrypt.domainsinstructr.confwith your domain - Call the
/maintenance/letsencryptendpoint or use theletsencryptmaintenance command - Enable HTTPS:
application.https.enabled = true - Configure ports:
application.http.port = 80andapplication.https.port = 443 - Force HTTPS:
httpservice.force.https = true
Automate Certificate Renewal
Let’s Encrypt certificates expire after 90 days. Schedule a user-defined function to call $.renewCertificates() daily or weekly to keep certificates current.
Enable Password Security Rules
Configure password complexity requirements in structr.conf:
security.passwordpolicy.minlength = 8
security.passwordpolicy.complexity.enforce = true
security.passwordpolicy.complexity.requiredigits = true
security.passwordpolicy.complexity.requirelowercase = true
security.passwordpolicy.complexity.requireuppercase = true
security.passwordpolicy.complexity.requirenonalphanumeric = true
security.passwordpolicy.maxfailedattempts = 4
Use the LoginServlet for Authentication
Configure your login form to POST directly to /structr/rest/login instead of implementing authentication in JavaScript. This handles session management automatically.
Secure File Permissions
On the server filesystem, protect sensitive files:
structr.confshould be readable only by the Structr process (mode 600)- Follow Neo4j’s file permission recommendations for database files
Use Encrypted String Properties
For sensitive data like API keys or personal information, use the EncryptedString property type. Data is encrypted using AES with a key configured in structr.conf or set via $.set_encryption_key().
Use Parameterized Cypher Queries
Always use parameters instead of string concatenation when building Cypher queries. This protects against injection attacks and improves readability.
Recommended:
$.cypher('MATCH (n) WHERE n.name CONTAINS $searchTerm', { searchTerm: 'Admin' })
Not recommended:
$.cypher('MATCH (n) WHERE n.name CONTAINS "' + searchTerm + '"')
The parameterized version passes values safely to the database regardless of special characters or malicious input.
Use Group-Based Permissions for Type Access
Grant groups access to all instances of a type directly in the schema. This is simpler than managing individual object permissions.
Set Visibility Flags Consistently
Login pages should be visibleToPublicUsers but not visibleToAuthenticatedUsers. Protected pages should be visibleToAuthenticatedUsers only.
Test With Non-Admin Users Early
Admin users bypass all permission checks. If you only test as admin, permission problems won’t surface until a regular user tries the application.
Data Modeling
Use Unique Relationship Types
Don’t use generic names like HAS for all relationships. Specific names like PROJECT_HAS_TASK allow the database to query relationships directly without filtering in code.
Index Properties You Query Frequently
Especially properties with uniqueness constraints – without an index, uniqueness validation slows down object creation significantly.
Use Traits for Shared Functionality
If multiple types need the same properties or methods, define them in a trait and inherit from it. Structr supports multiple inheritance through traits, so a type can combine functionality from several sources.
Use Self-Referencing Relationships for Tree Structures
A type can have a relationship to itself – for example, a Folder type with a parent relationship pointing to another Folder. This is the natural way to model hierarchies in a graph database.
Business Logic
Use “After” Lifecycle Methods for Side Effects
Email notifications, external API calls, and other side effects belong in afterCreate or afterSave, not in onCreate or onSave. The “after” methods run in a separate transaction after data is safely persisted.
Use Service Classes for Cross-Type Logic
Logic that doesn’t belong to a specific type – like report generation or external system integration – should live in a service class.
Pass UUIDs Into Privileged Contexts
When using $.doPrivileged() or $.doAs(), pass the object’s UUID and retrieve it inside the new context. Object references from the outer context carry the wrong security context.
Pages and Templates
Start With a Page Import
Instead of building pages from scratch, import an existing HTML template or page. Structr parses the HTML structure and creates the corresponding DOM elements, which you can then make dynamic with repeaters and data bindings.
Use Shared Components for Repeated Elements
Headers, footers, and navigation menus should be Shared Components. Changes propagate automatically to all pages that use them.
Use Template Elements for Complex Markup Blocks
Template elements contain larger blocks of HTML and can include logic that pre-processes data. Use them when you need more control than simple DOM elements provide – for example, when building a page layout with multiple insertion points.
Call render(children) in Templates
Templates don’t render their children automatically. If content disappears when you move it into a template, you probably forgot this.
Use Pagination for Lists
Structr can render thousands of objects, but users can’t navigate thousands of table rows. Always limit result sets with page() or a reasonable maximum.
Create Widgets for Repeated Patterns
Widgets are reusable page fragments that can be dragged into any page. If you find yourself building the same UI pattern multiple times, turn it into a widget.
Performance
Create Views for Your API Consumers
The default public view contains only id, type, and name. Create dedicated views with exactly the properties each consumer needs – this reduces data transfer and improves response times.
Use Cypher for Complex Graph Traversals
For queries that traverse multiple relationship levels, $.cypher() is often faster than nested $.find() calls. Results are automatically instantiated as Structr entities.
Handle Long-Running Operations Gracefully
Backend operations that involve complex database queries or iterate over large datasets can delay page rendering. Use one of these strategies to keep pages responsive:
Lazy Loading
Load data asynchronously after the initial page render. The page displays immediately, and results appear once the query completes. This works well for dashboard widgets or secondary content that users don’t need instantly.
Caching
Use the cache() function to compute expensive results once and reuse them for a configurable period:
${cache('my-cache-key', 3600, () => expensive_query())}
This is ideal for data that changes infrequently, such as aggregated statistics or reports.
System Context Queries
Permission resolution adds overhead to every query. For backend operations where you already control access, running queries in the system context bypasses these checks:
${do_as_admin(do_privileged(() => find('Project')))}
Use this only when the surrounding logic already enforces appropriate access control.
What You Don’t Need to Do
Structr handles many things automatically that other platforms require you to implement manually:
- Transactions – Every request runs in a transaction automatically
- Session management – The LoginServlet handles this
- REST endpoints – Created automatically for all schema types
- Relationship management – Handled based on schema cardinality
- Input validation – Schema constraints are enforced automatically
If you find yourself implementing any of these manually, there’s probably a simpler way.
Troubleshooting
When something doesn’t work as expected, Structr provides several tools to help you identify and resolve the issue. This chapter covers common problems and how to diagnose them.
Server Log
The server log is your primary tool for diagnosing problems. You can view it in the Dashboard under “Server Log”, or directly in the log file on the server.
Enable Query Logging
If you need to see exactly what database queries Structr is executing, enable query logging in the configuration:
log.cypher.debug = true
After saving this setting, all Cypher queries are written to the server log. This is useful when you suspect a query is returning unexpected results or causing performance issues. Remember to disable it again after debugging – query logging generates a lot of output.
Error Messages
When an error occurs, Structr returns an HTTP status code and an error response object:
{
    "code": 422,
    "message": "Unable to commit transaction, validation failed",
    "errors": [
        {
            "type": "Project",
            "property": "name",
            "token": "must_not_be_empty"
        }
    ]
}
Common Status Codes
| Code | Meaning |
|---|---|
| 401 | Not authenticated – user needs to log in |
| 403 | Forbidden – user lacks permission for this operation |
| 404 | Not found – object or endpoint doesn’t exist |
| 422 | Validation failed – data doesn’t meet schema constraints |
| 500 | Server error – check the server log for details |
Common Problems
Admin User Interface
Overview
The Structr Admin User Interface is a web-based console for building and managing Structr applications. From here, you can design your data model, build pages, manage users, and monitor your running application.
Quick Reference
| I want to… | Go to |
|---|---|
| Define data types and relationships | Schema |
| Write business logic and methods | Code |
| View and edit data in the database | Data |
| Build web pages and templates | Pages |
| Manage static files (CSS, JS, images) | Files |
| Manage users, groups, and permissions | Security |
| Export or import my application | Dashboard |
| Run scripts and queries interactively | Admin Console (Ctrl+Alt+C) |
Interface Structure
The interface is organized around a header bar that stays visible across all areas. The main navigation on the left side of the header takes you to the different functional areas: Dashboard, Pages, Files, Security, Schema, Code, Data, and more. Less frequently used items are available in the burger menu, which also contains the logout link. You can configure which items appear in the main navigation through the UI Settings on the Dashboard.
On the right side of the header, tools are available regardless of which area you are working in:
Search
The magnifying glass icon opens a global search across all your data.
Configuration
The wrench icon opens the Configuration Interface in a new browser tab. This separate interface provides access to all runtime settings that control Structr’s behavior, from database connections to scheduled tasks. It requires authentication with the superuser password defined in structr.conf, adding an extra layer of security for these sensitive operations. For details, see the Configuration Interface section below.
Admin Console
The terminal icon opens the Admin Console – a Quake-style terminal that slides down from the top of the screen. This is a powerful REPL for executing JavaScript, StructrScript, Cypher queries, and administrative commands. You can also open it with Ctrl+Alt+C.
Notifications
The bell icon shows notifications and system alerts.
The Main Areas
Dashboard
This is the default landing page after login. Here you can view system information, check server logs, and use deployment tools to export and import your application.
Pages
This is the visual editor for building web pages. You can use the tree view to see your page structure, drag and drop widgets, and preview your pages in real time.
Files
This is where you manage your static assets – CSS, JavaScript, images, and documents. You can upload files, organize them in folders, and reference them in your pages.
Security
Here you can manage users and groups, configure resource access grants, and set up CORS.
Schema
This is the visual data modeler. Types appear as boxes, relationships as connecting lines. You can drag them to arrange the layout and click to edit their properties.
Code
Here you can write and organize your business logic. The same types as in the Schema area are displayed, but organized for writing and editing methods rather than visualizing relationships.
Data
Here you can browse and edit the objects in your database. Select a type, view all instances in a table, and edit values directly.
Flows
This is a visual workflow designer where you can create automated processes and data transformations.
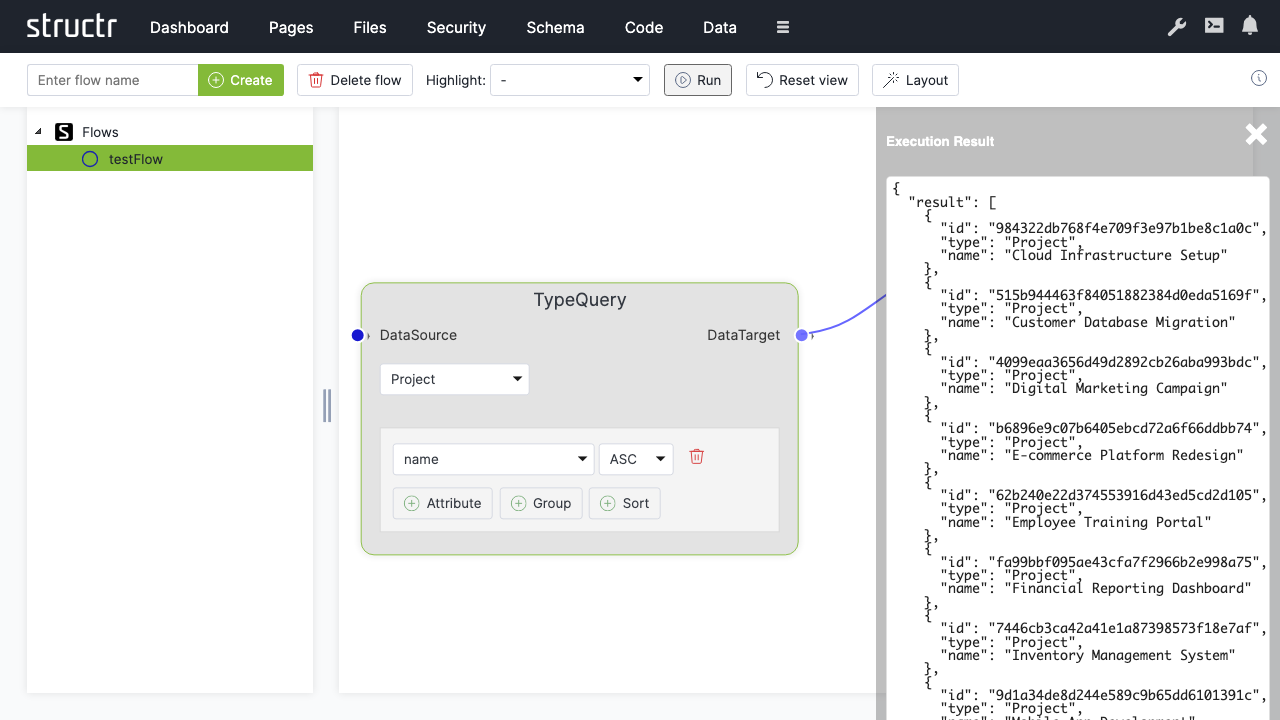
Job Queue
This area shows scheduled jobs and background tasks. Jobs created with $.schedule() appear here and can be monitored or cancelled. (Note: This area is currently labeled “Importer” in the UI but will be renamed in a future release.)
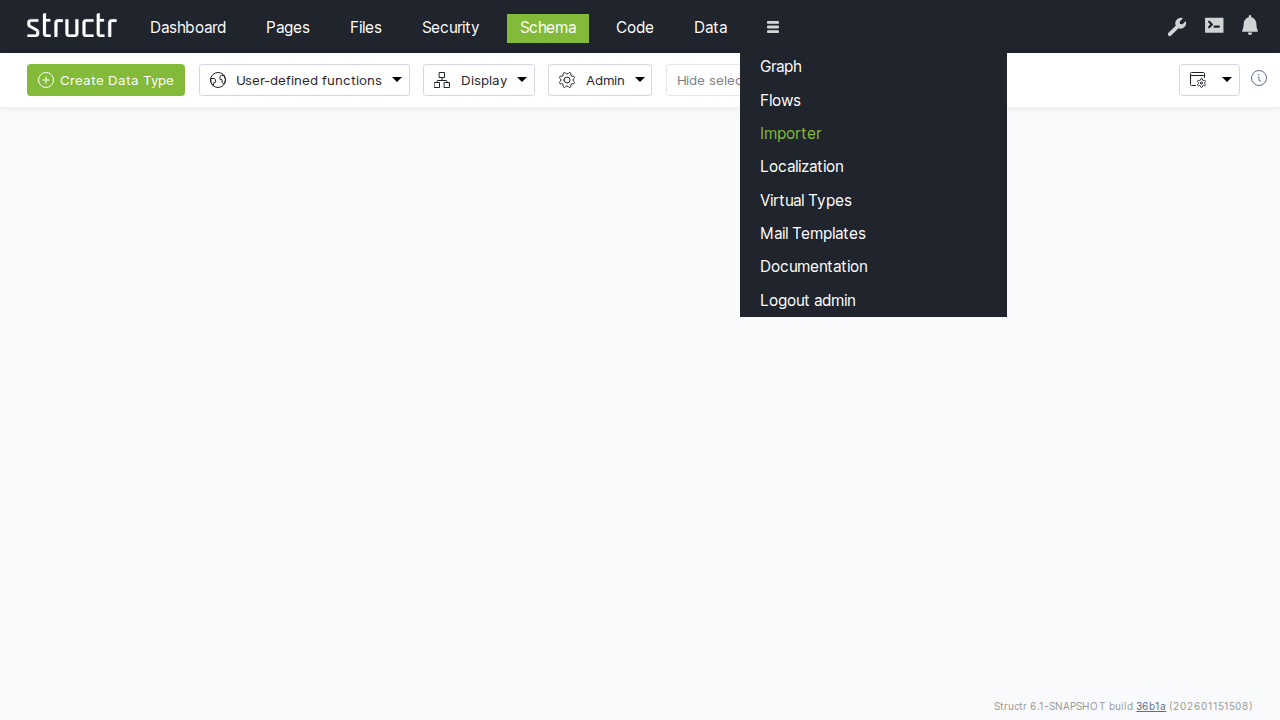
Localization
Here you can manage translations for multi-language applications.
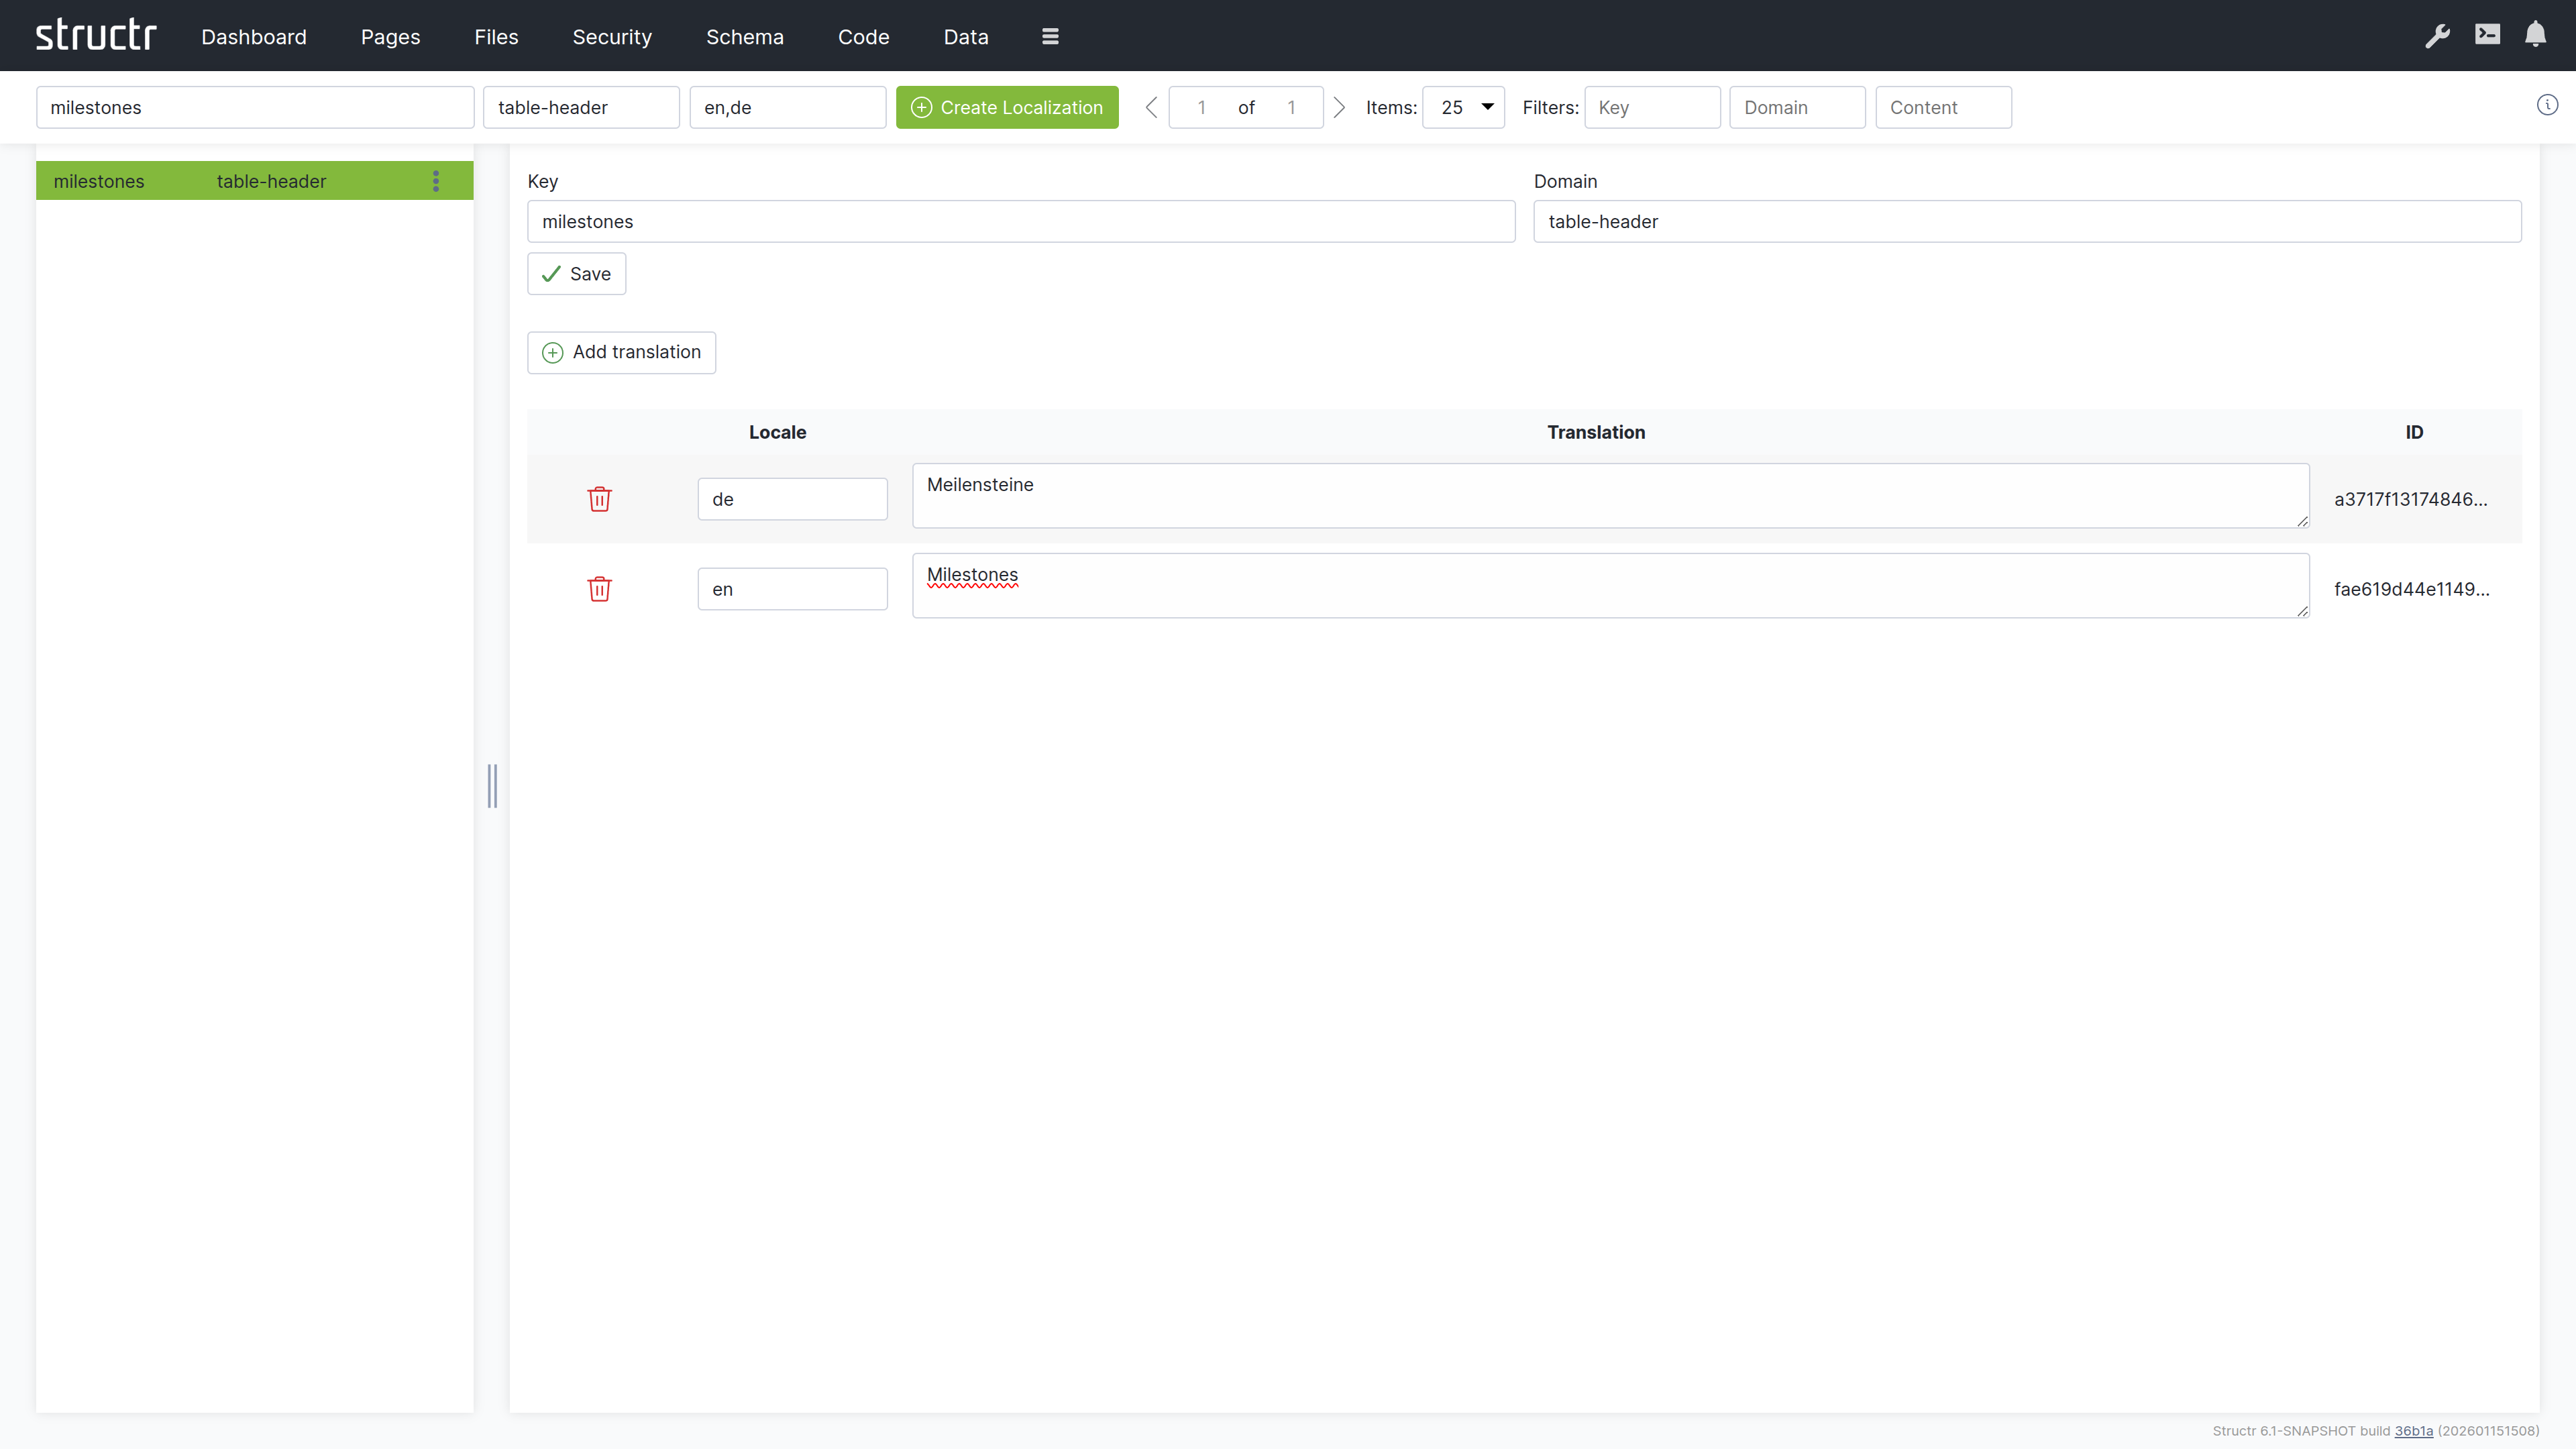
Graph
This is an interactive graph explorer where you can visualize your data objects and their relationships.
Virtual Types
Here you can configure dynamic types that transform or aggregate data from other sources.
Mail Templates
Here you can create and edit email templates used in automated notifications.
Browser Compatibility
The Admin UI is supported in Chrome, Firefox, Safari, and Edge. For the best experience, keep your browser updated to the latest version.
Dashboard
The Dashboard provides system information, server logs, deployment tools, and configuration options for the Admin UI. This is the default landing page after login and gives you a quick overview of the system state.
About Me
This tab shows information about the currently logged-in user. You can verify your identity, check which groups you belong to, and see your active sessions. This is useful when troubleshooting permission issues or when working with multiple accounts.
The tab displays:
- Username and UUID
- Email address
- Working directory
- Session IDs
- Group memberships
The Session ID is particularly useful for debugging. If you need to see your application from another user’s perspective, you can copy their Session ID from the table and set it in your browser. This allows you to experience exactly what that user sees without knowing their password.
About Structr
This tab shows detailed information about the Structr server instance. You can verify which version is running, which modules are available, and whether your license is valid.
Version and Modules
The version number identifies the exact build you are running. Indicators show whether newer releases or snapshots are available. Below the version, you will see a list of all active modules. Modules extend Structr’s functionality – for example, the PDF module adds PDF generation capabilities, and the Excel module enables spreadsheet import and export.
License and Database
The license section shows your licensee name, host ID, and the validity period (start and end date). You need the host ID when requesting a license from Structr.
The database section shows which driver is in use. Structr supports both embedded and external Neo4j databases.
UUID Format
This displays the current UUID format. Structr supports UUIDs with and without dashes. The format is configured at installation time and should not be changed afterwards.
Runtime Information
This section shows server resource information: number of processors, free memory, total memory, and maximum memory. You can monitor these values to assess server capacity and diagnose performance issues.
Scripting Debugger
This shows whether the GraalVM scripting debugger is active. The debugger allows you to set breakpoints and step through JavaScript code using Chrome DevTools. To enable it, set application.scripting.debugger = true in structr.conf. See Debugging JavaScript Code for details.
Access Statistics
This is a filterable table showing request statistics: timestamps, request counts, and HTTP methods used. You can use this to analyze usage patterns and identify unusual access behavior.
Deployment
This tab provides tools for exporting and importing Structr applications and data.
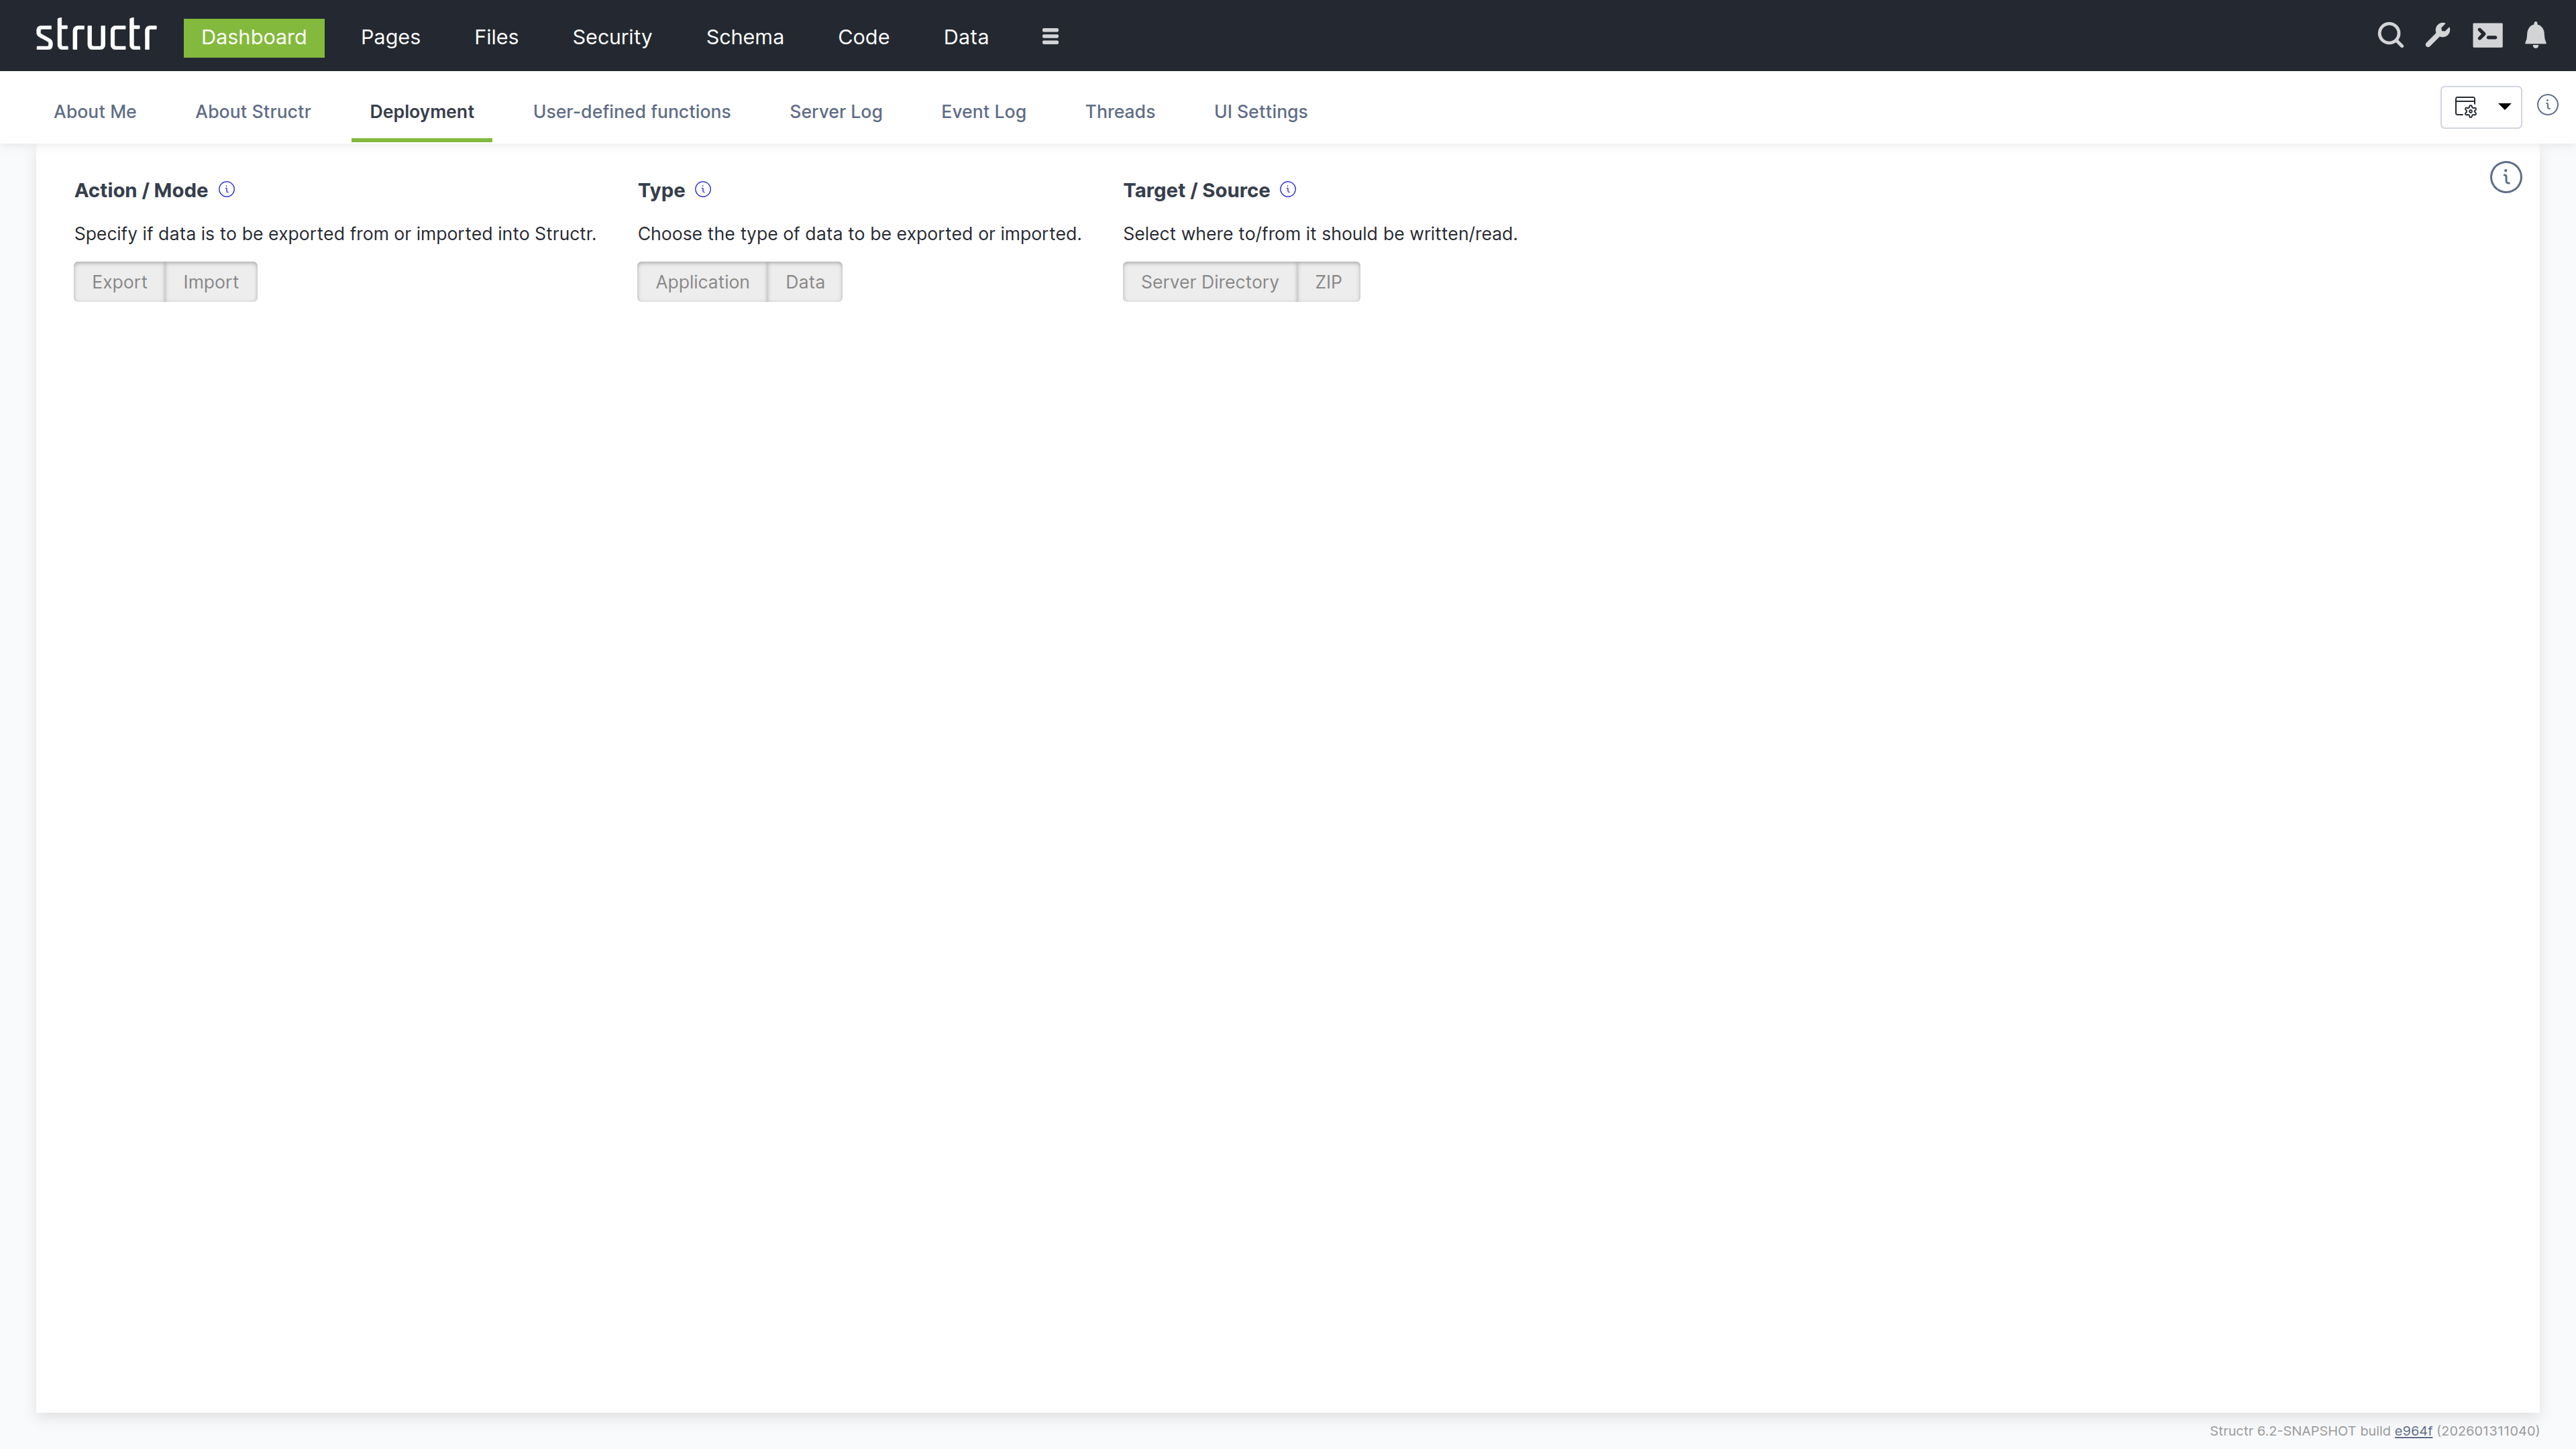
Application Deployment
The upper section handles application deployment – exporting and importing the structure of your application (schema, pages, files, templates, security settings, configuration).
Four options are available:
- Export application to local directory – Enter an absolute path on the server filesystem and click the button to export
- Export and download application as ZIP file – Downloads the export directly to your browser
- Import application from local directory – Enter the path to an existing export and click to import
- Import application from URL – Enter a URL to a ZIP file and click to download and import
Data Deployment
The lower section handles data deployment – exporting and importing the actual objects in your database.
- Export data to local directory – Select which types to export, enter a path, and click to export
- Import data from local directory – Enter the path to an existing data export and click to import
You can follow the progress of any export or import operation in the Server Log tab or via the notifications in the UI.
For details on the export format, pre/post-deploy scripts, and alternative deployment methods, see the Deployment chapter in Operations.
User-Defined Functions
This tab displays a table of all user-defined functions in the system. You can view and execute any function directly from this interface.
Each function is listed with its name and can be executed by clicking on it. This provides a quick way to run maintenance tasks, test functions, or trigger administrative operations without using the API or Admin Console.
Server Log
This tab displays the server log in real-time. The log contains technical information about what Structr is doing: startup messages, errors, warnings, request processing, and transaction details.
Controls
The log refreshes every second by default. You can click inside the log area to pause auto-refresh when you need to read a specific message. The available controls are:
- Copy to clipboard
- Download log file
- Refresh interval (1–10 seconds, or manual)
- Number of lines to display
- Log source selection (Structr supports multiple log files when rotation is enabled)
Log Format
Each log entry follows the format: Date Time [Thread] Level Logger - Message
For example:
2026-01-28 09:40:18.126 [main] INFO org.structr.Server - Starting Structr 6.1-SNAPSHOT
The log levels are INFO (normal operation), WARN (potential issues that do not prevent operation), and ERROR (problems that need attention).
Event Log
This tab shows a structured view of system events: API requests, authentication events, transactions, and administrative actions. Unlike the server log which contains free-form text, the event log presents events as filterable table rows with consistent columns.
Event Types
The following event types are tracked:
- Authentication – Login and logout events with user information
- Rest – API requests with method, path, and user details
- Http – Page requests and OAuth login attempts
- Transaction – Database transactions with performance metrics (changelog updates, callbacks, validation, indexing times)
- Maintenance – Administrative commands
Using the Event Log
The event log does not auto-refresh. Click the refresh button to update it. You can filter by event type to focus on specific activities. The transaction events include timing breakdowns that can help you identify performance bottlenecks.
Threads
This tab lists all threads running in the Java Virtual Machine. Each row shows the thread name, state, and stack trace. You can use this tab to diagnose hanging requests, infinite loops, or deadlocks.
Thread Management
Two actions are available for each thread:
- Interrupt – Requests graceful termination
- Kill – Forces immediate termination (use with caution)
Long-running threads may indicate problems in your application code, such as infinite loops or deadlocks.
UI Settings
This tab lets you configure the Admin UI appearance and behavior. Changes take effect immediately and are stored per user.
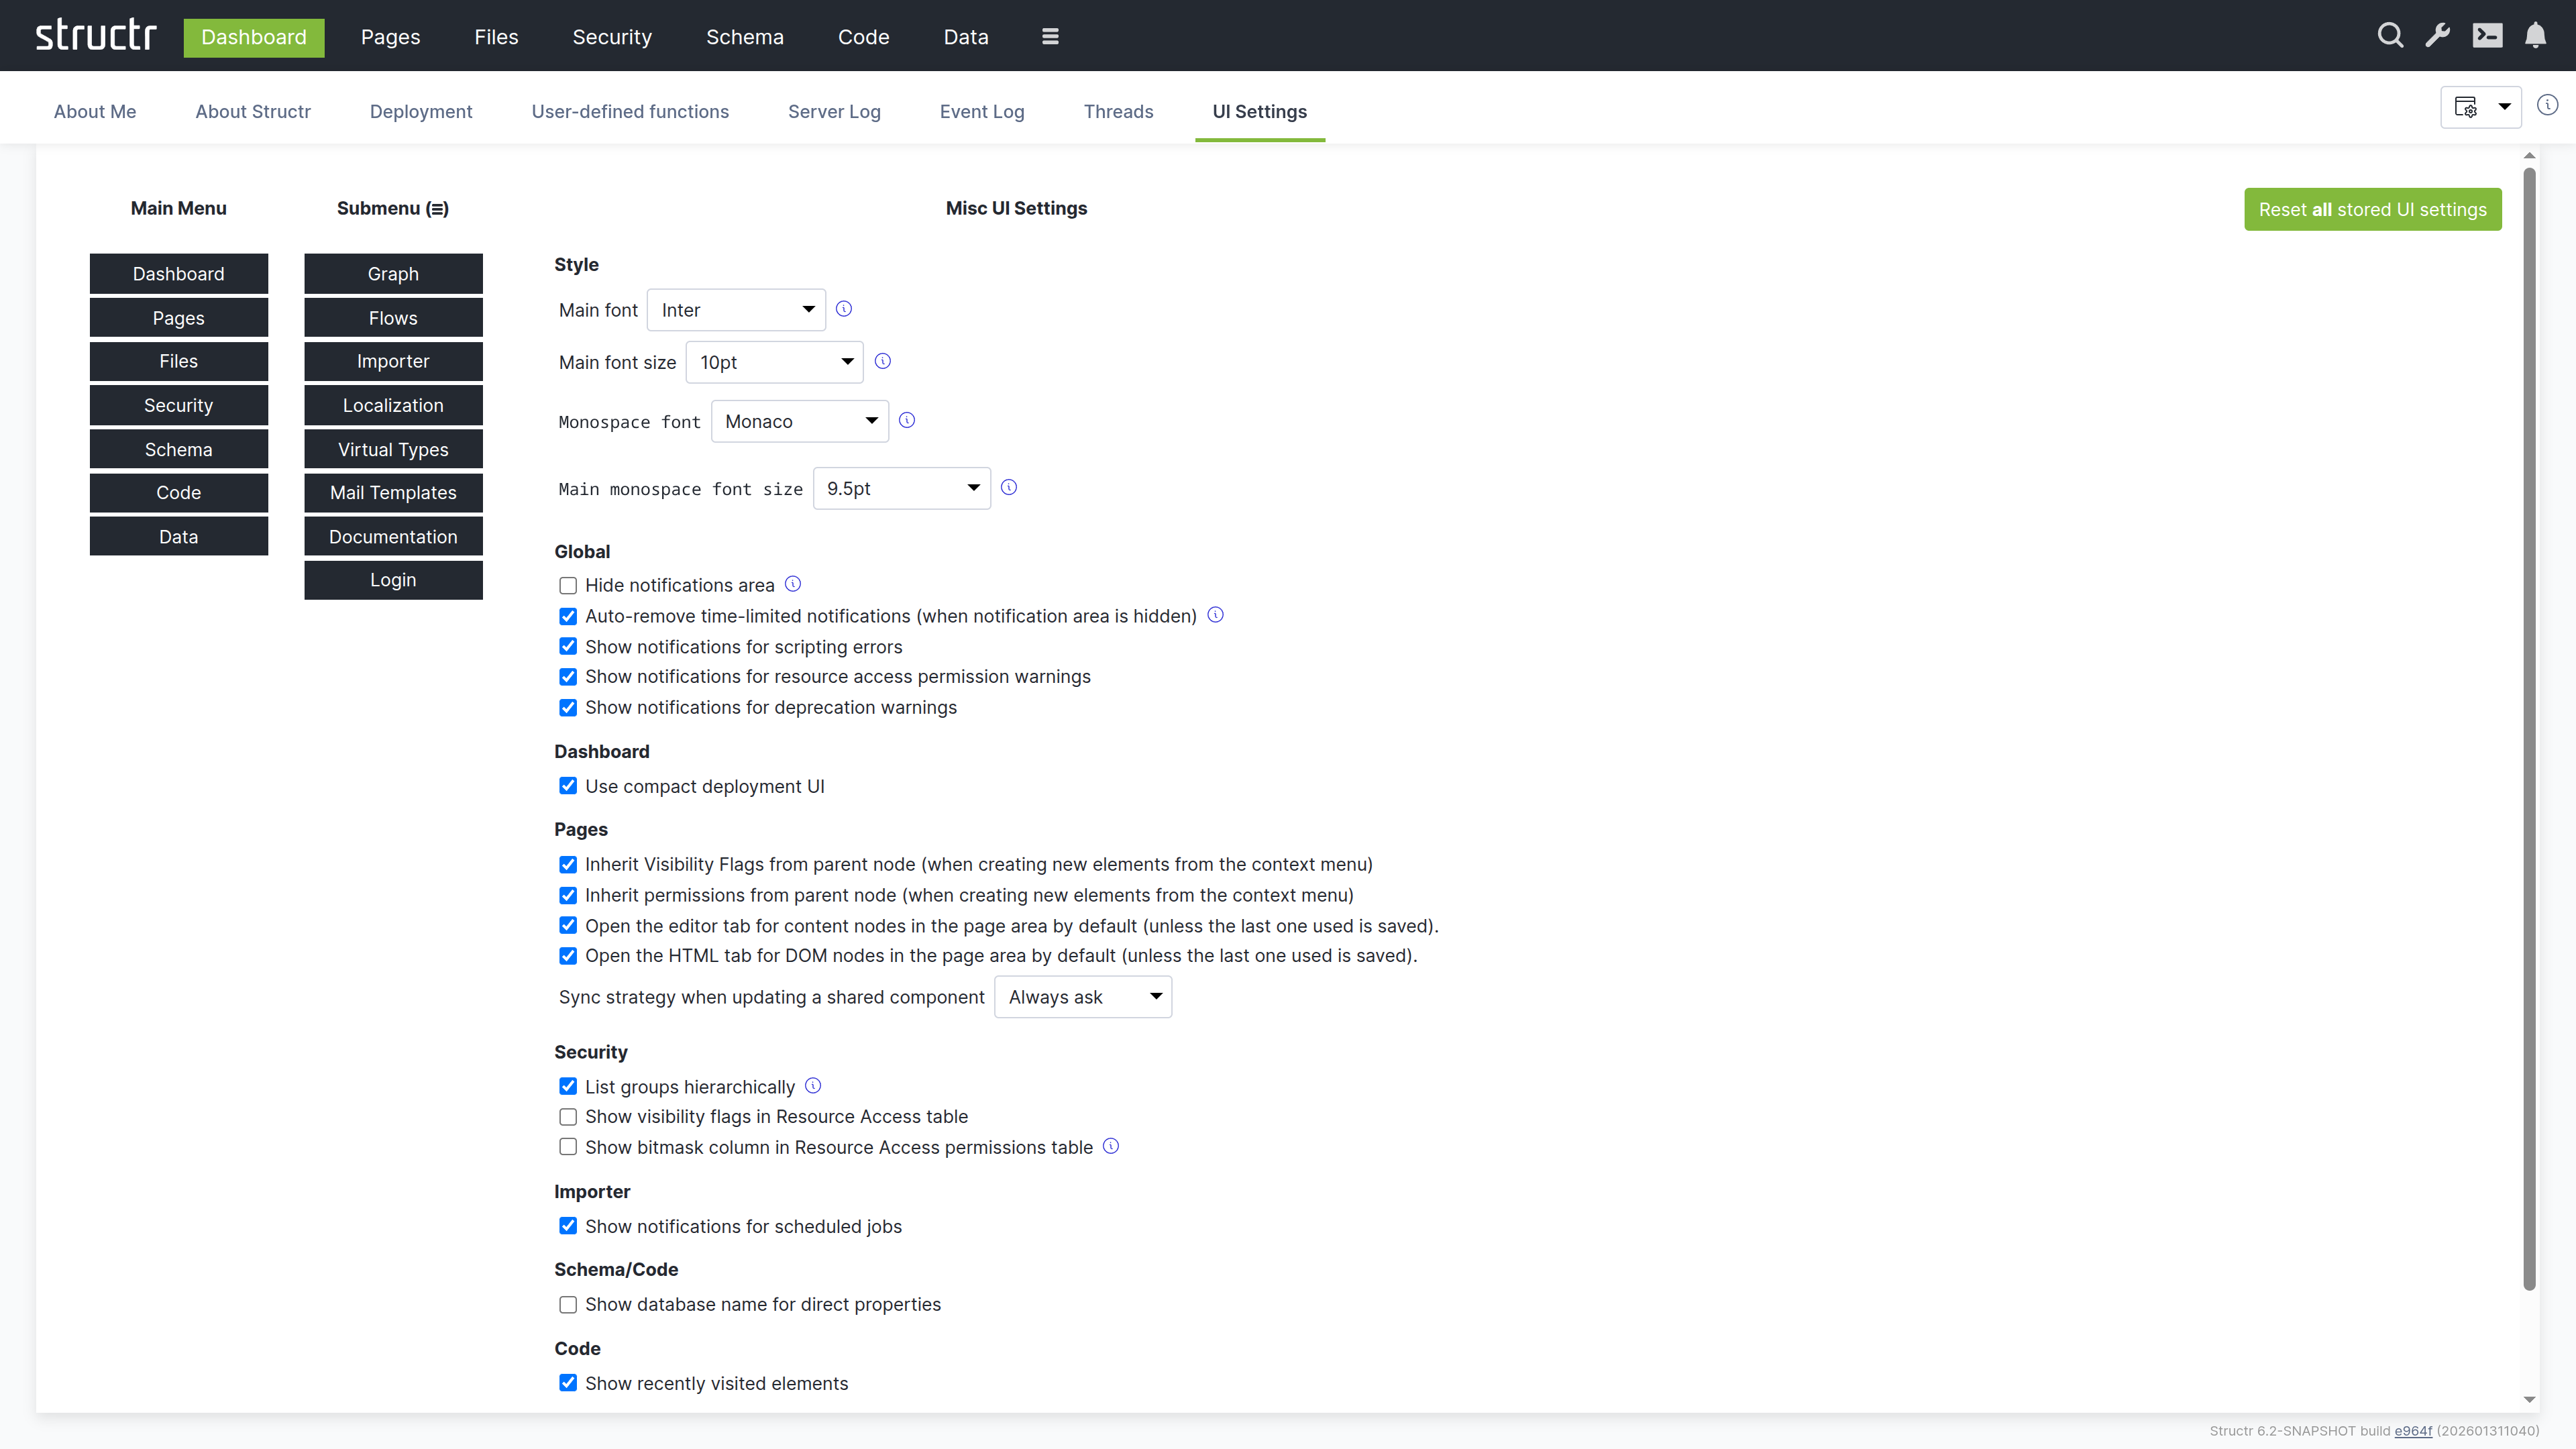
Menu Configuration
Here you can configure which items appear in the main navigation bar and which are moved to the burger menu. This lets you prioritize the areas you use most frequently.
Font Settings
You can set the main font, font size, and monospace font for the Admin UI. The monospace font is used in code editors and log displays.
Behavior Settings
This section contains checkboxes for various UI behaviors, grouped by area:
- Global – Notification display and behavior
- Dashboard – Compact deployment UI option
- Pages – Inheritance behavior when creating elements, default tab selection
- Security – Group display, visibility flags in tables
- Importer – Job notifications
- Schema/Code – Database name display
- Code – Recently visited elements
- Data – Array size display limits
Note that the settings relevant to a specific area also appear in a Settings menu within that area. For example, the Pages settings are available both here and in the Pages area’s own Settings menu. This allows you to adjust settings without navigating back to the Dashboard.
Admin Console
The Admin Console is a text-based interface for advanced administration tasks. It provides a REPL (read-evaluate-print loop) where you can execute JavaScript, StructrScript, Cypher queries, Admin Shell commands, and REST calls directly.
Opening the Console
The Admin Console is integrated into the Admin UI as a Quake-style terminal that slides down from the top of the screen and overlays the current view. You can open it in two ways: click the terminal icon in the header (available in all areas), or press Ctrl+Alt+C (on macOS: Control+Option+C) to toggle the console.
Console Modes
The console has five modes that you can cycle through by pressing Shift+Tab.
JavaScript Mode
A full JavaScript REPL where you can execute JavaScript expressions. Variables you declare persist across commands, so you can build up state interactively. This mode is useful for data manipulation, quick fixes, and exploration.
// Find all projects and store in a variable
let projects = $.find('Project');

// Use the variable in subsequent commands
$.print(projects.length + ' projects found');

// Modify data interactively
for (let p of projects) {
    if (p.status === 'draft') {
        $.set(p, 'status', 'archived');
    }
}
Since all parts of a Structr application are stored in the database, you can use JavaScript mode to create schema types and data objects directly:
$.create('SchemaNode', { name: 'Project' });
$.create('Project', { name: 'Project #1' });
$.find('Project').map(p => p.name).join(', ');
StructrScript Mode
Execute StructrScript expressions directly. This mode is useful for testing expressions before using them in pages or templates. Unlike JavaScript mode, you cannot declare persistent variables here.
find('User', 'name', 'admin')
join(extract(find('Project'), 'name'), ', ')
Cypher Mode
Execute Cypher queries directly against the Neo4j database. This mode is useful for database maintenance tasks like setting labels, modifying data, or exploring relationships.
MATCH (n:Project)-[:HAS_TASK]->(t:Task) RETURN n.name, count(t)
By default, the output is limited to 10 results to prevent overwhelming the display with large result sets. If your query returns more objects, Structr displays an error message asking you to use LIMIT in your query. You can change this limit through the application.console.cypher.maxresults setting in the Configuration Interface.
Admin Shell Mode
A command-line interface for administrative tasks. Type help to see available commands, or help <command> for detailed information about a specific command.
Markdown Rendering Hint: MarkdownTopic(export) not rendered because level 5 >= maxLevels (5)
Markdown Rendering Hint: MarkdownTopic(export-data) not rendered because level 5 >= maxLevels (5)
Markdown Rendering Hint: MarkdownTopic(import) not rendered because level 5 >= maxLevels (5)
Markdown Rendering Hint: MarkdownTopic(import-data) not rendered because level 5 >= maxLevels (5)
Markdown Rendering Hint: MarkdownTopic(file-import) not rendered because level 5 >= maxLevels (5)
Markdown Rendering Hint: MarkdownTopic(init) not rendered because level 5 >= maxLevels (5)
Markdown Rendering Hint: MarkdownTopic(user) not rendered because level 5 >= maxLevels (5)
REST Mode
Execute REST API calls directly from the console. This mode simulates external access to the Structr REST API. Requests run without authentication by default, allowing you to test Resource Access Grants and verify how your API behaves for unauthenticated users. Type help to see available commands.
Markdown Rendering Hint: MarkdownTopic(get) not rendered because level 5 >= maxLevels (5)
Markdown Rendering Hint: MarkdownTopic(post) not rendered because level 5 >= maxLevels (5)
Markdown Rendering Hint: MarkdownTopic(put) not rendered because level 5 >= maxLevels (5)
Markdown Rendering Hint: MarkdownTopic(del) not rendered because level 5 >= maxLevels (5)
Markdown Rendering Hint: MarkdownTopic(auth) not rendered because level 5 >= maxLevels (5)
Markdown Rendering Hint: MarkdownTopic(as) not rendered because level 5 >= maxLevels (5)
Markdown Rendering Hint: MarkdownTopic(Example Session) not rendered because level 5 >= maxLevels (5)
SSH Access
The Admin Console functionality is also available via SSH for admin users. Connect to the configured SSH port (default 8022):
ssh -p 8022 admin@localhost
You can configure the SSH port through the application.ssh.port setting in the Configuration Interface. Authentication works via password or public key. For public key authentication, store the user’s public key in the publicKey property on the user node.
Related Topics
- Business Logic - JavaScript and StructrScript syntax and capabilities
- Deployment - Using Admin Shell commands for application export/import
- Configuration Interface - Changing console-related settings
Schema
The Schema area is the visual editor for designing your data model. Types appear as boxes on a canvas, and relationships appear as connecting lines between them. You can drag types to arrange them, click to edit their properties, and draw connections between types to create relationships.
The Canvas
The main area displays your data model as a graph. Each type appears as a box showing the type name. Hover over a type to reveal the pencil icon (edit) and delete icon. Connection points at the top and bottom of each box let you create relationships by dragging from one type to another – drag from the source type’s connector to the target type’s connector, and Structr opens the relationship configuration dialog.
Navigating Large Schemas
Use the mouse wheel to zoom in and out. Click and drag on empty canvas space to pan. For applications with many types, these controls help you focus on the part of the schema relevant to your current task.
Relationship Colors
Relationship lines are color-coded:
- Green – Normal relationships
- Orange – Relationships configured for permission propagation (see User Management for details on graph-based permission resolution)
Schema and Data Are Loosely Coupled
The schema and your data are loosely coupled. If you delete a type from the schema, the type definition and its relationships are removed, but the data objects of that type remain in the database. You can recreate the type later and the data becomes accessible again. This flexibility is useful during development but means you need to manage data cleanup separately from schema changes.
Editing Types and Relationships
Click the pencil icon on a type box to open the Edit Type dialog. Click on a relationship line to open the Edit Relationship dialog. Both dialogs provide access to all configuration options – properties, methods, views, and more. For details on these options, see the Data Model chapter.
Secondary Menu
The menu bar above the canvas provides tools for managing your schema.
Create Type
The green button opens the Create Type dialog where you enter a name and select traits for the new type. After creation, the Edit Type dialog opens automatically so you can add properties and configure the type further.
Snapshots
The Snapshots menu lets you save and restore schema states. A snapshot captures your entire schema definition at a point in time.
- Create Snapshot – Saves the current schema state with a name you provide
- Restore Snapshot – Replaces the current schema with a previously saved snapshot
- Delete Snapshot – Removes a saved snapshot
Snapshots are useful before making significant schema changes, allowing you to roll back if needed.
User Defined Functions
Opens a table listing all global schema methods. This is a legacy location – the same methods are more conveniently accessible in the Code area under Global Methods.
Display Menu
Controls the visual appearance of the schema editor.
Markdown Rendering Hint: MarkdownTopic(Type Visibility) not rendered because level 5 >= maxLevels (5)
Markdown Rendering Hint: MarkdownTopic(Display Options) not rendered because level 5 >= maxLevels (5)
Markdown Rendering Hint: MarkdownTopic(Edge Style) not rendered because level 5 >= maxLevels (5)
Markdown Rendering Hint: MarkdownTopic(Layouts) not rendered because level 5 >= maxLevels (5)
Markdown Rendering Hint: MarkdownTopic(Reset Layout / Reset Zoom) not rendered because level 5 >= maxLevels (5)
Markdown Rendering Hint: MarkdownTopic(Apply Automatic Layout) not rendered because level 5 >= maxLevels (5)
Admin Menu
The Admin menu provides database maintenance functions.
Indexing – Nodes
- Rebuild Index – Recreates indexes for all or selected node types. Run this after adding indexed properties to a type that already has data.
- Add UUIDs – Adds UUIDs to nodes that lack one. Use this when importing data from an external Neo4j database.
- Create Labels – Creates Neo4j labels based on the type property. Use this when importing data that has type values but is missing the corresponding labels.
Indexing – Relationships
- Rebuild Index – Recreates indexes for relationships.
- Add UUIDs – Adds UUIDs to relationships imported from an external database.
Rebuild All Indexes
Triggers a complete rebuild of all indexes for both nodes and relationships. Use this after importing data or when you suspect index inconsistencies.
Maintenance
- Flush Caches – Clears internal caches. Rarely needed in current versions.
- Clear Schema – Removes all custom types and relationships from the schema. Use with extreme caution – this erases your entire data model definition (though not the data itself).
Settings
The gear icon opens configuration options for the Schema area. These are the same settings available in the Dashboard under UI Settings, filtered to show only schema-relevant options.
Data
The Data area is a generic interface for viewing and editing all objects in your database. You can select a type from the list, view all its instances in a table, and edit values directly. This is useful for data inspection, quick fixes, bulk operations, and CSV import/export.
Browsing Your Data
The left sidebar displays all your custom types. Click on a type to view its instances in a paginated table on the right.
Type Filter
A filter button above the list lets you expand what’s shown. You can include:
- Custom Types (shown by default)
- Custom Relationship Types
- Built-In Relationship Types
- HTML Types
- Flow Types
- Other Types
Recently Used Types
Below the type list, recently accessed types are shown for quick navigation.
The Data Table
When you select a type, the main area displays all objects of that type in a table. Each row represents an object, and each column represents a property.
Pagination and Views
Above the table, the following controls are available:
- Pager controls for navigating through pages
- A page size input to set how many objects appear per page
- A view dropdown to select which properties appear as columns
Editing Values
System properties (like id and type) are read-only, but you can edit other properties directly in the table cells by clicking on them.
Navigating Related Objects
Properties that reference other objects are clickable. Click on one to open a dialog showing the related object, where you can view and edit it. From that dialog, you can navigate further to other related objects, allowing you to traverse your entire data graph without leaving the Data area.
Creating Relationships
For relationship properties, a plus button appears in the table cell. Click it to open a search dialog limited to the target type. Select an object to create the relationship. The dialog respects the cardinality defined in the schema – for one-to-one or many-to-one relationships, selecting a new object replaces the existing one.
Creating and Deleting Objects
Create Button
The Create button in the header creates a new object of the currently selected type. The button label changes to reflect the type currently being viewed.
Delete All
The “Delete All Objects of This Type” button does exactly what it says – use it with caution. A checkbox lets you restrict deletion to exactly this type; if unchecked, objects of derived types are also deleted.
Import and Export
Export as CSV
Downloads the current table view as a CSV file.
Import CSV
Opens the Simple CSV Import dialog. See the Importing Data chapter for details on the import process and field mapping.
Search
The search box in the header searches across your entire database, not just the currently selected type. Results are grouped by type, making it easy to find objects regardless of their location. Click the small “x” at the end of the search field to clear the search and return to the type-based view.
The REST Endpoint Link
In the top right corner of the content area, a link to the REST endpoint for the current type is displayed.
HTML REST View
When you access a REST URL with a browser, Structr detects the text/html content type and returns a formatted HTML page instead of raw JSON. Objects appear with collapsible JSON structures that you can expand and navigate. A status bar at the top lets you switch between the available views for the type.
This feature makes it easy to explore your data and debug API responses directly in the browser, without needing external tools like Postman or curl.
Pages
The Pages area is the visual editor for building your application’s user interface. It combines a page tree, property panels, and live preview in one workspace. Here you design layouts, configure data bindings, set up interactions, and preview the results.
The Workspace
The screen is divided into three parts: a left sidebar with the page tree and localization tools, a main area for properties and preview, and a right sidebar with widgets, shared components, recycle bin, and preview panel. All sidebars are collapsible, so you can expand your workspace when you need more room.
Left Sidebar
The Page Tree
The Pages panel shows all your pages as expandable trees. Each page reveals its structure when expanded: HTML elements, templates, content nodes, and their nesting relationships.
Markdown Rendering Hint: MarkdownTopic(Element Icons) not rendered because level 5 >= maxLevels (5)
Markdown Rendering Hint: MarkdownTopic(Visibility Indicators) not rendered because level 5 >= maxLevels (5)
Markdown Rendering Hint: MarkdownTopic(Interaction) not rendered because level 5 >= maxLevels (5)
Localization
The Localization panel lets you manage translations for the current page. Select a page, enter a language code, and click refresh to see all localize() calls used in that page. You can create, edit, and delete translations directly here.
Right Sidebar
Widgets
The Widgets panel contains reusable page fragments. You can drag a widget onto your page tree to insert it. If the widget has configuration options, a dialog appears where you can enter values before insertion.
Markdown Rendering Hint: MarkdownTopic(Suggested Widgets) not rendered because level 5 >= maxLevels (5)
Markdown Rendering Hint: MarkdownTopic(Local and Remote Widgets) not rendered because level 5 >= maxLevels (5)
Shared Components
Shared components work differently from widgets. When you insert a widget, Structr copies its content into your page. When you insert a shared component, Structr creates a reference to the original. If you edit the shared component, every page that uses it updates automatically.
You can create a shared component by dragging an element from the page tree into the Shared Components panel. Headers, footers, and navigation menus are ideal candidates – anything that should look and behave the same across multiple pages.
Recycle Bin
When you delete an element from a page, it goes to the recycle bin rather than being permanently removed. You can drag elements back into the page tree to restore them. This safety net is especially valuable when restructuring complex pages.
Note that pages themselves are not soft-deleted. When you delete a page, only its child elements go to the recycle bin.
Preview
The Preview panel shows your page as users will see it. You can keep the preview visible while working with other tabs in the main area, watching your changes take effect in real time.
Editing Elements
When you select an element in the page tree, the main area shows its properties organized in tabs. The available tabs depend on the element type.
General Tab
This contains basic settings: name, CSS classes, HTML ID, and inline styles. For repeaters, the Function Query and Data Key fields are located here. Show and Hide Conditions control whether the element appears in the output.
HTML Tab
This is available for HTML elements. Here you can manage HTML attributes – both global attributes and tag-specific ones. Click “Show all attributes” to reveal event handlers like onclick. You can add custom attributes with the plus button.
Editor Tab
This is available for templates and content elements. It provides a Monaco-based code editor with syntax highlighting and autocompletion. The content type selector at the bottom controls processing: Markdown and AsciiDoc convert to HTML, while plaintext, XML, and JSON output directly.
Repeater Tab
Here you can configure data-driven rendering. Select a source (Flow, Cypher Query, or Function Query), define the data key, and the element renders once for each object in the result.
Events Tab
Here you can set up Event Action Mappings – what happens when users interact with the element. Select a DOM event, choose an action, configure parameters, and define follow-up behaviors.
Security Tab
This shows access control settings: owner, visibility flags, and individual permissions.
Advanced Tab
This provides a raw view of all attributes in an editable table. It is useful for properties that are not exposed in other tabs.
Preview Tab
This shows the rendered page. Hover over elements to highlight them in both the preview and the tree. Click to select for editing.
Active Elements Tab
This gives you an overview of key components: templates, repeaters, and elements with event action mappings. Click any item to jump to its location in the tree.
URL Routing Tab
This is available for pages. Here you can configure additional URL paths with typed parameters. See the Navigation & Routing chapter for details.
The Context Menu
Right-click any element to open the context menu. What you see depends on the element type.
Insert Options
These let you add new elements as children or siblings. Suggested Widgets appear when widgets match the current element’s selector. Suggested Elements offer common children for the current tag (for example, <tr> for tables, <li> for lists).
Edit Options
- Clone – Copies the element and inserts it after the original
- Wrap Element In – Wraps the element with a new parent
- Replace Element With – Swaps the element while keeping its children
- Convert to Shared Component – Moves the element to shared components
Select/Deselect
This marks elements for move or clone operations. After selecting, you can right-click elsewhere and choose “Clone Selected Element Here” or “Move Selected Element Here.”
Remove Node
This sends the element to the recycle bin.
Creating Pages
The Create Page button in the secondary menu offers two options:
Create
Opens a dialog with templates based on Tailwind CSS, ranging from empty pages to complex layouts with sidebars and navigation. These templates are actually widgets with the “Is Page Template” flag enabled.
Import
Lets you create pages from HTML source code or by fetching from an external URL. This is how you bring existing designs into Structr and make them dynamic.
Related Topics
- Pages & Templates – Explains how to build page structures, work with templates, and create widgets and shared components
- Dynamic Content – Covers data binding, template expressions, and repeaters
- Event Action Mapping – Details how to handle user interactions
- Navigation & Routing – Describes URL configuration and the
currentkeyword - Security – Explains visibility flags and access control
Security
The Security area is where you manage access control for your application. Here you create users and organize them into groups, define which REST endpoints are accessible to authenticated and anonymous users, and configure cross-origin request settings for browser-based clients. The permission model supports both role-based access through groups and fine-grained object-level permissions. Each of these concerns has its own tab.
Users and Groups
The first tab displays two lists side by side: users on the left, groups on the right. Both lists are paginated and filterable, which is helpful when you have many users.
Creating Users and Groups
Click the Create button above either list to add a new user or group. If you’ve extended the User or Group types (by creating subclasses or adding the User trait to another type), a dropdown appears next to the button that lets you choose which type to create.
Organizing Your Security Model
You can drag users onto groups to make them members, and drag groups onto other groups to create hierarchies. This flexibility lets you model complex organizational structures: departments containing teams, teams containing members, with permissions flowing through the hierarchy.
Editing Users
Click a user to edit the name inline. For more options, hover over the user and click the menu icon to open the context menu.
Markdown Rendering Hint: MarkdownTopic(General Dialog) not rendered because level 5 >= maxLevels (5)
Markdown Rendering Hint: MarkdownTopic(Advanced Dialog) not rendered because level 5 >= maxLevels (5)
Markdown Rendering Hint: MarkdownTopic(Security Dialog) not rendered because level 5 >= maxLevels (5)
Markdown Rendering Hint: MarkdownTopic(Delete User) not rendered because level 5 >= maxLevels (5)
Editing Groups
Groups have names and members but fewer special properties. Click to edit the name inline. Use the context menu to access the Advanced dialog (all attributes), Security dialog (access control for the group object), or Delete Group.
Resource Access
The second tab controls which REST endpoints are accessible and to whom.
The Resource Access Table
Each row represents a grant with:
- Signature – The URL pattern this grant applies to
- Permissions – Checkboxes for each HTTP method (GET, POST, PUT, DELETE, OPTIONS, HEAD, PATCH), separately for authenticated and non-authenticated users
Creating Grants
Enter a signature in the input field next to the Create button and click Create. For details on signature syntax and configuration patterns, see the User Management chapter.
Per-User and Per-Group Grants
Resource Access grants are themselves objects with their own access control. Click the lock icon at the end of any row to open the access control dialog for that grant.
This means you can create multiple grants for the same signature, each visible to different users or groups. One grant might allow read-only access for regular users, while another allows full access for administrators. Each user sees only the grants that apply to them.
Visibility Options
The Settings menu on the right side of the tab bar includes options for showing visibility flags and bitmask columns in the table. The bitmask is a numeric representation of the permission flags, which can be useful for debugging.
CORS
The third tab configures Cross-Origin Resource Sharing settings.
The CORS Table
Each row configures CORS for one URL path. Enter a path in the input field, click Create, then fill in the columns:
Markdown Rendering Hint: MarkdownTopic(Accepted Origins) not rendered because level 5 >= maxLevels (5)
Markdown Rendering Hint: MarkdownTopic(Max Age) not rendered because level 5 >= maxLevels (5)
Markdown Rendering Hint: MarkdownTopic(Allow Methods) not rendered because level 5 >= maxLevels (5)
Markdown Rendering Hint: MarkdownTopic(Allow Headers) not rendered because level 5 >= maxLevels (5)
Markdown Rendering Hint: MarkdownTopic(Allow Credentials) not rendered because level 5 >= maxLevels (5)
Markdown Rendering Hint: MarkdownTopic(Expose Headers) not rendered because level 5 >= maxLevels (5)
Related Topics
- User Management – Concepts behind users, groups, and permissions
- REST Interface/Authentication – Resource Access Permissions and CORS
Code
The Code area is where you write and organize your application’s business logic. While the Schema area gives you a visual overview of types and relationships, the Code area focuses on what those types actually do – their methods, computed properties, and API configuration.
Working with the Code Area
The screen is divided into a navigation tree on the left and a context-sensitive editor on the right. The tree organizes your code by type: expand a type to see its properties, views, and methods. Click any item to edit it.
Here you also have access to user-defined functions (global utilities available throughout your application) and service classes (containers for business logic that does not belong to a specific type). The OpenAPI output is also available here, which is useful for verifying how your methods appear to API consumers.
The Navigation Tree
The tree contains the following sections:
User Defined Functions
This shows global functions in a table format – the same view that is available in the Schema area. These functions are callable from anywhere in your application.
OpenAPI
This section displays the OpenAPI specification for your application. The specification is also exposed as a public endpoint that external consumers can access to discover and interact with your APIs. It serves as the authoritative reference for all API endpoints defined in your application, documenting available methods, their parameters, and expected responses.

Types
This lists all your custom types and service classes. Expand a type to see its contents:
- Direct Properties – Properties defined on this type
- Linked Properties – Properties from relationships
- Views – Property sets for different contexts (API responses, UI display)
- Methods – The business logic attached to this type
- Inherited Properties – Properties from parent types or traits
This structure mirrors what you see in the Schema type editor, but it is organized for code navigation rather than visual modeling.
Services
This is a category under Types for service classes. Service classes can only contain methods, not properties. They are useful for grouping related business logic that does not belong to a specific data type – things like report generators, external integrations, or utility functions.
The Method Editor
Click any method to open the editor.
Writing Code
The editor is based on Monaco (the same engine as VS Code), with syntax highlighting for JavaScript and StructrScript, autocompletion, and all the features you would expect from a modern code editor.
At the bottom of the screen, a settings dropdown lets you configure the editor to your preferences: word wrap, indentation style, tab size, code folding, and more.
Method Configuration
Above the editor, several options control how the method behaves:
Markdown Rendering Hint: MarkdownTopic(Method is static) not rendered because level 5 >= maxLevels (5)
Markdown Rendering Hint: MarkdownTopic(Not callable via HTTP) not rendered because level 5 >= maxLevels (5)
Markdown Rendering Hint: MarkdownTopic(Wrap JavaScript in main) not rendered because level 5 >= maxLevels (5)
Markdown Rendering Hint: MarkdownTopic(Return result object only) not rendered because level 5 >= maxLevels (5)
Markdown Rendering Hint: MarkdownTopic(HTTP verb dropdown) not rendered because level 5 >= maxLevels (5)
Testing Your Code
For static methods, a Run Dialog button appears in the action bar alongside Save, Revert, and Delete. Click it to open a testing interface where you can enter parameters and execute the method immediately. The return value displays in the dialog, making it easy to test and debug without leaving the editor.
API Tab
Here you can define typed parameters for your method. Structr validates incoming requests against these definitions before your code runs, catching type mismatches and missing required parameters automatically. This also generates OpenAPI documentation.
Usage Tab
This shows how to call the method from different contexts: JavaScript, StructrScript, and REST API. The examples use your actual method name and parameters, so you can copy them directly into your code.
Searching Your Code
The search field in the secondary menu searches across all code in your application – schema methods, user-defined functions, and service classes. This is invaluable when you need to find where something is defined or used.
Note that the search does not include page content. For that, use the Pages area.
Two Views, One Model
The Code area and Schema area are two perspectives on the same underlying data. Changes you make in one immediately appear in the other.
Use the Schema area when you are thinking about structure – what types exist, how they relate to each other, what properties they have. Use the Code area when you are thinking about behavior – what methods do, how they are implemented, how they are called.
Files
The Files area is Structr’s virtual file system – a familiar file browser interface where you can manage your application’s static assets. CSS, JavaScript, images, documents, and any other files live here.
Secondary Menu
Create Folder
Creates a new folder in the currently selected directory. If you’ve created types that extend Folder, a dropdown lets you choose which type to create.
Create File
Creates a new empty file in the current directory. Like with folders, a dropdown appears if you have custom file types.
Mount Folder
Opens the Mount Dialog for connecting external storage locations to Structr’s virtual file system.
Markdown Rendering Hint: MarkdownTopic(The Mount Dialog) not rendered because level 5 >= maxLevels (5)
Search
The search field on the right searches across all files, including their contents. This full-text search is powered by Apache Tika and can index text from PDFs, images (via OCR), Office documents, and many other formats. Type your query and press Enter to see results.
Left Sidebar
Favorites
At the top of the directory tree, Favorite Files provides quick access to frequently used files. Drag any file here during development to keep it handy – this is useful for JavaScript files, stylesheets, or configuration files you edit often.
Directory Tree
Below Favorites, the familiar folder hierarchy shows your file system structure. Click a folder to view its contents on the right. Click a file or folder name to rename it inline.
Main Area
The main area shows the contents of the selected folder.
View Controls
At the top right, three buttons switch between view modes:
- List – Compact rows with detailed information
- Tiles – Medium-sized previews with thumbnails
- Images – Larger previews, ideal for browsing image folders
A pager on the left handles large directories, and a filter box lets you narrow down the displayed files.
The File Table
In list view, each row shows:
- Icon – Click to download or open the file (depending on content type)
- Name – The file name
- Lock icon – Opens the Access Control dialog
- Export checkbox – Marks the file for inclusion in deployment exports (only available below the top level)
- UUID – The file’s unique identifier
- Modified – Last modification timestamp
- Size – File size
- Type – Both the Structr type and MIME type
- Owner – The file’s owner
Hold Ctrl while clicking to select multiple files for bulk operations.
Uploading Files
Drag files from your desktop onto the right side of the Files area to upload them. Files are Base64-encoded and uploaded in chunks via WebSocket. This works well for smaller files; for large files or bulk uploads, consider using the REST API or deployment import.
Search Results
When you search, results appear in a table similar to the file list. A magnifying glass icon at the start of each row shows the search context – click it to see where your search term appears within the file.
Context Menu
Right-click a file or hover and click the menu icon to open the context menu.
Edit File
Opens the file in a built-in editor. The editor warns you before opening binary files or files that are too large. For text files, you get syntax highlighting based on the file type.
If the file has the isTemplate flag enabled, a checkbox in the editor lets you preview the rendered output with template expressions evaluated.
General
Opens the file’s property dialog with:
- Name – The file name
- Content Type – The MIME type (affects how browsers handle the file)
- Cache for Seconds – Controls HTTP cache headers when serving the file
- isTemplate – When enabled, Structr evaluates template expressions in the file content before serving it, allowing you to mix static and dynamic content
- Caching disabled – Prevents browser caching
- Include in Frontend Export – Marks the file for deployment export
Advanced
The raw attribute table, same as in other areas.
Add to Favorites
Adds the file to the Favorites section for quick access.
Copy Download URL
Copies the file’s download URL to your clipboard.
Download File
Downloads the file directly.
Security
A submenu with:
- Access Control / Visibility – Opens the full access control dialog
- Quick toggles – Make the file visible to authenticated users, public users, or both
Delete File
Removes the file. When multiple files are selected, this becomes “Delete Files” and removes all selected items.
Folder Context Menu
Folders have a simpler context menu with General (just name and export checkbox), Advanced, Security, and Delete Folder.
Content Type Features
Some content types unlock additional functionality.
CSV and XML Files
Files with text/csv or text/xml content type show an “Import CSV” or “Import XML” menu entry that opens the import wizard documented in the Importing Data chapter.
ZIP Archives
ZIP files show two additional options:
- Extract Archive Here – Extracts contents into the current folder
- Extract Archive to New Folder – Creates a new folder and extracts there
Images
Images get special treatment:
Markdown Rendering Hint: MarkdownTopic(Automatic Thumbnails) not rendered because level 5 >= maxLevels (5)
Markdown Rendering Hint: MarkdownTopic(Metadata Extraction) not rendered because level 5 >= maxLevels (5)
Markdown Rendering Hint: MarkdownTopic(Edit Image) not rendered because level 5 >= maxLevels (5)
Checksums
Structr automatically calculates checksums for all files. By default, a fast xxHash is computed; you can configure additional algorithms in structr.conf.
Naming Conflicts
If you create a file with a name that already exists in the folder, Structr automatically appends a timestamp to make the name unique.
Related Topics
- Importing Data – CSV and XML import wizards
- Data Model – Creating custom file types with the File trait
- Security – File permissions and visibility
- Pages & Templates – Using files in pages, the isTemplate feature
Graph
The Graph area is an interactive graph explorer where you can visualize your data objects and their relationships. This area is particularly useful when you need to understand the connections between objects in your database, explore how data is interlinked, or navigate complex relationship structures. By starting from a query result, you can progressively expand the visualization to discover related objects step by step. By default, this area is hidden in the burger menu.
Querying Data
The header contains two input fields for specifying which data to display.
REST URL
In the left input field, you can enter a REST URL to load objects. The results will be displayed as nodes in the graph visualization.
Cypher Query
In the right input field, you can enter a Cypher query to further filter or transform the results.
The Graph Visualization
Each object returned by your query appears as a filled circle on the canvas, with its name displayed as a label.
Exploring Relationships
When you hover over a node, additional colored circles appear around it. Each colored circle contains a number indicating how many outgoing relationships of a particular type exist. The colors distinguish different relationship types.
Click on one of these colored circles to follow all relationships of that type. The related nodes are then added to the visualization, and you can see the connections between them. This way, you can progressively navigate through your data graph, expanding the view step by step.
Display Options
A dropdown menu next to the input fields provides configuration options:
Display Options
Two checkboxes control what’s shown in the visualization:
- Node Labels – Shows or hides the names on nodes
- Edge Labels – Shows or hides the names on relationship lines
Layout Algorithm
You can choose between two different layout algorithms that determine how nodes are arranged on the canvas.
Clear Graph
This button resets the visualization, removing all displayed nodes and relationships so you can start fresh.
Flows
The Flows area is a visual workflow designer where you can create automated processes using flow-based programming. This approach is similar to visual scripting tools like Unity’s Visual Script. By default, this area is hidden in the burger menu.
Secondary Menu
Create Flow
An input field and Create button on the left let you create a new flow. A flow is a container for flow nodes that you connect to define a process.
Delete
Deletes the currently selected flow.
Highlight
A dropdown that highlights different aspects of your flow: Execution, Data, Logic, or Exception Handling. This helps you focus on specific channels when working with complex flows.
Run
Executes the current flow.
Reset View
Resets the canvas zoom and pan position.
Layout
Automatically arranges the flow nodes on the canvas.
Left Sidebar
The sidebar shows a tree of all flows in your application. Click on a flow to open it on the canvas.
The Canvas
The main area displays the flow nodes and their connections. You can zoom and pan the canvas to navigate larger flows.
Adding Nodes
Right-click on the canvas to open the context menu, which lets you add new nodes. The menu is organized into categories:
Markdown Rendering Hint: MarkdownTopic(Action Nodes) not rendered because level 5 >= maxLevels (5)
Markdown Rendering Hint: MarkdownTopic(Data Nodes) not rendered because level 5 >= maxLevels (5)
Markdown Rendering Hint: MarkdownTopic(Logic Nodes) not rendered because level 5 >= maxLevels (5)
Markdown Rendering Hint: MarkdownTopic(Actions) not rendered because level 5 >= maxLevels (5)
Connecting Nodes
Each node has input and output connectors. You connect nodes by dragging from an output connector to an input connector. The connectors are color-coded by channel type:
- Green – Execution channel (controls the order of operations)
- Blue – Data channel (passes data between nodes)
- Red – Exception handling channel (handles errors)
- Dark green – Logic channel (passes boolean values)
You can only connect connectors of the same type.
Related Topics
- Flows – Detailed documentation on flow-based programming, node types, and building workflows
Job Queue
The Job Queue area displays scheduled jobs and background tasks. Despite its current label “Importer” in the UI, this area is not limited to import operations – it shows all jobs created with the $.schedule() function as well as batch import jobs. By default, this area is hidden in the burger menu.
Note: This area will be renamed from “Importer” to “Job Queue” in a future release.
Secondary Menu
Refresh
The button on the left refreshes the job list.
Cancel Jobs
An input field labeled “Cancel all queued jobs after this ID” lets you specify a job ID. Click the Cancel Jobs button to cancel all queued jobs with IDs higher than the specified value. This is useful when you need to stop a large number of scheduled jobs at once.
Settings
On the right side, the usual configuration options are available.
The Job Table
The main area displays a table of all jobs with the following columns:
- Job ID – The unique identifier for the job
- Job Type – The type of job (e.g., scheduled function, import batch)
- User – The user who created the job
- File UUID – For import jobs, the UUID of the file being imported
- File Path – For import jobs, the path to the file
- File Size – For import jobs, the size of the file
- Processed Chunks – For chunked imports, shows progress as processed/total chunks
- Status – The current state of the job (queued, running, completed, failed)
- Action – Actions you can perform on the job, such as cancelling it
Background
This area was originally designed to display import jobs – when you import a large file that gets split into chunks, each batch appears here so you can monitor progress. Later, the area was extended to also show jobs created with the $.schedule() function, making it a general-purpose job monitor.
Related Topics
- Importing Data – Details on CSV and XML import processes
- Business Logic – Using
$.schedule()to create background jobs
Localization
The Localization area is where you manage translations for multi-language applications. Here you create and edit the translation entries that the localize() function looks up when rendering pages. Each entry consists of a key, an optional domain for organizing related translations, and one or more locale-specific translations. When a page calls localize() with a key, Structr returns the appropriate translation based on the current user’s locale setting. By default, this area is hidden in the burger menu.
Note: This area appears empty until you create your first localization entry.
Secondary Menu
Create Localization
Three input fields let you create a new localization entry by entering Key, Domain (optional), and Locale. Click the Create Localization button to create it. After creation, select the entry in the list to add the actual translated text.
Pager
Navigation controls for browsing through large numbers of entries.
Filter
Three input fields let you filter the list by Key, Domain, and Content.
Left Sidebar
The sidebar lists all localization entries. Each entry shows its key, and entries with the same key but different locales are grouped together. Click an entry to select it and edit its translations in the main area.
The context menu on each entry provides Edit (opens the properties dialog) and Delete options.
Main Area
When you select a localization entry, the main area shows an editor for that key and all its translations across different locales.
Key and Domain
Two input fields at the top let you edit the key name and domain. Changing the key here updates all translations that share this key.
Save Button
Saves changes to the key and domain fields.
Add Translation Button
Adds a new translation row for an additional locale.
Translations Table
The table shows all translations for the selected key:
| Column | Description |
|---|---|
| (Actions) | Delete and Save buttons for each translation |
| Locale | The language code – edit directly to change |
| Translation | The translated text – edit directly to change |
| ID | The unique identifier (read-only) |
You edit the Locale and Translation fields directly in the table. Click Save on the row to persist your changes.
Related Topics
- Pages & Templates – The Translations section explains the
localize()function, locale resolution, and the Translations flyout
Virtual Types
The Virtual Types area is where you create and configure virtual types – dynamic data transformations that expose transformed data via REST endpoints. Virtual types allow you to present your data in different formats without modifying the underlying schema. You can rename properties, filter objects, apply transformations, and create simplified views of complex data structures. This makes them useful for building APIs that present data differently to different consumers, or for transforming data during import and export operations. By default, this area is hidden in the burger menu.
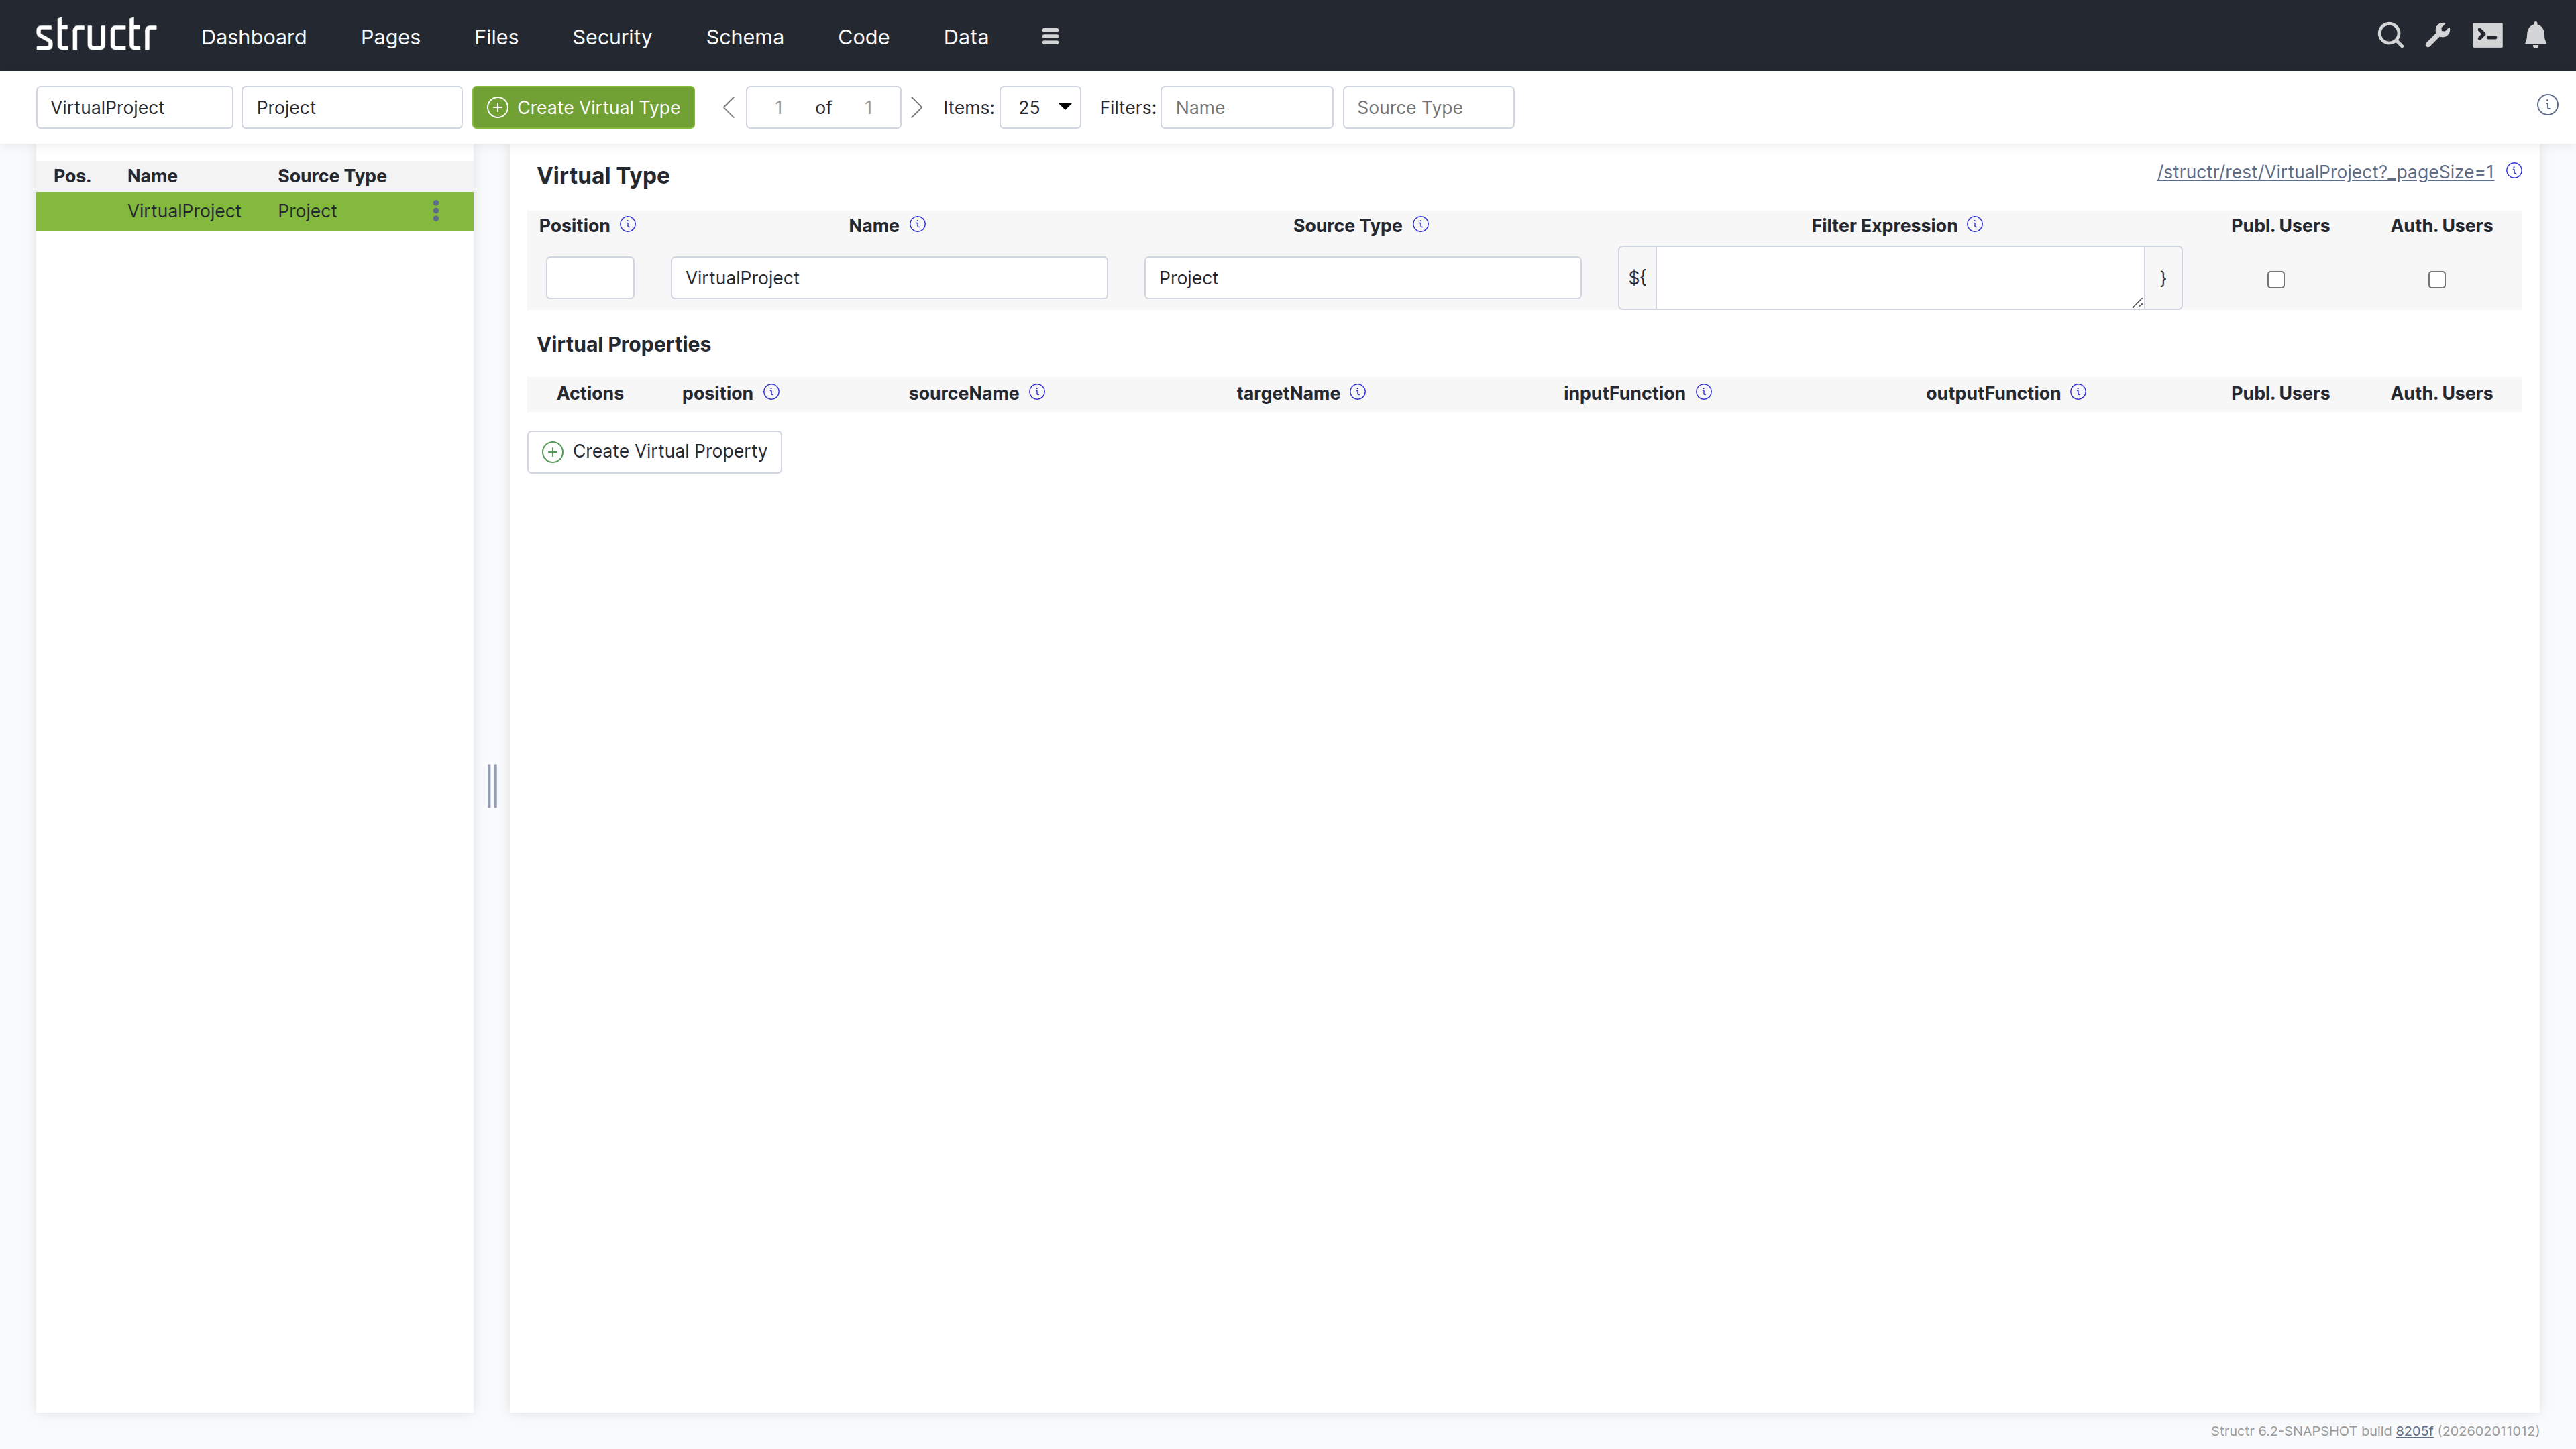
Note: This area appears empty until you create your first virtual type.
Secondary Menu
Create Virtual Type
On the left, two input fields let you enter the Name and Source Type for a new virtual type. Both fields are required. Click the Create button to create it.
Pager
Navigation controls for browsing through large numbers of virtual types.
Filter
Two input fields on the right let you filter the list by Name and Source Type.
Left Sidebar
The sidebar shows a list of all virtual types with the following information:
- Position – The sort order
- Name – The virtual type name
- Source Type – The type that provides the source data
Each entry has a context menu with Edit and Delete options.
Main Area
When you select a virtual type, the main area shows an editor for its configuration. In the top right corner, a link to the REST endpoint for this virtual type is displayed (as an HTML view, same as in the Data area).
Virtual Type Settings
The upper section contains settings for the virtual type itself:
- Position – Controls the sort order in the list
- Name – The name of the virtual type (also determines the REST endpoint URL)
- Source Type – The type that provides the source data
- Filter Expression – An optional script expression that filters which source objects are included
- Visible to Public Users – Checkbox for public visibility
- Visible to Authenticated Users – Checkbox for authenticated user visibility
Virtual Properties Table
Below the settings, a table shows all virtual properties defined for this type. The columns are:
- Actions – Edit and delete buttons
- Position – Sort order of the property
- Source Name – The property name on the source type
- Target Name – The property name in the virtual type output
- Input Function – Optional transformation script for input (used during imports)
- Output Function – Optional transformation script for output
- Public Users – Visibility flag
- Authenticated Users – Visibility flag
Create Virtual Property
A button below the table lets you add new virtual properties.
Related Topics
- Virtual Types – Detailed documentation on data transformation concepts, use cases, and scripting
- Importing Data – Using virtual types for CSV import transformations
- REST Interface – How virtual types create REST endpoints
Mail Templates
The Mail Templates area is where you create and manage email templates for your application. These templates define the content and structure of automated emails such as registration confirmations, password resets, or notification messages. Templates can include template expressions that are replaced with dynamic content when the email is sent, allowing you to personalize messages with user-specific information. Each template can have multiple locale variants to support multi-language applications. By default, this area is hidden in the burger menu.
Note: This area appears empty until you create your first mail template.
Secondary Menu
Create Mail Template
On the left, two input fields let you enter the Name and Locale for a new mail template. Click the Create button to create it.
Template Wizard
The wand button labeled “Create Mail Templates for Processes” opens a wizard that automatically generates mail templates for common workflows:
- User Self-Registration – Templates for the registration confirmation email
- Reset Password – Templates for the password reset email
This saves time when setting up standard authentication workflows.
Pager
Navigation controls for browsing through large numbers of mail templates.
Filter
Two input fields on the right let you filter the list by Name and Locale.
Left Sidebar
The sidebar shows a list of all mail templates. Click on a template to open it in the editor on the right.
Each entry has a context menu with:
- Properties – Opens the Advanced dialog for the mail template, which also includes the Security section
- Delete – Removes the template
Main Area
When you select a mail template, the main area shows an editor with the following sections:
Template Settings
The upper section contains:
- Name – The template name (used to reference the template in code)
- Locale – The language/locale code for this template
- Description – An optional description of the template’s purpose
- Visible to Public Users – Visibility checkbox
- Visible to Authenticated Users – Visibility checkbox
Content Editor
On the left side, a text editor lets you write the email content. You can use template expressions with the ${...} syntax to insert dynamic values that are replaced when the email is sent.
Preview
On the right side, a preview panel shows how the template will look.
Related Topics
- SMTP – Configuring email sending
- User Management – User self-registration and password reset workflows that use mail templates
Configuration Interface
The Configuration Interface provides access to all runtime settings that control Structr’s behavior. You can open it by clicking the wrench icon in the header bar. The interface opens in a new browser tab and requires a separate login using the superuser password defined in structr.conf.

This separation is intentional. The Configuration Interface provides access to sensitive operations that go beyond normal application administration: you can configure database connections, restart services, and define cron expressions for scheduled functions. These capabilities would otherwise require direct access to maintenance commands or configuration files. By requiring a separate authentication with the superuser password, Structr adds an additional layer of security that protects these critical settings even if an attacker gains access to a regular admin account.
Interface Layout
The Configuration Interface uses a different layout than other areas of the Admin UI. The header bar is present at the top, but it contains no main navigation menu. In the top right corner, you find a logout link to end your session in the Configuration Interface.
Instead of a menu, the secondary area below the header provides a search field that filters configuration options by name or description.
The main area is divided into two sections. The left side displays a list of categories. Depending on your screen resolution, this list may appear at the top instead of on the left. Click a category to display its settings on the right side. Each setting shows its current value, default value, and a description of its purpose.
At the bottom of the screen, you find buttons to create new configuration entries, reload the configuration file, and save your changes. When you modify a setting, click Save to structr.conf in the bottom right corner to persist your changes.
Some settings display a small red button next to them. Clicking this button resets the setting to its default value and saves the change automatically. You do not need to click the save button separately for these reset operations.
What You Can Configure
Settings are organized into categories such as application settings, database configuration, HTTP server options, security settings, and more. Most changes take effect immediately, though some require a server restart.
Beyond simple configuration values, the Configuration Interface is currently the only place where you can define cron expressions for user-defined functions. This allows you to schedule functions to run at specific intervals without writing additional code.
For a complete reference of all available settings, see the Settings chapter in the References section.
REST Interface
Overview
The REST interface is the universal application programming interface (API) in Structr. It provides access to all types in the data model, including the internal types that power Structr. The REST API allows you to create, read, update and delete any object in the database, as well as create and run business logic methods and maintenance tasks.
Basics
Endpoints
Structr automatically creates REST endpoints for all types in the data model. There are different types of endpoints: collection resources, which provide access to collections of objects of the corresponding type, and entity resources that allow you to read, update or delete individual objects.
Transactions
All requests made via the REST interface are subject to the ACID principle, meaning each request is processed as a single atomic transaction. If a request is successful, all changes made within that request are guaranteed to be saved in the database. Conversely, if any part of the request fails, all changes are rolled back and the database remains in its previous state. This ensures data consistency even when multiple related objects are created or modified in a single request.
How to access the API
To use the API, you need an HTTP client that supports GET, PUT, POST, PATCH (optional) and DELETE, and a JSON parser/formatter to process the response. Since these technologies are available in all modern browsers, it is very easy to work with the API in a web application using fetch() or libraries like jQuery. The Data Access article shows examples for different HTTP clients.
The example requests in this chapter use curl, a command-line tool available at https://curl.haxx.se/download.html. It might already be installed on your system.
Note: The output of all REST endpoints can also be viewed with a browser. Browser requests send an
HTTP Accept:text/htmlheader which causes Structr to generate the output as HTML.
Data Format
The REST API uses JSON to transfer data. The request body must be valid JSON and it can either be a single object or an array of objects. The response body of any endpoint will always be a JSON Result Object, which is a single object with at least a result entry.
Objects
A valid JSON object consists of quoted key-value mappings where the values can be strings, numbers, objects, arrays or null. Date values are represented by the ISO 8601 international date format string.
{
    "id": "a01e2889c25045bdae6b33b9fca49707",
    "name": "Project #1",
    "type": "Project",
    "description": "An example project",
    "priority": 2,
    "tasks": [
        {
            "id": "dfa33b9dcda6454a805bd7739aab32c9",
            "name": "Task #1",
            "type": "Task"
        },
        {
            "id": "68122629f8e6402a8b684f4e7681653c",
            "name": "Task #2",
            "type": "Task"
        }
    ],
    "owner": {},
    "other": null,
    "example": {
        "name": "A nested example object",
        "fields": []
    },
    "createdDate": "2020-04-21T18:31:52+0200"
}
The JSON object above is a part of an example result produced by the /Project endpoint. You can see several different nested objects in the result: the root object is a Project node, the tasks array contains two Task objects, and the owner is an empty object because the view has no fields for this type. (All these details will be explained in the following sections).
Nested Objects
One of the most important and powerful functions of the Structr REST API is the ability to transform nested JSON objects into graph structures, and vice versa. The transformation is based on contextual properties in the data model, which encapsulate the relationships between nodes in the graph.
You can think of the data model as a blueprint for the structures that are created in the database. If you specify a relationship between two types, each of them gets a contextual property that manages the association. In this example, we use Project and Task, with the following schema.
Input and Output
The general rule is that the input format for objects is identical to the output format, so you can use (almost) the same JSON to create or update objects as you get as a response.
For example, when you create a new project, you can specify an existing Task object in the tasks array to associate it with the project. You can leave out the id and type properties for the new object, because they are filled by Structr once the object is created in the database.
Create a new object and associate an existing task
{
    "name": "Project #2",
    "description": "A second example project",
    "priority": 1,
    "tasks": [
        {
        "id": "dfa33b9dcda6454a805bd7739aab32c9",
        }
    ]
}
Reference by UUID
The reference to an existing object is established with the id property. The property contains the UUID of the object, which is the primary identifier. Because the UUID represents the identity, you can use it instead of the object itself when specifying a reference to an existing object, like in the following example.
Markdown Rendering Hint: MarkdownTopic(Short Form) not rendered because level 5 >= maxLevels (5)
Reference by property value
It is also possible to use properties other than id to reference an object, for example name, or a numeric property like originId etc. The only requirement is a uniqueness constraint on the corresponding property to avoid ambiguity.
Markdown Rendering Hint: MarkdownTopic(Short Form) not rendered because level 5 >= maxLevels (5)
Errors
If a request causes an error on the server, Structr responds with a corresponding HTTP status code and an error response object. You can find a list of possible status codes in the Troubleshooting Guide. The error response object looks like this.
Error Response Object
{
    "code": 422,
    "message": "Unable to commit transaction, validation failed",
    "errors": [
        {
        "type": "Project",
        "property": "name",
        "token": "must_not_be_empty"
        }
    ]
}
It contains the following fields:
| Name | Description |
|---|---|
| code | HTTP status code |
| message | Status message |
| errors | Array of error objects |
Error Objects
Error objects contain detailed information about an error. There can be multiple error objects in a single error response. An error object contains the following fields.
| Name | Description |
|---|---|
| type | Data type of the erroneous object |
| property | Name of the property that caused the error (optional) |
| token | Error token |
| details | Details (optional) |
Note: If an error occurs in a request, the whole transaction is rolled back and no changes will be made to the database contents.
Related Topics
- Authentication – Explains how to authenticate requests and configure access permissions for endpoints
- Data Access – Covers reading, creating, updating, and deleting objects through the API
- Views – Describes how to control which properties appear in API responses
Authentication
REST endpoints are protected by a security layer called Resource Access Permissions that controls which endpoints each type of user can access. This article explains how to configure these permissions and how to set up CORS for cross-origin requests.
For general information about authentication methods (sessions, JWT, OAuth, two-factor authentication), see the Security chapter.
Resource Access Permissions
Non-admin users require explicit permission to fetch data from REST endpoints. Resource Access Permissions define which endpoints each user category can access. Consider the following request:
curl:
curl -s http://localhost:8082/structr/rest/User
Response:
{
    "code": 401,
    "message": "Forbidden",
    "errors": []
}
Access to the User collection was denied. If you look at the log file, you can see a warning message because access to resources without authentication is prohibited by default:
2020-04-19 11:40:15.775 [qtp1049379734-90] INFO o.structr.web.auth.UiAuthenticator - Found no resource access permission for anonymous users with signature 'User' and method 'GET'.
Signature
Resource Access Permissions consist of a signature and a set of flags that control access to individual REST endpoints. The signature of an endpoint is based on its URL, replacing any UUID with _id, plus a special representation for the view (the view’s name, capitalized and with a leading underscore).
The signature of a schema method equals its name, but capitalized. The following table shows examples for different URLs and the resulting signatures:
| Type | URL | Signature |
|---|---|---|
| Collection | /structr/rest/Project | Project |
| Collection with view | /structr/rest/Project/ui | Project/_Ui |
| Collection with view | /structr/rest/Project/info | Project/_Info |
| Object with UUID | /structr/rest/Project/362cc05768044c7db886f0bec0061a0a | Project/_id |
| Object with UUID and view | /structr/rest/Project/362cc05768044c7db886f0bec0061a0a/info | Project/_id/_Info |
| Subcollection | /structr/rest/Project/362cc05768044c7db886f0bec0061a0a/tasks | Project/_id/Task |
| Schema Method | /structr/rest/Project/362cc05768044c7db886f0bec0061a0a/doUpdate | Project/_id/DoUpdate |
Finding the Correct Signature
If access to an endpoint is denied because of a missing Resource Access Permission, you can find the required signature in the log file:
Found no resource access permission for anonymous users with signature 'User/_id' and method 'GET'.
Flags
The flags property of a Resource Access Permission is a bitmask based on an integer value where each bit controls one permission. You can either set all flags at once with the corresponding integer value, or click the checkboxes in the Admin UI to toggle individual permissions.
Anonymous Access
With the default configuration, anonymous users cannot access any endpoints. To allow anonymous access to an endpoint, you must grant permission explicitly and separately for each HTTP method. Use the “Non-authenticated Users” flags in Resource Access Permissions for this purpose.
Without endpoint access permission:
curl -s http://localhost:8082/structr/rest/Project
{
    "code": 401,
    "message": "Forbidden",
    "errors": []
}
With endpoint access permission:
curl -s http://localhost:8082/structr/rest/Project
{
    "result": [],
    "query_time": "0.000127127",
    "result_count": 0,
    "page_count": 0,
    "result_count_time": "0.000199823",
    "serialization_time": "0.001092944"
}
Now you can access the endpoint, but you still don’t see any data because no project nodes are visible for anonymous users. Visibility is controlled separately through visibility flags on each object (see User Management in the Security chapter).
Authenticated Users
With the default configuration, non-admin users cannot access any endpoints. To allow non-admin users access to an endpoint, you must grant permission explicitly and separately for each HTTP method. Use the “Authenticated Users” flags in Resource Access Permissions for this purpose.
Cross-Origin Resource Sharing (CORS)
When your frontend runs on a different domain than your Structr backend, browsers block requests by default. This security feature is called the same-origin policy. CORS headers tell browsers which cross-origin requests to allow.
When You Need CORS
CORS configuration is required when:
- Your frontend is served from a different domain than Structr
- You’re developing locally with a frontend on a different port
- You’re building a single-page application that calls the Structr API
CORS Settings
Each CORS entry configures response headers for a URL path:
| Setting | HTTP Header | Purpose |
|---|---|---|
| Accepted Origins | Access-Control-Allow-Origin | Which domains can make requests (* for any) |
| Max Age | Access-Control-Max-Age | How long browsers cache preflight responses (seconds) |
| Allow Methods | Access-Control-Allow-Methods | Which HTTP methods are permitted |
| Allow Headers | Access-Control-Allow-Headers | Which request headers clients can send |
| Allow Credentials | Access-Control-Allow-Credentials | Whether to include cookies |
| Expose Headers | Access-Control-Expose-Headers | Which response headers JavaScript can access |
Common Patterns
For development with a local frontend:
| Setting | Value |
|---|---|
| Path | /structr/rest |
| Accepted Origins | http://localhost:3000 |
| Allow Methods | GET, POST, PUT, DELETE, OPTIONS |
| Allow Headers | Content-Type, Authorization |
| Allow Credentials | true |
For a public API:
| Setting | Value |
|---|---|
| Path | /structr/rest |
| Accepted Origins | * |
| Allow Methods | GET, POST |
| Allow Headers | Content-Type |
Configure CORS settings in the Security area of the Admin UI under the CORS tab.
Related Topics
- Security - Authentication methods, users, groups, and the permission system
- Data Access - Once authentication is configured, this article explains how to read, create, update, and delete objects
- Admin UI / Security - How to manage users, groups, and Resource Access Permissions in the Admin UI
Data Access
This article explains how to read, create, update, and delete objects through the REST API. It assumes you understand the basics covered in the Overview article and have configured authentication as described in the Authentication article.
There are two different endpoint types in the REST API:
- Collection Endpoints – Access collections of objects, with support for pagination, searching, and filtering
- Entity Endpoints – Access individual objects by UUID, including executing methods
The examples in this chapter use HTTP header-based authentication with the default admin user that Structr creates on first startup.
Collection Endpoints
Collection endpoints provide access to collections of objects and support pagination, searching, filtering and bulk editing. The example request below accesses the endpoint for the type Project and fetches all existing objects.
Request
$ curl -s -HX-User:admin -HX-Password:admin http://localhost:8082/structr/rest/Project
If the request is successful, the result object contains one or more objects and some metadata.
Response
{
    "result": [
        {
            "id": "c624511baa534ece9678f9d212711a9d",
            "type": "Project",
            "name": "Project #1"
        },
        {
            "id": "85889e5ff1cd4bb39dc32076516504ce",
            "type": "Project",
            "name": "Project #2"
        }
    ],
    "query_time": "0.000026964",
    "result_count": 2,
    "page_count": 1,
    "result_count_time": "0.000076108",
    "serialization_time": "0.000425659"
}
Result Object
| Key | Description |
|---|---|
result | Array of result objects |
query_time | Time it took to run the query (in seconds) |
result_count | Number of results in the database (if fewer than the soft limit) |
page_count | Number of pages in a paginated result |
result_count_time | Time it took to count the result objects (in seconds) |
serialization_time | Time it took to serialize the JSON response (in seconds) |
Pagination
The number of results returned by a GET request to a collection resource can be limited with the request parameter _pageSize. This so-called pagination depends on a combination of the parameters _pageSize and _page. The _page parameter has a default value of 1, so you can omit it to get the first page of the paginated results.
Note: Starting with Structr 4.0, the built-in request parameters must be prefixed with an underscore, i.e. pageSize becomes _pageSize. This change was introduced to prevent name clashes with user-defined attributes. If your installation runs on a version prior to 4.0, simply omit the underscore.
Markdown Rendering Hint: MarkdownTopic(Fetch the First 10 Projects) not rendered because level 5 >= maxLevels (5)
Markdown Rendering Hint: MarkdownTopic(Fetch the Next 10 Projects) not rendered because level 5 >= maxLevels (5)
Sorting
By default, the results of a GET request are unordered, and the desired sort order can be controlled with the (optional) parameters _sort and _order. You can sort the result by one or more indexed property value (including Function Property results), in ascending (_order=asc) or descending order (_order=desc), as shown in the following examples. The default sort order is ascending order. String sort order depends on the case of the value, i.e. upper case Z comes before lower case a.
To sort the result based on multiple fields, repeat the _sort and _order parameters in the request URL for each property you want to sort by. The order of appearance of the fields in the URL determines the priority.
$ curl -s -HX-User:admin -HX-Password:admin http://localhost:8082/structr/rest/Project?_sort=name
$ curl -s -HX-User:admin -HX-Password:admin http://localhost:8082/structr/rest/Project?_sort=name&_order=desc
$ curl -s -HX-User:admin -HX-Password:admin "http://localhost:8082/structr/rest/Project?_sort=status&_sort=name&_order=desc&_order=asc"
Null Values
If a sorted collection includes objects with null values, those objects are placed at the end of the collection for ascending order (“nulls last”), or at the beginning of the collection for descending order.
Empty Values
Empty string values are not treated like null, but are instead placed at the beginning of the collection for ascending order, or at the end of the collection for descending order.
Searching
To search for objects with a specific value, you can simply put the property name with the desired value in a request parameter, as shown in the following example.
$ curl -s -HX-User:admin -HX-Password:admin http://localhost:8082/structr/rest/Project?name=Project1
These simple value-based filters can also be used on contextual properties, e.g. you can select all projects with a specific owner.
$ curl -s -HX-User:admin -HX-Password:admin http://localhost:8082/structr/rest/Project?owner=5c08c5bd41164e558e9388c22752d273
You can also search for multiple values at once, resulting in an “OR” conjunction, with the ; character between the values:
$ curl -s -HX-User:admin -HX-Password:admin "http://localhost:8082/structr/rest/Project?name=Project1;Project2"
Indexing
Please note that you can only search for objects based on indexed and contextual properties, so make sure to set the indexed flag (and a type hint for Function Properties) in the data model. Setting the flag is necessary because Structr maintains indexes in the database to provide better search performance, and the creation and deletion of these indexes is coupled to indexed flag.
Advanced Search Capabilities
Besides simple value-based filters, Structr also supports other search methods:
- inexact search
- geographical distance search
- range queries
- empty / non-empty values
Markdown Rendering Hint: MarkdownTopic(Inexact Search) not rendered because level 5 >= maxLevels (5)
Markdown Rendering Hint: MarkdownTopic(Distance Search) not rendered because level 5 >= maxLevels (5)
Markdown Rendering Hint: MarkdownTopic(Range Filters) not rendered because level 5 >= maxLevels (5)
Markdown Rendering Hint: MarkdownTopic(Date Ranges) not rendered because level 5 >= maxLevels (5)
Markdown Rendering Hint: MarkdownTopic(Empty Values) not rendered because level 5 >= maxLevels (5)
More Search Options
If you need more search options, e.g. search on multiple types, faceted search etc., have a look at the following options:
- create a common base type and use the collection resource of that type to search for objects of different types
- create a search page with an embedded script to run custom queries, process the results and return a JSON result
- use the Cypher endpoint to use graph queries
- Every type in the inheritance hierarchy defines its own collection resource, so you can access different types that share the same base class under a common URL.
Entity Endpoints
Entity endpoints can be used to fetch the contents of a single object (using a GET request), to update an object (using PUT), or to delete an object (DELETE). Entity endpoints can also be used to execute schema methods. Access to entity endpoints and the corresponding responses are a little bit different to those of collection endpoints. The URL usually ends with a UUID, or with the name of method to be executed, and the response object contains only a single object instead of a collection.
Fetching an object by UUID
$ curl -s -HX-User:admin -HX-Password:admin http://localhost:8082/structr/rest/Project/c431c1b5020f4430808f9b330a123159
Response
{
    "result": {
        "id": "c431c1b5020f4430808f9b330a123159",
        "type": "Project",
        "name": "New Project 2"
    },
    "query_time": "0.000851438",
    "result_count": 1,
    "page_count": 1,
    "result_count_time": "0.000054867",
    "serialization_time": "0.000185543"
}
Note: The result key contains a single object instead of an array.
Executing a schema method
You can execute schema methods by sending a POST request with optional parameters in the request body to the entity resource URL of an object, as shown in the following example.
The example request causes the schema method myUpdateMethod to be executed on the project node with the UUID c431c1b5020f4430808f9b330a123159, with the parameters parameter1=test, parameter2=123.
$ curl -s -HX-User:admin -HX-Password:admin http://localhost:8082/structr/rest/Project/c431c1b5020f4430808f9b330a123159/myUpdateMethod -XPOST -d '{
    "parameter1": "test",
    "parameter2: 123
}'
Markdown Rendering Hint: MarkdownTopic(Response) not rendered because level 5 >= maxLevels (5)
Executing a maintenance command
You can execute a maintenance command by sending a POST request to the maintenance endpoint of the corresponding maintenance command.
$ curl -s -HX-User:admin -HX-Password:admin http://localhost:8082/structr/rest/maintenance/rebuildIndex -XPOST
Markdown Rendering Hint: MarkdownTopic(Response) not rendered because level 5 >= maxLevels (5)
View Selection
A View is a named group of properties that specifies the contents of an object in the JSON output. We recommend to create dedicated views for the individual consumers of your API, to optimize data transfer and allow for independent development and modification of the endpoints.
You can select any of the Views defined in the data model by appending its name to the request URL. If the URL does not contain a view, the public view is selected automatically.
Default View (public)
$ curl -s -HX-User:admin -HX-Password:admin http://localhost:8082/structr/rest/Project?_sort=name
Markdown Rendering Hint: MarkdownTopic(Result) not rendered because level 5 >= maxLevels (5)
Manual View Selection (info)
The next request selects the info view, so the result object is different from the previous one. Note that view selection is important in fetch() and jQuery $.ajax() as well, because the view controls which properties are available in the resulting JSON object.
Markdown Rendering Hint: MarkdownTopic(fetch()) not rendered because level 5 >= maxLevels (5)
Markdown Rendering Hint: MarkdownTopic(jQuery) not rendered because level 5 >= maxLevels (5)
Markdown Rendering Hint: MarkdownTopic(curl) not rendered because level 5 >= maxLevels (5)
Markdown Rendering Hint: MarkdownTopic(Result) not rendered because level 5 >= maxLevels (5)
Output Depth of result
If a view is created on multiple node types and contains remote node objects, then the output depth of the result JSON is restricted to the level of 3 by default. This is to prevent the whole graph from being rendered, which could happen in some scenarios like trees for examples.
With the query parameter _outputNestingDepth the output depth of the result JSON can be adjusted to the desired level.
Creating Objects
To create new objects in the database, you send a POST request to the collection resource endpoint of the target type. If the request body contains JSON data, the data will be stored in the new object. If the request does not contain a JSON body, it creates an “empty” object which only contains the properties that are assigned by Structr automatically.
fetch()
fetch('/structr/rest/Project/info', {
    method: 'POST',
    credentials: 'include',
    body: JSON.stringify({
        name: "New Project"
    }),
}).then(function(response) {
    return response.json();
}).then(function(json) {
    json.result.forEach(project => {
        // process result
    });
});
jQuery
$.ajax({
    url: '/structr/rest/Project/info',
    method: 'POST',
    data: JSON.stringify({
        name: "New Project"
    }),
    statusCode: {
        201: function(result) {
            result.forEach(function(project) {
                // process result
            });
        }
    }
});
curl
$ curl -s -HX-User:admin -HX-Password:admin http://localhost:8082/structr/rest/Project -XPOST -d '{ "name": "New Project" }'
Response
If the request results in the creation of a new object, Structr responds with an HTTP status of 201 Created and the UUID of the new object in the result.
{
    "result": [
        "b0f7e79a17c649a9934687554990acd5"
    ],
    "result_count": 1,
    "page_count": 1,
    "result_count_time": "0.000048183",
    "serialization_time": "0.000224176"
}
Creating Multiple Objects
You can create more than one object of the same type in a single request by sending an array of JSON objects in the request body, as shown in the next example. Doing so has the advantage that all objects are created in a single transaction, so either all objects are created, or none, if an error occurs. It is also much more efficient because the transaction overhead is incurred only once.
fetch()
fetch('/structr/rest/Project/info', {
    method: 'POST',
    credentials: 'include',
    body: JSON.stringify([
        { "name": "New Project 2" },
        { "name": "Another project" },
        { "name": "Project X", "description": "A secret Project" }
    ]),
}).then(function(response) {
    return response.json();
}).then(function(json) {
    json.result.forEach(newProjectId => {
        // process result
    });
});
jQuery
$.ajax({
    url: '/structr/rest/Project/info',
    method: 'POST',
    data: JSON.stringify([
        { "name": "New Project 2" },
        { "name": "Another project" },
        { "name": "Project X", "description": "A secret Project" }
    ]},
    statusCode: {
        201: function(result) {
            result.forEach(function(project) {
                // process result
            });
        }
    }
});
curl
$ curl -s -HX-User:admin -HX-Password:admin http://localhost:8082/structr/rest/Project -XPOST -d '
    [
    { "name": "New Project 2" },
    { "name": "Another project" },
    { "name": "Project X", "description": "A secret Project" }
    ]'
Response
{
    "result": [
        "c431c1b5020f4430808f9b330a123159",
        "4384f4685a4a41d09d4cfa1cb34c3024",
        "011c26a452e24af0a3973862a305907c"
    ],
    "result_count": 3,
    "page_count": 1,
    "result_count_time": "0.000038485",
    "serialization_time": "0.000152850"
}
Updating Objects
To update an existing object, you must know its UUID. You can then send a PUT request to the entity endpoint of the object which is either /structr/rest/
fetch()
fetch('/structr/rest/Project/' + id, {
    method: 'PUT',
    credentials: 'include',
    body: JSON.stringify({
        "name": "Updated name"
    }),
}).then(function(response) {
    return response.json();
}).then(function(json) {
    // process result
});
jQuery
$.ajax({
    url: '/structr/rest/Project/' + id,
        method: 'PUT',
        data: JSON.stringify({
        "name": "Updated name"
    }),
    statusCode: {
        200: function(result) {
            // process result
        }
    }
});
curl
$ curl -s -HX-User:admin -HX-Password:admin http://localhost:8082/structr/rest/Project/c431c1b5020f4430808f9b330a123159 -XPUT -d '{ "name": "Updated name" }'
The response of a successful PUT request contains the status code 200 OK with an empty result object.
Updating Multiple Objects
To update multiple objects at once, you can use the HTTP PATCH method on the collection resource of the target type, as shown in the following example.
Markdown Rendering Hint: MarkdownTopic(fetch()) not rendered because level 5 >= maxLevels (5)
Markdown Rendering Hint: MarkdownTopic(jQuery) not rendered because level 5 >= maxLevels (5)
Markdown Rendering Hint: MarkdownTopic(curl) not rendered because level 5 >= maxLevels (5)
Deleting Objects
To delete objects, you can send a DELETE request, either to the entity resource of an existing object, or to the collection resource of a type. If you want to delete more than one object, you can use DELETE analogous to GET to delete all objects that would be returned by a GET request, including filters but without pagination.
Note: If you send an unintended DELETE request to the collection resource, for example, because you have not checked that the id parameter is empty, you delete all objects in that collection.
fetch()
fetch('/structr/rest/Project/' + id, {
    method: 'DELETE',
    credentials: 'include',
}).then(function(response) {
    return response.json();
}).then(function(json) {
    // process result
});
jQuery
$.ajax({
    url: '/structr/rest/Project/' + id,
    method: 'DELETE',
    statusCode: {
        200: function(result) {
            // process result
        }
    }
});
curl
$ curl -s -HX-User:admin -HX-Password:admin http://localhost:8082/structr/rest/Project/c431c1b5020f4430808f9b330a123159 -XDELETE
The response of a successful DELETE request contains the status code 200 OK with an empty result object.
Deleting Multiple Objects
Markdown Rendering Hint: MarkdownTopic(fetch()) not rendered because level 5 >= maxLevels (5)
Markdown Rendering Hint: MarkdownTopic(jQuery) not rendered because level 5 >= maxLevels (5)
Markdown Rendering Hint: MarkdownTopic(curl) not rendered because level 5 >= maxLevels (5)
Deleting All Objects Of The Same Type
$ curl -s -HX-User:admin -HX-Password:admin "http://localhost:8082/structr/rest/Project"
This will delete all objects in the target resource.
Note: Beware that this will also delete all objects of inheriting types!
To only delete objects of a certain type without deleting inheriting types, we can use the internal type attribute as an additional filter as shown in the next query.
$ curl -s -HX-User:admin -HX-Password:admin "http://localhost:8082/structr/rest/Project?type=Project"
Related Topics
- Authentication – Authentication methods and access permissions
- Data Model – Defining types, properties, and relationships that the API exposes
Virtual Types
Virtual Types create custom REST endpoints that transform and filter data from existing types. They allow you to expose different views of your data without modifying your schema or duplicating data in the database.
How Virtual Types Work
Each Virtual Type is based on a Source Type. When you request the Virtual Type’s REST endpoint, Structr retrieves instances of the Source Type, applies an optional filter expression, and transforms each object according to your Virtual Property definitions. The transformed data is returned directly - nothing is stored in the database.
The REST endpoint is automatically created at:
/structr/rest/{VirtualTypeName}
For example, a Virtual Type named PublicProject creates an endpoint at /structr/rest/PublicProject.
Accessing Virtual Types
You access Virtual Types through the REST API just like regular types:
curl:
curl http://localhost:8082/structr/rest/PublicProject \
  -H "X-User: admin" \
  -H "X-Password: admin"
JavaScript:
const response = await fetch('/structr/rest/PublicProject', {
    headers: {
        'Content-Type': 'application/json'
    }
});

const data = await response.json();
The response has the same structure as any other REST endpoint:
{
    "result": [
        {
            "id": "a3f8b2c1-d4e5-f6a7-b8c9-d0e1f2a3b4c5",
            "type": "PublicProject",
            "name": "Project Alpha",
            "status": "active",
            "managerName": "Jane Smith"
        }
    ],
    "result_count": 1,
    "page_count": 1,
    "query_time": "0.000127127",
    "serialization_time": "0.001092944"
}
Notice that the type field shows the Virtual Type name, and properties like managerName can be computed values that don’t exist on the source type.
Configuration
Virtual Types are configured in the Admin UI under the Virtual Types area. Each Virtual Type has:
Source Type
The Source Type provides the data that the Virtual Type transforms. All instances of this type are candidates for inclusion in the Virtual Type’s output.
Filter Expression
The Filter Expression is a script that determines which source objects appear in the output. Only objects for which the expression returns true are included.
For example, to expose only active projects:
$.this.status === 'active'
Or to expose only projects visible to the current user:
$.this.visibleToAuthenticatedUsers === true
Virtual Properties
Virtual Properties define which properties appear in the output and how they are transformed. Each Virtual Property has:
| Setting | Description |
|---|---|
| Source Name | The property name on the Source Type |
| Target Name | The property name in the Virtual Type output |
| Input Function | Transforms data during input operations (e.g., CSV import) |
| Output Function | Transforms data during output operations (REST responses) |
If you only specify Source Name and Target Name, the property value is passed through unchanged. Use Output Functions when you need to transform or compute values.
Output Functions
Output Functions transform property values when data is read through the REST endpoint. The function receives the source object as $.this and returns the transformed value.
Renaming Properties
To expose a property under a different name, create a Virtual Property with the desired Target Name and a simple Output Function:
$.this.internalProjectCode
This exposes the internal internalProjectCode property as whatever Target Name you specify.
Computed Properties
Output Functions can compute values that don’t exist on the source type:
Full name from parts:
$.this.firstName + ' ' + $.this.lastName
Age from birth date:
Math.floor((Date.now() - new Date($.this.birthDate).getTime()) / (365.25 * 24 * 60 * 60 * 1000))
Related data:
$.this.manager ? $.this.manager.name : 'Unassigned'
Formatting Values
Output Functions can format values for display:
Date formatting:
$.date_format($.this.createdDate, 'yyyy-MM-dd')
Currency formatting:
'$' + $.this.amount.toFixed(2)
Input Functions
Input Functions transform data during write operations, primarily used for CSV import. When you import data through a Virtual Type, Input Functions convert the incoming values before they are stored.
For example, to parse a date string during import:
$.parse_date($.input, 'MM/dd/yyyy')
The incoming value is available as $.input.
Use Cases
API Facades
Create simplified views for external consumers without exposing your internal data model. You can flatten nested structures, rename properties to match external specifications, or hide internal fields:
A Virtual Type PublicProject might expose only name, status, and description from a Project type that has many more internal properties.
Filtered Endpoints
Create endpoints that return subsets of data without requiring query parameters:
ActiveProject- only projects with status “active”MyTasks- only tasks assigned to the current user (using$.mein the filter)RecentOrders- only orders from the last 30 days
Computed Views
Expose calculated values without storing them:
- Project progress percentage calculated from completed vs. total tasks
- User display names combined from first and last name
- Aggregated totals from related objects
CSV Import Mapping
Virtual Types serve as the mapping layer for CSV imports. Each column maps to a Virtual Property, and Input Functions handle data conversion. For details, see the Data Creation & Import chapter.
Limitations
Virtual Types transform data at read time. They do not support:
- Creating new objects (POST requests)
- Updating objects (PUT/PATCH requests)
- Deleting objects (DELETE requests)
For write operations, use the source type’s REST endpoint directly.
Related Topics
- Overview - REST API fundamentals and data format
- Data Access - Reading and writing data through the REST API
- Authentication - Securing REST endpoints with Resource Access Permissions
- Data Creation & Import - Using Virtual Types for CSV import transformations
- Admin User Interface / Virtual Types - The interface for creating and configuring Virtual Types
System endpoints
| Name | Description |
|---|---|
Reset password endpoint | |
User self-registration endpoint | |
Login endpoint | |
JWT token endpoint | |
Logout endpoint | |
Schema information endpoint | |
HTTP access statistics endpoint | |
Runtime event log endpoint | |
Direct Cypher query endpoint | |
Structr environment information endpoint | |
User information endpoint | HTTP endpoint that always returns the current user as a JSON object. URL path is /me. |
Statistics Log endpoint | |
Maintenance command execution endpoint |
Markdown Rendering Hint: Children of Topic(System endpoints) not rendered because MarkdownTableFormatter prevents rendering of children.
Servlets
| Name | Description |
|---|---|
LoginServlet | |
HistogramServlet | |
ProxyServlet | |
HealthCheckServlet | |
LogoutServlet | |
UploadServlet | File upload endpoint. |
HtmlServlet | Main entry point for HTML rendering. |
EventSourceServlet | |
TokenServlet | JWT token endpoint |
DeploymentServlet | |
MetricsServlet | |
JsonRestServlet | |
OpenAPIServlet | |
DocumentationServlet | |
ConfigServlet | |
CsvServlet | |
FlowServlet | |
PdfServlet |
Markdown Rendering Hint: Children of Topic(Servlets) not rendered because MarkdownTableFormatter prevents rendering of children.
Request parameters
Structr’s HTTP API supports a number of custom request parameters to influence the behaviour of the endpoints.
| Key | Name | Description |
|---|---|---|
_page | Page number | Request parameter used for pagination, sets the page number, value can be any positive integer > 0. |
_pageSize | Page size | Request parameter used for pagination, sets the page size. |
_sort | Sort key | Request parameter used for sorting, sets the sort key. |
_order | Sort order | Request parameter used for sorting, sets the sort order, value can be ‘asc’ or ‘desc’ for ascending or descending order. |
_inexact | Search type | Request parameter that activates inexact search. |
_latlon | Latitude/Longitude | Request parameter used for distance search, specifies the center point of the distance search in the form latitude,longitude. |
_location | Location (country, city, street) | Request parameter used for distance search, specifies the center point of the distance search in the form country,city,street. |
_country | Country | Request parameter used for distance search, specifies the center point of the search circle together with _postalCode, _city, _street. |
_postalCode | Postal code | Request parameter used for distance search, specifies the center point of the search circle together with _country, _city, _street. |
_city | City | Request parameter used for distance search, specifies the center point of the search circle together with _country, _postalCode, _street. |
_street | Street | Request parameter used for distance search, specifies the center point of the search circle together with _country, _postalCode, _city. |
_distance | Distance in kilometers | Request parameter used for distance search, specifies the radius of the search circle. |
_outputNestingDepth | JSON Nesting Depth | You can control how deeply nested objects are serialized in REST responses using the _outputNestingDepth request parameter. By default, Structr serializes nested objects to a depth of three levels, but increasing the nesting depth includes more levels of related objects in the response. This is useful when you need to access deeply nested relationships without making multiple requests. |
_filename | Download filename | Request parameter that sets the ‘filename’ part of the Content-Disposition: attachment response header. |
_as-data-url | Download as data URL | Request parameter that controls the response format of a file download. If set (with any value), it causes the file data to be returned in Base64 format ready to be used in a data URL. |
_locale | Locale | Request parameter that overrides the locale for the current request. |
Markdown Rendering Hint: Children of Topic(Request parameters) not rendered because MarkdownTableFormatter prevents rendering of children.
Request headers
Structr’s HTTP API supports a number of custom request headers to influence the behaviour of the endpoints.
| Name | Description |
|---|---|
Accept | |
Access-Control-Request-Headers | |
Access-Control-Request-Method | |
Authorization | |
Cache-Control | |
Content-Type | |
Expires | |
If-Modified-Since | |
Last-Modified | |
Origin | |
Pragma | |
Refresh-Token | |
Range | |
Structr-Return-Details-For-Created-Objects | |
Structr-Websocket-Broadcast | |
Structr-Cascading-Delete | |
Structr-Force-Merge-Of-Nested-Properties | |
Vary | |
X-Forwarded-For | |
X-User | Custom request header to authenticate single requests with username / password, used in header-based authentication. |
X-Password | Custom request header to authenticate single requests with username / password, used in header-based authentication. |
X-StructrSessionToken | Custom request header to authenticate single requests with sessionToken, used in header-based authentication. |
X-Structr-Edition | Custom response header sent by some Structr versions to indicate the Structr Edition that is running. |
X-Structr-Cluster-Node |
Markdown Rendering Hint: Children of Topic(Request headers) not rendered because MarkdownTableFormatter prevents rendering of children.
Security
Overview
Structr provides a security system that controls who can access your application and what they can do. This chapter covers authentication (verifying identity), authorization (granting permissions), and the tools to manage both.
Core Concepts
Structr’s security model is built on four pillars:
| Concept | Question it answers | Key mechanism |
|---|---|---|
| Users & Groups | Who are the actors? | User accounts, group membership, inheritance |
| Authentication | How do we verify identity? | Sessions, JWT, OAuth, two-factor |
| Permissions | What can each actor do? | Ownership, grants, visibility flags |
| Access Control | Which endpoints are accessible? | Resource Access Permissions |
These concepts work together: a request arrives, Structr authenticates the user (or treats them as anonymous), then checks permissions for the requested operation.
Authentication
When a request reaches Structr, the authentication system determines the user context. Structr checks for a session cookie first, then for a JWT token in the Authorization header, then for X-User and X-Password headers. If none of these are present, Structr treats the request as anonymous.
Structr supports multiple authentication methods that you can combine based on your needs:
| Scenario | Recommended method |
|---|---|
| Web application with login form | Sessions |
| Single-page application (SPA) | JWT |
| Mobile app | JWT |
| Login via external provider (Google, Azure, GitHub) | OAuth |
| Your server calling Structr API | JWT or authentication headers |
| External system with its own identity provider | JWKS validation |
| High-security requirements | Any method combined with two-factor authentication |
The distinction between the last two server scenarios: when your own backend calls Structr, you control the credentials and can use JWT tokens that Structr issues or simple authentication headers. When an external system (like an Azure service principal) calls Structr with tokens from its own identity provider, Structr validates those tokens against the provider’s JWKS endpoint.
Permission Resolution
Once Structr knows who is making the request, it evaluates permissions for every operation the user attempts. Structr checks permissions in a specific order and stops at the first match:
- Admin users bypass all permission checks
- Visibility flags grant read access to public or authenticated users
- Ownership grants full access to the object creator
- Direct grants check SECURITY relationships to the user or their groups
- Schema permissions check type-level grants for groups
- Graph resolution follows permission propagation paths through relationships
For details on each level, see the User Management article.
Getting Started
Basic Web Application
A basic security setup for a typical web application involves creating users and groups in the Security area of the Admin UI, creating a Resource Access Permission with signature _login that allows POST for public users, implementing a login form that posts to /structr/rest/login, and configuring permissions on your data types.
Adding OAuth
To add OAuth login, register your application with the OAuth provider, configure the provider settings in structr.conf, add login links pointing to /oauth/<provider>/login, and optionally implement onOAuthLogin to customize user creation.
Adding Two-Factor Authentication
To add two-factor authentication, set security.twofactorauthentication.level to 1 (optional) or 2 (required), create a two-factor code entry page, and update your login flow to handle the 202 response.
Securing an API
To secure a REST API for external consumers, create Resource Access Permissions for each endpoint you want to expose, configure JWT settings in structr.conf, implement token request and refresh logic in your API clients, and optionally configure CORS if clients run in browsers.
Related Topics
- REST Interface / Authentication - Resource Access Permissions and CORS configuration
- SSL Configuration - Installing SSL certificates for HTTPS
- Configuration Interface - Security-related settings in structr.conf
- Admin UI / Security - Managing users and groups through the graphical interface
User Management
Structr provides a multi-layered security system that combines user and group management with flexible permission resolution. This chapter covers how to manage users and groups, how authentication works, and how permissions are resolved.
Users
The User type is a built-in type in Structr that represents user accounts in your application. Users can authenticate, own objects, receive permissions, and belong to groups. Every request to Structr is evaluated in the context of a user - either an authenticated user or an anonymous user.
You can use the User type directly, extend it with additional properties, or create subtypes for specialized user categories in your application.
Creating Users
You can create users through the Admin UI or programmatically.
Via Admin UI:
- Navigate to the Security area
- Click “Add User”
- Structr creates a new user with a random default name
- Rename the user and configure properties through the Edit dialog
Via REST API (curl):
curl -X POST http://localhost:8082/structr/rest/User \
  -H "Content-Type: application/json" \
  -H "X-User: admin" \
  -H "X-Password: admin" \
  -d '{
    "name": "john.doe",
    "eMail": "john.doe@example.com",
    "password": "securePassword123"
  }'
Via REST API (JavaScript):
const response = await fetch('/structr/rest/User', {
    method: 'POST',
    headers: {
        'Content-Type': 'application/json'
    },
    body: JSON.stringify({
        name: 'john.doe',
        eMail: 'john.doe@example.com',
        password: 'securePassword123'
    })
});

const result = await response.json();
console.log('Created user:', result.result.id);
User Properties
The following properties are available on user objects:
| Property | Type | Description |
|---|---|---|
name | String | Username for authentication |
eMail | String | Email address, often used as an alternative login identifier |
password | String | User password (stored as a secure hash, never in cleartext) |
isAdmin | Boolean | Administrator flag that grants full system access, bypassing all permission checks |
blocked | Boolean | When true, completely disables the account and prevents any action |
passwordAttempts | Integer | Counter for failed login attempts; triggers account lockout when threshold is exceeded |
locale | String | Preferred locale for localization (e.g., de_DE, en_US). Structr uses this value in the $.locale() function and for locale-aware formatting. |
publicKey | String | SSH public key for filesystem access via the SSH service |
skipSecurityRelationships | Boolean | Disables automatic creation of OWNS and SECURITY relationships when this user creates objects. Useful for admin users creating many objects where individual ownership tracking is not needed. |
confirmationKey | String | Temporary authentication key used during self-registration. Replaces the password until the user confirms their account via the confirmation link. |
twoFactorSecret | String | Secret key for TOTP two-factor authentication (see Two-Factor Authentication chapter) |
twoFactorConfirmed | Boolean | Indicates whether the user has completed two-factor setup |
isTwoFactorUser | Boolean | Enables two-factor authentication for this user (when 2FA level is set to optional) |
Setting Passwords
Structr never stores cleartext passwords - only secure hash values. To set or change a password:
Via Admin UI:
- Open the user’s Edit Properties dialog
- Go to the Node Properties tab
- Enter the new password in the Password field
Via REST API (curl):
curl -X PUT http://localhost:8082/structr/rest/User/<UUID> \
  -H "Content-Type: application/json" \
  -H "X-User: admin" \
  -H "X-Password: admin" \
  -d '{"password": "newSecurePassword456"}'
Via REST API (JavaScript):
await fetch('/structr/rest/User/<UUID>', {
    method: 'PUT',
    headers: {
        'Content-Type': 'application/json'
    },
    body: JSON.stringify({
        password: 'newSecurePassword456'
    })
});
You cannot display or recover existing passwords. If a user forgets their password, use the password reset flow or set a new password directly.
Extending the User Type
You can customize the User type to fit your application’s needs.
Markdown Rendering Hint: MarkdownTopic(Adding Properties) not rendered because level 5 >= maxLevels (5)
Markdown Rendering Hint: MarkdownTopic(Creating Subtypes) not rendered because level 5 >= maxLevels (5)
Groups
The Group type organizes users and simplifies permission management. Instead of granting permissions to individual users, you grant them to groups and add users to those groups. When a user belongs to a group, they inherit all permissions granted to that group.
Groups also serve as the integration point for external directory services like LDAP. When you connect Structr to an LDAP server, directory groups can map to Structr groups, enabling centralized user management. For details, see the LDAP chapter.
Creating Groups
Via Admin UI:
- Navigate to the Security area
- Click “Add Group”
- Rename the group as appropriate
Via REST API (curl):
curl -X POST http://localhost:8082/structr/rest/Group \
  -H "Content-Type: application/json" \
  -H "X-User: admin" \
  -H "X-Password: admin" \
  -d '{"name": "Editors"}'
Via REST API (JavaScript):
await fetch('/structr/rest/Group', {
    method: 'POST',
    headers: {
        'Content-Type': 'application/json'
    },
    body: JSON.stringify({
        name: 'Editors'
    })
});
Managing Membership
In the Admin UI, drag and drop users into groups in the Security area. Groups can contain both users and other groups, allowing hierarchical structures.
Via REST API (curl):
# Add user to group
curl -X PUT http://localhost:8082/structr/rest/User/<USER_UUID> \
  -H "Content-Type: application/json" \
  -H "X-User: admin" \
  -H "X-Password: admin" \
  -d '{"groups": ["<GROUP_UUID>"]}'
Via REST API (JavaScript):
await fetch('/structr/rest/User/<USER_UUID>', {
    method: 'PUT',
    headers: {
        'Content-Type': 'application/json'
    },
    body: JSON.stringify({
        groups: ['<GROUP_UUID>']
    })
});
Group Inheritance
All members inherit access rights granted to a group. This includes direct group members, users in nested subgroups, and permissions that flow down the group hierarchy.
Schema-Based Permissions
In addition to object-level permissions, Structr supports schema-based permissions that apply to all instances of a type. This feature allows you to grant a group access to all objects of a specific type without creating individual permission grants.
To configure schema-based permissions:
- Open the Schema area
- Select the type you want to configure
- Open the Security tab
- Configure which groups have read, write, delete, or accessControl permissions on all instances of this type
Schema-based permissions are evaluated efficiently and improve performance compared to individual object permissions, especially when you have many objects of the same type.
User Categories
Structr distinguishes several categories of users based on their authentication status and privileges.
Anonymous Users
Requests without authentication credentials are anonymous requests. The corresponding user is called the anonymous user or public user. Anonymous users are at the lowest level of the access control hierarchy and can only access objects explicitly marked as public.
Authenticated Users
A request that includes valid credentials is an authenticated request. Authenticated users are at a higher level in the access control hierarchy and can access objects based on their permissions, group memberships, and ownership.
Admin Users
Admin users have the isAdmin flag set to true. They can create, read, modify, and delete all nodes and relationships in the database. They can access all endpoints, modify the schema, and execute maintenance tasks. Admin users bypass all permission checks.
Note: The
isAdminflag is required for users to log into the Structr Admin UI.
Superuser
The superuser is a special account defined in structr.conf with the superuser.password setting. This account exists separately from regular admin users and serves specific purposes:
- Logging into the Configuration Interface
- Performing system-level operations that require elevated privileges beyond normal admin access
The superuser account is not stored in the database. It exists only through the configuration file setting.
Authentication Methods
Authentication determines who is making a request. Structr supports multiple authentication methods that you can use depending on your application’s needs.
| Method | Use Case |
|---|---|
| HTTP Headers | Simple API access, scripting |
| Session Cookies | Web applications with login forms |
| JSON Web Tokens | Stateless APIs, single-page applications |
| OAuth | Login via external providers (Google, GitHub, etc.) |
For details on JWT authentication, including token creation, refresh tokens, and external JWKS providers, see the JWT Authentication chapter.
For details on OAuth authentication with providers like Google, GitHub, or Auth0, see the OAuth chapter.
Authentication Headers
You can provide username and password via the HTTP headers X-User and X-Password. When you secure the connection with TLS, the headers are encrypted and your credentials are protected.
Note: Do not use authentication headers over unencrypted connections (http://…) except for localhost. Always use HTTPS for remote servers.
curl:
curl -s http://localhost:8082/structr/rest/Project \
  -H "X-User: admin" \
  -H "X-Password: admin"
JavaScript:
const response = await fetch('/structr/rest/Project', {
    headers: {
        'X-User': 'admin',
        'X-Password': 'admin'
    }
});

const data = await response.json();
console.log(data.result);
Response:
{
    "result": [
        {
            "id": "362cc05768044c7db886f0bec0061a0a",
            "type": "Project",
            "name": "Project #1"
        }
    ],
    "query_time": "0.000035672",
    "result_count": 1,
    "page_count": 1,
    "result_count_time": "0.000114435",
    "serialization_time": "0.001253579"
}
You must send the authentication headers with every request. For applications where this is impractical, use session-based authentication.
Sessions
Session-based authentication lets you log in once and use a session cookie for subsequent requests. The server maintains session state and the cookie authenticates each request.
Markdown Rendering Hint: MarkdownTopic(Prerequisites) not rendered because level 5 >= maxLevels (5)
Markdown Rendering Hint: MarkdownTopic(Login) not rendered because level 5 >= maxLevels (5)
Markdown Rendering Hint: MarkdownTopic(Logout) not rendered because level 5 >= maxLevels (5)
Permission System
Structr’s permission system operates on multiple levels, checked in the following order:
- Administrator Check - Users with
isAdmin=truebypass all other checks - Visibility Flags - Simple public/private flags on objects
- Ownership - Creator/owner permissions
- Permission Grants - Explicit user/group permissions
- Schema-Based Permissions - Type-level permissions for groups
- Graph-Based Resolution - Permission propagation through relationships
Permission Types
Four basic permissions control access to objects:
| Permission | Description |
|---|---|
| Read | View object properties and relationships |
| Write | Modify object properties |
| Delete | Remove objects from the database |
| AccessControl | Modify security settings and permissions on the object |
Visibility Flags
Every object has two visibility flags:
| Flag | Description |
|---|---|
visibleToPublicUsers | Grants read access to anonymous users |
visibleToAuthenticatedUsers | Grants read access to logged-in users |
These flags provide simple access control without explicit permission grants. Visibility grants read permission - the object appears in results and you can read its properties.
Note that these flags are independent: visibleToPublicUsers does not imply visibility for authenticated users, and visibleToAuthenticatedUsers does not imply visibility for anonymous users.
Ownership
When a non-admin user creates an object, Structr automatically grants full permissions (Read, Write, Delete, AccessControl) through an OWNS relationship.
When an anonymous user creates an object (if a Resource Access Permission allows the request), the object becomes ownerless. You can configure default permissions for ownerless nodes in the Configuration Interface.
Note: An object must first be visible to a user before they can modify it.
For admin users, you can disable automatic ownership creation by setting skipSecurityRelationships = true. This improves performance when creating many objects that do not need individual ownership tracking.
To prevent ownership for non-admin users, add an onCreate lifecycle method:
{
    $.set($.this, 'owner', null);
}
Permission Grants
You can grant specific permissions to users or groups on individual objects through SECURITY relationships.
Granting permissions:
$.grant(user, node, 'read, write');
Revoking permissions:
$.revoke(user, node, 'write');
Structr creates SECURITY relationships automatically when users create objects. To skip this for admin users, set skipSecurityRelationships = true. For non-admin users, use a lifecycle method:
{
    $.revoke($.me, $.this, 'read, write, delete, accessControl');
}
Note: If you skip both OWNS and SECURITY relationships, the creating user may lose access to the object. Use
grant()orcopy_permissions()to assign appropriate access.
Graph-Based Permission Resolution
For complex scenarios, Structr can propagate permissions through relationships. This enables domain-specific security models where access to one object grants access to related objects.
Markdown Rendering Hint: MarkdownTopic(How It Works) not rendered because level 5 >= maxLevels (5)
Markdown Rendering Hint: MarkdownTopic(Propagation Direction) not rendered because level 5 >= maxLevels (5)
Markdown Rendering Hint: MarkdownTopic(Permission Actions) not rendered because level 5 >= maxLevels (5)
Markdown Rendering Hint: MarkdownTopic(Hidden Properties) not rendered because level 5 >= maxLevels (5)
Markdown Rendering Hint: MarkdownTopic(Resolution Process) not rendered because level 5 >= maxLevels (5)
Account Security
Password Policy
Configure password requirements in structr.conf:
# Minimum password length
security.passwordpolicy.minlength = 8

# Maximum failed login attempts before lockout
security.passwordpolicy.maxfailedattempts = 4

# Complexity requirements
security.passwordpolicy.complexity.enforce = true
security.passwordpolicy.complexity.requiredigits = true
security.passwordpolicy.complexity.requirelowercase = true
security.passwordpolicy.complexity.requireuppercase = true
security.passwordpolicy.complexity.requirenonalphanumeric = true

# Clear all sessions when password changes
security.passwordpolicy.onchange.clearsessions = true
When you enable complexity enforcement, passwords must contain at least one character from each required category.
Account Lockout
When a user exceeds the maximum failed login attempts configured in security.passwordpolicy.maxfailedattempts, Structr locks the account. The passwordAttempts property tracks failures.
To unlock an account, reset passwordAttempts to 0:
curl:
curl -X PUT http://localhost:8082/structr/rest/User/<UUID> \
  -H "Content-Type: application/json" \
  -H "X-User: admin" \
  -H "X-Password: admin" \
  -d '{"passwordAttempts": 0}'
JavaScript:
await fetch('/structr/rest/User/<UUID>', {
    method: 'PUT',
    headers: {
        'Content-Type': 'application/json'
    },
    body: JSON.stringify({
        passwordAttempts: 0
    })
});
Blocking Users
To manually disable a user account, set blocked to true. A blocked user cannot perform any action in Structr, regardless of their permissions or admin status. This is useful for temporarily suspending accounts without deleting them.
curl:
curl -X PUT http://localhost:8082/structr/rest/User/<UUID> \
  -H "Content-Type: application/json" \
  -H "X-User: admin" \
  -H "X-Password: admin" \
  -d '{"blocked": true}'
To unblock a user, set blocked to false.
Two-Factor Authentication
Structr supports TOTP-based two-factor authentication. For configuration and implementation details, see the Two-Factor Authentication chapter.
User Self-Registration
You can allow users to sign up themselves instead of creating accounts manually. The registration process uses double opt-in: users enter their email address, receive a confirmation email, and click a link to complete registration.
Markdown Rendering Hint: MarkdownTopic(Prerequisites) not rendered because level 5 >= maxLevels (5)
Markdown Rendering Hint: MarkdownTopic(How It Works) not rendered because level 5 >= maxLevels (5)
Markdown Rendering Hint: MarkdownTopic(Mail Templates) not rendered because level 5 >= maxLevels (5)
Markdown Rendering Hint: MarkdownTopic(Registration Endpoint) not rendered because level 5 >= maxLevels (5)
Password Reset
To allow users to regain access when they forget their password, Structr provides a password reset flow.
Markdown Rendering Hint: MarkdownTopic(Prerequisites) not rendered because level 5 >= maxLevels (5)
Markdown Rendering Hint: MarkdownTopic(Mail Templates) not rendered because level 5 >= maxLevels (5)
Markdown Rendering Hint: MarkdownTopic(Password Reset Endpoint) not rendered because level 5 >= maxLevels (5)
Best Practices
- Grant minimal permissions - Follow the principle of least privilege
- Use groups effectively - Manage permissions through groups rather than individual grants
- Use schema-based permissions for performance - When all instances of a type should have the same permissions, configure them at the schema level
- Test with non-admin users - Admin users bypass all permission checks, so always test your permission design with regular users
- Design clear permission flows - When using graph-based resolution, document how permissions propagate through your data model
- Monitor failed logins - Watch for brute-force attempts through the
passwordAttemptsproperty - Enable two-factor authentication - Require 2FA for admin users and sensitive operations
Related Topics
- Two-Factor Authentication - TOTP-based second factor for login security
- JWT Authentication - Token-based authentication with JSON Web Tokens
- OAuth - Authentication with external providers like Google, GitHub, or Auth0
- SMTP - Configuring email for self-registration and password reset
- LDAP - Integrating with external directory services
- SSH Service - Configuring SSH access to the Structr filesystem
- REST Interface/Authentication - Resource Access Permissions and endpoint security
- Security (Admin UI) - Managing users, groups, and resource access permissions in the Admin UI
Two-Factor Authentication
Structr supports two-factor authentication (2FA) using the TOTP (Time-Based One-Time Password) standard. When enabled, users must provide a code from an authenticator app in addition to their password. This adds a second layer of security that protects accounts even if passwords are compromised.
TOTP is compatible with common authenticator apps like Google Authenticator, Microsoft Authenticator, Authy, and others.
Prerequisites
Because TOTP relies on synchronized time, ensure that both the Structr server and users’ mobile devices are synced to an NTP server. Time drift of more than 30 seconds can cause authentication failures.
Configuration
Configure two-factor authentication in structr.conf or through the Configuration Interface.
Application Settings
| Setting | Default | Description |
|---|---|---|
security.twofactorauthentication.level | 1 | Enforcement level: 0 = disabled, 1 = optional (per-user), 2 = required for all users |
security.twofactorauthentication.issuer | structr | The issuer name displayed in authenticator apps |
security.twofactorauthentication.algorithm | SHA1 | Hash algorithm: SHA1, SHA256, or SHA512 |
security.twofactorauthentication.digits | 6 | Code length: 6 or 8 digits |
security.twofactorauthentication.period | 30 | Code validity period in seconds |
security.twofactorauthentication.logintimeout | 30 | Time window in seconds to enter the code after password authentication |
security.twofactorauthentication.loginpage | /twofactor | Application page for entering the two-factor code |
security.twofactorauthentication.whitelistedIPs | Comma-separated list of IP addresses that bypass two-factor authentication |
Note: Changing
algorithm,digits, orperiodafter users have already enrolled invalidates their existing authenticator setup. SettwoFactorConfirmed = falseon affected users so they receive a new QR code on their next login.
Enforcement Levels
The level setting controls how two-factor authentication applies to users:
| Level | Behavior |
|---|---|
| 0 | Two-factor authentication is completely disabled |
| 1 | Optional - users can enable 2FA individually via the isTwoFactorUser property |
| 2 | Required - all users must use two-factor authentication |
User Properties
Three properties on the User type control two-factor authentication:
| Property | Type | Description |
|---|---|---|
isTwoFactorUser | Boolean | Enables two-factor authentication for this user. Only effective when level is set to 1 (optional). |
twoFactorConfirmed | Boolean | Indicates whether the user has completed two-factor setup. Automatically set to true after first successful 2FA login. Set to false to force re-enrollment. |
twoFactorSecret | String | The secret key used to generate TOTP codes. Automatically generated when the user first enrolls. |
Authentication Flow
The two-factor login process works as follows:
- User submits username and password to
/structr/rest/login - If credentials are valid and 2FA is enabled, Structr returns HTTP status 202 (Accepted)
- The response headers contain a temporary token and, for first-time setup, QR code data
- User scans the QR code with their authenticator app (first time only)
- User enters the 6-digit code from their authenticator app
- User submits the code with the temporary token to
/structr/rest/login - If the code is valid, Structr creates a session and returns HTTP status 200
Implementation
To implement two-factor authentication in your application, you need two pages: a login page and a two-factor code entry page.
Login Page
Create a login form that detects the two-factor response. When the server returns status 202, redirect to the two-factor page with the token and optional QR data.
JavaScript:
async function login(username, password) {
    const response = await fetch('/structr/rest/login', {
        method: 'POST',
        headers: {
            'Content-Type': 'application/json'
        },
        body: JSON.stringify({
            name: username,
            password: password
        })
    });

    if (response.status === 202) {
        // Two-factor authentication required
        const token = response.headers.get('token');
        const qrdata = response.headers.get('qrdata') || '';
        const twoFactorPage = response.headers.get('twoFactorLoginPage');

        window.location.href = `${twoFactorPage}?token=${token}&qrdata=${qrdata}`;
    } else if (response.ok) {
        // Login successful, no 2FA required
        window.location.href = '/';
    } else {
        // Login failed
        const error = await response.json();
        console.error('Login failed:', error);
    }
}
curl:
curl -si http://localhost:8082/structr/rest/login \
  -X POST \
  -H "Content-Type: application/json" \
  -d '{"name": "user", "password": "password"}'
When two-factor authentication is required, the response looks like:
HTTP/1.1 202 Accepted
token: eyJhbGciOiJIUzI1NiJ9...
twoFactorLoginPage: /twofactor
qrdata: iVBORw0KGgoAAAANSUhEUgAA...
The response headers contain:
| Header | Description |
|---|---|
token | Temporary token for the two-factor login (valid for the configured timeout period) |
twoFactorLoginPage | The configured page for entering the two-factor code |
qrdata | Base64-encoded PNG image of the QR code (only present if twoFactorConfirmed is false) |
Two-Factor Page
Create a page that displays the QR code for first-time setup and accepts the TOTP code.
JavaScript:
document.addEventListener('DOMContentLoaded', () => {
    const params = new URLSearchParams(location.search);
    const token = params.get('token');
    const qrdata = params.get('qrdata');

    // Display QR code for first-time setup
    if (qrdata) {
        const qrImage = document.getElementById('qrcode');
        // Convert URL-safe base64 back to standard base64
        const standardBase64 = qrdata.replaceAll('_', '/').replaceAll('-', '+');
        qrImage.src = 'data:image/png;base64,' + standardBase64;
        qrImage.style.display = 'block';

        document.getElementById('setup-instructions').style.display = 'block';
    }

    // Handle form submission
    document.getElementById('twoFactorForm').addEventListener('submit', async (event) => {
        event.preventDefault();

        const code = document.getElementById('code').value;

        const response = await fetch('/structr/rest/login', {
            method: 'POST',
            headers: {
                'Content-Type': 'application/json'
            },
            body: JSON.stringify({
                twoFactorToken: token,
                twoFactorCode: code
            })
        });

        if (response.ok) {
            window.location.href = '/';
        } else {
            document.getElementById('error').textContent = 'Invalid code. Please try again.';
        }
    });
});
curl:
curl -si http://localhost:8082/structr/rest/login \
  -X POST \
  -H "Content-Type: application/json" \
  -d '{"twoFactorToken": "eyJhbGciOiJIUzI1NiJ9...", "twoFactorCode": "123456"}'
Example HTML Structure
<!DOCTYPE html>
<html>
<head>
    <title>Two-Factor Authentication</title>
</head>
<body>
    <h1>Two-Factor Authentication</h1>

    <div id="setup-instructions" style="display: none;">
        <p>Scan this QR code with your authenticator app:</p>
        <img id="qrcode" alt="QR Code" />
        <p>Then enter the 6-digit code shown in your app.</p>
    </div>

    <form id="twoFactorForm">
        <label for="code">Authentication Code:</label>
        <input type="text" id="code" name="code"
               pattern="[0-9]{6,8}" maxlength="8"
               autocomplete="one-time-code" required />
        <button type="submit">Verify</button>
    </form>

    <p id="error" style="color: red;"></p>

    <script src="twofactor.js"></script>
</body>
</html>
Managing User Enrollment
Enabling 2FA for a User
When the enforcement level is set to 1 (optional), enable two-factor authentication for individual users by setting isTwoFactorUser to true.
curl:
curl -X PUT http://localhost:8082/structr/rest/User/<UUID> \
  -H "Content-Type: application/json" \
  -H "X-User: admin" \
  -H "X-Password: admin" \
  -d '{"isTwoFactorUser": true}'
JavaScript:
await fetch('/structr/rest/User/<UUID>', {
    method: 'PUT',
    headers: {
        'Content-Type': 'application/json'
    },
    body: JSON.stringify({
        isTwoFactorUser: true
    })
});
The user will see the QR code on their next login.
Re-Enrolling a User
To force a user to set up two-factor authentication again (for example, if they lost their phone), set twoFactorConfirmed to false:
curl:
curl -X PUT http://localhost:8082/structr/rest/User/<UUID> \
  -H "Content-Type: application/json" \
  -H "X-User: admin" \
  -H "X-Password: admin" \
  -d '{"twoFactorConfirmed": false}'
The user will receive a new QR code on their next login. Their authenticator app will need to be updated with the new secret.
Disabling 2FA for a User
To disable two-factor authentication for a user (when level is 1):
curl:
curl -X PUT http://localhost:8082/structr/rest/User/<UUID> \
  -H "Content-Type: application/json" \
  -H "X-User: admin" \
  -H "X-Password: admin" \
  -d '{"isTwoFactorUser": false}'
IP Whitelisting
For trusted networks or automated systems, you can bypass two-factor authentication based on IP address. Add IP addresses to the security.twofactorauthentication.whitelistedIPs setting:
security.twofactorauthentication.whitelistedIPs = 192.168.1.100, 10.0.0.0/24
Requests from whitelisted IPs proceed with password authentication only, even if the user has two-factor authentication enabled.
Troubleshooting
Invalid Code Errors
If users consistently receive “invalid code” errors:
- Check time synchronization - The most common cause is time drift between the server and the user’s device. Ensure both are synced to NTP.
- Verify the period setting - If you changed
security.twofactorauthentication.period, users need to re-enroll. - Check the algorithm - Some older authenticator apps only support SHA1.
Lost Authenticator Access
If a user loses access to their authenticator app:
- An administrator sets
twoFactorConfirmed = falseon the user - The user logs in with username and password
- The user scans the new QR code with their authenticator app
- The user completes the login with the new code
QR Code Not Displaying
If the QR code does not display:
- Check that
qrdatais present in the response headers - Verify the base64 conversion (URL-safe to standard)
- Ensure the
twoFactorConfirmedproperty is false
Related Topics
- User Management - User properties and account security
- JWT Authentication - Token-based authentication
- OAuth - Authentication with external providers
JWT Authentication
Structr supports authentication and authorization with JSON Web Tokens (JWTs). JWTs enable stateless authentication where the server does not need to maintain session state. This approach is particularly useful for APIs, single-page applications, and mobile apps.
You can learn more about JWT at https://jwt.io/.
Configuration
Structr supports three methods for signing and verifying JWTs:
- Secret Key – a shared secret for signing and verification
- Java KeyStore – a private/public keypair stored in a JKS file
- External JWKS – validation against an external identity provider like Microsoft Entra ID
Secret Key
To use JWTs with a secret key, configure the following settings in structr.conf or through the Configuration Interface:
| Setting | Value |
|---|---|
security.jwt.secrettype | secret |
security.jwt.secret | Your secret key (at least 32 characters) |
Java KeyStore
When you want to sign and verify JWTs with a private/public keypair, you first need to create a Java KeyStore file containing your keys.
Create a new keypair in a new KeyStore file with the following keytool command:
keytool -genkey -alias jwtkey -keyalg RSA -keystore server.jks -storepass jkspassword
Store the KeyStore file in the same directory as your structr.conf file.
Configure the following settings:
| Setting | Value |
|---|---|
security.jwt.secrettype | keypair |
security.jwt.keystore | The name of your KeyStore file |
security.jwt.keystore.password | The password to your KeyStore file |
security.jwt.key.alias | The alias of the key in the KeyStore file |
Token Settings
You can adjust token expiration and issuer in the configuration:
| Setting | Default | Description |
|---|---|---|
security.jwt.jwtissuer | structr | The issuer field in the JWT |
security.jwt.expirationtime | 60 | Access token expiration in minutes |
security.jwt.refreshtoken.expirationtime | 1440 | Refresh token expiration in minutes (default: 24 hours) |
Creating Tokens
Structr creates JWT access tokens through a request to the token resource. With each access token, Structr also creates a refresh token that you can use to obtain further access tokens without sending user credentials again.
Structr provides the tokens in the response body and stores them as HttpOnly cookies in the browser.
Prerequisites
Create a Resource Access Permission with the signature _token that allows POST for public users.
Requesting a Token
curl:
curl -X POST http://localhost:8082/structr/rest/token \
  -H "Content-Type: application/json" \
  -d '{
    "name": "admin",
    "password": "admin"
  }'
JavaScript:
const response = await fetch('/structr/rest/token', {
    method: 'POST',
    headers: {
        'Content-Type': 'application/json'
    },
    body: JSON.stringify({
        name: 'admin',
        password: 'admin'
    })
});

const data = await response.json();
const accessToken = data.result.access_token;
const refreshToken = data.result.refresh_token;
Response:
{
  "result": {
    "access_token": "eyJhbGciOiJIUzI1NiJ9.eyJpc3MiOiJzdHJ1Y3RyIiwic3ViIjoiYWRtaW4iLCJleHAiOjE1OTc5MjMzNjh9...",
    "refresh_token": "eyJhbGciOiJIUzI1NiJ9.eyJpc3MiOiJzdHJ1Y3RyIiwidHlwZSI6InJlZnJlc2giLCJleHAiOjE1OTgwMDYxNjh9...",
    "expiration_date": "1597923368582",
    "token_type": "Bearer"
  },
  "result_count": 1,
  "page_count": 1,
  "result_count_time": "0.000041704",
  "serialization_time": "0.000166971"
}
Refreshing a Token
To obtain a new access token without sending user credentials again, include the refresh token in the request header:
curl:
curl -X POST http://localhost:8082/structr/rest/token \
  -H "refresh_token: eyJhbGciOiJIUzI1NiJ9..."
JavaScript:
const response = await fetch('/structr/rest/token', {
    method: 'POST',
    headers: {
        'refresh_token': refreshToken
    }
});

const data = await response.json();
const newAccessToken = data.result.access_token;
Token Lifetime
The access token remains valid until:
- The expiration time is exceeded
- You revoke the token
- You revoke the refresh token that Structr created with it
- The user creates a new token (which invalidates the previous one)
The refresh token remains valid until:
- The expiration time is exceeded
- You revoke the token
Authenticating Requests
To authenticate a request with a JWT, you have two options.
Cookie-Based Authentication
When you request a token from a browser, Structr stores the access token as an HttpOnly cookie. The browser automatically sends this cookie with subsequent requests, so you do not need additional configuration.
JavaScript:
// After obtaining a token, subsequent requests are automatically authenticated
const response = await fetch('/structr/rest/User', {
    credentials: 'include'  // Include cookies
});

const data = await response.json();
Bearer Token Authentication
For API access or when cookies are not available, send the access token in the HTTP Authorization header:
curl:
curl http://localhost:8082/structr/rest/User \
  -H "Authorization: Bearer eyJhbGciOiJIUzI1NiJ9..."
JavaScript:
const response = await fetch('/structr/rest/User', {
    headers: {
        'Authorization': `Bearer ${accessToken}`
    }
});

const data = await response.json();
Revoking Tokens
Structr stores tokens in the database, allowing you to revoke them before they expire. This is useful for implementing logout functionality or invalidating compromised tokens.
Viewing Active Tokens
You can query the RefreshToken type to see active tokens for a user:
curl:
curl http://localhost:8082/structr/rest/RefreshToken \
  -H "X-User: admin" \
  -H "X-Password: admin"
JavaScript:
const response = await fetch('/structr/rest/RefreshToken', {
    headers: {
        'Authorization': `Bearer ${accessToken}`
    }
});

const tokens = await response.json();
Revoking a Specific Token
To revoke a token, delete the corresponding RefreshToken object:
curl:
curl -X DELETE http://localhost:8082/structr/rest/RefreshToken/<UUID> \
  -H "X-User: admin" \
  -H "X-Password: admin"
JavaScript:
await fetch(`/structr/rest/RefreshToken/${tokenId}`, {
    method: 'DELETE',
    headers: {
        'Authorization': `Bearer ${accessToken}`
    }
});
When you delete a refresh token, the associated access token also becomes invalid.
Revoking All Tokens for a User
To log out a user from all devices, delete all their refresh tokens:
curl:
curl -X DELETE "http://localhost:8082/structr/rest/RefreshToken?user=<USER_UUID>" \
  -H "X-User: admin" \
  -H "X-Password: admin"
External JWKS Providers
Structr can validate JWTs issued by external authentication systems like Microsoft Entra ID, Keycloak, Auth0, or other OIDC-compliant identity providers. This enables machine-to-machine authentication where external systems send requests to Structr with pre-issued tokens.
When an external system (such as an Entra ID service principal) sends a request to Structr with a JWT in the Authorization header, Structr validates the token by fetching the public key from the configured JWKS endpoint. Structr does not manage these external identities - it only validates the tokens they produce.
This capability is particularly useful for:
- Integrating with enterprise identity providers
- Machine-to-machine authentication using service principals
- Centralizing authentication across multiple applications
Note: JWKS validation handles incoming requests with externally-issued tokens. For interactive user login through external providers, see the OAuth chapter.
Configuration
To enable external token validation, configure the JWKS provider settings:
| Setting | Description |
|---|---|
security.jwt.secrettype | Set to jwks for external JWKS validation |
security.jwks.provider | The JWKS endpoint URL of the external service |
security.jwt.jwtissuer | The expected issuer claim in the JWT |
security.jwks.admin.claim.key | Token claim to check for admin privileges (optional) |
security.jwks.admin.claim.value | Value that grants admin privileges (optional) |
security.jwks.group.claim.key | Token claim containing group memberships (optional) |
Microsoft Entra ID
To validate tokens issued by Microsoft Entra ID (formerly Azure Active Directory), configure the JWKS endpoint and issuer for your Azure tenant:
security.jwt.secrettype = jwks
security.jwks.provider = https://login.microsoftonline.com/<tenant-id>/discovery/v2.0/keys
security.jwt.jwtissuer = https://login.microsoftonline.com/<tenant-id>/v2.0
security.jwks.admin.claim.key = roles
security.jwks.admin.claim.value = <your-admin-role-name>
security.jwks.group.claim.key = roles
Replace <tenant-id> with your Azure tenant ID and <your-admin-role-name> with the role value that should grant admin privileges in Structr.
In Azure Portal, configure your App Registration to include role claims in the token under “Token configuration”.
After you configure these settings, Structr validates tokens in the Authorization header against the configured service.
How It Works
When Structr receives a request with a JWT in the Authorization header:
- Structr extracts the token and reads its header to identify the signing key (via the
kidclaim) - Structr fetches the public keys from the configured JWKS endpoint
- Structr verifies the token signature using the appropriate public key
- If validation succeeds, Structr processes the request in the context of the authenticated identity
Structr caches the public keys from the JWKS endpoint to avoid fetching them on every request.
Error Handling
If token validation fails, Structr returns an appropriate HTTP error:
| Status | Reason |
|---|---|
| 401 Unauthorized | Token is missing, expired, or has an invalid signature |
| 503 Service Unavailable | JWKS endpoint is unreachable |
When the JWKS endpoint is temporarily unavailable, Structr uses cached keys if available. If no cached keys exist, the request fails with a 503 error.
Best Practices
- Use short expiration times for access tokens - 15-60 minutes is typical. Use refresh tokens to obtain new access tokens.
- Store refresh tokens securely - Refresh tokens have longer lifetimes and should be protected.
- Use HTTPS - Always transmit tokens over encrypted connections.
- Implement token refresh logic - Check for 401 responses and automatically refresh tokens when they expire.
- Revoke tokens on logout - Delete refresh tokens when users log out to prevent token reuse.
Related Topics
- User Management - Users, groups, and the permission system
- OAuth - Interactive authentication with external identity providers
- Two-Factor Authentication - Adding a second factor to login security
- REST Interface/Authentication - Resource Access Permissions and endpoint security
OAuth
Structr supports OAuth authentication through various external identity providers. OAuth allows users to authenticate using their existing accounts from services like Google, GitHub, or Microsoft Entra ID, eliminating the need for separate credentials in your application.
OAuth implements an interactive login flow where users authenticate through a provider’s login page. For machine-to-machine authentication using pre-issued tokens, see the JWKS section in the JWT Authentication chapter.
For more information about how OAuth works, see the Authorization Code Flow documentation.
Supported Providers
Structr includes built-in support for the following OAuth providers:
- OpenID Connect (Auth0) – works with any OIDC-compliant provider
- Microsoft Entra ID (Azure AD) – enterprise Single Sign-On with Azure Active Directory
- Keycloak – open-source identity and access management
- GitHub
You can also configure custom OAuth providers by specifying the required endpoints.
Configuration
Configure OAuth settings in structr.conf or through the Configuration Interface.
Enabling Providers
Control which OAuth providers are available using the oauth.servers setting:
| Setting | Description |
|---|---|
oauth.servers | Space-separated list of enabled OAuth providers (e.g., google github azure). Defaults to all available providers: auth0 azure facebook github google linkedin keycloak |
Provider Settings
Each provider requires a client ID and client secret. Most providers also support simplified tenant-based configuration where endpoints are constructed automatically.
Markdown Rendering Hint: MarkdownTopic(Recommended Approach: Tenant-Based Configuration) not rendered because level 5 >= maxLevels (5)
Markdown Rendering Hint: MarkdownTopic(Auth0) not rendered because level 5 >= maxLevels (5)
Markdown Rendering Hint: MarkdownTopic(Microsoft Entra ID (Azure AD)) not rendered because level 5 >= maxLevels (5)
Markdown Rendering Hint: MarkdownTopic(Keycloak) not rendered because level 5 >= maxLevels (5)
Markdown Rendering Hint: MarkdownTopic(Other Providers (Google, GitHub, Facebook, LinkedIn)) not rendered because level 5 >= maxLevels (5)
Complete Provider Settings Reference
The following table shows all available settings. Replace <provider> with the provider name (auth0, azure, google, facebook, github, linkedin, keycloak).
Markdown Rendering Hint: MarkdownTopic(General Settings (All Providers)) not rendered because level 5 >= maxLevels (5)
Markdown Rendering Hint: MarkdownTopic(Tenant/Server-Based Configuration (Recommended)) not rendered because level 5 >= maxLevels (5)
Markdown Rendering Hint: MarkdownTopic(Manual Endpoint Configuration (Advanced)) not rendered because level 5 >= maxLevels (5)
Required Global Setting
Enable automatic user creation so Structr can create user nodes for new OAuth users:
| Setting | Value |
|---|---|
jsonrestservlet.user.autocreate | true |
Provider-Specific Examples
Markdown Rendering Hint: MarkdownTopic(Microsoft Entra ID (Azure AD)) not rendered because level 5 >= maxLevels (5)
Markdown Rendering Hint: MarkdownTopic(Google) not rendered because level 5 >= maxLevels (5)
Markdown Rendering Hint: MarkdownTopic(GitHub) not rendered because level 5 >= maxLevels (5)
Markdown Rendering Hint: MarkdownTopic(Keycloak) not rendered because level 5 >= maxLevels (5)
Admin UI Integration
When you configure an OAuth provider, Structr automatically adds a login button for that provider to the Admin UI login form. Clicking this button redirects to the provider’s login page and returns to the Structr backend after successful authentication. This enables Single Sign-On for administrators without additional configuration.
Setting the isAdmin flag
Please note that in order to log into the Admin User Interface, the new user must be created with the isAdmin flag set to true. That means you need to implement a custom onOAuthLogin lifecycle method as described below, and select an “Admin Group” in Azure AD that Structr can use to identify administrators.
Triggering Authentication
For your own application pages, trigger OAuth authentication by redirecting users to /oauth/<provider>/login.
HTML
<a href="/oauth/auth0/login">Login with Auth0</a>
<a href="/oauth/azure/login">Login with Microsoft</a>
<a href="/oauth/google/login">Login with Google</a>
<a href="/oauth/github/login">Login with GitHub</a>
<a href="/oauth/facebook/login">Login with Facebook</a>
<a href="/oauth/linkedin/login">Login with LinkedIn</a>
<a href="/oauth/keycloak/login">Login with Keycloak</a>
Authentication Flow
When a user clicks the login link in your page or in the Admin UI login form, the following process is executed:
- Structr redirects the user to the provider’s authorization URL
- The user authenticates with the provider (enters credentials, approves permissions)
- The provider redirects back to Structr’s callback URL with an authorization code
- Structr exchanges the authorization code for an access token
- Structr retrieves user details from the provider
- Structr creates or updates the local User node
- If configured, Structr calls the
onOAuthLoginmethod on the User type - Structr creates a session and redirects to the configured return URL
Customizing User Creation
When a user logs in via OAuth for the first time, Structr creates a new user node. You can customize this process by implementing the onOAuthLogin lifecycle method on your User type (or a User subtype).
Method Parameters
The onOAuthLogin method receives information about the login through $.methodParameters:
| Parameter | Description |
|---|---|
provider | The name of the OAuth provider (e.g., “google”, “github”, “azure”) |
userinfo | Object containing user details from the provider |
The userinfo object contains provider-specific fields. Common fields include:
| Field | Description |
|---|---|
name | User’s display name |
email | User’s email address |
sub | Unique identifier from the provider |
accessTokenClaims | Claims from the access token (provider-specific) |
Example: Basic User Setup
{
    $.log('User ' + $.this.name + ' logged in via ' + $.methodParameters.provider);

    // Update user name from provider data
    const providerName = $.methodParameters.userinfo['name'];
    if (providerName && $.this.name !== providerName) {
        $.this.name = providerName;
    }

    // Set email if available
    const providerEmail = $.methodParameters.userinfo['email'];
    if (providerEmail) {
        $.this.eMail = providerEmail;
    }
}
Example: Azure AD Integration with Group Mapping
This example shows how to integrate with Azure Active Directory (Entra ID), including mapping Azure groups to Structr admin privileges:
{
    const ADMIN_GROUP = 'bc6fbf5f-34f9-4789-8443-76b194edfa09';  // Azure AD group ID

    $.log('User ' + $.this.name + ' just logged in via ' + $.methodParameters.provider);
    $.log('User information: ', JSON.stringify($.methodParameters.userinfo, null, 2));

    // Update username from Azure AD
    if ($.this.name !== $.methodParameters.userinfo['name']) {
        $.log('Updating username ' + $.this.name + ' to ' + $.methodParameters.userinfo['name']);
        $.this.name = $.methodParameters.userinfo['name'];
    }

    // Check Azure AD group membership for admin rights
    let azureGroups = $.methodParameters.userinfo['accessTokenClaims']['wids'];
    $.log('Azure AD groups: ', JSON.stringify(azureGroups, null, 2));

    if (azureGroups.includes(ADMIN_GROUP)) {
        $.this.isAdmin = true;
        $.log('Granted admin rights for ' + $.this.name);
    } else {
        $.this.isAdmin = false;
        $.log('User ' + $.this.name + ' does not have admin rights');
    }
}
Example: Mapping Provider Groups to Structr Groups
{
    const GROUP_MAPPING = {
        'azure-editors-group-id': 'Editors',
        'azure-viewers-group-id': 'Viewers',
        'azure-admins-group-id': 'Administrators'
    };

    let azureGroups = $.methodParameters.userinfo['accessTokenClaims']['groups'] || [];

    for (let azureGroupId in GROUP_MAPPING) {
        let structrGroupName = GROUP_MAPPING[azureGroupId];
        let structrGroup = $.first($.find('Group', 'name', structrGroupName));

        if (structrGroup) {
            if (azureGroups.includes(azureGroupId)) {
                $.add_to_group(structrGroup, $.this);
                $.log('Added ' + $.this.name + ' to group ' + structrGroupName);
            } else {
                $.remove_from_group(structrGroup, $.this);
                $.log('Removed ' + $.this.name + ' from group ' + structrGroupName);
            }
        }
    }
}
Provider Setup
Each OAuth provider requires you to register your application and obtain client credentials. The general process is:
- Create a developer account with the provider
- Register a new application
- Configure the redirect URI to match
oauth.<provider>.redirect_uriexactly - Copy the client ID and client secret to your Structr configuration
Redirect URI Format
Your redirect URI typically follows this pattern:
https://your-domain.com/oauth/<provider>/auth
Register this URL with the provider and ensure it matches your Structr configuration exactly. Mismatched redirect URIs are a common source of OAuth errors.
Provider-Specific Setup Notes
Markdown Rendering Hint: MarkdownTopic(Microsoft Entra ID (Azure AD)) not rendered because level 5 >= maxLevels (5)
Markdown Rendering Hint: MarkdownTopic(Google) not rendered because level 5 >= maxLevels (5)
Markdown Rendering Hint: MarkdownTopic(GitHub) not rendered because level 5 >= maxLevels (5)
Markdown Rendering Hint: MarkdownTopic(Keycloak) not rendered because level 5 >= maxLevels (5)
Markdown Rendering Hint: MarkdownTopic(Auth0) not rendered because level 5 >= maxLevels (5)
Error Handling
When authentication fails, Structr redirects to the configured error_uri with error information in the query parameters.
Common error scenarios:
| Error | Cause | Solution |
|---|---|---|
invalid_client | Wrong client ID or secret | Verify credentials in Structr configuration |
redirect_uri_mismatch | Redirect URI doesn’t match | Ensure exact match between provider and Structr config |
access_denied | User denied permission | User must approve the requested permissions |
server_error | Provider-side error | Check provider status, retry later |
Best Practices
- Use HTTPS - OAuth requires secure connections in production
- Use tenant-based configuration - Simplifies setup and reduces configuration errors
- Validate user data - Don’t blindly trust data from providers; validate and sanitize
- Map groups carefully - Document the relationship between provider groups and Structr permissions
- Handle token expiration - OAuth tokens expire; implement refresh logic if needed
- Log authentication events - Track logins for security auditing
- Enable only needed providers - Use
oauth.serversto limit available authentication methods
Related Topics
- User Management - Users, groups, and the permission system
- JWT Authentication - Token-based authentication, including external JWKS providers for machine-to-machine scenarios
- Two-Factor Authentication - Adding a second factor after OAuth login
- REST Interface/Authentication - Resource Access Permissions and endpoint security
SSL Configuration
HTTPS encrypts all communication between the browser and server, protecting sensitive data from interception. Structr supports automatic SSL certificate management through Let’s Encrypt as well as manual certificate installation.
Prerequisites
Before configuring HTTPS, you need superuser credentials for your Structr instance and a domain name pointing to your server. Let’s Encrypt does not work with localhost, so you need a real domain for automatic certificates. The server must be reachable from the internet on ports 80 and 443 for Let’s Encrypt validation. If you want to use the standard ports 80 and 443, you also need appropriate privileges to bind to these privileged ports.
Certificate Types
Structr supports two types of SSL certificates:
Let’s Encrypt certificates are issued by a trusted certificate authority and recognized by all browsers without warnings. They require a publicly accessible domain and internet connectivity for validation. Let’s Encrypt certificates are free and automatically renewed.
Self-signed certificates are generated locally without a certificate authority. Browsers will show security warnings because they cannot verify the certificate’s authenticity. Self-signed certificates are suitable for local development and testing, but not for production use.
For production deployments, use Let’s Encrypt. For local development where Let’s Encrypt is not possible, use self-signed certificates or mkcert.
Let’s Encrypt
Let’s Encrypt provides free, automatically renewed SSL certificates. When you request a certificate, Structr handles the domain validation process and stores the resulting certificate files in the /opt/structr/ssl/ directory. You do not need to manually manage these files - Structr configures the paths automatically.
Configuration
Configure Let’s Encrypt in the Configuration Interface under Security Settings:
| Setting | Description |
|---|---|
letsencrypt.domains | Your domain name(s), comma-separated for multiple domains |
letsencrypt.email | Contact email for certificate notifications |
letsencrypt.challenge | Validation method: http (default) or dns |
Requesting a Certificate
After configuring the domain, request a certificate through the REST API:
curl -X POST http://your-domain.com/structr/rest/maintenance/letsencrypt \
  -H "X-User: admin" \
  -H "X-Password: admin" \
  -H "Content-Type: application/json" \
  -d '{"server": "production", "challenge": "http", "wait": "10"}'
The parameters control the certificate request:
| Parameter | Description |
|---|---|
server | production for real certificates, staging for testing |
challenge | http for HTTP-01 validation, dns for DNS-01 |
wait | Seconds to wait for challenge completion |
You can also request certificates through the Admin UI under Dashboard → Maintenance → Let’s Encrypt Certificate.
Certificate Renewal
Let’s Encrypt certificates are valid for 90 days. Structr automatically renews certificates before they expire. To manually trigger renewal, execute the certificate request again.
Enabling HTTPS
Once you have a certificate (from Let’s Encrypt or manually installed), enable HTTPS in the Configuration Interface under Server Settings:
| Setting | Description |
|---|---|
application.http.port | HTTP port, typically 80 |
application.https.port | HTTPS port, typically 443 |
application.https.enabled | Set to true to enable HTTPS |
httpservice.force.https | Set to true to redirect all HTTP traffic to HTTPS |
After changing these settings, restart the HTTP service. You can do this in the Services tab of the Configuration Interface, through the REST API, or via the command line:
curl -X POST http://localhost:8082/structr/rest/maintenance/restartService \
  -H "X-User: admin" \
  -H "X-Password: admin" \
  -H "Content-Type: application/json" \
  -d '{"serviceName": "HttpService"}'
sudo systemctl restart structr
Manual Certificate Installation
If you have certificates from another certificate authority or need to use existing certificates, you can install them manually. Manual certificates are stored in the same directory as Let’s Encrypt certificates (/opt/structr/ssl/), but you must configure the paths explicitly.
Place your certificate files in the Structr SSL directory and set appropriate ownership:
sudo mkdir -p /opt/structr/ssl/
sudo cp your-certificate.pem /opt/structr/ssl/
sudo cp your-private-key.pem /opt/structr/ssl/
sudo chown -R structr:structr /opt/structr/ssl/
Configure the certificate paths in the Configuration Interface under Server Settings:
| Setting | Description |
|---|---|
application.ssl.certificate.path | Path to your certificate file |
application.ssl.private.key.path | Path to your private key file |
SSL Hardening
For enhanced security, configure protocol and cipher settings:
| Setting | Recommended Value |
|---|---|
application.ssl.protocols | TLSv1.2,TLSv1.3 |
application.ssl.ciphers | ECDHE-RSA-AES256-GCM-SHA384,ECDHE-RSA-AES128-GCM-SHA256 |
application.ssl.dh.keysize | 2048 |
Local Development
Let’s Encrypt requires a publicly accessible domain and cannot issue certificates for localhost. For local development, you need to use self-signed certificates instead. Unlike Let’s Encrypt certificates, self-signed certificates are not trusted by browsers, so you will see security warnings. This is acceptable for development but not for production.
You have two options for creating local certificates: generating a self-signed certificate manually with OpenSSL, or using mkcert which creates certificates trusted by your local machine.
Self-Signed Certificates
Generate a self-signed certificate for development:
openssl req -x509 -newkey rsa:4096 \
  -keyout localhost-key.pem \
  -out localhost-cert.pem \
  -days 365 -nodes \
  -subj "/CN=localhost"

sudo mkdir -p /opt/structr/ssl/
sudo mv localhost-cert.pem localhost-key.pem /opt/structr/ssl/
Configure Structr to use these certificates:
| Setting | Value |
|---|---|
application.https.enabled | true |
application.https.port | 8443 |
application.ssl.certificate.path | /opt/structr/ssl/localhost-cert.pem |
application.ssl.private.key.path | /opt/structr/ssl/localhost-key.pem |
Browsers will show security warnings for self-signed certificates. Click through the warning to access your application during development.
Using mkcert
For a smoother development experience, use mkcert to create locally-trusted certificates. Install mkcert through your package manager (brew install mkcert on macOS, sudo apt install mkcert on Ubuntu), then create and install a local certificate authority:
mkcert -install
mkcert localhost 127.0.0.1 ::1

sudo mkdir -p /opt/structr/ssl/
sudo mv localhost+2.pem /opt/structr/ssl/localhost-cert.pem
sudo mv localhost+2-key.pem /opt/structr/ssl/localhost-key.pem
Browsers will trust mkcert certificates without warnings.
Verification
After enabling HTTPS, verify your configuration by testing the HTTPS connection with curl -I https://your-domain.com. If you enabled HTTP-to-HTTPS redirection, test that as well with curl -I http://your-domain.com - this should return a 301 or 302 redirect to the HTTPS URL.
You can check certificate details with OpenSSL:
echo | openssl s_client -connect your-domain.com:443 2>/dev/null | \
  openssl x509 -noout -dates
In the browser, navigate to your domain and check for the lock icon in the address bar. Click the icon to view certificate details and verify the certificate is valid and issued by the expected authority.
Troubleshooting
Certificate Generation Fails
When Let’s Encrypt certificate generation fails, first verify that your domain’s DNS correctly points to your server. The server must be reachable from the internet on ports 80 and 443 for the validation challenge. Check that no other service (like Apache or nginx) is using port 80. Review the Structr log for detailed error messages:
tail -f /var/log/structr/structr.log | grep -i letsencrypt
HTTPS Not Working
If HTTPS connections fail after setup, verify that application.https.enabled is set to true and that the certificate files exist in the SSL directory. Make sure you restarted the HTTP service after changing configuration. Check whether the HTTPS port is listening and not blocked by a firewall:
sudo netstat -tlnp | grep :443
ls -la /opt/structr/ssl/
Permission Denied on Ports 80/443
Binding to ports below 1024 requires elevated privileges. You can either grant the capability to bind privileged ports to Java, or use higher ports with port forwarding:
# Grant capability to Java
sudo setcap 'cap_net_bind_service=+ep' /usr/bin/java

# Or use port forwarding
sudo iptables -t nat -A PREROUTING -p tcp --dport 80 -j REDIRECT --to-port 8082
sudo iptables -t nat -A PREROUTING -p tcp --dport 443 -j REDIRECT --to-port 8443
HTTP Not Redirecting to HTTPS
If HTTP traffic is not redirecting to HTTPS, verify that httpservice.force.https is set to true and restart the HTTP service after changing the setting. Also clear your browser cache, as browsers may have cached the non-redirecting response.
Related Topics
- Security - Authentication methods, users, groups, and permissions
- Configuration Interface - Managing Structr settings including SSL configuration
- Operations - Server management and maintenance tasks
SSH Access
Structr includes a built-in SSH server that provides command-line access to the Admin Console and filesystem. Administrators can connect via SSH to execute scripts, run queries, and manage files without using the web interface.
Overview
The SSH service provides two main capabilities:
- Admin Console - An interactive command-line interface for executing JavaScript, StructrScript, Cypher queries, and administrative commands
- Filesystem Access - SFTP and SSHFS access to Structr’s virtual filesystem
SSH access is restricted to admin users. Non-admin users receive an authentication error when attempting to connect.
Enabling the SSH Service
The SSH service is not enabled by default. To activate it:
- Open the Configuration Interface
- Enable the
SSHServicein the list of configured services - Save the configuration
- Navigate to the Services tab
- Start the SSHService
When the service starts successfully, you see log entries like:
INFO  org.structr.files.ssh.SSHService - Setting up SSH server..
INFO  org.structr.files.ssh.SSHService - Initializing host key generator..
INFO  org.structr.files.ssh.SSHService - Configuring SSH server..
INFO  org.structr.files.ssh.SSHService - Starting SSH server on port 8022
INFO  org.structr.files.ssh.SSHService - Initialization complete.
On first startup, Structr generates an SSH host key and stores it locally. This key identifies your Structr instance to SSH clients.
Configuration
Configure the SSH service in structr.conf:
| Setting | Default | Description |
|---|---|---|
sshservice.port | 8022 | The port the SSH server listens on |
Remember that structr.conf only contains settings that differ from defaults. If you want to use port 8022, you do not need to add this setting.
Setting Up User Access
SSH authentication uses public key authentication. Each user who needs SSH access must have their public key configured in Structr.
To add a public key for a user:
- Open the Security area in the Admin UI
- Select the user
- Open the Edit dialog
- Navigate to the Advanced tab
- Paste the user’s public key into the
publicKeyfield - Save the changes
The public key is typically found in ~/.ssh/id_rsa.pub or ~/.ssh/id_ed25519.pub on the user’s machine. The entire contents of this file should be pasted into the field.
Note: Only users with
isAdmin = truecan connect via SSH. Non-admin users receive the error “SSH access is only allowed for admin users!” when attempting to connect.
Connecting via SSH
Connect to Structr using a standard SSH client:
ssh -p 8022 admin@localhost
Replace admin with your username, localhost with your server address, and 8022 with your configured port.
On first connection, you are prompted to verify the server’s host key fingerprint:
The authenticity of host '[localhost]:8022 ([127.0.0.1]:8022)' can't be established.
RSA key fingerprint is SHA256:9YVTKL8x/PUhOdQUPdDmwdCDqZmDzbE5NuXlY16jQeI.
Are you sure you want to continue connecting (yes/no/[fingerprint])? yes
After confirming, you see the welcome message and enter the Admin Console:
Welcome to the Structr 6.2-SNAPSHOT JavaScript console. Use <Shift>+<Tab> to switch modes.
admin@Structr/>
Admin Console
The Admin Console provides an interactive environment for executing commands. It supports multiple modes, each with different capabilities.
Switching Modes
Use Console.setMode() to switch between modes:
Console.setMode('JavaScript')   // Default mode
Console.setMode('StructrScript')
Console.setMode('Cypher')
Console.setMode('AdminShell')
Console.setMode('REST')
You can also press Shift+Tab to cycle through available modes.
JavaScript Mode
The default mode. Execute JavaScript code with full access to Structr’s scripting API:
admin@Structr/> $.find('User')
admin@Structr/> $.find('Project', { status: 'active' })
admin@Structr/> $.create('Task', { name: 'New Task' })
StructrScript Mode
Execute StructrScript expressions:
admin@Structr/> find('User')
admin@Structr/> size(find('Project'))
Cypher Mode
Execute Neo4j Cypher queries directly:
admin@Structr/> MATCH (n:User) RETURN n
admin@Structr/> MATCH (p:Project)-[:HAS_TASK]->(t:Task) RETURN p.name, count(t)
AdminShell Mode
Access administrative commands. Type help to see available commands:
admin@Structr/> Console.setMode('AdminShell')
Mode set to 'AdminShell'. Type 'help' to get a list of commands.
admin@Structr/> help
REST Mode
Execute REST-style operations. Type help to see available commands:
admin@Structr/> Console.setMode('REST')
Mode set to 'REST'. Type 'help' to get a list of commands.
admin@Structr/> help
Filesystem Access
You can mount Structr’s virtual filesystem on your local machine using SSHFS. This allows you to browse and edit files using standard file management tools.
Mounting with SSHFS
Install SSHFS on your system if not already available, then mount the filesystem:
sshfs admin@localhost:/ mountpoint -p 8022
Replace:
adminwith your usernamelocalhostwith your server addressmountpointwith your local mount directory8022with your configured SSH port
After mounting, you can navigate the Structr filesystem like any local directory:
cd mountpoint
ls -la
Unmounting
To unmount the filesystem:
fusermount -u mountpoint   # Linux
umount mountpoint          # macOS
Troubleshooting
Connection Refused
If you cannot connect:
- Verify the SSHService is running in the Services tab
- Check that the port is not blocked by a firewall
- Confirm you are using the correct port (default: 8022)
# Check if the port is listening
netstat -tlnp | grep 8022
Authentication Failures
If authentication fails:
- Verify the public key is correctly entered in the user’s
publicKeyfield - Ensure the user has
isAdmin = true - Check that you are using the matching private key on the client
# Test with verbose output to see authentication details
ssh -v -p 8022 admin@localhost
“SSH access is only allowed for admin users!”
This error indicates the user exists and authenticated successfully, but does not have admin privileges. Set isAdmin = true on the user to grant SSH access.
Security Considerations
SSH access provides powerful administrative capabilities. Consider these security practices:
- Limit admin users - Only grant admin status to users who genuinely need it
- Protect private keys - Users should secure their private keys with passphrases
- Use strong keys - Prefer Ed25519 or RSA keys with at least 4096 bits
- Monitor access - Review server logs for SSH connection attempts
- Firewall the port - Restrict SSH port access to trusted networks if possible
Related Topics
- User Management - Managing users and the
publicKeyproperty - Configuration - Service configuration in structr.conf
- Admin Console - Detailed documentation of console commands and modes
Rate Limiting
Structr provides built-in rate limiting to protect your application from being overwhelmed by too many requests. When enabled, requests that exceed the configured threshold are delayed, throttled, or rejected. This helps protect against denial-of-service attacks and misbehaving clients.
Rate limiting is disabled by default. To enable it, set httpservice.dosfilter.ratelimiting to Enabled in the Configuration Interface under DoS Filter Settings.
How It Works
The rate limiter tracks requests per client IP address. When a client exceeds the allowed requests per second:
- Initial excess requests are delayed by a configurable amount
- If the client continues, requests are throttled (queued)
- If the queue fills up, additional requests are rejected with an HTTP error code
This graduated response allows legitimate users who briefly spike their request rate to continue with a slight delay, while persistent offenders are blocked.
Configuration
| Setting | Default | Description |
|---|---|---|
httpservice.dosfilter.ratelimiting | Disabled | Enable or disable rate limiting. |
httpservice.dosfilter.maxrequestspersec | 10 | Maximum requests per second before throttling begins. |
httpservice.dosfilter.delayms | 100 | Delay in milliseconds applied to requests exceeding the limit. |
httpservice.dosfilter.maxwaitms | 50 | Maximum time in milliseconds a request will wait for processing. |
httpservice.dosfilter.throttledrequests | 5 | Number of requests that can be queued for throttling. |
httpservice.dosfilter.throttlems | 30000 | Duration in milliseconds to throttle a client. |
httpservice.dosfilter.maxrequestms | 30000 | Maximum time in milliseconds for a request to be processed. |
httpservice.dosfilter.maxidletrackerms | 30000 | Time in milliseconds before an idle client tracker is removed. |
httpservice.dosfilter.insertheaders | Enabled | Add rate limiting headers to responses. |
httpservice.dosfilter.remoteport | Disabled | Include remote port in client identification. |
httpservice.dosfilter.ipwhitelist | (empty) | Comma-separated list of IP addresses exempt from rate limiting. |
httpservice.dosfilter.managedattr | Enabled | Enable JMX management attributes. |
httpservice.dosfilter.toomanycode | 429 | HTTP status code returned when requests are rejected. |
Monitoring
When rate limiting activates, Structr logs warnings with details about the affected client:
DoS ALERT: Request delayed=100ms, ip=192.168.1.100, overlimit=OverLimit[id=192.168.1.100, duration=PT0.016S, count=10], user=null
The log entry shows the IP address, the delay applied, and the request count that triggered the limit.
Whitelisting Trusted Clients
Internal services or monitoring systems may need to make frequent requests without being throttled. Add their IP addresses to the whitelist:
httpservice.dosfilter.ipwhitelist = 10.0.0.1, 10.0.0.2, 192.168.1.50
Whitelisted IPs are completely exempt from rate limiting.
APIs & Integrations
Structr provides email functionality for both sending and receiving messages. You can send simple emails with a single function call, compose complex messages with attachments and custom headers, and automatically fetch incoming mail from IMAP or POP3 mailboxes.
Quick Start
To send your first email:
- Configure your SMTP server in the Configuration Interface under SMTP Settings (host, port, user, password)
- Call
sendPlaintextMail()orsendHtmlMail():
$.sendPlaintextMail(
    'sender@example.com', 'Sender Name',
    'recipient@example.com', 'Recipient Name',
    'Subject Line',
    'Email body text'
);
That’s it. For multiple recipients, attachments, or custom headers, see the Advanced Email API section below.
Sending Emails
SMTP Configuration
Before sending emails, configure your SMTP server in the Configuration Interface under SMTP Settings:
| Setting | Description |
|---|---|
smtp.host | SMTP server hostname |
smtp.port | SMTP server port (typically 587 for TLS, 465 for SSL) |
smtp.user | SMTP username for authentication |
smtp.password | SMTP password |
smtp.tls.enabled | Enable TLS encryption |
smtp.tls.required | Require TLS (fail if not available) |
Multiple SMTP Configurations
You can define multiple SMTP configurations for different purposes (transactional emails, marketing, different departments). Add a prefix to each setting:
# Default configuration
smtp.host = mail.example.com
smtp.port = 587
smtp.user = default@example.com
smtp.password = secret
smtp.tls.enabled = true
smtp.tls.required = true

# Marketing configuration
marketing.smtp.host = marketing-mail.example.com
marketing.smtp.port = 587
marketing.smtp.user = marketing@example.com
marketing.smtp.password = secret
marketing.smtp.tls.enabled = true
marketing.smtp.tls.required = true
Select a configuration in your code with mailSelectConfig() before sending.
Basic Email Functions
For simple emails, use the one-line functions:
sendHtmlMail:
$.sendHtmlMail(
    'info@example.com',           // fromAddress
    'Example Company',            // fromName
    'user@domain.com',            // toAddress
    'John Doe',                   // toName
    'Welcome to Our Service',     // subject
    '<h1>Welcome!</h1><p>Thank you for signing up.</p>',  // htmlContent
    'Welcome! Thank you for signing up.'                   // textContent
);
sendPlaintextMail:
$.sendPlaintextMail(
    'info@example.com',           // fromAddress
    'Example Company',            // fromName
    'user@domain.com',            // toAddress
    'John Doe',                   // toName
    'Your Order Confirmation',    // subject
    'Your order #12345 has been confirmed.'  // content
);
With attachments:
let invoice = $.first($.find('File', 'name', 'invoice.pdf'));

$.sendHtmlMail(
    'billing@example.com',
    'Billing Department',
    'customer@domain.com',
    'Customer Name',
    'Your Invoice',
    '<p>Please find your invoice attached.</p>',
    'Please find your invoice attached.',
    [invoice]  // attachments must be a list
);
Advanced Email API
For complex emails with multiple recipients, custom headers, or dynamic content, use the Advanced Mail API. This follows a builder pattern: start with mailBegin(), configure the message, then send with mailSend().
Basic example:
$.mailBegin('support@example.com', 'Support Team', 'Re: Your Question', '<p>Thank you for contacting us.</p>', 'Thank you for contacting us.');
$.mailAddTo('customer@domain.com', 'Customer Name');
$.mailSend();
Complete example with all features:
// Start a new email
$.mailBegin('newsletter@example.com', 'Newsletter');

// Set content
$.mailSetSubject('Monthly Newsletter - January 2026');
$.mailSetHtmlContent('<h1>Newsletter</h1><p>This month's updates...</p>');
$.mailSetTextContent('Newsletter\n\nThis month's updates...');

// Add recipients
$.mailAddTo('subscriber1@example.com', 'Subscriber One');
$.mailAddTo('subscriber2@example.com', 'Subscriber Two');
$.mailAddCc('marketing@example.com', 'Marketing Team');
$.mailAddBcc('archive@example.com');

// Set reply-to address
$.mailAddReplyTo('feedback@example.com', 'Feedback');

// Add custom headers
$.mailAddHeader('X-Campaign-ID', 'newsletter-2026-01');
$.mailAddHeader('X-Mailer', 'Structr');

// Add attachments
let attachment = $.first($.find('File', 'name', 'report.pdf'));
$.mailAddAttachment(attachment, 'January-Report.pdf');  // optional custom filename

// Send and get message ID
let messageId = $.mailSend();

if ($.mailHasError()) {
    $.log('Failed to send email: ' + $.mailGetError());
} else {
    $.log('Email sent with ID: ' + messageId);
}
Using Different SMTP Configurations
Select a named configuration before sending:
$.mailBegin('marketing@example.com', 'Marketing');
$.mailSelectConfig('marketing');  // Use marketing SMTP settings
$.mailAddTo('customer@example.com');
$.mailSetSubject('Special Offer');
$.mailSetHtmlContent('<p>Check out our latest deals!</p>');
$.mailSend();
To reset to the default configuration:
$.mailSelectConfig(''); // Empty string resets to default
Dynamic SMTP Configuration
For runtime-configurable SMTP settings (e.g., from database or user input):
$.mailBegin('sender@example.com', 'Sender');
$.mailSetManualConfig(
    'smtp.provider.com',  // host
    587,                  // port
    'username',           // user
    'password',           // password
    true,                 // useTLS
    true                  // requireTLS
);
$.mailAddTo('recipient@example.com');
$.mailSetSubject('Test');
$.mailSetTextContent('Test message');
$.mailSend();

// Reset manual config for next email
$.mailResetManualConfig();
Configuration priority: manual config > selected config > default config.
Saving Outgoing Messages
Outgoing emails are not saved by default. To keep a record of sent emails, explicitly enable saving with mailSaveOutgoingMessage(true) before calling mailSend(). Structr then stores the message as an EMailMessage object:
$.mailBegin('support@example.com', 'Support');
$.mailAddTo('customer@example.com');
$.mailSetSubject('Ticket #12345 Update');
$.mailSetHtmlContent('<p>Your ticket has been updated.</p>');

// Enable saving before sending
$.mailSaveOutgoingMessage(true);

$.mailSend();

// Retrieve the saved message
let sentMessage = $.mailGetLastOutgoingMessage();
$.log('Saved message ID: ' + sentMessage.id);
Saved messages include all recipients, content, headers, and attachments. Attachments are copied to the file system under the configured attachment path.
Replying to Messages
To create a proper reply that mail clients can thread correctly:
// Get the original message
let originalMessage = $.first($.find('EMailMessage', 'id', originalId));

$.mailBegin('support@example.com', 'Support');
$.mailAddTo(originalMessage.fromMail);
$.mailSetSubject('Re: ' + originalMessage.subject);
$.mailSetHtmlContent('<p>Thank you for your message.</p>');

// Set In-Reply-To header for threading
$.mailSetInReplyTo(originalMessage.messageId);

$.mailSend();
Error Handling
Always check for errors after sending:
$.mailBegin('sender@example.com', 'Sender');
$.mailAddTo('recipient@example.com');
$.mailSetSubject('Test');
$.mailSetTextContent('Test message');
$.mailSend();

if ($.mailHasError()) {
    let error = $.mailGetError();
    $.log('Email failed: ' + error);
    // Handle error (retry, notify admin, etc.)
} else {
    $.log('Email sent successfully');
}
Common errors include authentication failures, connection timeouts, and invalid recipient addresses.
Sender Address Requirements
Most SMTP providers require the sender address to match your authenticated account. If you use a shared SMTP server, the from address must typically be your account email.
For example, if your SMTP account is user@example.com, sending from other@example.com will likely fail with an error like:
550 5.7.1 User not authorized to send on behalf of <other@example.com>
This also applies to Structr’s built-in mail templates for password reset and registration confirmation. By default, these emails are sent using the address configured in structr.conf under smtp.user (if it contains a valid email address). If not, the sender defaults to structr-mail-daemon@localhost, which is typically rejected by external mail providers. Configure the correct sender addresses in the Mail Templates area of the Admin UI.
Receiving Emails
Structr can automatically fetch emails from IMAP or POP3 mailboxes and store them as EMailMessage objects in the database. The MailService runs in the background and periodically checks all configured mailboxes.
MailService Configuration
Configure the MailService in the Configuration Interface:
| Setting | Default | Description |
|---|---|---|
mail.maxemails | 25 | Maximum number of emails to fetch per mailbox per check |
mail.updateinterval | 30000 | Interval between checks in milliseconds (default: 30 seconds) |
mail.attachmentbasepath | /mail/attachments | Base path for storing email attachments |
Creating a Mailbox
Create a Mailbox object to configure an email account for fetching:
$.create('Mailbox', {
    name: 'Support Inbox',
    host: 'imap.example.com',
    mailProtocol: 'imaps',        // 'imaps' for IMAP over SSL, 'pop3' for POP3
    port: 993,                     // Optional, uses protocol default if not set
    user: 'support@example.com',
    password: 'secret',
    folders: ['INBOX', 'Support']  // Folders to monitor
});
| Property | Description |
|---|---|
host | Mail server hostname |
mailProtocol | imaps (IMAP over SSL) or pop3 |
port | Server port (optional, defaults to protocol standard) |
user | Account username |
password | Account password |
folders | Array of folder names to fetch from |
overrideMailEntityType | Custom type extending EMailMessage (optional) |
How Mail Fetching Works
The MailService automatically:
- Connects to each configured mailbox at the configured interval
- Fetches messages from the specified folders (newest first)
- Checks for duplicates using the Message-ID header
- Creates
EMailMessageobjects for new messages - Extracts and stores attachments as File objects
Duplicate detection first tries to match by messageId. If no Message-ID header exists, it falls back to matching by subject, from, to, and dates.
EMailMessage Properties
Fetched emails are stored with these properties:
| Property | Description |
|---|---|
subject | Email subject |
from | Sender display string (name and address) |
fromMail | Sender email address only |
to | Recipients (To:) |
cc | Carbon copy recipients |
bcc | Blind carbon copy recipients |
content | Plain text content |
htmlContent | HTML content |
folder | Source folder name |
sentDate | When the email was sent |
receivedDate | When the email was received |
messageId | Unique message identifier |
inReplyTo | Message-ID of the parent message (for threading) |
header | JSON string containing all headers |
mailbox | Reference to the source Mailbox |
attachedFiles | List of attached File objects |
Listing Available Folders
To discover which folders are available on a mail server, call the method getAvailableFoldersOnServer:
let mailbox = $.first($.find('Mailbox', 'name', 'Support Inbox'));
let folders = mailbox.getAvailableFoldersOnServer();

for (let folder of folders) {
    $.log('Available folder: ' + folder);
}
Manual Mail Fetching
While the MailService fetches automatically, you can trigger an immediate fetch:
let mailbox = $.first($.find('Mailbox', 'name', 'Support Inbox'));
mailbox.fetchMails();
Custom Email Types
To add custom properties or methods to incoming emails, create a type that extends EMailMessage and configure it on the mailbox:
// Assuming you have a custom type 'SupportTicketMail' extending EMailMessage
let mailbox = $.first($.find('Mailbox', 'name', 'Support Inbox'));
mailbox.overrideMailEntityType = 'SupportTicketMail';
New emails will be created as your custom type, allowing you to add lifecycle methods like onCreate for automatic processing.
Processing Incoming Emails
To automatically process incoming emails, create an onCreate method on EMailMessage (or your custom type):
// onCreate method on EMailMessage or custom subtype
{
    $.log('New email received: ' + $.this.subject);

    // Example: Create a support ticket from the email
    if ($.this.mailbox.name === 'Support Inbox') {
        $.create('SupportTicket', {
            title: $.this.subject,
            description: $.this.content,
            customerEmail: $.this.fromMail,
            sourceEmail: $.this
        });
    }
}
Attachment Storage
Email attachments are automatically extracted and stored as File objects. The storage path follows this structure:
{mail.attachmentbasepath}/{year}/{month}/{day}/{mailbox-uuid}/
For example: /mail/attachments/2026/2/2/a1b2c3d4-...
Attachments are linked to their email via the attachedFiles property.
Best Practices
Sending
- Always check
mailHasError()after sending and handle failures appropriately - Use
mailSaveOutgoingMessage()for important emails to maintain a record - Set
mailSetInReplyTo()when replying to maintain proper threading - Provide both HTML and plain text content for maximum compatibility
Receiving
- Set a reasonable
mail.maxemailsvalue to avoid overwhelming the system - Use
overrideMailEntityTypeto add custom processing logic - Monitor the server log for connection or authentication errors
- Consider the
mail.updateintervalbased on how quickly you need to process incoming mail
Security
- Store SMTP and mailbox passwords securely
- Use TLS/SSL for all mail connections
- Be cautious with attachments from unknown senders
Related Topics
- Scheduled Tasks - Triggering email-related tasks on a schedule
- Business Logic - Processing emails in lifecycle methods
- Files - Working with email attachments
OpenAPI
Structr automatically generates OpenAPI 3.0.2 documentation for your REST API. This documentation describes your types, methods, and endpoints in a standardized format that other developers and tools can use to understand and interact with your API.
When You Need OpenAPI
OpenAPI documentation becomes valuable when your API moves beyond internal use:
- External developers need to integrate with your system without access to your codebase
- Frontend teams want to generate TypeScript types or API clients automatically
- Partners or customers require formal API documentation as part of a contract
- API testing tools like Postman can import OpenAPI specs to create test collections
- Code generators can create client SDKs in various languages from your spec
If your Structr application is only used through its own pages and you control all the code, you may not need OpenAPI at all. But as soon as others consume your API, OpenAPI saves time and prevents misunderstandings.
How It Works
Structr generates and serves the OpenAPI specification directly from your schema. There is no separate documentation file to maintain - when you request the OpenAPI endpoint, Structr reads your current schema and builds the specification on the fly. Add a property to a type or change a method signature, and the next request to the OpenAPI endpoint reflects that change.
You control what appears in the documentation: types and methods must be explicitly enabled for OpenAPI output, and you can add descriptions, summaries, and parameter documentation to make the spec useful for consumers.
Accessing the Documentation
Swagger UI
Structr includes Swagger UI, an interactive documentation interface where you can explore your API, view endpoint details, and test requests directly in the browser.
Access Swagger UI in the Admin UI:
- Open the Code area
- Click “OpenAPI” in the navigation tree on the left
Swagger UI displays all documented endpoints grouped by tag. You can expand any endpoint to see its parameters, request body schema, and response format. The “Try it out” feature lets you execute requests and see real responses.
JSON Endpoints
The raw OpenAPI specification is available at:
/structr/openapi
This returns the complete OpenAPI document as JSON. You can use this URL with any OpenAPI-compatible tool - code generators, API testing tools, or documentation platforms.
When you organize your API with tags, each tag also gets its own endpoint:
/structr/openapi/<tag>.json
For example, if you tag your project management types with “projects”, the documentation is available at /structr/openapi/projects.json. This is useful when you want to share only a subset of your API with specific consumers.
Configuring Types for OpenAPI
By default, types are not included in the OpenAPI output. To document a type and its endpoints, you must explicitly enable it and assign a tag. Methods on that type must also be enabled separately - enabling a type does not automatically include all its methods.
Note: OpenAPI visibility requires explicit opt-in at two levels: first enable the type, then enable each method you want to document. This gives you fine-grained control over what appears in your API documentation.
Enabling OpenAPI Output for Types
In the Schema area or Code area:
- Select the type you want to document
- Open the type settings
- Enable “Include in OpenAPI output”
- Enter a tag name (e.g., “projects”, “users”, “public-api”)
All types with the same tag are grouped together in the documentation. The tag also determines the URL for the tag-specific endpoint (/structr/openapi/<tag>.json).
Type Documentation Fields
Each type has fields for OpenAPI documentation:
| Field | Purpose |
|---|---|
| Summary | A short one-line description shown in endpoint lists |
| Description | A detailed explanation shown when the endpoint is expanded |
Write the summary for scanning - developers should understand what the type represents at a glance. Use the description for details: what the type is used for, important relationships, or usage notes.
Documenting Methods
Schema methods must also be explicitly enabled for OpenAPI output - just enabling the type is not enough. Each method you want to document needs its own OpenAPI configuration.
Enabling OpenAPI Output for Methods
In the Schema area or Code area:
- Select the method you want to document
- Open the API tab
- Enable OpenAPI output for this method
- Add summary, description, and parameter documentation
Methods marked as “Not callable via HTTP” cannot be included in OpenAPI documentation since they are not accessible via the REST API.
Method Documentation Fields
| Field | Purpose |
|---|---|
| Summary | A short description of what the method does |
| Description | Detailed explanation, including side effects or prerequisites |
Parameter Documentation
In the API tab, you can define typed parameters for your method. Each parameter has:
| Field | Purpose |
|---|---|
| Name | The parameter name as it appears in requests |
| Type | The expected data type (String, Integer, Boolean, etc.) |
| Description | What the parameter is used for |
| Required | Whether the parameter must be provided |
Structr validates incoming requests against these definitions before your code runs. This provides automatic input validation and generates accurate parameter documentation.
Example: Documenting a Search Method
For a method searchProjects that searches projects by keyword:
| Setting | Value |
|---|---|
| Summary | Search projects by keyword |
| Description | Returns all projects where the name or description contains the search term. Results are sorted by relevance. |
Parameters:
| Name | Type | Required | Description |
|---|---|---|---|
| query | String | Yes | The search term to match against project names and descriptions |
| limit | Integer | No | Maximum number of results (default: 20) |
| offset | Integer | No | Number of results to skip for pagination |
Documenting User-Defined Functions
User-defined functions (global schema methods) can also be documented for OpenAPI. The same fields are available: summary, description, and typed parameters.
This is useful when you create utility endpoints that don’t belong to a specific type - for example, a global search across multiple types or a health check endpoint.
Global Settings
Configure global OpenAPI settings in structr.conf or through the Configuration Interface:
| Setting | Default | Description |
|---|---|---|
openapiservlet.server.title | Structr REST Server | The title shown at the top of the documentation |
openapiservlet.server.version | 1.0.1 | The API version number |
Set these to match your application:
openapiservlet.server.title = Project Management API
openapiservlet.server.version = 2.1.0
The title appears prominently in Swagger UI and helps consumers identify which API they are viewing. The version number should follow semantic versioning and be updated when you make changes to your API.
Standard Endpoints
Structr automatically documents the standard endpoints for authentication and system operations:
/structr/rest/login- Session-based login/structr/rest/logout- End the current session/structr/rest/token- JWT token creation and refresh/structr/rest/me- Current user information
These endpoints appear in the documentation without additional configuration.
Organizing Your API
Choosing Tags
Tags group related endpoints in the documentation. Choose tags based on how API consumers think about your domain:
| Approach | Example Tags |
|---|---|
| By domain area | projects, tasks, users, reports |
| By access level | public, internal, admin |
| By consumer | mobile-app, web-frontend, integrations |
You can use multiple tag strategies by giving some types domain tags and others access-level tags. A type can only have one tag, so choose the most useful grouping for your consumers.
What to Include
Not every type needs to be in the OpenAPI documentation. Consider including:
- Types that external consumers interact with directly
- Types that represent your domain model
- Utility methods that provide specific functionality
Consider excluding:
- Internal types used only by your application logic
- Types that are implementation details
- Methods that should not be called by external consumers (mark these as “Not callable via HTTP”)
Best Practices
Write for Your Consumers
Documentation is for people who don’t know your codebase. Avoid jargon, explain abbreviations, and provide context. A good description answers: What is this? When would I use it? What should I know before using it?
Keep Summaries Short
Summaries appear in lists and should be scannable. Aim for under 60 characters. Save details for the description field.
Document Side Effects
If a method sends emails, creates related objects, or has other side effects, document them. Consumers need to know what happens when they call your API.
Version Your API
Update openapiservlet.server.version when you make breaking changes. This helps consumers know when they need to update their integrations.
Review the Output
Periodically open Swagger UI and review your documentation as a consumer would. Look for missing descriptions, unclear summaries, or undocumented parameters.
Related Topics
- REST Interface - How the REST API works and how to access it
- Data Model - Configuring types and their OpenAPI settings
- Business Logic - Creating methods and configuring their API exposure
- Code Area (Admin UI) - Using Swagger UI and the method editor
JDBC
Structr can query external SQL databases directly using the jdbc() function. This allows you to import data from MySQL, PostgreSQL, Oracle, SQL Server, or any other database with a JDBC driver, without setting up intermediate services or ETL pipelines.
When to Use JDBC
JDBC integration is useful when you need to:
- Import data from existing SQL databases into Structr
- Synchronize data between Structr and legacy systems
- Query external databases without migrating data
- Build dashboards that combine Structr data with external sources
For ongoing synchronization, combine JDBC queries with scheduled tasks. For one-time imports, run the query manually or through a schema method.
Prerequisites
JDBC drivers are not included with Structr. Before using the jdbc() function, you must install the appropriate driver for your database.
Installing a JDBC Driver
- Download the JDBC driver JAR for your database:
- MySQL: MySQL Connector/J
- PostgreSQL: PostgreSQL JDBC Driver
- SQL Server: Microsoft JDBC Driver
- Oracle: Oracle JDBC Driver
- Copy the JAR file to Structr’s
libdirectory:
cp mysql-connector-java-8.0.33.jar /opt/structr/lib/
- Restart Structr to load the driver
The jdbc() Function
The jdbc() function executes an SQL statement against an external database and returns any results.
Syntax
$.jdbc(url, query)
$.jdbc(url, query, username, password)
| Parameter | Description |
|---|---|
url | JDBC connection URL including host, port, and database name |
query | SQL statement to execute |
username | Optional: Database username (can also be included in URL) |
password | Optional: Database password (can also be included in URL) |
Return Value
For SELECT statements, the function returns an array of objects. Each object represents a row, with properties matching the column names.
[
    { id: 1, name: "Alice", email: "alice@example.com" },
    { id: 2, name: "Bob", email: "bob@example.com" }
]
For INSERT, UPDATE, and DELETE statements, the function executes the statement but returns an empty result.
Connection URLs
JDBC connection URLs follow a standard format but vary slightly by database:
| Database | URL Format |
|---|---|
| MySQL | jdbc:mysql://host:3306/database |
| PostgreSQL | jdbc:postgresql://host:5432/database |
| SQL Server | jdbc:sqlserver://host:1433;databaseName=database |
| Oracle | jdbc:oracle:thin:@host:1521:database |
| MariaDB | jdbc:mariadb://host:3306/database |
Authentication
You can provide credentials either as separate parameters or in the URL:
// Credentials as parameters (recommended)
let result = $.jdbc("jdbc:mysql://localhost:3306/mydb", "SELECT * FROM users", "admin", "secret");

// Credentials in URL
let result = $.jdbc("jdbc:mysql://localhost:3306/mydb?user=admin&password=secret", "SELECT * FROM users");
Examples
Importing from MySQL
{
    let url = "jdbc:mysql://localhost:3306/legacy_crm";
    let query = "SELECT id, name, email, created_at FROM customers WHERE active = 1";

    let rows = $.jdbc(url, query, "reader", "secret");

    for (let row of rows) {
        $.create('Customer', {
            externalId: row.id,
            name: row.name,
            eMail: row.email,
            importedAt: $.now
        });
    }

    $.log('Imported ' + $.size(rows) + ' customers');
}
Querying PostgreSQL
{
    let url = "jdbc:postgresql://db.example.com:5432/analytics";
    let query = "SELECT product_id, SUM(quantity) as total FROM orders GROUP BY product_id";

    let rows = $.jdbc(url, query, "readonly", "secret");

    for (let row of rows) {
        let product = $.first($.find('Product', 'externalId', row.product_id));
        if (product) {
            product.totalOrders = row.total;
        }
    }
}
Querying SQL Server
{
    let url = "jdbc:sqlserver://sqlserver.example.com:1433;databaseName=inventory";
    let query = "SELECT sku, stock_level, warehouse FROM inventory WHERE stock_level < 10";

    let rows = $.jdbc(url, query, "reader", "secret");

    // Process low-stock items
    for (let row of rows) {
        $.create('LowStockAlert', {
            sku: row.sku,
            currentStock: row.stock_level,
            warehouse: row.warehouse,
            alertDate: $.now
        });
    }
}
Writing to External Databases
The jdbc() function can also execute INSERT, UPDATE, and DELETE statements:
{
    let url = "jdbc:mysql://localhost:3306/external_system";

    // Insert a record
    $.jdbc(url, "INSERT INTO sync_log (source, timestamp, status) VALUES ('structr', NOW(), 'completed')", "writer", "secret");

    // Update records
    $.jdbc(url, "UPDATE orders SET synced = 1 WHERE synced = 0", "writer", "secret");

    // Delete old records
    $.jdbc(url, "DELETE FROM temp_data WHERE created_at < DATE_SUB(NOW(), INTERVAL 7 DAY)", "writer", "secret");
}
Write operations execute successfully but don’t return affected row counts. If you need confirmation, query the data afterward or use database-specific techniques like SELECT LAST_INSERT_ID().
Scheduled Synchronization
Combine JDBC with scheduled tasks for regular data synchronization:
// Global schema method: syncExternalOrders
// Cron expression: 0 */15 * * * * (every 15 minutes)
{
    let lastSync = $.first($.find('SyncStatus', 'name', 'orders'));
    let since = lastSync ? lastSync.lastRun : '1970-01-01';

    let query = "SELECT * FROM orders WHERE updated_at > '" + since + "' ORDER BY updated_at";
    let rows = $.jdbc("jdbc:mysql://orders.example.com:3306/shop", query, "sync", "secret");

    for (let row of rows) {
        let existing = $.first($.find('Order', 'externalId', row.id));

        if (existing) {
            existing.status = row.status;
            existing.updatedAt = $.now;
        } else {
            $.create('Order', {
                externalId: row.id,
                customerEmail: row.customer_email,
                total: row.total,
                status: row.status
            });
        }
    }

    // Update sync timestamp
    if (!lastSync) {
        lastSync = $.create('SyncStatus', { name: 'orders' });
    }
    lastSync.lastRun = $.now;

    $.log('Synced ' + $.size(rows) + ' orders');
}
Supported Databases
JDBC drivers are loaded automatically based on the connection URL (JDBC 4.0 auto-discovery). The following databases are commonly used with Structr:
| Database | Driver JAR | Example URL |
|---|---|---|
| MySQL | mysql-connector-java-x.x.x.jar | jdbc:mysql://host:3306/db |
| PostgreSQL | postgresql-x.x.x.jar | jdbc:postgresql://host:5432/db |
| SQL Server | mssql-jdbc-x.x.x.jar | jdbc:sqlserver://host:1433;databaseName=db |
| Oracle | ojdbc8.jar | jdbc:oracle:thin:@host:1521:sid |
| MariaDB | mariadb-java-client-x.x.x.jar | jdbc:mariadb://host:3306/db |
| H2 | h2-x.x.x.jar | jdbc:h2:~/dbfile |
| SQLite | sqlite-jdbc-x.x.x.jar | jdbc:sqlite:/path/to/db.sqlite |
Error Handling
Wrap JDBC calls in try-catch blocks to handle connection failures and query errors:
{
    try {
        let rows = $.jdbc("jdbc:mysql://localhost:3306/mydb", "SELECT * FROM customers", "admin", "secret");

        // Process results
        for (let row of rows) {
            $.create('Customer', { name: row.name });
        }

    } catch (e) {
        $.log('JDBC error: ' + e.message);

        // Optionally notify administrators
        $.sendPlaintextMail(
            'alerts@example.com', 'System',
            'admin@example.com', 'Admin',
            'JDBC Import Failed',
            'Error: ' + e.message
        );
    }
}
Common errors:
| Error | Cause |
|---|---|
No suitable JDBC driver found | JDBC driver JAR not in lib directory, restart Structr after adding |
Access denied | Invalid username or password |
Unknown database | Database name incorrect or doesn’t exist |
Connection refused | Database server not reachable (check host, port, firewall) |
Best Practices
Use Appropriate Credentials
For read-only operations, create a dedicated database user with minimal permissions:
-- MySQL example: read-only user
CREATE USER 'structr_reader'@'%' IDENTIFIED BY 'password';
GRANT SELECT ON legacy_db.* TO 'structr_reader'@'%';
For write operations, grant only the necessary permissions:
-- MySQL example: limited write access
CREATE USER 'structr_sync'@'%' IDENTIFIED BY 'password';
GRANT SELECT, INSERT, UPDATE ON external_db.sync_log TO 'structr_sync'@'%';
Limit Result Sets
For large tables, use LIMIT or WHERE clauses to avoid memory issues:
// Bad: fetches entire table
let rows = $.jdbc(url, "SELECT * FROM orders", user, pass);

// Good: fetches only what you need
let rows = $.jdbc(url, "SELECT * FROM orders WHERE created_at > '2024-01-01' LIMIT 1000", user, pass);
Store Connection Details Securely
Don’t hardcode credentials in your scripts. Use a dedicated configuration type:
{
    let config = $.first($.find('JdbcConfig', 'name', 'legacy_crm'));
    let url = "jdbc:mysql://" + config.host + ":" + config.port + "/" + config.database;

    let rows = $.jdbc(url, "SELECT * FROM customers", config.username, config.password);
    // ...
}
Handle Column Name Differences
Map external column names to Structr property names explicitly:
for (let row of rows) {
    $.create('Customer', {
        name: row.customer_name,      // External: customer_name → Structr: name
        eMail: row.email_address,     // External: email_address → Structr: eMail
        phone: row.phone_number       // External: phone_number → Structr: phone
    });
}
Limitations
- Large result sets are loaded entirely into memory. For very large imports, paginate with
LIMITandOFFSET. - Connection pooling is not supported. Each call opens a new connection. For high-frequency queries, consider caching results.
- Write operations (
INSERT,UPDATE,DELETE) execute successfully but don’t return affected row counts.
Related Topics
- Scheduled Tasks - Running JDBC imports on a schedule
- Data Creation & Import - Other import methods including CSV and REST
- Business Logic - Processing imported data in schema methods
MongoDB
Structr can connect to MongoDB databases using the mongodb() function. This function returns a MongoDB collection object that you can use to query, insert, update, and delete documents using the standard MongoDB Java driver API.
When to Use MongoDB
MongoDB integration is useful when you need to:
- Query document databases that store data in flexible JSON-like structures
- Integrate with existing MongoDB systems without migrating data
- Combine Structr’s graph database with MongoDB’s document storage
- Access analytics or logging data stored in MongoDB
Unlike JDBC, MongoDB integration requires no driver installation - the MongoDB client library is included with Structr.
The mongodb() Function
The mongodb() function connects to a MongoDB server and returns a collection object.
Syntax
$.mongodb(url, database, collection)
| Parameter | Description |
|---|---|
url | MongoDB connection URL (e.g., mongodb://localhost:27017) |
database | Database name |
collection | Collection name |
Return Value
The function returns a MongoCollection object. You can call MongoDB operations directly on this object, such as find(), insertOne(), updateOne(), deleteOne(), and others.
The bson() Function
MongoDB queries and documents must be passed as BSON objects. Use the $.bson() function to convert JavaScript objects to BSON:
$.bson({ name: 'John', status: 'active' })
Reading Data
Find All Documents
{
    let collection = $.mongodb('mongodb://localhost:27017', 'mydb', 'customers');
    let results = collection.find();

    for (let doc of results) {
        $.log('Customer: ' + doc.get('name'));
    }
}
Important: Results from
find()are not native JavaScript arrays. Usefor...ofto iterate - methods like.filter()or.map()are not available.Important: Documents in the result are not native JavaScript objects. Use
doc.get('fieldName')instead ofdoc.fieldNameto access properties.
Find with Query
Filter documents using a BSON query:
{
    let collection = $.mongodb('mongodb://localhost:27017', 'mydb', 'customers');
    let results = collection.find($.bson({ status: 'active' }));

    for (let doc of results) {
        $.create('Customer', {
            mongoId: doc.get('_id').toString(),
            name: doc.get('name'),
            email: doc.get('email')
        });
    }
}
Find with Query Operators
MongoDB query operators work as expected:
{
    let collection = $.mongodb('mongodb://localhost:27017', 'mydb', 'orders');

    // Find orders over $100
    let results = collection.find($.bson({ total: { $gt: 100 } }));

    for (let doc of results) {
        $.log('Order: ' + doc.get('orderId') + ' - $' + doc.get('total'));
    }
}
Find with Regular Expressions
{
    let collection = $.mongodb('mongodb://localhost:27017', 'mydb', 'products');

    // Find products with names matching a pattern
    let results = collection.find($.bson({ name: { $regex: 'Test[0-9]' } }));

    for (let doc of results) {
        $.log('Product: ' + doc.get('name'));
    }
}
Find with Date Comparisons
{
    let collection = $.mongodb('mongodb://localhost:27017', 'mydb', 'events');

    // Find events from 2024 onwards
    let results = collection.find($.bson({
        date: { $gte: new Date(2024, 0, 1) }
    }));

    for (let doc of results) {
        $.log('Event: ' + doc.get('name') + ' on ' + doc.get('date'));
    }
}
Query Operators
Common MongoDB query operators:
| Operator | Description | Example |
|---|---|---|
$eq | Equal | { status: { $eq: 'active' } } |
$ne | Not equal | { status: { $ne: 'deleted' } } |
$gt | Greater than | { price: { $gt: 100 } } |
$gte | Greater than or equal | { price: { $gte: 100 } } |
$lt | Less than | { stock: { $lt: 10 } } |
$lte | Less than or equal | { stock: { $lte: 10 } } |
$in | In array | { status: { $in: ['active', 'pending'] } } |
$regex | Regular expression | { name: { $regex: '^Test' } } |
$exists | Field exists | { email: { $exists: true } } |
For the full list of operators, see the MongoDB Query Operators documentation.
Writing Data
Insert One Document
{
    let collection = $.mongodb('mongodb://localhost:27017', 'mydb', 'customers');

    collection.insertOne($.bson({
        name: 'John Doe',
        email: 'john@example.com',
        createdAt: new Date()
    }));
}
Insert with Date Fields
{
    let collection = $.mongodb('mongodb://localhost:27017', 'mydb', 'events');

    collection.insertOne($.bson({
        name: 'Conference',
        date: new Date(2024, 6, 15),
        attendees: 100
    }));
}
Updating Data
Update One Document
{
    let collection = $.mongodb('mongodb://localhost:27017', 'mydb', 'customers');

    collection.updateOne(
        $.bson({ email: 'john@example.com' }),
        $.bson({ $set: { status: 'inactive' } })
    );
}
Update Many Documents
{
    let collection = $.mongodb('mongodb://localhost:27017', 'mydb', 'orders');

    collection.updateMany(
        $.bson({ status: 'pending' }),
        $.bson({ $set: { status: 'cancelled', cancelledAt: new Date() } })
    );
}
Deleting Data
Delete One Document
{
    let collection = $.mongodb('mongodb://localhost:27017', 'mydb', 'customers');

    collection.deleteOne($.bson({ email: 'john@example.com' }));
}
Delete Many Documents
{
    let collection = $.mongodb('mongodb://localhost:27017', 'mydb', 'logs');

    // Delete logs older than 30 days
    let cutoff = new Date(Date.now() - 30 * 24 * 60 * 60 * 1000);
    collection.deleteMany($.bson({ timestamp: { $lt: cutoff } }));
}
Examples
Importing MongoDB Data into Structr
{
    let collection = $.mongodb('mongodb://localhost:27017', 'crm', 'contacts');
    let results = collection.find($.bson({ active: true }));

    let count = 0;
    for (let doc of results) {
        let mongoId = doc.get('_id').toString();

        // Check if already imported
        let existing = $.first($.find('Contact', 'mongoId', mongoId));

        if (!existing) {
            $.create('Contact', {
                mongoId: mongoId,
                name: doc.get('name'),
                email: doc.get('email'),
                phone: doc.get('phone'),
                importedAt: $.now
            });
            count++;
        }
    }

    $.log('Imported ' + count + ' new contacts');
}
Insert and Query
{
    let collection = $.mongodb('mongodb://localhost:27017', 'testDatabase', 'testCollection');

    // Insert a record
    collection.insertOne($.bson({
        name: 'Test4',
        createdAt: new Date()
    }));

    // Query all records with that name
    let results = collection.find($.bson({ name: 'Test4' }));

    for (let doc of results) {
        $.log('Found: ' + doc.get('name') + ' created at ' + doc.get('createdAt'));
    }
}
Scheduled Sync
// Global schema method: syncFromMongo
// Cron expression: 0 */15 * * * * (every 15 minutes)
{
    let collection = $.mongodb('mongodb://analytics.example.com:27017', 'events', 'pageviews');

    // Get last sync time
    let syncStatus = $.first($.find('SyncStatus', 'name', 'mongo_pageviews'));
    let since = syncStatus ? syncStatus.lastRun : new Date(0);

    let results = collection.find($.bson({
        timestamp: { $gt: since }
    }));

    let count = 0;
    for (let doc of results) {
        $.create('PageView', {
            path: doc.get('path'),
            userId: doc.get('userId'),
            timestamp: doc.get('timestamp')
        });
        count++;
    }

    // Update sync status
    if (!syncStatus) {
        syncStatus = $.create('SyncStatus', { name: 'mongo_pageviews' });
    }
    syncStatus.lastRun = $.now;

    $.log('Synced ' + count + ' pageviews from MongoDB');
}
Available Collection Methods
The returned collection object exposes all methods from the MongoDB Java Driver’s MongoCollection class. Common methods include:
| Method | Description |
|---|---|
find() | Find all documents |
find(query) | Find documents matching query |
insertOne(document) | Insert one document |
insertMany(documents) | Insert multiple documents |
updateOne(query, update) | Update first matching document |
updateMany(query, update) | Update all matching documents |
deleteOne(query) | Delete first matching document |
deleteMany(query) | Delete all matching documents |
countDocuments() | Count all documents |
countDocuments(query) | Count matching documents |
For the complete API, see the MongoDB Java Driver documentation.
Connection URL
The MongoDB connection URL follows the standard MongoDB connection string format:
mongodb://[username:password@]host[:port][/database][?options]
Examples:
| Scenario | URL |
|---|---|
| Local, default port | mongodb://localhost:27017 |
| Local, short form | mongodb://localhost |
| With authentication | mongodb://user:pass@localhost:27017 |
| Remote server | mongodb://mongo.example.com:27017 |
| Replica set | mongodb://host1:27017,host2:27017,host3:27017/?replicaSet=mySet |
Important Notes
Results Are Not Native JavaScript
Results from find() behave differently than native JavaScript:
// This does NOT work:
let results = collection.find();
let filtered = results.filter(d => d.status === 'active');  // Error!
let name = results[0].name;  // Error!

// This works:
for (let doc of results) {
    let name = doc.get('name');  // Use .get() for properties
}
Always Use bson() for Queries
Pass all query and document objects through $.bson():
// This does NOT work:
collection.find({ name: 'John' });  // Error!

// This works:
collection.find($.bson({ name: 'John' }));
Convert ObjectIds to Strings
MongoDB’s _id field is an ObjectId. Convert it to a string when storing in Structr:
let mongoId = doc.get('_id').toString();
Error Handling
{
    try {
        let collection = $.mongodb('mongodb://localhost:27017', 'mydb', 'customers');
        let results = collection.find();

        for (let doc of results) {
            $.create('Customer', {
                name: doc.get('name')
            });
        }

    } catch (e) {
        $.log('MongoDB error: ' + e.message);
    }
}
Testing with Docker
To quickly set up a local MongoDB instance for testing:
docker run -d -p 27017:27017 mongo
This starts MongoDB on the default port, accessible at mongodb://localhost:27017.
Related Topics
- JDBC - Connecting to SQL databases
- Scheduled Tasks - Running MongoDB operations on a schedule
- Business Logic - Processing imported data in schema methods
FTP
Structr includes a built-in FTP server that provides file access to the virtual filesystem. Users can connect with any FTP client and browse, upload, or download files according to their permissions.
Configuration
Enable and configure the FTP server in the Configuration Interface or in structr.conf:
| Setting | Description | Default |
|---|---|---|
application.ftp.enabled | Enable FTP server | false |
application.ftp.port | FTP port | 8021 |
Authentication
FTP authentication uses Structr user accounts with password authentication. Users log in with their Structr username and password.
# Connect with lftp
lftp -p 8021 -u username localhost

# Connect with standard ftp client
ftp localhost 8021
File Visibility
After authentication, the FTP connection shows files and folders based on the user’s permissions in Structr’s virtual filesystem.
Regular users see:
- Files and folders they have read access to
- File owners only for nodes they have read rights on
- Files are hidden if their parent folder is not accessible
Admin users see:
- All files and folders in the system
- All file owners
Example: Regular User
$ lftp -p 8021 -u user1 localhost
Password: *****
lftp user1@localhost:~> ls
drwx------   1              0 Jun 30 15:22 testFolder
-rw-------   1 user1      347 Jun 30 09:24 test1.txt
-rw-------   1             25 Jun 30 15:41 test2.txt
-rw-------   1              5 Jun 30 09:24 test3.txt
-rw-------   1 user1        5 Jun 30 09:24 test4.txt
Files without visible owner (test2.txt, test3.txt) belong to users that user1 cannot see.
Example: Admin User
$ lftp -p 8021 -u admin localhost
Password: *****
lftp admin@localhost:~> ls
drwx------   1 admin        0 Jun 30 15:22 testFolder
-rw-------   1 user1      347 Jun 30 09:24 test1.txt
-rw-------   1 admin       25 Jun 30 09:24 test2.txt
-rw-------   1 user2        5 Jun 30 09:24 test3.txt
-rw-------   1 user1        5 Jun 30 09:24 test4.txt
Admin users see all files and their owners.
Supported Operations
The FTP server supports standard file operations:
| Operation | Description |
|---|---|
ls / dir | List files and folders |
cd | Change directory |
get | Download file |
put | Upload file |
mkdir | Create directory |
rm | Delete file |
rmdir | Delete directory |
All operations respect Structr’s permission system. Users can only perform operations they have rights for.
Use Cases
FTP access is useful for:
- Bulk file transfers - Upload or download many files at once
- Automated backups - Script file retrieval from Structr
- Legacy integration - Connect systems that only support FTP
- Direct file management - Use familiar FTP clients instead of the web interface
Security Considerations
- FTP transmits credentials in plain text. Consider using FTPS or restricting access to trusted networks.
- The FTP server binds to all interfaces by default. Use firewall rules to limit access if needed.
- File permissions in FTP mirror Structr’s security model - users cannot access files they don’t have rights to.
Related Topics
- Files & Folders - Structr’s virtual filesystem
- Users & Groups - Managing user accounts and permissions
- Security - Access control and permissions
Message Brokers
Structr can connect to message brokers to send and receive messages asynchronously. This enables event-driven architectures, real-time data pipelines, and integration with external systems through industry-standard messaging protocols.
When to Use Message Brokers
Message brokers are useful when you need to:
- Decouple systems - Send data to other services without waiting for a response
- Process events asynchronously - Handle incoming events in the background
- Integrate with IoT devices - Receive sensor data or send commands via MQTT
- Build data pipelines - Stream data to analytics systems via Kafka or Pulsar
- Enable real-time communication - React to events from external systems immediately
If you only need to push updates to browsers, Server-Sent Events may be simpler. Message brokers are for system-to-system communication.
Supported Brokers
Structr supports three message broker protocols:
| Broker | Protocol | Typical Use Case |
|---|---|---|
| MQTT | Lightweight publish/subscribe | IoT, sensors, mobile apps |
| Kafka | Distributed streaming | High-throughput data pipelines, event sourcing |
| Pulsar | Cloud-native messaging | Multi-tenant messaging, geo-replication |
All three use the same programming model in Structr: create a client, configure subscribers, and process incoming messages with callbacks.
Core Concepts
Message Clients
A message client represents a connection to a broker. In Structr, clients are database objects - you create them like any other data object, either through the Admin UI or via $.create() in scripts. Each broker type has its own client type (MQTTClient, KafkaClient, PulsarClient) with broker-specific configuration properties, but they all share the same interface for sending messages and managing subscriptions.
When you enable a client, Structr establishes and maintains the connection in the background. The connection persists independently of HTTP requests or user sessions.
Message Subscribers
A MessageSubscriber is a database object that defines what happens when a message arrives. You create subscribers and link them to one or more clients. Each subscriber has:
- topic - Which topic to listen to (use
*for all topics) - callback - Code that runs when a message arrives (stored as a string property)
- clients - Which client(s) this subscriber is connected to (a relationship to MessageClient objects)
When a message arrives on a matching topic, Structr executes the callback code with two special variables available:
$.topic- The topic the message was published to$.message- The message content (typically a string or JSON)
The Basic Pattern
Message broker integration in Structr works through database objects. Clients and subscribers are regular Structr objects that you create, configure, and link - just like any other data in your application. This means you can create them through the Admin UI or programmatically via scripts.
Setting up via Admin UI:
- Open the Data area in the Admin UI
- Select the client type (
MQTTClient,KafkaClient, orPulsarClient) - Create a new object and fill in the connection properties
- Create a
MessageSubscriberobject with a topic and callback - Link the subscriber to the client by setting the
clientsproperty - Enable the client by checking
isEnabled(MQTT) orenabled(Kafka/Pulsar)
Setting up via Script:
The same steps work programmatically using $.create(). This is useful when you need to create clients dynamically or as part of an application setup routine.
Once the client is enabled, Structr maintains the connection in the background. Incoming messages automatically trigger the callbacks of linked subscribers. The connection persists across requests - you configure it once, and it keeps running until you disable or delete the client.
MQTT
MQTT (Message Queuing Telemetry Transport) is a lightweight protocol designed for constrained devices and low-bandwidth networks. It’s the standard for IoT applications.
MQTTClient Properties
| Property | Type | Description |
|---|---|---|
mainBrokerURL | String | Broker URL (required), e.g., ws://localhost:15675/ws |
fallbackBrokerURLs | String[] | Alternative broker URLs for failover |
username | String | Authentication username |
password | String | Authentication password |
qos | Integer | Quality of Service level (0, 1, or 2), default: 0 |
isEnabled | Boolean | Set to true to connect |
isConnected | Boolean | Connection status (read-only) |
Setting Up an MQTT Client
You can create the client and subscriber objects in the Data area of the Admin UI, or programmatically as shown below:
// Create the MQTT client
let client = $.create('MQTTClient', {
    name: 'IoT Gateway',
    mainBrokerURL: 'ws://localhost:15675/ws',
    username: 'guest',
    password: 'guest',
    qos: 1
});

// Create a subscriber for temperature readings
let subscriber = $.create('MessageSubscriber', {
    topic: 'sensors/temperature',
    callback: `{
        let data = JSON.parse($.message);
        $.log('Temperature reading: ' + data.value + '°C from ' + data.sensorId);

        // Store the reading
        $.create('TemperatureReading', {
            sensorId: data.sensorId,
            value: data.value,
            timestamp: $.now
        });
    }`
});

// Link subscriber to client
subscriber.clients = [client];

// Enable the connection
client.isEnabled = true;
When creating via the Admin UI, you fill in the same properties in the object editor. The callback property accepts StructrScript or JavaScript code as a string. After linking the subscriber to the client and enabling isEnabled, the connection activates immediately.
After enabling, the isConnected property indicates whether the connection succeeded. In the Admin UI, the client will show a green indicator when connected, red when disconnected.
Subscribing to Multiple Topics
You can create multiple subscribers for different topics:
// Subscribe to all sensor data
$.create('MessageSubscriber', {
    topic: 'sensors/*',
    callback: `{ $.call('processSensorData', { topic: $.topic, message: $.message }); }`,
    clients: [client]
});

// Subscribe to system alerts
$.create('MessageSubscriber', {
    topic: 'alerts/#',
    callback: `{ $.call('handleAlert', { topic: $.topic, message: $.message }); }`,
    clients: [client]
});
Use * to match a single level, # to match multiple levels in MQTT topic hierarchies.
Publishing Messages
Send messages using the client’s sendMessage method or the mqttPublish function:
// Using the method on the client
client.sendMessage('devices/lamp/command', JSON.stringify({ action: 'on', brightness: 80 }));

// Using the global function
$.mqttPublish(client, 'devices/lamp/command', JSON.stringify({ action: 'off' }));
MQTT-Specific Functions
| Function | Description |
|---|---|
mqttPublish(client, topic, message) | Publish a message to a topic |
mqttSubscribe(client, topic) | Subscribe to a topic programmatically |
mqttUnsubscribe(client, topic) | Unsubscribe from a topic |
Quality of Service Levels
MQTT supports three QoS levels:
| Level | Name | Guarantee |
|---|---|---|
| 0 | At most once | Message may be lost |
| 1 | At least once | Message delivered, may be duplicated |
| 2 | Exactly once | Message delivered exactly once |
Higher QoS levels add overhead. Use QoS 0 for frequent sensor readings where occasional loss is acceptable, QoS 1 or 2 for important commands or events.
Kafka
Apache Kafka is a distributed streaming platform designed for high-throughput, fault-tolerant messaging. It’s commonly used for data pipelines and event sourcing.
KafkaClient Properties
| Property | Type | Description |
|---|---|---|
servers | String[] | Bootstrap server addresses, e.g., ['localhost:9092'] |
groupId | String | Consumer group ID for coordinated consumption |
enabled | Boolean | Set to true to connect |
Setting Up a Kafka Client
Create the client and subscriber objects in the Data area, or programmatically:
// Create the Kafka client
let client = $.create('KafkaClient', {
    name: 'Event Processor',
    servers: ['kafka1.example.com:9092', 'kafka2.example.com:9092'],
    groupId: 'structr-consumers'
});

// Create a subscriber for order events
let subscriber = $.create('MessageSubscriber', {
    topic: 'orders',
    callback: `{
        let order = JSON.parse($.message);
        $.log('New order received: ' + order.orderId);

        $.create('Order', {
            externalId: order.orderId,
            customerEmail: order.customer.email,
            totalAmount: order.total,
            status: 'received'
        });
    }`,
    clients: [client]
});

// Enable the connection
client.enabled = true;
The servers property accepts an array of bootstrap servers. Kafka clients connect to any available server and discover the full cluster topology automatically.
Publishing to Kafka
let client = $.first($.find('KafkaClient', 'name', 'Event Processor'));

client.sendMessage('order-updates', JSON.stringify({
    orderId: order.externalId,
    status: 'shipped',
    trackingNumber: 'ABC123',
    timestamp: new Date().toISOString()
}));
Consumer Groups
The groupId property determines how multiple consumers coordinate. Consumers in the same group share the workload - each message is processed by only one consumer in the group. Different groups receive all messages independently.
Use the same groupId across multiple Structr instances to distribute processing. Use different group IDs if each instance needs to see all messages.
Pulsar
Apache Pulsar is a cloud-native messaging platform that combines messaging and streaming. It supports multi-tenancy and geo-replication out of the box.
PulsarClient Properties
| Property | Type | Description |
|---|---|---|
servers | String[] | Service URLs, e.g., ['pulsar://localhost:6650'] |
enabled | Boolean | Set to true to connect |
Setting Up a Pulsar Client
Create the client and subscriber objects in the Data area, or programmatically:
// Create the Pulsar client
let client = $.create('PulsarClient', {
    name: 'Analytics Pipeline',
    servers: ['pulsar://pulsar.example.com:6650']
});

// Create a subscriber for analytics events
let subscriber = $.create('MessageSubscriber', {
    topic: 'analytics/pageviews',
    callback: `{
        let event = JSON.parse($.message);

        $.create('PageView', {
            path: event.path,
            userId: event.userId,
            sessionId: event.sessionId,
            timestamp: $.parseDate(event.timestamp, "yyyy-MM-dd'T'HH:mm:ss.SSSZ")
        });
    }`,
    clients: [client]
});

// Enable the connection
client.enabled = true;
Pulsar clients have minimal configuration. The servers property accepts Pulsar service URLs, typically starting with pulsar:// for unencrypted or pulsar+ssl:// for TLS connections.
Publishing to Pulsar
let client = $.first($.find('PulsarClient', 'name', 'Analytics Pipeline'));

client.sendMessage('analytics/events', JSON.stringify({
    type: 'conversion',
    userId: user.id,
    product: product.name,
    value: product.price,
    timestamp: new Date().toISOString()
}));
Working with Callbacks
Callback Context
Inside a callback, you have access to:
| Variable | Description |
|---|---|
$.topic | The topic the message arrived on |
$.message | The message content as a string |
$.this | The MessageSubscriber object |
Forwarding to Schema Methods
For complex processing, forward messages to a global schema method:
// Simple callback that delegates to a method
$.create('MessageSubscriber', {
    topic: '*',
    callback: `{ $.call('handleIncomingMessage', { topic: $.topic, message: $.message }); }`
});
Then implement the logic in your schema method where you have full access to error handling, transactions, and other methods:
// Global schema method: handleIncomingMessage
{
    let topic = $.arguments.topic;
    let message = $.arguments.message;

    try {
        let data = JSON.parse(message);

        if (topic.startsWith('sensors/')) {
            processSensorData(topic, data);
        } else if (topic.startsWith('orders/')) {
            processOrderEvent(topic, data);
        } else {
            $.log('Unknown topic: ' + topic);
        }
    } catch (e) {
        $.log('Error processing message: ' + e.message);
        // Store failed message for retry
        $.create('FailedMessage', {
            topic: topic,
            message: message,
            error: e.message,
            timestamp: $.now
        });
    }
}
Error Handling
Callbacks should handle errors gracefully. Unhandled exceptions are logged but don’t stop message processing. For critical messages, implement your own retry logic:
$.create('MessageSubscriber', {
    topic: 'critical-events',
    callback: `{
        try {
            let event = JSON.parse($.message);
            processEvent(event);
        } catch (e) {
            // Log and store for manual review
            $.log('Failed to process critical event: ' + e.message);
            $.create('FailedEvent', {
                topic: $.topic,
                payload: $.message,
                error: e.message
            });
        }
    }`
});
Managing Connections
Checking Connection Status
For MQTT clients, check the isConnected property:
let client = $.first($.find('MQTTClient', 'name', 'IoT Gateway'));

if (!client.isConnected) {
    $.log('MQTT client is disconnected, attempting reconnect...');
    client.isEnabled = false;
    client.isEnabled = true;
}
Disabling and Re-enabling
To temporarily stop processing:
// Disable
client.isEnabled = false;  // or client.enabled = false for Kafka/Pulsar

// Re-enable
client.isEnabled = true;
Disabling disconnects from the broker. Re-enabling reconnects and resubscribes to all configured topics.
Cleaning Up
Deleting a client automatically closes the connection and cleans up resources. Subscribers linked only to that client become inactive but are not automatically deleted.
Best Practices
Use JSON for Messages
Structure your messages as JSON for easy parsing and forward compatibility:
client.sendMessage('events', JSON.stringify({
    type: 'user.created',
    version: 1,
    timestamp: new Date().toISOString(),
    data: {
        userId: user.id,
        email: user.eMail
    }
}));
Keep Callbacks Simple
Callbacks should be short. Delegate complex logic to schema methods:
// Good: Simple callback that delegates
callback: `{ $.call('processOrder', { data: $.message }); }`

// Avoid: Complex logic directly in callback
callback: `{ /* 50 lines of processing code */ }`
Handle Connection Failures
Brokers can become unavailable. Design your application to handle disconnections gracefully and log connection issues for monitoring.
Use Meaningful Topic Names
Organize topics hierarchically for easier subscription management:
sensors/temperature/building-a/floor-1
sensors/humidity/building-a/floor-1
orders/created
orders/shipped
orders/delivered
Secure Your Connections
Use authentication (username/password for MQTT) and encrypted connections (TLS) in production. Never store credentials in callbacks - use the client properties.
Troubleshooting
Client Won’t Connect
- Verify the broker URL is correct and reachable from the Structr server
- Check authentication credentials
- Review the Structr server log for connection errors
- For MQTT, ensure the WebSocket endpoint is enabled on the broker
Messages Not Received
- Verify the subscriber’s topic matches the published topic
- Check that the subscriber is linked to the correct client
- Ensure the client is enabled and connected
- Test with topic
*to receive all messages and verify the connection works
Callback Errors
- Check the server log for exception details
- Verify JSON parsing if the message format is unexpected
- Test the callback logic in a schema method first
Related Topics
- Server-Sent Events - Pushing updates to browsers
- Scheduled Tasks - Processing queued messages periodically
- Business Logic - Implementing message handlers as schema methods
Server-Sent Events
Server-sent events (SSE) allow Structr to push messages to connected browsers in real time. Unlike traditional request-response patterns where the client polls for updates, SSE maintains an open connection that the server can use to send data whenever something relevant happens.
Common use cases include live notifications, real-time dashboards, progress updates for long-running operations, and collaborative features where multiple users need to see changes immediately.
How It Works
The browser opens a persistent connection to Structr’s EventSource endpoint. Structr keeps track of all connected clients. When your server-side code calls broadcastEvent(), Structr sends the message to all connected clients (or a filtered subset based on authentication status). The browser receives the message through its EventSource API and can update the UI accordingly.
This is a one-way channel: server to client. For bidirectional communication, consider WebSockets instead.
Important: When not used over HTTP/2, SSE is limited to a maximum of 6 open connections per browser. This limit applies across all tabs, so opening multiple tabs to the same application can exhaust available connections. Use HTTP/2 in production to avoid this limitation. See the MDN EventSource documentation for details.
Configuration
Enabling the EventSource Servlet
The EventSource servlet is not enabled by default. To activate it:
- Open the Configuration Interface
- Navigate to Servlet Settings
- Add
EventSourceServletto the list of enabled servlets - Save the configuration
- Restart the HTTP service
Note: Do not enable this servlet by editing
structr.confdirectly. The settinghttp-service.servletscontains a list of all active servlets. If you add onlyEventSourceServlettostructr.conf, all other servlets will be disabled becausestructr.confoverrides defaults rather than extending them. Always use the Configuration Interface for this setting.
Resource Access
To allow users to connect to the EventSource endpoint, create a Resource Access Permission:
| Setting | Value |
|---|---|
| Signature | _eventSource |
| Flags | GET for the appropriate user types |
For authenticated users only, grant GET to authenticated users. To allow anonymous connections, grant GET to public users as well.
Client Setup
In your frontend JavaScript, create an EventSource connection:
const source = new EventSource('/structr/EventSource', {
withCredentials: true
});
source.onmessage = function(event) {
console.log('Received:', event.data);
};
source.onerror = function(event) {
console.error('EventSource error:', event);
};
The withCredentials: true option ensures that session cookies are sent with the connection request, allowing Structr to identify authenticated users.
Handling Different Event Types
The onmessage handler only receives events with the type message. For custom event types, use addEventListener():
const source = new EventSource('/structr/EventSource', {
withCredentials: true
});
// Generic message handler
source.onmessage = function(event) {
console.log('Message:', event.data);
};
// Custom event type handlers
source.addEventListener('notification', function(event) {
showNotification(JSON.parse(event.data));
});
source.addEventListener('data-update', function(event) {
refreshData(JSON.parse(event.data));
});
source.addEventListener('maintenance', function(event) {
showMaintenanceWarning(JSON.parse(event.data));
});
Connection Management
Browsers automatically reconnect if the connection drops. You can track connection state:
source.onopen = function(event) {
console.log('Connected to EventSource');
};
source.onerror = function(event) {
if (source.readyState === EventSource.CLOSED) {
console.log('Connection closed');
} else if (source.readyState === EventSource.CONNECTING) {
console.log('Reconnecting...');
}
};
To explicitly close the connection:
source.close();
Sending Events
Structr provides two functions for sending server-sent events:
broadcastEvent()- Send to all connected clients (filtered by authentication status)sendEvent()- Send to specific users or groups
Broadcasting to All Clients
Use broadcastEvent() to send messages to all connected clients.
Function Signature:
broadcastEvent(eventType, message [, authenticatedUsers [, anonymousUsers]])
| Parameter | Type | Default | Description |
|---|---|---|---|
| eventType | String | required | The event type (use message for the generic onmessage handler) |
| message | String | required | The message content (typically JSON) |
| authenticatedUsers | Boolean | true | Send to authenticated users |
| anonymousUsers | Boolean | false | Send to anonymous users |
StructrScript:
${broadcastEvent('message', 'Hello world!')}
${broadcastEvent('message', 'For everyone', true, true)}
JavaScript:
$.broadcastEvent('message', 'Hello world!');
$.broadcastEvent('message', 'For everyone', true, true);
Sending to Specific Recipients
Use sendEvent() to send messages to specific users or groups. The message is only delivered if the recipient has an open EventSource connection.
Function Signature:
sendEvent(eventType, message, recipients)
| Parameter | Type | Description |
|---|---|---|
| eventType | String | The event type |
| message | String | The message content |
| recipients | User, Group, or List | A single user, a single group, or a list containing users and groups |
When you specify a group, all members of that group (including nested groups) receive the message.
StructrScript:
${sendEvent('message', 'Welcome!', find('User', 'name', 'Bob'))}
${sendEvent('notification', 'Team update', find('Group', 'name', 'Editors'))}
JavaScript:
// Send to a specific user
let bob = $.first($.find('User', 'name', 'Bob'));
$.sendEvent('message', 'Welcome!', bob);
// Send to a group
let editors = $.first($.find('Group', 'name', 'Editors'));
$.sendEvent('notification', 'Team update', editors);
// Send to multiple recipients (all admin users)
let admins = $.find('User', { isAdmin: true });
$.sendEvent('announcement', 'Admin meeting in 10 minutes', admins);
The function returns true if at least one recipient had an open connection and received the message, false otherwise.
Sending JSON Data
For structured data, serialize to JSON:
JavaScript:
$.broadcastEvent('message', JSON.stringify({
type: 'notification',
title: 'New Comment',
body: 'Someone commented on your post',
timestamp: new Date().getTime()
}));
On the client:
source.onmessage = function(event) {
const data = JSON.parse(event.data);
if (data.type === 'notification') {
showNotification(data.title, data.body);
}
};
Custom Event Types
Use custom event types to separate different kinds of messages:
JavaScript (server):
// Notification for the UI
$.broadcastEvent('notification', JSON.stringify({
title: 'New Message',
body: 'You have a new message from Admin'
}));
// Data update signal
$.broadcastEvent('data-update', JSON.stringify({
entity: 'Project',
id: project.id,
action: 'modified'
}));
// System maintenance warning
$.broadcastEvent('maintenance', JSON.stringify({
message: 'System maintenance in 10 minutes',
shutdownTime: new Date().getTime() + 600000
}));
Remember: custom event types require addEventListener() on the client, not onmessage.
Targeting by Authentication Status
Control who receives broadcast messages:
// Only authenticated users (default)
$.broadcastEvent('message', 'For logged-in users only', true, false);
// Only anonymous users
$.broadcastEvent('message', 'For anonymous users only', false, true);
// Everyone
$.broadcastEvent('message', 'For everyone', true, true);
Practical Examples
Live Notifications
Trigger a notification when a new comment is created. In the afterCreate method of your Comment type:
{
let notification = JSON.stringify({
type: 'new-comment',
postId: $.this.post.id,
authorName: $.this.author.name,
preview: $.this.text.substring(0, 100)
});
// Notify the post author specifically
$.sendEvent('notification', notification, $.this.post.author);
}
Or broadcast to all authenticated users:
{
let notification = JSON.stringify({
type: 'new-comment',
postId: $.this.post.id,
authorName: $.this.author.name,
preview: $.this.text.substring(0, 100)
});
$.broadcastEvent('notification', notification);
}
Progress Updates
For long-running operations, send progress updates:
{
let items = $.find('DataItem', { needsProcessing: true });
let total = $.size(items);
let processed = 0;
for (let item of items) {
// Your processing logic here
item.needsProcessing = false;
item.processedDate = $.now;
processed++;
// Send progress update every 10 items
if (processed % 10 === 0) {
$.broadcastEvent('progress', JSON.stringify({
taskId: 'data-processing',
processed: processed,
total: total,
percent: Math.round((processed / total) * 100)
}));
}
}
// Send completion message
$.broadcastEvent('progress', JSON.stringify({
taskId: 'data-processing',
processed: total,
total: total,
percent: 100,
complete: true
}));
}
Collaborative Editing
Notify other users when someone is editing a document:
{
// Notify all members of the document's team
$.sendEvent('editing', JSON.stringify({
documentId: $.this.id,
documentName: $.this.name,
userId: $.me.id,
userName: $.me.name,
action: 'started'
}), $.this.team);
}
Team Announcements
Send announcements to specific groups:
{
let engineeringTeam = $.first($.find('Group', 'name', 'Engineering'));
$.sendEvent('announcement', JSON.stringify({
title: 'Sprint Planning',
message: 'Sprint planning meeting starts in 15 minutes',
room: 'Conference Room A'
}), engineeringTeam);
}
Best Practices
Use JSON for Message Data
Always serialize structured data as JSON. This makes parsing reliable and allows you to include multiple fields:
// Good
$.broadcastEvent('message', JSON.stringify({ action: 'refresh', target: 'projects' }));
// Avoid
$.broadcastEvent('message', 'refresh:projects');
Choose Meaningful Event Types
Use descriptive event types to organize your messages:
notification- User-facing alertsdata-update- Signals that data has changedprogress- Long-running operation updatessystem- System-level messages (maintenance, etc.)
Handle Reconnection Gracefully
Clients may miss messages during reconnection. Design your application to handle this:
- Include timestamps in messages so clients can detect gaps
- Provide a way to fetch missed updates via REST API
- Consider sending a “sync” message when clients reconnect
Use Targeted Messages for Sensitive Data
broadcastEvent() sends to all connected clients matching the authentication filter. For user-specific or sensitive data, use sendEvent() with specific recipients instead:
// Bad: broadcasts salary info to everyone
$.broadcastEvent('notification', JSON.stringify({
message: 'Your salary has been updated to $75,000'
}));
// Good: sends only to the specific user
$.sendEvent('notification', JSON.stringify({
message: 'Your salary has been updated to $75,000'
}), employee);
Consider Message Volume
Broadcasting too frequently can overwhelm clients and waste bandwidth. For high-frequency updates:
- Batch multiple changes into single messages
- Throttle updates (e.g., maximum one update per second)
- Send minimal data and let clients fetch details via REST
Troubleshooting
Events Not Received
If clients are not receiving events:
- Verify the EventSource servlet is enabled in the Configuration Interface under Servlet Settings
- Check that the Resource Access Permission for
_eventSourceexists and grants GET - Confirm the client is using
withCredentials: true - Check the browser’s Network tab for the EventSource connection status
Connection Drops Frequently
EventSource connections can be closed by proxies or load balancers with short timeouts. Configure your infrastructure to allow long-lived connections, or implement reconnection logic on the client.
Wrong Event Type
If onmessage is not firing, verify you are using message as the event type. For any other event type, you must use addEventListener().
Related Topics
- Business Logic - Triggering events from lifecycle methods
- Scheduled Tasks - Sending periodic updates via SSE
- REST Interface - Complementary request-response API
Host Script Execution
Structr can execute shell scripts on the host system, allowing your application to interact with the operating system, run external tools, and integrate with other software on the server. This opens up possibilities like generating documents with external converters, running maintenance tasks from a web interface, querying system metadata, controlling Docker containers, or integrating with legacy systems.
For security reasons, scripts must be explicitly registered in the configuration file before they can be executed. You cannot run arbitrary commands, only scripts that an administrator has approved.
Registering Scripts
Scripts are registered in structr.conf using a key-value format:
my.pdf.generator = generate-pdf.sh
backup.database = db-backup.sh
docker.restart.app = restart-container.sh
The key (left side) is what you use in your code to call the script. The value (right side) is the filename of the script. Keys must be lowercase.
The Scripts Folder
All scripts must be placed in the scripts folder within your Structr installation directory. The location is controlled by the scripts.path setting, which defaults to scripts relative to base.path.
Scripts must be executable:
chmod +x scripts/generate-pdf.sh
For security, Structr does not follow symbolic links and does not allow directory traversal (paths containing ..). These restrictions can be disabled via configuration settings, but this is not recommended.
Executing Scripts
Structr provides two functions for script execution: exec() for text output and execBinary() for binary data.
exec()
The exec() function runs a script and returns its text output.
StructrScript:
${exec('my.pdf.generator')}
${exec('my.script', merge('param1', 'param2'))}
JavaScript:
$.exec('my.pdf.generator');
$.exec('my.script', ['param1', 'param2']);
Parameters are passed to the script as command-line arguments. They are automatically quoted to handle spaces and special characters.
execBinary()
The execBinary() function runs a script and streams its binary output directly to a file or HTTP response. This is essential when working with binary data like images, PDFs, or other generated files.
StructrScript:
${execBinary(response, 'my.pdf.generator')}
${execBinary(myFile, 'convert.image', merge('input.png'))}
JavaScript:
$.execBinary($.response, 'my.pdf.generator');
$.execBinary(myFile, 'convert.image', ['input.png']);
When streaming to an HTTP response, ensure the page has the correct content type set and the pageCreatesRawData flag enabled.
Parameter Masking
When passing sensitive values like passwords or API keys, you can mask them in the log output:
JavaScript:
$.exec('my.script', [
'username',
{ value: 'SECRET_API_KEY', mask: true }
]);
The masked parameter appears as *** in the log while the actual value is passed to the script.
Log Behavior
You can control how script execution is logged by passing a third parameter:
| Value | Behavior |
|---|---|
| 0 | Do not log the command line |
| 1 | Log only the script path |
| 2 | Log script path and parameters (with masking applied) |
The default is controlled by the log.scriptprocess.commandline setting.
Security Considerations
Host script execution is a powerful feature that requires careful handling.
- Only scripts registered in
structr.confcan be executed. This configuration-based allowlist prevents code injection attacks. Even if an attacker gains access to your application logic, they cannot execute arbitrary commands. - By default, script paths cannot be symbolic links. This prevents attacks where a symlink points to a sensitive file outside the scripts folder.
- Paths containing
..are rejected by default, preventing access to files outside the scripts folder. - Always validate and sanitize any user input before passing it as a parameter to a script. Never construct script parameters directly from user input without validation.
- Run Structr with a user account that has only the permissions necessary for its operation. Scripts execute with the same permissions as the Structr process.
Best Practices
- When passing parameters with special characters or receiving output that may contain special characters, encode the data as Base64. This prevents issues with quoting and escaping.
- Combine host scripts with the Cron service to run them on a schedule. Register the script in
structr.conf, then call it from a scheduled function. - Scripts should do one thing well. Complex logic is better implemented in Structr’s scripting environment where you have access to the full API.
- Use the log behavior parameter to avoid logging sensitive data while still maintaining an audit trail for debugging.
Example for Base64 encoding:
// Encode parameters
$.exec('my.script', [$.base64_encode(complexInput)]);
// Decode output
let result = $.base64_decode($.exec('my.script'));
let data = $.from_json(result);
Related Topics
- Scheduled Tasks - Running scripts automatically on a schedule
- Configuration - Setting up structr.conf
RSS Feeds
Structr can fetch and store content from RSS and Atom feeds. Create a DataFeed object with a feed URL, and Structr retrieves entries and stores them as FeedItem objects. You can configure retention limits and add custom processing logic when new items arrive.
Quick Start
To subscribe to a feed:
{
let feed = $.create('DataFeed', {
name: 'Tech News',
url: 'https://example.com/feed.xml'
});
}
When a DataFeed is created, Structr immediately fetches the feed and creates FeedItem objects for each entry. Access the items via the items property:
{
let feed = $.first($.find('DataFeed', 'name', 'Tech News'));
for (let item of feed.items) {
$.log(item.name + ' - ' + item.pubDate);
}
}
DataFeed Properties
| Property | Type | Description |
|---|---|---|
url | String | Feed URL (required) |
name | String | Display name for the feed |
description | String | Feed description (populated automatically from feed metadata) |
feedType | String | Feed format (e.g., rss_2.0, atom_1.0 - populated automatically) |
updateInterval | Long | Milliseconds between updates (used by updateIfDue()) |
lastUpdated | Date | Timestamp of the last successful fetch |
maxItems | Integer | Maximum number of items to retain |
maxAge | Long | Maximum age of items in milliseconds |
items | List | Collection of FeedItem objects |
FeedItem Properties
Each feed entry is stored as a FeedItem with these properties:
| Property | Type | Description |
|---|---|---|
name | String | Entry title |
url | String | Link to the original content |
author | String | Author name |
description | String | Entry summary or excerpt |
pubDate | Date | Publication date |
updatedDate | Date | Last modification date |
comments | String | URL to comments |
contents | List | Full content blocks (FeedItemContent objects) |
enclosures | List | Attached media (FeedItemEnclosure objects) |
feed | DataFeed | Reference to the parent feed |
FeedItemContent Properties
Some feeds include full content in addition to the description. These are stored as FeedItemContent objects:
| Property | Type | Description |
|---|---|---|
value | String | The content text or HTML |
mode | String | Content mode (e.g., escaped, xml) |
itemType | String | MIME type of the content |
item | FeedItem | Reference to the parent item |
FeedItemEnclosure Properties
Feeds often include media attachments like images, audio files, or videos. These are stored as FeedItemEnclosure objects:
| Property | Type | Description |
|---|---|---|
url | String | URL to the media file |
enclosureType | String | MIME type (e.g., image/jpeg, audio/mpeg) |
enclosureLength | Long | File size in bytes |
item | FeedItem | Reference to the parent item |
Updating Feeds
Manual Update
Trigger an immediate update with updateFeed():
{
let feed = $.first($.find('DataFeed', 'name', 'News Feed'));
feed.updateFeed();
}
Conditional Update
The updateIfDue() method checks whether enough time has passed since lastUpdated based on updateInterval. If an update is due, it fetches new entries:
{
let feed = $.first($.find('DataFeed', 'name', 'News Feed'));
feed.updateIfDue();
}
This is useful when called from a scheduled task that runs more frequently than individual feed intervals.
Automatic Updates via CronService
Structr includes a built-in UpdateFeedTask that periodically checks all feeds. To enable it, configure the CronService in structr.conf:
#### Specifying the feed update task for the CronService
CronService.tasks = org.structr.feed.cron.UpdateFeedTask
#### Setting up the execution interval in cron time format
# In this example the web feed will be updated every 5 minutes
org.structr.feed.cron.UpdateFeedTask.cronExpression = 5 * * * * *
After changing the configuration:
- Stop the Structr instance
- Edit
structr.confwith the settings above - Restart the instance
The UpdateFeedTask calls updateIfDue() on each DataFeed. Configure updateInterval on individual feeds to control how often they actually fetch new content:
{
$.create('DataFeed', {
name: 'Hourly News',
url: 'https://example.com/news.xml',
updateInterval: 3600000 // Only fetch if last update was more than 1 hour ago
});
}
Even if the CronService runs every 5 minutes, a feed with updateInterval set to one hour will only fetch when at least one hour has passed since lastUpdated.
Retention Control
By default, Structr keeps all feed items indefinitely. Use maxItems and maxAge to automatically remove old entries. Cleanup runs automatically after each feed update.
Limiting by Count
Keep only the most recent entries:
{
$.create('DataFeed', {
name: 'Headlines',
url: 'https://example.com/headlines.xml',
maxItems: 50 // Keep only the 50 most recent items
});
}
Limiting by Age
Remove entries older than a specified duration:
{
$.create('DataFeed', {
name: 'Daily Digest',
url: 'https://example.com/daily.xml',
maxAge: 604800000 // Keep items for 7 days (7 * 24 * 60 * 60 * 1000)
});
}
Manual Cleanup
You can also trigger cleanup manually:
{
let feed = $.first($.find('DataFeed', 'name', 'Active Feed'));
feed.cleanUp();
}
DataFeed Methods
| Method | Description |
|---|---|
updateFeed() | Fetches new entries from the remote feed URL and runs cleanup afterward |
updateIfDue() | Checks if an update is due based on lastUpdated and updateInterval, and fetches new items if necessary |
cleanUp() | Removes old feed items based on the configured maxItems and maxAge properties |
Processing New Items
To automatically process incoming feed items, add an onCreate method to the FeedItem type. This is useful for setting visibility, creating notifications, or triggering other actions.
Making Items Visible
By default, newly created FeedItem objects are not visible to public or authenticated users. Set the visibility flags in the onCreate method:
// onCreate method on FeedItem
{
$.this.visibleToPublicUsers = true;
$.this.visibleToAuthenticatedUsers = true;
}
Custom Processing
You can extend the onCreate method with additional logic:
// onCreate method on FeedItem
{
// Make visible
$.this.visibleToPublicUsers = true;
$.this.visibleToAuthenticatedUsers = true;
// Create a notification for items from a specific feed
if ($.this.feed.name === 'Critical Alerts') {
$.create('Notification', {
title: 'Alert: ' + $.this.name,
message: $.this.description,
sourceUrl: $.this.url
});
}
}
Examples
News Aggregator
Collect news from multiple sources:
{
let sources = [
{ name: 'Tech News', url: 'https://technews.example.com/feed.xml' },
{ name: 'Business', url: 'https://business.example.com/rss' },
{ name: 'Science', url: 'https://science.example.com/atom.xml' }
];
for (let source of sources) {
$.create('DataFeed', {
name: source.name,
url: source.url,
updateInterval: 1800000, // 30 minutes
maxItems: 100
});
}
}
Finding Podcast Episodes
Extract audio files from a podcast feed:
{
let feed = $.first($.find('DataFeed', 'name', 'My Podcast'));
let episodes = [];
for (let item of feed.items) {
let audioEnclosure = null;
for (let enc of item.enclosures) {
if (enc.enclosureType === 'audio/mpeg') {
audioEnclosure = enc;
break;
}
}
episodes.push({
title: item.name,
published: item.pubDate,
description: item.description,
audioUrl: audioEnclosure ? audioEnclosure.url : null,
fileSize: audioEnclosure ? audioEnclosure.enclosureLength : null
});
}
return episodes;
}
Recent Items Across All Feeds
Get items from the last 24 hours across all feeds:
{
let yesterday = new Date(Date.now() - 86400000);
let feeds = $.find('DataFeed');
let recentItems = [];
for (let feed of feeds) {
for (let item of feed.items) {
if (item.pubDate && item.pubDate.getTime() > yesterday.getTime()) {
recentItems.push({
feedName: feed.name,
title: item.name,
url: item.url,
published: item.pubDate
});
}
}
}
return recentItems;
}
Duplicate Detection
Structr detects duplicate entries using the item’s URL. When fetching a feed, items with URLs that already exist in the feed’s item list are skipped. This prevents duplicate entries even if the feed is fetched multiple times.
Supported Feed Formats
Structr uses the ROME library to parse feeds and supports:
- RSS 0.90, 0.91, 0.92, 0.93, 0.94, 1.0, 2.0
- Atom 0.3, 1.0
The feed format is detected automatically and stored in the feedType property.
Related Topics
- Scheduled Tasks - Running feed updates on a schedule
- Business Logic - Processing feed items in lifecycle methods
Spatial
Structr provides support for geographic data. This includes a built-in Location type with distance-based queries, geocoding to convert addresses to coordinates, geometry processing for polygons and spatial analysis, and import capabilities for standard geospatial file formats.
Note: The geometry functions require the
geo-transformationsmodule.
The Location Type
Structr includes a built-in Location type for storing geographic coordinates. This type has two key properties:
| Property | Type | Description |
|---|---|---|
latitude | Double | Latitude coordinate (WGS84) |
longitude | Double | Longitude coordinate (WGS84) |
Creating Locations
Create Location objects like any other Structr type:
{
// Create a location for Frankfurt
let frankfurt = $.create('Location', {
name: 'Frankfurt Office',
latitude: 50.1109,
longitude: 8.6821
});
}
You can also extend the Location type or add these properties to your own types. Any type with latitude and longitude properties can use distance-based queries.
Distance-Based Queries
The withinDistance predicate finds objects within a specified radius of a point. The distance is measured in kilometers.
{
// Find all locations within 25 km of a point
let nearbyLocations = $.find('Location', $.withinDistance(50.1109, 8.6821, 25));
$.log('Found ' + $.size(nearbyLocations) + ' locations');
}
This works with any type that has latitude and longitude properties:
{
// Find stores within 10 km
let nearbyStores = $.find('Store', $.withinDistance(customerLat, customerLon, 10));
// Find events within 50 km
let nearbyEvents = $.find('Event', $.withinDistance(userLat, userLon, 50));
}
Distance Queries via REST API
The REST API supports distance-based queries using request parameters. Any type with latitude and longitude properties (typically by extending the built-in Location type) can be queried this way.
Using coordinates directly:
curl "http://localhost:8082/structr/rest/Hotel?_latlon=50.1167851,8.7265218&_distance=0.1"
The _latlon parameter specifies the search origin as latitude,longitude, and _distance specifies the search radius in kilometers.
Using address components:
curl "http://localhost:8082/structr/rest/Store?_country=Germany&_city=Frankfurt&_street=Hauptstraße&_distance=5"
Using combined location string:
curl "http://localhost:8082/structr/rest/Restaurant?_location=Germany,Berlin,Unter%20den%20Linden&_distance=2"
The _location parameter accepts the format country,city,street.
Request Parameters for Distance Search:
| Parameter | Description |
|---|---|
_latlon | Search origin as latitude,longitude |
_distance | Search radius in kilometers |
_location | Search origin as country,city,street |
_country | Country (used with other address fields) |
_city | City (used with other address fields) |
_street | Street (used with other address fields) |
_postalCode | Postal code (used with other address fields) |
When using address-based parameters (_location or the individual fields), Structr geocodes the address using the configured provider and searches for objects within the specified radius. Geocoded addresses are cached to minimize API calls.
Geocoding
Geocoding converts addresses into geographic coordinates. Structr uses geocoding automatically when you use the distance parameter in REST queries.
Configuration
Configure geocoding in the Configuration Interface:
| Setting | Description |
|---|---|
geocoding.provider | Full class name of the provider |
geocoding.apikey | API key (required for Google and Bing) |
geocoding.language | Language for results (e.g., en, de) |
Supported Providers
| Provider | Class Name | API Key |
|---|---|---|
| Google Maps | org.structr.common.geo.GoogleGeoCodingProvider | Required |
| Bing Maps | org.structr.common.geo.BingGeoCodingProvider | Required |
| OpenStreetMap | org.structr.common.geo.OSMGeoCodingProvider | Not required |
Caching
Geocoding results are automatically cached (up to 10,000 entries) to minimize API calls and improve performance. The cache persists for the lifetime of the Structr process.
Working with Geometries
For more complex geographic data like polygons, boundaries, or routes, create a custom Geometry type that stores WKT (Well-Known Text) representations.
Creating a Geometry Type
In the Schema area, create a type with these properties:
| Property | Type | Description |
|---|---|---|
wkt | String | WKT representation of the geometry |
name | String | Name or identifier |
Add a schema method getGeometry to convert WKT to a geometry object:
// Schema method: getGeometry
{
return $.wktToGeometry($.this.wkt);
}
Add a method contains to check if a point is inside:
// Schema method: contains (parameter: point)
{
let point = $.retrieve('point');
let geometry = $.this.getGeometry();
let pointGeom = $.wktToGeometry('POINT(' + point.latitude + ' ' + point.longitude + ')');
return geometry.contains(pointGeom);
}
Creating Geometries
{
// Create a polygon
let polygon = $.create('Geometry', {
name: 'Delivery Zone A',
wkt: 'POLYGON ((8.6 50.0, 8.8 50.0, 8.8 50.2, 8.6 50.2, 8.6 50.0))'
});
// Create a line
let route = $.create('Geometry', {
name: 'Route 1',
wkt: 'LINESTRING (8.68 50.11, 8.69 50.12, 8.70 50.13)'
});
}
Point-in-Polygon Queries
Check if a point is inside a geometry:
{
let point = { latitude: 50.1, longitude: 8.7 };
// Check against a single geometry
let zone = $.first($.find('Geometry', 'name', 'Delivery Zone A'));
if (zone.contains(point)) {
$.log('Point is inside delivery zone');
}
// Find all geometries containing a point
let geometries = $.find('Geometry');
let matching = [];
for (let geom of geometries) {
if (geom.contains(point)) {
matching.push(geom);
}
}
}
Geometry Functions
Structr provides functions for creating, parsing, and analyzing geometries.
Creating Geometries
| Function | Description |
|---|---|
coordsToPoint(coord) | Create Point from [x, y], {x, y}, or {latitude, longitude} |
coordsToLineString(coords) | Create LineString from array of coordinates |
coordsToPolygon(coords) | Create Polygon from array of coordinates |
coordsToMultipoint(coords) | Create MultiPoint from array of coordinates |
{
let point = $.coordsToPoint([8.6821, 50.1109]);
let point2 = $.coordsToPoint({ latitude: 50.1109, longitude: 8.6821 });
let line = $.coordsToLineString([[8.68, 50.11], [8.69, 50.12], [8.70, 50.13]]);
let polygon = $.coordsToPolygon([
[8.6, 50.0], [8.8, 50.0], [8.8, 50.2], [8.6, 50.2], [8.6, 50.0]
]);
}
Parsing Geometries
| Function | Description |
|---|---|
wktToGeometry(wkt) | Parse WKT string to geometry |
wktToPolygons(wkt) | Extract all polygons from WKT |
{
let point = $.wktToGeometry('POINT (8.6821 50.1109)');
let polygon = $.wktToGeometry('POLYGON ((8.6 50.0, 8.8 50.0, 8.8 50.2, 8.6 50.2, 8.6 50.0))');
}
Calculations
| Function | Description |
|---|---|
distance(point1, point2) | Geodetic distance in meters |
azimuth(point1, point2) | Bearing in degrees |
getCoordinates(geometry) | Extract coordinates as array |
{
let frankfurt = $.coordsToPoint([8.6821, 50.1109]);
let berlin = $.coordsToPoint([13.405, 52.52]);
let distanceMeters = $.distance(frankfurt, berlin);
$.log('Distance: ' + (distanceMeters / 1000).toFixed(1) + ' km');
let bearing = $.azimuth(frankfurt, berlin);
$.log('Bearing: ' + bearing.toFixed(1) + '°');
}
Coordinate Conversion
| Function | Description |
|---|---|
latLonToUtm(lat, lon) | Convert to UTM string |
utmToLatLon(utmString) | Convert UTM to lat/lon object |
convertGeometry(srcCRS, dstCRS, geom) | Transform coordinate system |
{
// Lat/Lon to UTM
let utm = $.latLonToUtm(53.855, 8.0817);
// Result: "32U 439596 5967780"
// UTM to Lat/Lon
let coords = $.utmToLatLon('32U 439596 5967780');
// Result: { latitude: 53.855, longitude: 8.0817 }
// Transform between coordinate systems
let wgs84Point = $.wktToGeometry('POINT (8.6821 50.1109)');
let utmPoint = $.convertGeometry('EPSG:4326', 'EPSG:32632', wgs84Point);
}
File Import
GPX Import
The importGpx function parses GPS track files:
{
let file = $.first($.find('File', 'name', 'track.gpx'));
let gpxData = $.importGpx($.getContent(file, 'utf-8'));
// Process waypoints
if (gpxData.waypoints) {
for (let wp of gpxData.waypoints) {
$.create('Waypoint', {
name: wp.name,
latitude: wp.latitude,
longitude: wp.longitude,
altitude: wp.altitude
});
}
}
// Process tracks
if (gpxData.tracks) {
for (let track of gpxData.tracks) {
let points = [];
for (let segment of track.segments) {
for (let point of segment.points) {
points.push([point.longitude, point.latitude]);
}
}
$.create('Route', {
name: track.name,
wkt: $.coordsToLineString(points).toString()
});
}
}
}
Shapefile Import
The readShapefile function reads ESRI Shapefiles:
{
let result = $.readShapefile('/data/regions.shp');
$.log('Fields: ' + result.fields.join(', '));
for (let item of result.geometries) {
$.create('Region', {
name: item.metadata.NAME,
wkt: item.wkt,
population: item.metadata.POPULATION
});
}
}
The function automatically reads the associated .dbf file for attributes and .prj file for coordinate reference system, transforming coordinates to WGS84.
Map Layers
For applications with multiple geometry sources (e.g., different Shapefiles), organize geometries into layers:
{
// Create a map layer
let layer = $.create('MapLayer', {
name: 'Administrative Boundaries',
description: 'Country and state boundaries'
});
// Import shapefile into layer
let result = $.readShapefile('/data/boundaries.shp');
for (let item of result.geometries) {
$.create('Geometry', {
mapLayer: layer,
name: item.metadata.NAME,
wkt: item.wkt
});
}
}
Examples
Store Locator
// Schema method on Store: findNearby (parameters: latitude, longitude, radiusKm)
{
let lat = $.retrieve('latitude');
let lon = $.retrieve('longitude');
let radius = $.retrieve('radiusKm');
let stores = $.find('Store', $.withinDistance(lat, lon, radius));
let customerPoint = $.coordsToPoint([lon, lat]);
let result = [];
for (let store of stores) {
let storePoint = $.coordsToPoint([store.longitude, store.latitude]);
let dist = $.distance(customerPoint, storePoint);
result.push({
store: store,
distanceKm: (dist / 1000).toFixed(1)
});
}
// Sort by distance
result.sort((a, b) => a.distanceKm - b.distanceKm);
return result;
}
Geofencing
// Global schema method: checkDeliveryZone (parameters: latitude, longitude)
{
let lat = $.retrieve('latitude');
let lon = $.retrieve('longitude');
let point = $.wktToGeometry('POINT(' + lat + ' ' + lon + ')');
let zones = $.find('DeliveryZone');
for (let zone of zones) {
let polygon = $.wktToGeometry(zone.wkt);
if (polygon.contains(point)) {
return {
inZone: true,
zoneName: zone.name,
deliveryFee: zone.deliveryFee
};
}
}
return { inZone: false };
}
Related Topics
- Building a Spatial Index - Tutorial for optimizing point-in-polygon queries
- REST API - Distance queries with
_latlon,_distance, and address parameters - Schema - Creating custom types for geographic data
- Scheduled Tasks - Batch geocoding and index building
Operations
Configuration
Structr is configured through the structr.conf file located in the installation directory. This file uses a simple key-value format where each line contains a setting name and its value, separated by an equals sign.
File Location
The location of structr.conf depends on how you installed Structr:
| Installation Type | File Location |
|---|---|
| Debian Package | /usr/lib/structr/structr.conf |
| ZIP Distribution | ./structr.conf (in the Structr directory) |
Configuration Interface
The preferred way to edit configuration settings is through the Configuration Interface in the Admin UI. This interface displays all available settings organized by category, shows default values, and provides descriptions for each setting.
You can access the Configuration Interface by clicking the wrench icon in the Admin UI header bar. The interface opens in a new browser tab and requires authentication with the superuser password.
After making changes, click the green button in the lower right corner to save them to structr.conf. Individual settings can be reset to their default value using the red button with the white X next to each field. This takes effect immediately. The interface also provides a reload function to apply configuration changes without restarting Structr.
How Settings Are Stored
Structr has a large number of settings with built-in default values. The structr.conf file only stores settings that differ from these defaults. This keeps the file compact and makes it easy to see what has been customized.
A fresh installation contains only a single entry:
superuser.password = <generated-password>
As you customize your installation through the Configuration Interface, additional settings appear in the file. Settings that match their default values are not written to the file.
Editing the File Directly
While the Configuration Interface is the recommended approach, you can also edit structr.conf directly with a text editor. This is useful for automation, version control, or when you need to configure Structr before starting it for the first time.
Each setting goes on its own line:
superuser.password = mysecretpassword
application.title = My Application
httpservice.maxfilesize = 1000
After editing the file manually, changes take effect after restarting Structr or using the reload function in the Configuration Interface.
Configuration via Environment Variables (Docker)
When running Structr in a Docker container, you can pass configuration settings as environment variables instead of editing structr.conf. This is particularly useful with docker-compose.yml files, as it keeps configuration visible and allows different settings per environment without modifying the image.
Naming Convention
To convert a structr.conf setting to an environment variable:
- Replace any existing underscores with double underscores (
_→__) - Replace all dots with single underscores (
.→_) - Add
STRUCTR_as a prefix
Examples
| structr.conf Setting | Environment Variable |
|---|---|
application.http.port | STRUCTR_application_http_port |
superuser.password | STRUCTR_superuser_password |
application.instance.name | STRUCTR_application_instance_name |
application.heap.min_size | STRUCTR_application_heap_min__size |
Note how min_size becomes min__size – the double underscore preserves the original underscore, distinguishing it from underscores that replace dots.
Docker Compose Example
services:
structr:
image: structr/structr:latest
ports:
- "8082:8082"
environment:
- STRUCTR_superuser_password=mysecretpassword
- STRUCTR_application_instance_name=Production
- STRUCTR_application_instance_stage=PROD
- STRUCTR_application_heap_max__size=8g
volumes:
- structr-data:/var/lib/structr/files
Environment variables take precedence over settings in structr.conf.
Essential Settings
While Structr has many configuration options, these are the settings you are most likely to need when setting up and running an instance.
| Category | Setting | Default | Description |
|---|---|---|---|
| Instance | application.instance.name | (empty) | A name displayed in the top right corner of the Admin UI. |
| Instance | application.instance.stage | (empty) | A stage label (e.g., “DEV”, “STAGING”, “PROD”) displayed alongside the instance name. |
| HTTP | application.http.port | 8082 | HTTP port. Requires restart. |
| HTTP | application.https.port | 8083 | HTTPS port. Requires restart. |
| HTTP | application.https.enabled | false | Enable HTTPS. Requires a keystore with SSL certificate. |
| Memory | application.heap.min_size | 1g | Minimum Java heap size (e.g., 512m, 1g). Requires restart. |
| Memory | application.heap.max_size | 4g | Maximum Java heap size (e.g., 2g, 4g, 8g). Requires restart. |
| Storage | files.path | <install-dir>/files | Storage location for uploaded files and the virtual file system. |
| Logging | log.level | INFO | Log verbosity: TRACE, DEBUG, INFO, WARN, ERROR. Takes effect immediately. |
| Admin | initialuser.name | admin | Username for the initial admin. |
| Admin | initialuser.password | admin | Password for the initial admin. Change immediately after first login. |
File Permissions
The structr.conf file contains sensitive information including database credentials and encryption keys. Restrict access to this file:
chmod 600 structr.conf
This ensures only the file owner can read and write the configuration. Other users on the system cannot access it.
When using Neo4j as database, also follow the Neo4j file permission recommendations.
Data-at-Rest Encryption
To protect data stored on disk in case of physical hardware theft, enable filesystem-level encryption on the operating system. This is called data-at-rest encryption and must be configured at the OS level as Structr does not provide this directly.
Consult your operating system documentation for options like LUKS (Linux), BitLocker (Windows), or FileVault (macOS).
Related Topics
- Email - SMTP configuration
- OAuth - Authentication provider settings
- JWT Authentication - Token settings
- Two-Factor Authentication - 2FA settings
Application Lifecycle
Structr applications are developed, tested, and deployed through an export/import mechanism that integrates with version control systems like Git. This enables you to work on a local development instance, track changes in a repository, collaborate with team members, and deploy updates to staging or production servers.
The export creates a portable folder structure containing your application’s schema, pages, templates, business logic, and configuration. This folder can be committed to a repository, shared with others, or imported into another Structr instance.
Application vs. Data Deployment
Structr provides two deployment mechanisms: application deployment and data deployment.
Application deployment exports the structure of your application: Schema, pages, templates, shared components, widgets, files marked for export, security settings, and business logic. This is everything needed to recreate the application on another system, but it does not include users, groups, or any data created during normal use of the application.
Data deployment exports the actual objects stored in your database. You select which types to export, making this useful for migrating user data, creating test datasets, or synchronizing content between environments.
Typical Workflow
Application deployment enables collaborative development of Structr applications. Whether you work alone or in a team, the recommended workflow is based on a code repository such as Git.
This is the typical development cycle. It is very important to do these steps in exactly the following order:
- Develop and test changes on a local Structr instance
- Export the application to a repository folder
- Commit and push your changes
- On the target server (staging or production), pull the latest changes
- Import the application
When working in a team, each developer works on their local instance and merges changes through the repository. Structr does not merge during import - all conflict resolution happens in the version control system.
For detailed setup instructions with Docker and Git, see the Version Control Workflow section below.
Data deployment serves a different purpose. You use it less frequently, typically for initial data migration when setting up a new environment, creating backups of user-generated content, or populating test systems with sample data.
Application Deployment
Application deployment exports everything that defines your application:
- Schema definitions and business logic from the Schema and Code areas
- Pages, shared components, and templates
- Files and folders marked for export
- Mail templates
- Widgets
- Site configurations
- Localizations
- Security settings (resource access grants)
This export does not include users, groups, or any data objects created by users of your application. You can deploy a new version of your application without affecting the data it operates on.
Export Methods
You can trigger an application export in three ways:
Markdown Rendering Hint: MarkdownTopic(Via Dashboard) not rendered because level 5 >= maxLevels (5)
Markdown Rendering Hint: MarkdownTopic(Via Admin Console) not rendered because level 5 >= maxLevels (5)
Markdown Rendering Hint: MarkdownTopic(Via REST API) not rendered because level 5 >= maxLevels (5)
Import Methods
Application import is a destructive operation. Structr deletes all existing pages, schema definitions, templates, components, and other application data before importing the new version. User data (users, groups, and objects created by your application) remains untouched.
There is no conflict resolution or merging during import. If you need to merge changes from multiple developers, do this in your version control system before importing.
Markdown Rendering Hint: MarkdownTopic(Via Dashboard) not rendered because level 5 >= maxLevels (5)
Markdown Rendering Hint: MarkdownTopic(Via Admin Console) not rendered because level 5 >= maxLevels (5)
Markdown Rendering Hint: MarkdownTopic(Via REST API) not rendered because level 5 >= maxLevels (5)
Export Format
Structr exports applications to a specific folder structure. Each component type has its own folder and a corresponding JSON file with metadata:
| Folder/File | Contents |
|---|---|
schema/ | Schema definitions and code from the Schema and Code areas |
pages/ | Pages from the Pages editor |
components/ | Shared components |
templates/ | Template elements |
files/ | Files from the virtual filesystem (only those marked for export) |
mail-templates/ | Mail templates |
security/ | Resource access grants |
modules/ | Application configuration and module definitions |
localizations.json | Localization entries |
sites.json | Site configurations |
widgets.json | Widgets created in the Pages area |
application-configuration-data.json | Schema layouts from the Schema editor |
deploy.conf | Information about the exporting Structr instance |
Each folder has a corresponding .json file (e.g., pages.json, files.json) containing metadata like visibility flags, content types, and UUIDs for each item.
Including Files in the Export
Files and folders in the virtual filesystem are not exported by default. To include a file or folder in the export, set the includeInFrontendExport flag on it. Child items inherit this flag from their parent folder, so setting it on a folder includes all its contents.
Note: The flag is named
includeInFrontendExportfor historical reasons. It controls inclusion in application deployment exports.
Pre- and Post-Deploy Scripts
You can include scripts that run automatically before or after import.
Markdown Rendering Hint: MarkdownTopic(pre-deploy.conf) not rendered because level 5 >= maxLevels (5)
Markdown Rendering Hint: MarkdownTopic(post-deploy.conf) not rendered because level 5 >= maxLevels (5)
Version Control Workflow
When running Structr with Docker using custom volume directories, you can integrate deployment with a Git repository. This allows you to store your application in version control and collaborate with other developers.
The typical workflow:
- Clone your application repository to
./volumes/structr-repositoryon the host system - Import the application in Structr’s Dashboard under Deployment by entering
/var/lib/structr/repository/webappin the “Import application from local directory” field - Make changes in Structr (schema, pages, business logic, etc.)
- Export the application by entering
/var/lib/structr/repository/webappin the “Export application to local directory” field - On the host system, commit and push your changes from
./volumes/structr-repository - To deploy updates, pull the latest changes and repeat from step 2
This workflow keeps your application under version control while allowing you to use Structr’s visual editors for development. Merging changes from multiple developers happens in Git, not during Structr import.
Data Deployment
Data deployment exports the actual objects stored in your database. Unlike application deployment, you explicitly select which types to export. This gives you control over what data to migrate, back up, or synchronize between environments.
Common use cases include:
- Migrating users and groups to a new instance
- Creating backups of user-generated content
- Populating test environments with realistic data
- Synchronizing reference data between environments
Data Export
Markdown Rendering Hint: MarkdownTopic(Via Dashboard) not rendered because level 5 >= maxLevels (5)
Markdown Rendering Hint: MarkdownTopic(Via Admin Console) not rendered because level 5 >= maxLevels (5)
Markdown Rendering Hint: MarkdownTopic(Via REST API) not rendered because level 5 >= maxLevels (5)
Data Import
Data import adds new objects to the database. If an object with the same UUID already exists, it is replaced with the imported version. Objects that exist in the database but not in the import are left unchanged.
Markdown Rendering Hint: MarkdownTopic(Via Dashboard) not rendered because level 5 >= maxLevels (5)
Markdown Rendering Hint: MarkdownTopic(Via Admin Console) not rendered because level 5 >= maxLevels (5)
Markdown Rendering Hint: MarkdownTopic(Via REST API) not rendered because level 5 >= maxLevels (5)
Data Export Format
A data deployment export contains:
| Folder/File | Contents |
|---|---|
nodes/ | Export files for the selected node types |
relationships/ | Export files for relationships from/to the selected types |
pre-data-deploy.conf | Script that runs before data import |
post-data-deploy.conf | Script that runs after data import |
Import Behavior
Data import runs without validation by default. Cardinality constraints are not enforced, validation rules are not applied, and onCreate/onSave methods are not executed. This is because nodes and relationships are imported sequentially, and enabling validation would likely cause errors that stop the import.
After importing data, rebuild the database indexes by going to the Schema area, clicking the Admin button, and selecting “Rebuild all Indexes”.
The pre-data-deploy.conf and post-data-deploy.conf scripts work the same way as their application deployment counterparts.
Monitoring Progress
You can follow the progress of any export or import operation in the Server Log tab on the Dashboard or via the notifications in the Structr UI.
Related Topics
- Virtual File System - Managing files and the includeInFrontendExport flag
- Schema - Understanding schema definitions in deployment exports
Backup & Recovery
A Structr installation stores data in two separate locations: the graph database (Neo4j) holds all objects and relationships, while binary file contents and configuration are stored in the Structr installation directory. A complete backup must include both.
What to Back Up
| Component | Location | Contains |
|---|---|---|
| Database | Neo4j data directory | All objects, relationships, schema, users, permissions |
| Structr directory | Structr installation directory | Binary files, configuration, certificates, scripts |
The Structr directory contains several important subdirectories and files:
files/– Uploaded files, images, documents (binary content)structr.conf– Server settings, credentials, customizationsscripts/– Host scripts registered for execution- SSL certificates and keystores
- Other runtime configuration
The database and Structr directory must be backed up together to maintain consistency. A file referenced in the database must exist in the files/ directory, and vice versa.
Application Backup
To back up your application structure without data, use the Deployment Export feature. This creates a portable folder containing schema definitions, pages, templates, components, and configuration files that can be stored in version control.
Application backups are useful for:
- Version control of your application
- Deploying the same application to multiple environments
- Recovering the application structure after a fresh database setup
See the Application Lifecycle chapter for details on deployment exports.
Full Backup (Cold Backup)
A cold backup taken with all services stopped is the most reliable way to back up a Structr installation. It guarantees consistency between the database and binary files.
Server Installation
- Stop Structr:
systemctl stop structr - Stop Neo4j:
systemctl stop neo4j - Back up the following:
- Neo4j data directory (typically
/var/lib/neo4j/data/) - Structr installation directory (typically
/usr/lib/structr/for Debian packages)
- Start Neo4j:
systemctl start neo4j - Start Structr:
systemctl start structr
Docker Installation
- Stop the containers:
docker-compose down - Back up the Docker volumes:
- Neo4j data volume
- Structr data volume (files, configuration, scripts)
- Start the containers:
docker-compose up -d
You can find your volume locations with docker volume inspect <volume-name>.
VM Snapshots
If Structr and Neo4j run on the same virtual machine, creating a VM snapshot is the simplest backup method. Stop both services before taking the snapshot to ensure consistency.
Restore
Server Installation
- Stop Structr:
systemctl stop structr - Stop Neo4j:
systemctl stop neo4j - Replace the Neo4j data directory with the backup
- Replace the Structr installation directory with the backup
- Start Neo4j:
systemctl start neo4j - Start Structr:
systemctl start structr
Docker Installation
- Stop the containers:
docker-compose down - Replace the volume contents with the backup data
- Start the containers:
docker-compose up -d
Backup Strategy Recommendations
- Schedule backups during low-traffic periods to minimize downtime
- Test restore procedures regularly in a non-production environment
- Keep multiple backup generations (daily, weekly, monthly)
- Store backups in a separate location from the production system
- Document your backup and restore procedures
Related Topics
- Application Lifecycle - Deployment export and import
- Configuration - Server settings and file locations
- Maintenance - Maintenance mode for planned downtime
Multi-Site Hosting
A single Structr instance can serve multiple websites under different domains. This is useful when you want to run a public website and an internal application side by side, serve localized versions of your site under country-specific domains, or operate staging and production environments on the same server.
Structr uses Site objects to control which pages are served for which domain. You can think of this as a built-in reverse proxy: when a request arrives, Structr checks the hostname and port against your configured sites and serves only the pages assigned to the matching site.
Pages not assigned to any site are served for all requests, which is the default behavior when you don’t use this feature. Sites control page visibility only while files are not affected and remain accessible regardless of the requesting domain.
Creating a Site
Site is a built-in type in Structr. To create a site:
- Open the Data area in the Admin UI
- Select the
Sitetype - Create a new Site object with the following properties:
| Property | Description |
|---|---|
name | A descriptive name for the site (e.g., “Production Website”) |
hostname | The domain name this site responds to (e.g., example.com) |
port | Optional port number. If omitted, the site matches any port. |
Assigning Pages to Sites
Since there is no dedicated UI for managing site assignments, you configure the relationship between pages and sites in the Data area:
- Open the Data area in the Admin UI
- Select either the
Sitetype and edit thepagesproperty, or select thePagetype and edit thesitesproperty - Add or remove the relationship as needed
A page can be assigned to multiple sites if it should appear on more than one domain.
Request Matching
When Structr receives an HTTP request, it determines which pages to serve based on the following rules:
- If the page is not assigned to any site, it is visible for all requests
- If the page is assigned to one or more sites, Structr checks whether the request’s hostname and port match any of those sites
- A site matches if the hostname equals the request’s hostname AND either the site has no port defined or the port matches the request’s port
This means you can create a site with only a hostname to match all ports, or specify a port for exact matching.
Example Configuration
Consider a Structr instance accessible via three domains:
www.example.com(port 443) – public websiteadmin.example.com(port 443) – internal admin areastaging.example.com(port 8443) – staging environment
You would create three sites:
| Site Name | Hostname | Port |
|---|---|---|
| Public | www.example.com | (empty) |
| Admin | admin.example.com | (empty) |
| Staging | staging.example.com | 8443 |
Then assign your pages accordingly:
- Public marketing pages → Public site
- Admin dashboard pages → Admin site
- Test versions of pages → Staging site
- Shared components (e.g., error pages) → No site assignment (visible everywhere)
Deployment
Sites are included in application deployment exports. When you import an application, the site configurations are restored along with the page assignments.
If you deploy to an environment with different domain names (e.g., from staging to production), you may need to update the hostname properties after import.
Related Topics
- Pages - Creating and managing pages
- Application Lifecycle - Exporting and importing applications
Filesystem
Structr includes an integrated file storage system with a virtual filesystem that abstracts physical storage from the logical directory structure and metadata. Binary data can be stored on the local server filesystem, or on external storage backends through Structr’s File Service Provider API. Structr’s built-in web server can serve static HTML pages, CSS, JavaScript, images, and other web assets directly from this virtual filesystem, similar to how traditional web servers serve files from a document root.
Virtual Filesystem
The virtual filesystem in Structr represents a tree of folders and files. Each folder can contain subfolders and files, creating a familiar hierarchical structure.
This filesystem is called “virtual” because the folder structure exists only in the database – it doesn’t necessarily mirror a directory tree in the actual storage backend. A file’s path in Structr (like /documents/reports/quarterly.pdf) is independent of where the binary content is physically stored.
Benefits
This separation of metadata from storage provides flexibility:
- Files in different folders can be stored on different backends
- You can reorganize the virtual structure without moving physical files
- All files share consistent metadata, permissions, and search capabilities regardless of where they’re stored
- The same file can appear in multiple virtual locations without duplicating storage
Storage Backends
Since Structr 5.0, file content can be stored on various backends:
- Local filesystem – The default, stores files on the server’s disk
- Cloud storage – Amazon S3 and compatible services
- Archive systems – For long-term storage with different access patterns
You can configure storage backends per folder, allowing different parts of your virtual filesystem to use different physical storage. For example, frequently accessed files might live on fast local storage while archives go to cheaper cloud storage.
Custom Metadata
By extending the built-in File and Folder types in the schema, you can add custom metadata fields to your files. This allows you to create specialized types like:
InvoiceDocumentwith fields for invoice number, amount, and vendorProductImagewith fields for product reference, dimensions, and alt textBackupArchivewith fields for backup date, source system, and retention policy
Custom file types behave like any other schema type – you can query them, set permissions, and include them in your data model relationships.
Working with Files
Uploading
Files can be uploaded through:
- The Files area in the Admin UI
- The REST API upload endpoint
- Programmatically using the
$.create('File', ...)function with file content
Markdown Rendering Hint: MarkdownTopic(REST API Upload) not rendered because level 5 >= maxLevels (5)
Accessing
Files are accessible via:
- Direct URL using the file’s path or UUID
- The REST API for metadata and content
- Script functions for reading content programmatically
Permissions
Files use the same permission system as all other objects in Structr. You can control access through:
- Visibility flags (public, authenticated users)
- Owner permissions
- Group-based access grants
- Graph-based permission resolution through relationships
Advanced Features
Dynamic File Content
Files can be configured to evaluate their content as a template, similar to a Template element in Pages. When the isTemplate flag is enabled on a file, Structr processes template expressions in the file content before serving it. This allows you to mix static and dynamic content in CSS, JavaScript, or any other file type.
The text editor in the Files area has a “Show Preview” checkbox that displays a preview of the rendered output with template expressions evaluated.
Image Processing
When images are uploaded, Structr automatically extracts metadata and can create variants.
Markdown Rendering Hint: MarkdownTopic(Automatic Metadata) not rendered because level 5 >= maxLevels (5)
Markdown Rendering Hint: MarkdownTopic(Automatic Thumbnails) not rendered because level 5 >= maxLevels (5)
Markdown Rendering Hint: MarkdownTopic(Image Editing) not rendered because level 5 >= maxLevels (5)
Markdown Rendering Hint: MarkdownTopic(Supported Formats and Transformations) not rendered because level 5 >= maxLevels (5)
Video Processing
Video files support:
- Transcoding between formats
- Playback from specific timestamps
- Streaming delivery
Text Extraction
Structr integrates Apache Tika to extract text from documents. Supported formats include PDF, Microsoft Office documents (Word, Excel, PowerPoint), and many others – over a thousand file types in total.
Extracted text can be indexed for full-text search, making document contents searchable alongside structured data.
Optical Character Recognition
If Tesseract OCR is installed on the server, Structr can extract text from images. This enables searching scanned documents or processing image-based PDFs.
Fulltext Indexing
When indexing is enabled for a file type, Structr builds full-text indexes from extracted content. This allows searching across document contents using the same query mechanisms as structured data.
Configuration
Key settings in structr.conf:
| Setting | Description |
|---|---|
application.filesystem.enabled | Enable per-user home directories |
application.filesystem.indexing.enabled | Enable text extraction and indexing |
application.filesystem.indexing.maxsize | Maximum file size (MB) for indexing |
application.filesystem.unique.paths | Prevent duplicate filenames in folders |
application.filesystem.checksums.default | Checksums to calculate on upload |
Checksums
By default, Structr calculates an xxHash checksum for every uploaded file. You can configure additional checksums:
- crc32 – Fast cyclic redundancy check
- md5 – 128-bit hash (32 hex characters)
- sha1 – 160-bit hash (40 hex characters)
- sha512 – 512-bit hash (128 hex characters)
Checksums enable integrity verification and duplicate detection.
Scripting Access
Files and folders can be created and manipulated programmatically from any scripting context.
Creating Files and Folders
Use $.create() to create files and folders:
// Create a folder
let folder = $.create('Folder', { name: 'documents' });
// Create a file in that folder
let file = $.create('File', {
name: 'report.txt',
parent: folder,
contentType: 'text/plain'
});
Creating Folder Hierarchies
Structr provides functions to create entire folder hierarchies in one operation, automatically creating any missing parent folders.
Reading and Writing Binary Content
You can read and write binary content programmatically:
// Read file content
let content = $.getContent(file);
// Write file content
$.setContent(file, 'New content');
Custom File Types
For more control, create custom types that inherit from the File trait. This allows you to add custom properties and methods to your files while retaining all standard file functionality. For example, an InvoiceDocument type could have properties for invoice number and amount, plus a method to generate a PDF.
Serving Static Websites
Structr can serve complete static websites directly from its virtual filesystem. You can upload HTML files, stylesheets, JavaScript files, images, and fonts into a folder structure, and Structr’s web server delivers them to browsers just like Apache, Nginx, or any other traditional web server would.
This is useful for hosting static landing pages, documentation sites, or marketing websites alongside your dynamic Structr application. You can also use it during migration projects, serving an existing static site from Structr while gradually converting pages into dynamic Structr pages with data bindings and business logic.
To set up a static site, upload your files into the virtual filesystem while preserving the original directory structure. Files are served at URLs that match their path in the virtual filesystem, so a file at /assets/css/theme.css is accessible at that exact URL.
Differences from traditional web servers
While Structr serves static files in much the same way as traditional web servers, there is one important difference: Structr does not automatically resolve directory paths to index files. A request to /product/ resolves to the folder named product, not to a file like index.html inside it.
This means that directory-style links commonly used in static websites, such as href="/product/", will not work as expected. You need to use explicit file references like href="/product/index.html" instead.
Note that this only applies to static files in the virtual filesystem. Dynamic Structr pages behave differently: /product, /product/, and /product/index.html all resolve to the page named product. See the Navigation & Routing chapter for details on how Structr resolves page URLs.
Visibility and permissions
Static files follow the same permission model as all other objects in Structr. To make files accessible to public visitors, enable visibleToPublicUsers on the files and their parent folders. You can also restrict specific files or folders to authenticated users or individual groups, giving you fine-grained access control that traditional web servers typically require separate configuration for.
Maintenance
This chapter covers routine maintenance tasks for keeping your Structr instance running smoothly, including maintenance commands for database operations, the maintenance mode for planned downtime, and the process for updating to new versions.
Maintenance Commands
Maintenance commands perform administrative operations on the database and application, such as rebuilding indexes, migrating data, or clearing caches. You can execute them through the Admin UI, the REST API, or programmatically in scripts.
Executing via Admin UI
The Schema area provides access to common maintenance commands through the Admin menu:
Markdown Rendering Hint: MarkdownTopic(Indexing – Nodes) not rendered because level 5 >= maxLevels (5)
Markdown Rendering Hint: MarkdownTopic(Indexing – Relationships) not rendered because level 5 >= maxLevels (5)
Markdown Rendering Hint: MarkdownTopic(Maintenance) not rendered because level 5 >= maxLevels (5)
Executing via REST API
Send a POST request to the maintenance endpoint:
POST /structr/rest/maintenance/<command>
Content-Type: application/json
{
"parameter1": "value1",
"parameter2": "value2"
}
For example, to rebuild the index for a specific type:
POST /structr/rest/maintenance/rebuildIndex
Content-Type: application/json
{
"type": "Article"
}
Executing via Script
Use the maintenance() function to run commands from StructrScript or JavaScript. This requires admin privileges.
Markdown Rendering Hint: MarkdownTopic(JavaScript) not rendered because level 5 >= maxLevels (5)
Markdown Rendering Hint: MarkdownTopic(StructrScript) not rendered because level 5 >= maxLevels (5)
Available Commands
For a complete list of maintenance commands and their parameters, see the Maintenance Commands reference.
Maintenance Mode
Maintenance mode allows you to perform updates or other maintenance tasks while showing visitors a friendly maintenance page instead of an error. The Admin UI and all services remain accessible on separate ports, so you can continue working while users see the maintenance notice.
How It Works
When you enable maintenance mode:
- The main HTTP/HTTPS ports show a maintenance page to all visitors
- The Admin UI and API move to separate maintenance ports
- SSH and FTP services (if enabled) also move to their maintenance ports
This means you can perform maintenance tasks through the Admin UI while users cannot access the application.
Configuration
Configure maintenance mode in the Configuration Interface under Server Settings → Maintenance:
| Setting | Default | Description |
|---|---|---|
maintenance.enabled | false | Enable maintenance mode. |
maintenance.application.http.port | 8182 | HTTP port for Admin UI access during maintenance. |
maintenance.application.https.port | 8183 | HTTPS port during maintenance. |
maintenance.application.ssh.port | 8122 | SSH port during maintenance. |
maintenance.application.ftp.port | 8121 | FTP port during maintenance. |
maintenance.message | (default text) | Message shown on the maintenance page. HTML is allowed. |
maintenance.resource.path | (empty) | Path to a custom maintenance page. If empty, the default page with maintenance.message is shown. |
Enabling Maintenance Mode
- Open the Configuration Interface
- Navigate to Server Settings → Maintenance
- Optionally customize the maintenance message or provide a custom page
- Set
maintenance.enabledtotrue - Save the configuration
The maintenance page appears immediately on the main ports. Access the Admin UI through the maintenance port (default: 8182) to continue working.
Disabling Maintenance Mode
- Access the Configuration Interface through the maintenance port
- Set
maintenance.enabledtofalse - Save the configuration
The application returns to normal operation immediately.
Updates and Upgrades
Structr follows semantic versioning. Minor version updates (e.g., 5.1 → 5.2) include automatic migration and are generally safe. Major version updates (e.g., 5.x → 6.0) may include breaking changes and require more careful planning.
Before You Update
- Create a backup – Back up your database and the
filesdirectory - Export your application – Create an application deployment export as an additional safeguard
- Check the release notes – Review changes, especially for major versions
- For major versions – Read the migration guide and test the update in a non-production environment first
Update Process
The update process is straightforward:
- Enable maintenance mode (optional but recommended for production)
- Stop Structr:
systemctl stop structr - Install the new version:
- Debian package:
dpkg -i structr-<version>.deb - ZIP distribution: Extract and replace the installation files
- Start Structr:
systemctl start structr - Disable maintenance mode
Minor Version Updates
Minor versions maintain backward compatibility. Schema and data migrations happen automatically when Structr starts. Monitor the server log during startup to verify the migration completed successfully.
Major Version Updates
Major versions may include breaking changes to the schema, API, or scripting functions. Always:
- Read the migration guide for your target version
- Test the update in a staging environment
- Verify that your application works correctly before updating production
- Keep your backup until you have confirmed the update was successful
Related Topics
- Application Lifecycle - Creating backups through application export
- Backup and Recovery - Comprehensive backup strategies
- Health Checks and Monitoring - Monitoring your Structr instance
Monitoring
Structr provides several ways to monitor the health and performance of your instance: a web-based dashboard for interactive monitoring, and HTTP endpoints for integration with external monitoring systems like Prometheus and Grafana.
Dashboard Monitoring
The Admin UI Dashboard provides real-time monitoring capabilities:
- Server Log – Live view of the server log with configurable refresh interval
- Event Log – Structured view of API requests, authentication events, and transactions with timing breakdowns
- Threads – List of all running threads with the ability to interrupt or kill stuck threads
- Access Statistics – Filterable table of request statistics
See the Dashboard chapter for details on using these features.
System Resources
Structr monitors system resources to help you assess server capacity and diagnose performance issues. The Dashboard displays key metrics in the “About Structr” tab.
Available Metrics
| Metric | Description |
|---|---|
| Processors | Number of CPU cores available to the JVM |
| Free Memory | Currently unused heap memory |
| Total Memory | Heap memory currently allocated by the JVM |
| Max Memory | Maximum heap memory the JVM can allocate (configured via application.heap.max_size) |
| Uptime | Time since Structr started |
| Thread Count | Current number of active threads |
| Peak Thread Count | Highest thread count since startup |
| Daemon Thread Count | Number of daemon threads |
| CPU Load Average | System load average (1 minute) |
| Node Cache | Size and usage of the node cache |
| Relationship Cache | Size and usage of the relationship cache |
Interpreting Memory Values
The three memory values relate to each other as follows:
- Free Memory is the unused portion of Total Memory
- Total Memory grows up to Max Memory as needed
- If Free Memory stays consistently low while Total Memory equals Max Memory, consider increasing the heap size
Viewing System Resources
System resource information is available in two places:
- Dashboard – The “About Structr” tab shows processors, free memory, total memory, and max memory
- Health Check Endpoint – The
/structr/healthendpoint returns all metrics listed above in a machine-readable JSON format
HTTP Access Statistics
Structr automatically collects statistics about HTTP requests to your application. These statistics help you understand usage patterns, identify slow endpoints, and detect unusual access behavior.
Collected Metrics
For each endpoint (HTML pages and REST API), Structr tracks:
- Total request count
- Minimum response time
- Maximum response time
- Average response time
Statistics are aggregated per time interval to keep memory usage bounded while still providing useful historical data.
Viewing Statistics
Access statistics are available in two places:
- Dashboard – The “About Structr” tab shows a filterable table with request statistics grouped by timestamp, request count, and HTTP method
- Health Check Endpoint – The
/structr/healthendpoint includes response time statistics in thehtml:responseTimeandjson:responseTimesections
Configuration
Configure these settings in structr.conf or through the Configuration Interface:
| Setting | Default | Description |
|---|---|---|
application.stats.aggregation.interval | 60000 | Aggregation interval in milliseconds. Statistics are grouped into buckets of this size. |
Health Check Endpoint
The health check endpoint provides machine-readable status information for load balancers, container orchestration systems, and monitoring tools.
Endpoints
| Endpoint | Purpose |
|---|---|
/structr/health | Full health status in JSON format |
/structr/health/ready | Readiness probe (HTTP status only) |
Readiness Probe
The /structr/health/ready endpoint returns only an HTTP status code, making it suitable for Kubernetes readiness probes or load balancer health checks:
200 OK– Structr is ready to accept requests503 Service Unavailable– Structr is starting up, shutting down, or a deployment is in progress
Full Health Status
The /structr/health endpoint returns detailed status information in the application/health+json format:
- Memory utilization (free, max, total)
- CPU load average
- Uptime
- Thread counts (current, peak, daemon)
- Cache statistics (nodes, relationships)
- Response time statistics for HTML pages and REST endpoints
Access to the full health data is restricted by IP whitelist. Requests from non-whitelisted IPs receive only the HTTP status code.
Configuration
Configure these settings in structr.conf or through the Configuration Interface:
| Setting | Default | Description |
|---|---|---|
healthcheckservlet.path | /structr/health | Endpoint path |
healthcheckservlet.whitelist | 127.0.0.1, localhost, ::1 | IPs allowed to access full health data |
Prometheus Metrics
Structr exposes metrics in Prometheus format at /structr/metrics. This endpoint is designed for scraping by a Prometheus server.
Available Metrics
| Metric | Type | Description |
|---|---|---|
structr_http_requests_total | Counter | Total HTTP requests (labels: method, path, status) |
structr_http_request_duration_seconds | Histogram | Request duration (labels: method, path) |
In addition to Structr-specific metrics, standard JVM metrics are exposed (memory, garbage collection, threads, etc.).
Configuration
Configure these settings in structr.conf or through the Configuration Interface:
| Setting | Default | Description |
|---|---|---|
metricsservlet.path | /structr/metrics | Endpoint path |
metricsservlet.whitelist | 127.0.0.1, localhost, ::1 | IPs allowed to access metrics |
Prometheus Configuration
To scrape metrics from Structr, add a job to your Prometheus configuration:
scrape_configs:
- job_name: 'structr'
static_configs:
- targets: ['localhost:8082']
metrics_path: /structr/metrics
If Prometheus runs on a different machine, add its IP address to the whitelist in structr.conf:
metricsservlet.whitelist = 127.0.0.1, localhost, ::1, 10.0.0.50
Grafana Dashboard
A pre-built Grafana dashboard for Structr is available at grafana.com/grafana/dashboards/16770. You can import it using the dashboard ID 16770.
Query Histogram
The histogram endpoint provides detailed query performance analysis, useful for identifying slow queries and optimization opportunities.
Endpoint
/structr/histogram
Parameters
| Parameter | Description |
|---|---|
sort | Sort results by: total, count, min, max, avg (default: total) |
top | Number of results to return (default: 1000) |
reset | If present, clears the histogram data after returning results |
Example: /structr/histogram?sort=avg&top=100
Configuration
Configure these settings in structr.conf or through the Configuration Interface:
| Setting | Default | Description |
|---|---|---|
histogramservlet.path | /structr/histogram | Endpoint path |
histogramservlet.whitelist | 127.0.0.1, localhost, ::1 | IPs allowed to access histogram data |
Related Topics
- Dashboard - Interactive monitoring in the Admin UI
- Configuration - Server settings
- Maintenance - Maintenance mode for planned downtime
Logging & Debugging
This chapter covers the logging system and various debugging techniques available in Structr.
Server Log
Structr logs all server activity using the Log4J logging API with Logback as the implementation. The Logback configuration lives in the classpath in a file called logback.xml.
Log Location
The server log location depends on your installation method:
- Debian package:
/var/log/structr.log - ZIP installation:
logs/structr.login the Structr directory
Custom Log Configuration
The default logback.xml includes a reference to an optional logback-include.xml file where you can add custom settings. This is useful for changing the log level of individual Java packages to gain more detailed insight into internal processes.
Example logback-include.xml to enable debug logging for REST requests:
<included>
<logger name="org.structr.rest" level="DEBUG"/>
</included>
Place this file in the same directory as logback.xml (typically the Structr installation directory or classpath).
Viewing the Log
You can view the server log in several ways:
- Dashboard – The Server Log tab shows the log in real-time with configurable refresh interval
- Command line – Use
tail -f /var/log/structr.log(Debian) ortail -f logs/structr.log(ZIP) to follow the log - Log file – Open the file directly in a text editor
Log Format
Each log entry follows the format:
Date Time [Thread] Level Logger - Message
Example:
2026-02-03 14:30:45.123 [qtp123456-42] INFO o.s.rest.servlet.JsonRestServlet - GET /structr/rest/User
The components are:
- Date and time with milliseconds
- Thread name in brackets
- Log level (DEBUG, INFO, WARN, ERROR)
- Logger name (abbreviated package and class)
- The actual message
Log Levels
Structr supports the standard log levels. Set the default level via log.level in structr.conf:
| Level | Description |
|---|---|
| ERROR | Serious problems that need immediate attention |
| WARN | Potential issues that do not prevent operation |
| INFO | Normal operational messages (default) |
| DEBUG | Detailed information for troubleshooting |
Changes to log.level take effect immediately without restart.
For more granular control, use logback-include.xml to set different log levels for specific Java packages. This allows you to enable debug logging for one component while keeping other components at INFO level.
Log Rotation
The Debian package includes automatic log rotation via the system’s logrotate service. The default configuration:
- Rotates daily when the log exceeds 10MB
- Keeps 30 days of history
- Compresses old log files
- Log location:
/var/log/structr.log
The configuration file is located at /etc/logrotate.d/structr:
/var/log/structr.log {
su root adm
copytruncate
daily
rotate 30
dateext
dateformat .%Y-%m-%d-%s
size 10M
compress
delaycompress
}
If you installed Structr from the ZIP package, log rotation is not configured automatically. You can either set up logrotate manually or implement your own log management strategy.
When rotation is active, the Dashboard Server Log tab shows a log source selector where you can choose between the current and archived log files.
Logging Configuration
Configure these settings in structr.conf or through the Configuration Interface:
| Setting | Default | Description |
|---|---|---|
log.level | INFO | Default log level |
log.requests | false | Log all incoming HTTP requests |
log.querytime.threshold | 3000 | Log queries taking longer than this (milliseconds) |
log.callback.threshold | 50000 | Log transactions with more callbacks than this |
log.functions.stacktrace | false | Log full stack traces for function exceptions |
log.cypher.debug | false | Log generated Cypher queries |
log.cypher.debug.ping | false | Include WebSocket PING queries in Cypher debug log |
log.scriptprocess.commandline | 2 | Script execution logging: 0=none, 1=path only, 2=path and parameters |
log.directorywatchservice.scanquietly | false | Suppress directory watch service scan messages |
Logging from Code
Use the $.log() function to write messages to the server log from your application code.
JavaScript:
$.log('Processing order', order.id);
$.log('User logged in:', $.me.name);
// Template string syntax
$.log()`Processing batch ${page} of ${total}`);
StructrScript:
${log('Processing order', order.id)}
Log messages appear at INFO level with the logger name indicating the source location.
JavaScript Debugging
Structr includes a JavaScript debugger based on GraalVM that integrates with Chrome DevTools.
Enabling the Debugger
Set application.scripting.debugger to true in structr.conf or the Configuration Interface, then restart Structr.
When enabled, Structr generates a unique debugger URL on each startup. This URL is intentionally unpredictable for security reasons. You can find it in:
- The server log at startup
- The Dashboard in the “About Structr” tab under “Scripting Debugger”
Connecting Chrome DevTools
- Copy the debugger URL from the Dashboard or server log
- Open a new Chrome tab and paste the URL directly into the address bar
- Press Enter to open DevTools
Note that you must manually paste the URL – clicking links to chrome:// URLs is blocked by the browser for security reasons.
Setting Breakpoints
Chrome DevTools does not display your complete application code upfront. Instead, code snippets appear only when execution reaches them. This makes setting breakpoints through the DevTools interface impractical.
To pause execution at a specific point, insert the debugger statement directly in your code:
{
let orders = $.find('Order', { status: 'pending' });
debugger; // Execution pauses here
for (let order of orders) {
// process order
}
}
When execution hits the debugger statement, Chrome DevTools pauses and displays the surrounding code. From there you can:
- Step through code line by line
- Inspect variables and the call stack
- Evaluate expressions in the console
- Continue to the next
debuggerstatement or until completion
Remove debugger statements before deploying to production.
Limitations
The debugger pauses the entire request thread while waiting at a breakpoint. Use it only in development environments where blocking requests is acceptable.
JVM Remote Debugging
For debugging Structr itself or complex Java interop scenarios, you can attach a Java debugger (IntelliJ IDEA, Eclipse, etc.) to the running JVM.
Enabling Remote Debugging
Debian package:
Set the environment variable before starting Structr:
export ENABLE_STRUCTR_DEBUG=yes
systemctl restart structr
This enables debugging on port 5005.
ZIP installation:
Add the following JVM parameter to the start command or configuration:
-Xrunjdwp:transport=dt_socket,address=5005,server=y,suspend=n
Parameters:
address=5005– The port the debugger listens onserver=y– Structr waits for debugger connectionssuspend=n– Start immediately without waiting for debugger (useyto pause until debugger connects)
Connecting Your IDE
In IntelliJ IDEA:
- Run → Edit Configurations → Add New → Remote JVM Debug
- Set host to your server address and port to 5005
- Click Debug to connect
In Eclipse:
- Run → Debug Configurations → Remote Java Application
- Set connection properties and click Debug
Permission Debugging
When troubleshooting access control issues, add the logPermissionResolution parameter to your request:
GET /structr/rest/User?logPermissionResolution=true
This logs detailed information about how permissions are resolved for each object in the response, showing which grants or restrictions apply and why.
Thread Inspection
The Dashboard Threads tab shows all running threads in the JVM. This helps identify:
- Stuck or hung requests
- Infinite loops in code
- Deadlocks between threads
- Long-running operations
Each thread shows its name, state, and stack trace. You can interrupt or kill threads directly from the interface, though killing threads should be used with caution as it may leave data in an inconsistent state.
Event Log Debugging
The Dashboard Event Log provides structured information about requests and transactions:
- Authentication events with user details
- REST and HTTP requests with timing
- Transaction details including:
- Changelog update time
- Callback execution time
- Validation time
- Indexing time
Use the timing breakdown to identify performance bottlenecks in your application.
Common Debugging Scenarios
Package-specific Logging
To debug a specific area without flooding the log, create a logback-include.xml file:
<included>
<!-- Debug REST API -->
<logger name="org.structr.rest" level="DEBUG"/>
<!-- Debug WebSocket communication -->
<logger name="org.structr.websocket" level="DEBUG"/>
<!-- Debug scripting -->
<logger name="org.structr.core.script" level="DEBUG"/>
</included>
Slow Queries
Enable log.cypher.debug to see the generated Cypher queries, then analyze them for:
- Missing indexes
- Inefficient patterns
- Large result sets
The log.querytime.threshold setting automatically logs queries exceeding the threshold.
Permission Issues
Use logPermissionResolution=true on requests to see exactly how access is granted or denied.
JavaScript Errors
Enable log.functions.stacktrace to get full stack traces when functions throw exceptions.
Transaction Problems
The Event Log shows transaction timing. Look for transactions with high callback counts or long validation times.
Related Topics
- Monitoring – System health and performance metrics
- Configuration – Server settings
- Dashboard – Admin UI features
Changelog
Structr can automatically track all changes to your data, recording who changed what and when. This changelog provides a complete audit trail for compliance requirements, debugging, or building features like activity feeds and undo functionality.
Overview
The changelog system records five types of events:
| Verb | Description |
|---|---|
create | A node was created |
delete | A node was deleted |
link | A relationship was created |
unlink | A relationship was removed |
change | A property value was modified |
Structr provides two perspectives on the changelog data:
- Entity Changelog – What happened to a specific object? Use
changelog()to retrieve all changes made to an entity. - User Changelog – What did a specific user do? Use
userChangelog()to retrieve all changes made by a user.
Both track the same events, just organized differently.
Enabling the Changelog
The changelog is disabled by default. Enable it in structr.conf or through the Configuration Interface:
| Setting | Default | Description |
|---|---|---|
application.changelog.enabled | false | Enable entity-centric changelog |
application.changelog.user_centric.enabled | false | Enable user-centric changelog |
changelog.path | changelog/ | Directory where changelog files are stored |
You can enable one or both depending on your needs. Note that enabling the changelog adds overhead to every write operation, as each change must be recorded.
Storage
Changelog data is stored in files on the filesystem, not in the database. This keeps the database lean and allows the changelog to grow independently. The files are stored in the directory specified by changelog.path.
Querying the Entity Changelog
Use the changelog() function to retrieve the history of a specific entity.
Basic Usage
JavaScript:
let history = $.changelog(node);
StructrScript:
${changelog(current)}
You can also pass a UUID string instead of an entity:
let history = $.changelog('abc123-def456-...');
Resolving Related Entities
The second parameter controls whether related entities are resolved:
// Without resolving - target contains only the UUID
let history = $.changelog(node, false);
// With resolving - targetObj contains the actual entity (if it still exists)
let history = $.changelog(node, true);
Changelog Entry Structure
Each entry in the returned list contains different fields depending on the verb:
| Field | create | delete | link | unlink | change | Description |
|---|---|---|---|---|---|---|
verb | ✓ | ✓ | ✓ | ✓ | ✓ | The type of change |
time | ✓ | ✓ | ✓ | ✓ | ✓ | Timestamp (milliseconds since epoch) |
userId | ✓ | ✓ | ✓ | ✓ | ✓ | UUID of the user who made the change |
userName | ✓ | ✓ | ✓ | ✓ | ✓ | Name of the user |
target | ✓ | ✓ | ✓ | ✓ | UUID of the affected entity | |
type | ✓ | ✓ | Type of the created/deleted entity | |||
rel | ✓ | ✓ | Relationship type | |||
relId | ✓ | ✓ | Relationship UUID | |||
relDir | ✓ | ✓ | Direction (“in” or “out”) | |||
key | ✓ | Property name that was changed | ||||
prev | ✓ | Previous value (JSON) | ||||
val | ✓ | New value (JSON) | ||||
targetObj | ✓ | ✓ | ✓ | ✓ | Resolved entity (if resolve=true) |
Querying the User Changelog
Use the userChangelog() function to retrieve all changes made by a specific user.
JavaScript:
let userHistory = $.userChangelog(user);
let myHistory = $.userChangelog($.me);
StructrScript:
${userChangelog(me)}
The user changelog returns the same entry structure, but without userId and userName fields (since the user is already known). For change entries, the target and targetObj fields are included to indicate which entity was modified.
Filtering Results
Both functions support filtering to narrow down the results. Filters are combined with AND logic, except for filters that can have multiple values, which use OR logic within that filter.
Filter Parameters
| Filter | Applicable Verbs | Description |
|---|---|---|
timeFrom | all | Only entries at or after this time |
timeTo | all | Only entries at or before this time |
verb | all | Only entries with matching verb(s) |
userId | all | Only entries by matching user ID(s) |
userName | all | Only entries by matching user name(s) |
relType | link, unlink | Only entries with matching relationship type(s) |
relDir | link, unlink | Only entries with matching direction |
target | create, delete, link, unlink | Only entries involving matching target(s) |
key | change | Only entries changing matching property name(s) |
Time Filters
Time values can be specified as:
- Milliseconds since epoch (number)
- JavaScript Date object
- ISO format string:
yyyy-MM-dd'T'HH:mm:ssZ
JavaScript Filter Syntax
In JavaScript, pass filters as an object. Use arrays for multiple values:
// Single filter
let changes = $.changelog(node, false, {verb: 'change'});
// Multiple verbs (OR logic)
let linkEvents = $.changelog(node, false, {verb: ['link', 'unlink']});
// Combined filters (AND logic)
let recentLinks = $.changelog(node, false, {
verb: ['link', 'unlink'],
relType: 'OWNS',
timeFrom: Date.now() - 86400000 // Last 24 hours
});
// Filter by specific property changes
let nameChanges = $.changelog(node, false, {
verb: 'change',
key: 'name'
});
StructrScript Filter Syntax
In StructrScript, pass filters as key-value pairs:
${changelog(current, false, 'verb', 'change')}
${changelog(current, false, 'verb', 'link', 'verb', 'unlink')}
${changelog(current, false, 'verb', 'change', 'key', 'name', 'timeFrom', now)}
Use Cases
Activity Feed
Show recent changes to an entity:
let recentActivity = $.changelog(document, true, {
timeTo: Date.now(),
timeFrom: Date.now() - 7 * 86400000 // Last 7 days
});
for (let entry of recentActivity) {
$.log`${entry.userName} ${entry.verb}d at ${new Date(entry.time)}`;
}
Audit Trail
Track all modifications by a specific user:
let audit = $.userChangelog(suspiciousUser, true, {
timeFrom: investigationStart,
timeTo: investigationEnd
});
Property History
Show the history of a specific property:
let priceHistory = $.changelog(product, false, {
verb: 'change',
key: 'price'
});
for (let entry of priceHistory) {
$.log`Price changed from ${entry.prev} to ${entry.val}`;
}
Relationship Tracking
Find when relationships were created or removed:
let membershipChanges = $.changelog(group, true, {
verb: ['link', 'unlink'],
relType: 'HAS_MEMBER'
});
Performance Considerations
- The changelog adds write overhead to every database modification
- Changelog files grow over time and are not automatically pruned
- Consider enabling only the perspective you need (entity or user)
- For high-volume applications, implement a retention policy to archive or delete old changelog files
- Queries with
resolve=trueperform additional database lookups
Related Topics
- Built-in Analytics – Custom event tracking for application-level analytics
- Logging & Debugging – Server logging and debugging tools
- Security – Access control and permissions
Expert Topics
Built-in Analytics
Structr includes a built-in analytics system that allows you to build custom analytics and audit functionality into your application. You can record events like page views, user actions, or business transactions, and later query them with filtering, aggregation, and time-based analysis.
This feature is similar to tools like Google Analytics, but runs entirely within your Structr instance. All data stays on your server, giving you full control over what you track and how you analyze it.
Overview
Event tracking consists of two parts:
- The
logEvent()function records events from your application code - The
/structr/rest/logendpoint queries and analyzes recorded events
Events are stored as LogEvent entities in the database with the following properties:
| Property | Description |
|---|---|
| action | The type of event (e.g., “VIEW”, “CLICK”, “PURCHASE”) |
| message | Additional details about the event |
| subject | Who triggered the event (typically a user ID) |
| object | What the event relates to (typically a content ID) |
| timestamp | When the event occurred (set automatically) |
Recording Events
You can record events in two ways: using the logEvent() function from your application code, or by posting directly to the REST endpoint.
Using logEvent()
StructrScript:
${logEvent('VIEW', 'User viewed article', me.id, article.id)}
JavaScript:
$.logEvent('VIEW', 'User viewed article', $.me.id, article.id);
The parameters are:
- action (required) – The event type
- message (required) – A description or additional data
- subject (optional) – Who triggered the event
- object (optional) – What the event relates to
JavaScript Object Syntax
In JavaScript, you can also pass a single object:
$.logEvent({
action: 'PURCHASE',
message: 'Order completed',
subject: $.me.id,
object: order.id
});
Using the REST API
You can also create events via POST request, which is useful for external systems or JavaScript frontends:
POST /structr/rest/log
Content-Type: application/json
{
"action": "VIEW",
"message": "User viewed article",
"subject": "user-uuid-here",
"object": "article-uuid-here"
}
When using the REST API, subject, object, and action are required. The timestamp is set automatically.
Common Patterns
Track page views in a page’s onRender method:
$.logEvent('VIEW', request.path, $.me?.id, thisPage.id);
Track user actions in event handlers:
$.logEvent('DOWNLOAD', file.name, $.me.id, file.id);
Track business events in lifecycle methods:
// In Order.afterCreate
$.logEvent('ORDER_CREATED', 'New order: ' + this.total, this.customer.id, this.id);
Querying Events
The /structr/rest/log endpoint provides flexible querying capabilities.
Query Parameters
| Parameter | Description |
|---|---|
subject | Filter by subject ID |
object | Filter by object ID |
action | Filter by action type |
timestamp | Filter by time range using [start TO end] syntax |
aggregate | Group by time using SimpleDateFormat pattern |
histogram | Extract and count values from messages using regex |
filters | Filter messages by regex patterns (separated by ::) |
multiplier | Extract numeric multiplier from message using regex |
correlate | Filter based on related events (see Correlation section) |
Overview Query
Without parameters, the endpoint returns a summary of all recorded events:
GET /structr/rest/log
Response:
{
"result": [{
"actions": "VIEW, CLICK, PURCHASE",
"entryCount": 15423,
"firstEntry": "2026-01-01T00:00:00+0000",
"lastEntry": "2026-02-03T14:30:00+0000"
}]
}
Filtering Events
Filter by subject, object, action, or time range:
GET /structr/rest/log?subject=<userId>
GET /structr/rest/log?object=<articleId>
GET /structr/rest/log?action=VIEW
GET /structr/rest/log?subject=<userId>&action=PURCHASE
Time Range Queries
Filter by timestamp using range syntax:
GET /structr/rest/log?timestamp=[2026-01-01T00:00:00+0000 TO 2026-01-31T23:59:59+0000]
Aggregation
The aggregate parameter groups events by time intervals. It accepts a Java SimpleDateFormat pattern that defines the grouping granularity:
| Pattern | Groups by |
|---|---|
yyyy | Year |
yyyy-MM | Month |
yyyy-MM-dd | Day |
yyyy-MM-dd HH | Hour |
yyyy-MM-dd HH:mm | Minute |
Example – count events per day:
GET /structr/rest/log?action=VIEW&aggregate=yyyy-MM-dd
You can add custom aggregation patterns as additional query parameters. Each pattern is a regex that matches against the message field:
GET /structr/rest/log?action=VIEW&aggregate=yyyy-MM-dd&category=category:(.*)&premium=premium:true
This groups by day and counts how many messages match each pattern. The response includes a total count plus counts for each named pattern.
Multiplier
When aggregating, you can extract a numeric value from the message to use as a multiplier instead of counting each event as 1:
GET /structr/rest/log?action=PURCHASE&aggregate=yyyy-MM-dd&multiplier=amount:(\d+)
If an event message contains amount:150, it contributes 150 to the total instead of 1. This is useful for summing values like order amounts or quantities.
Histograms
The histogram parameter extracts values from messages using a regex pattern with a capture group, creating a breakdown by those values:
GET /structr/rest/log?action=VIEW&aggregate=yyyy-MM-dd&histogram=category:(.*)
This returns counts grouped by both time (from aggregate) and by the captured category value. The response shows how many events occurred for each category in each time period.
Filters
The filters parameter applies regex patterns to the message field. Only events where all patterns match are included. Separate multiple patterns with :::
GET /structr/rest/log?action=VIEW&filters=premium:true::region:EU
This returns only VIEW events where the message contains both premium:true and region:EU.
Correlation
Correlation allows you to filter events based on the existence of related events. This is useful for questions like “show me all views of articles that were later purchased” or “find users who viewed but did not buy”.
The correlation parameter has the format:
correlate=ACTION::OPERATOR::PATTERN
The components are:
- ACTION – The action type to correlate with (e.g., “PURCHASE”)
- OPERATOR – How to match:
and,andSubject,andObject, ornot - PATTERN – A regex pattern to extract a correlation key from the message
Example: Find views that led to purchases
GET /structr/rest/log?action=VIEW&correlate=PURCHASE::and::article-(.*)
This returns VIEW events only if there is also a PURCHASE event where the pattern article-(.*) extracts the same value from the message.
Operators:
| Operator | Description |
|---|---|
and | Include event if a correlating event exists |
andSubject | Include event if a correlating event exists with the same subject |
andObject | Include event if a correlating event exists with the same object |
not | Include event only if NO correlating event exists |
Example: Find users who viewed but did not purchase
GET /structr/rest/log?action=VIEW&correlate=PURCHASE::not::article-(.*)
This is an advanced feature that requires careful design of your event messages to include matchable patterns.
Designing Event Messages
The power of the query features depends on how you structure your event messages. A well-designed message format makes filtering, aggregation, and correlation much easier.
Key-Value Format
A recommended pattern is to use key-value pairs in your messages:
$.logEvent('PURCHASE', 'category:electronics amount:299 region:EU premium:true', $.me.id, order.id);
This format allows you to:
- Filter by any attribute:
filters=premium:true - Extract values for histograms:
histogram=category:(.*?) - Sum amounts:
multiplier=amount:(\d+) - Correlate by category:
correlate=VIEW::and::category:(.*?)
JSON Format
For complex data, you can store JSON in the message:
$.logEvent('PURCHASE', JSON.stringify({
category: 'electronics',
amount: 299,
region: 'EU'
}), $.me.id, order.id);
Note that JSON is harder to query with regex patterns, but useful when you need to retrieve and parse the full event data later.
Consistent Naming
Use consistent action names across your application:
- Use uppercase for action types:
VIEW,CLICK,PURCHASE - Use a prefix for related actions:
FUNNEL_START,FUNNEL_STEP,FUNNEL_COMPLETE - Document your event schema so team members use the same format
Use Cases
Page View Analytics
Track which pages are most popular:
// In page onRender
$.logEvent('VIEW', thisPage.name, $.me?.id, thisPage.id);
Query most viewed pages:
GET /structr/rest/log?action=VIEW&aggregate=object
User Activity Tracking
Track what a specific user does:
GET /structr/rest/log?subject=<userId>
Conversion Funnels
Track steps in a process:
$.logEvent('FUNNEL_STEP', 'cart', $.me.id, session.id);
$.logEvent('FUNNEL_STEP', 'checkout', $.me.id, session.id);
$.logEvent('FUNNEL_STEP', 'payment', $.me.id, session.id);
$.logEvent('FUNNEL_STEP', 'complete', $.me.id, session.id);
Audit Trails
Track who changed what:
// In onSave lifecycle method
let mods = $.retrieve('modifications');
$.logEvent('MODIFIED', JSON.stringify(mods.after), $.me.id, this.id);
Performance Considerations
- LogEvent entities are regular database nodes and count toward your database size
- Consider implementing a retention policy to delete old events
- For high-traffic applications, consider batching events or using sampling
- Index the properties you filter on most frequently
Related Topics
- Monitoring – System-level monitoring and health checks
- Lifecycle Methods – Recording events in onCreate, onSave, onDelete
- Scheduled Tasks – Implementing retention policies or generating reports
Migration Guide
This chapter covers breaking changes and migration steps when upgrading between major Structr versions.
Important: Always create a full backup before upgrading Structr.
Migrating to Structr 6.x
Version 6 introduces several breaking changes that require manual migration from 5.x.
Global Schema Methods
Global schema methods have been simplified. The globalSchemaMethods namespace no longer exists – functions can now be called directly from the root context.
StructrScript / JavaScript:
// Old (5.x)
$.globalSchemaMethods.foo()
// New (6.x)
$.foo()
REST API:
# Old (5.x)
/structr/rest/maintenance/globalSchemaMethods/foo
# New (6.x)
/structr/rest/foo
Action required: Search your codebase for
/maintenance/globalSchemaMethodsand$.globalSchemaMethodsand update all occurrences.
REST API Query Parameter Change
The _loose parameter has been renamed to _inexact.
# Old (5.x)
/structr/rest/foo?_loose=1
# New (6.x)
/structr/rest/foo?_inexact=1
REST API Response Structure
The response body from $.GET and $.POST requests is now accessible via the body property.
// Old (5.x)
JSON.parse($.GET(url))
// New (6.x)
JSON.parse($.GET(url).body)
Schema Inheritance
The extendsClass property on schema nodes has been replaced with inheritedTraits.
// Old (5.x)
eq('Location', get(first(find('SchemaNode', 'name', request.type)), 'extendsClass').name)
// New (6.x)
contains(first(find('SchemaNode', 'name', request.type)).inheritedTraits, 'Location')
JavaScript Function Return Behavior
JavaScript functions now return their result directly by default.
Option 1: Restore old behavior globally:
application.scripting.js.wrapinmainfunction = true
Option 2: Remove unnecessary return statements from functions.
JavaScript Strict Mode
Identifiers must be declared before use. Assigning to undeclared variables throws a ReferenceError.
// ❌ Not allowed
foo = 1;
for (foo of array) {}
// ✅ Correct
let foo = 1;
for (let foo of array) {}
Custom Indices
Custom indices are dropped during the upgrade to 6.0.
Action required: Recreate all custom indices manually after upgrading.
Upload Servlet Changes
| Aspect | 5.x Behavior | 6.x Behavior |
|---|---|---|
| Default upload folder | Root or configurable | /._structr_uploads |
| Empty folder setting | Allowed | Enforced non-empty |
uploadFolderPath | Unrestricted | Authenticated users only |
Repeaters: No REST Queries
REST queries are no longer allowed for repeaters. Migrate them to function queries or flows.
Migration Checklist for 6.x
- [ ] Replace
$.globalSchemaMethods.xyz()with$.xyz() - [ ] Update REST URLs: remove
/maintenance/globalSchemaMethods/ - [ ] Replace
_loosewith_inexact - [ ] Update
$.GET/$.POSTcalls to use.body - [ ] Replace
extendsClasswithinheritedTraits - [ ] Review JavaScript functions for return statement compatibility
- [ ] Declare all JavaScript variables properly
- [ ] Recreate custom indices after upgrade
- [ ] Review upload handling code
- [ ] Migrate repeater REST queries to function queries
Migrating to Structr 4.x
All versions starting with the 4.0 release include breaking changes which require migration of applications built with Structr versions prior to 4.0 (1.x, 2.x and 3.x).
GraalVM Migration
With version 4.0, the required Java Runtime changed from standard JVMs (OpenJDK, Oracle JDK) to GraalVM. GraalVM brings full ECMAScript support, better performance, and polyglot scripting capabilities.
Markdown Rendering Hint: MarkdownTopic(Installing GraalVM) not rendered because level 5 >= maxLevels (5)
Migration of Script Expressions
Markdown Rendering Hint: MarkdownTopic(Predicates in find() and search()) not rendered because level 5 >= maxLevels (5)
Resource Access Permissions
Resource Permissions (formerly “Resource Access Grants”) have been made more flexible. Rights management now also applies to permission nodes themselves, requiring users to have read access to the permission object to use it.
Markdown Rendering Hint: MarkdownTopic(Manual Migration) not rendered because level 5 >= maxLevels (5)
Markdown Rendering Hint: MarkdownTopic(Semi-automatic Migration via Deployment) not rendered because level 5 >= maxLevels (5)
Scripting Considerations
Markdown Rendering Hint: MarkdownTopic(Date Comparisons) not rendered because level 5 >= maxLevels (5)
Markdown Rendering Hint: MarkdownTopic(Conditional Chaining Limitation) not rendered because level 5 >= maxLevels (5)
REST Request Parameters
Starting with 4.0, REST request parameters must be prefixed with underscore to prevent name collisions with property names:
# Old
/structr/rest/Project?page=1&pageSize=10&sort=name
# New
/structr/rest/Project?_page=1&_pageSize=10&_sort=name
Full list of affected parameters:
| Parameter | Parameter | Parameter |
|---|---|---|
page | pageSize | sort |
order | loose | locale |
latlon | location | state |
house | country | postalCode |
city | street | distance |
outputNestingDepth | debugLoggingEnabled | forceResultCount |
disableSoftLimit | parallelizeJsonOutput | batchSize |
Legacy mode can be enabled with application.legacy.requestparameters.enabled = true but is discouraged for new projects.
Neo4j Upgrade
Neo4j 4.x is recommended for Structr 4.x, though Neo4j 3.5 is still supported. If upgrading Neo4j, consult the Neo4j changelog.
Markdown Rendering Hint: MarkdownTopic(Cypher Parameter Syntax) not rendered because level 5 >= maxLevels (5)
Markdown Rendering Hint: MarkdownTopic(Database Name Configuration) not rendered because level 5 >= maxLevels (5)
Migration Checklist for 4.x
- [ ] Install GraalVM as Java runtime
- [ ] Add
$.predicateprefix to all find/search predicates - [ ] Update Resource Permissions with visibility flags
- [ ] Split Resource Permissions that have both public and authenticated flags
- [ ] Prefix REST parameters with underscore
- [ ] Update date comparisons to use
getTime() - [ ] Review code for conditional chaining on ProxyObjects
- [ ] Update Neo4j configuration if upgrading database
- [ ] Update Cypher parameter syntax if using Neo4j 4.x
Tutorials
Building Your First Application
This tutorial walks you through building a simple project management application with Structr. You’ll learn the essential elements of Structr by creating a real application with a custom data model, dynamic pages, and reusable components.
The best way to learn Structr is to use it. We’ll build the application step by step, starting with a basic data model and simple page, then progressively adding more sophisticated features.
What You’ll Build
By the end of this tutorial, you’ll have created:
- A data model with a
Projecttype - A page that displays projects from the database
- Dynamic content using repeater elements
- An imported Bootstrap template with shared components
- A reusable page template for consistent layouts
Part 1: A First Simple Page
In this section we develop the foundation of our project management application. We’ll create a simple webpage, define a data model, create test data, and connect everything together.
Create a Page
Pages are the basic elements for rendering content in Structr. Static content displays the same way every time, while dynamic content combines markup with data from the database.
To create a new page:
- Navigate to the Pages area by clicking the pages icon in the main menu
- Click “Create Page” in the dropdown menu at the top-right corner of the Page Tree
This creates a fresh page with a minimal DOM tree structure, visible in the Page Tree on the left. Click on the page element to see its basic attributes.
To preview the page, click the Preview tab in the functions bar above the main area. In preview mode, you can edit static content inline by clicking on text.
The initial page structure includes a <title> and a <div> inside the body. Let’s configure these elements.
Understanding Template Expressions
The page’s title contains a content element with this text:
${capitalize(page.name)}
This is a template expression. The ${ and } delimiters create a scripting environment where the content is interpreted rather than displayed literally.
The expression calls the capitalize() function with page.name as its argument. The page keyword references the current page, and .name accesses its name property. The result: the page title automatically reflects the page name with its first letter capitalized.
Set the page name to “overview” (click Basic or Advanced, enter the name, click outside to save). The title should now display as “Overview”.
Note: The title starts with an uppercase letter even though the name uses lowercase. The
capitalize()function transforms the first character.
Add Page Content
The <body> contains a <div> with a content element showing “Initial body text”. This content isn’t in ${} delimiters, so it renders literally.
Let’s replace this with a table to display projects:
- Remove the content element by right-clicking and selecting “Remove Node”
- On the empty
<div>, select “Insert HTML element” → “t” → “table” - Build this structure:
<table>
<thead>
<tr>
<th> with content "Project Name"
<tbody>
<tr>
<td> with content "Project 1"
Note: Removed elements go to the Unused Elements area and can be dragged back if needed.
Create the Data Model
Our static table needs a data model to become dynamic. Navigate to the Schema area by clicking the schema icon.
Create a new type by typing “Project” into the “New type” field and clicking “Add”. Wait for the schema to update.
Note: Schema changes trigger a recompilation. The definition graph is modified, source code is generated and validated. Once complete, the updated schema is available throughout the application without restart or deployment.
Create Example Data
With our Project type ready, let’s create some data:
- Navigate to the Data area
- Filter the type list by entering “Project”
- Click “Create new Project” three times
- Name the projects “Project 1”, “Project 2”, and “Project 3” by clicking in the name cells
Make Content Dynamic with Repeaters
A repeater element transforms data into HTML markup. It executes a database query and renders its element once for each result.
To create a repeater:
- In the
<tbody>, delete all<tr>elements except one - Click the remaining
<tr>and select “Repeater” - Click “Function Query” and enter:
find('Project')
- Set the Data Key to “project”
- Click Save
The find() function returns all instances of the specified type. The data key “project” lets us access each result in template expressions.
Note: Function queries don’t need
${}delimiters – they’re auto-script environments where everything is interpreted as code.
Notice the page tree icon changed to indicate an active element. The preview shows multiple rows even though there’s only one <tr> in the DOM – that’s the repeater in action.
Display Dynamic Data
The rows still show “Project 1” because the content is static. Replace it with:
${project.name}
Now each row displays its project’s name.
To sort the results, modify the function query:
sort(find('Project'), 'name')
This completes the basic application. You now have a dynamic page displaying sorted data from the database.
Part 2: Import a Bootstrap Template
Let’s enhance the user interface by importing an existing web page as a template.
Import the Template
- Click “Import page” in the Page Tree dropdown menu
- Enter the URL of a Bootstrap template (or paste HTML directly)
- Click “Start Import”
The import runs in the background. When finished, select the new page and click Preview to see it.
Create Shared Components
The imported page is more complex than our simple table. For larger pages, it’s best to organize parts into shared components – reusable elements that can appear on multiple pages.
Benefits of shared components:
- DRY principle: Develop once, use everywhere. Changes automatically apply to all pages.
- Modularity: Group related elements logically (navigation, footer, cards).
Let’s convert the navigation and footer into shared components:
- Open the Shared Components fly-out on the right side of the Pages area
- Drag the
<nav>element into the drop zone - Click Advanced and rename it to “Navigation (top)”
- Repeat for the footer, naming it “Footer”
Note: The page output doesn’t change when creating shared components – you’re reorganizing without affecting the user experience.
Configure the Cards as Repeaters
Now simplify the page body:
- Remove all card elements except one (hover to highlight elements in preview)
- Click the remaining card element (with CSS selector
.col-lg-6.col-xxl-4.mb-5) - Configure it as a repeater with function query:
sort(find('Project'), 'name')
- Set Data Key to “project”
- Replace the card title with
${project.name}
Part 3: Create a Page Template
Templates let you define a consistent structure for multiple pages. We’ll create a template that includes the navigation and footer, with a placeholder for page-specific content.
Create the Template
- Create a new page
- Delete the
<html>node - Add a template element as the page’s only child
- Copy the HTML from your styled page into the template
- Set the template’s content type to
text/html
Use Include Functions
Replace the navigation HTML:
<nav>
...
</nav>
with:
${include('Navigation (top)')}
Do the same for the footer: ${include('Footer')}
Add Dynamic Content Placeholder
Replace the main content section:
<!-- Page Content-->
<section class="pt-4">
...
</section>
with:
<!-- Page Content-->
${render(children)}
The render(children) expression renders any child elements of the template.
Make It a Shared Component
- Name the template “Main Page Template”
- Drag it to the Shared Components area
Now you can use this template on any new page. Add the template as a shared component, then add page-specific content as its children.
Next Steps
You’ve built a functional application with:
- A custom data model
- Dynamic pages using repeaters
- Imported styles and templates
- Reusable shared components
To extend this application, consider:
- Adding more types (Task, Deadline) with relationships to Project
- Implementing editing functionality with Event Action Mapping
- Adding images using Structr’s file system integration
- Creating user authentication and permissions
Note: When creating relationships in the schema, use unique, descriptive names. Generic names like
HASorIS_PART_OFcan hurt performance if reused across different type pairs.
Building a Spatial Index
This tutorial shows how to build a quadtree-based spatial index for efficient point-in-polygon queries. When your application has many geometries, checking each one individually becomes slow. A spatial index narrows down candidates quickly by organizing geometries into a hierarchical grid.
Prerequisites
This tutorial assumes you have:
- A working Structr instance with the
geo-transformationsmodule - A
Geometrytype with awktproperty (see the Spatial Data article) - Geometries imported into your database (e.g., from Shapefiles)
How It Works
A quadtree divides space into four quadrants recursively. Each node in the tree represents a bounding box. When you search for geometries containing a point, the index quickly eliminates large portions of space that can’t possibly contain the point, returning only a small set of candidate geometries to check.
Creating the SpatialIndex Type
In the Schema area, create a SpatialIndex type with these properties:
| Property | Type | Description |
|---|---|---|
x1 | Double | Left edge of bounding box |
y1 | Double | Bottom edge of bounding box |
x2 | Double | Right edge of bounding box |
y2 | Double | Top edge of bounding box |
level | Integer | Depth in the quadtree (0 = root) |
isRoot | Boolean | True for the root node |
Create these relationships:
| Relationship | Target Type | Cardinality | Description |
|---|---|---|---|
parent | SpatialIndex | Many-to-One | Parent node |
children | SpatialIndex | One-to-Many | Child quadrants |
geometries | Geometry | Many-to-Many | Geometries in this cell |
Schema Methods
Add the following methods to the SpatialIndex type.
getGeometry
Returns the bounding box as a polygon geometry for intersection tests.
{
let points = [];
points.push($.this.x1 + ' ' + $.this.y1);
points.push($.this.x2 + ' ' + $.this.y1);
points.push($.this.x2 + ' ' + $.this.y2);
points.push($.this.x1 + ' ' + $.this.y2);
points.push($.this.x1 + ' ' + $.this.y1);
return $.wktToGeometry('POLYGON ((' + points.join(', ') + '))');
}
createChildren
Creates four child quadrants. The level parameter controls recursion depth.
{
let level = $.retrieve('level');
let halfWidth = ($.this.x2 - $.this.x1) / 2.0;
let halfHeight = ($.this.y2 - $.this.y1) / 2.0;
if (level <= 7) { // Maximum depth
let cx = $.this.x1 + halfWidth;
let cy = $.this.y1 + halfHeight;
// Create four quadrants
$.getOrCreate('SpatialIndex', { parent: $.this, x1: $.this.x1, y1: $.this.y1, x2: cx, y2: cy, level: level });
$.getOrCreate('SpatialIndex', { parent: $.this, x1: cx, y1: $.this.y1, x2: $.this.x2, y2: cy, level: level });
$.getOrCreate('SpatialIndex', { parent: $.this, x1: cx, y1: cy, x2: $.this.x2, y2: $.this.y2, level: level });
$.getOrCreate('SpatialIndex', { parent: $.this, x1: $.this.x1, y1: cy, x2: cx, y2: $.this.y2, level: level });
}
}
The maximum depth of 7 creates cells roughly 0.06° × 0.08° at the deepest level (assuming a root covering Germany). Adjust this value based on your data density.
storeGeometry
Adds a geometry to the index by finding all leaf nodes that intersect with it. It takes the geometry object and the Geometry entity as parameters.
{
let geometryNode = $.retrieve('geometryNode');
let geometry = $.retrieve('geometry');
let bbox = $.this.getGeometry();
if (bbox.intersects(geometry)) {
$.this.createChildren({ level: $.this.level + 1 });
if ($.size($.this.children) > 0) {
for (let child of $.this.children) {
child.storeGeometry({ geometry: geometry, geometryNode: geometryNode });
}
} else {
$.createRelationship($.this, geometryNode, 'GEOMETRY');
}
}
}
getGeometriesForPolygon
Finds all geometries that might contain or intersect with a given polygon (or point).
{
let polygon = $.retrieve('polygon');
let result = [];
let search = function(root, level) {
let bbox = root.getGeometry();
if (bbox.intersects(polygon)) {
let withinChildren = false;
for (let child of root.children) {
withinChildren |= search(child, level + 1);
}
if (!withinChildren) {
result = $.mergeUnique(result, root.geometries);
}
return true;
}
return false;
};
search($.this, 0);
return result;
}
Building the Index
Create a global schema method or maintenance script to populate the index:
{
// Create or get the root node
// Bounding box should cover your entire dataset
let index = $.getOrCreate('SpatialIndex', {
isRoot: true,
x1: 47.0, // Southern boundary (latitude)
y1: 5.0, // Western boundary (longitude)
x2: 55.0, // Northern boundary
y2: 15.0, // Eastern boundary
level: 0
});
// Index all geometries
let geometries = $.find('Geometry');
let count = 0;
for (let geom of geometries) {
let geometry = $.wktToGeometry(geom.wkt);
index.storeGeometry({ geometry: geometry, geometryNode: geom });
count++;
if (count % 100 === 0) {
$.log('Indexed ' + count + ' geometries...');
}
}
$.log('Indexing complete. Total: ' + count + ' geometries.');
}
For large datasets, run this as a scheduled task during off-peak hours.
Querying the Index
Once built, use the index to find geometries efficiently:
// Global schema method: findPolygon (parameters: latitude, longitude)
{
let latitude = $.retrieve('latitude');
let longitude = $.retrieve('longitude');
$.assert(!$.empty(latitude), 422, 'Missing latitude parameter.');
$.assert(!$.empty(longitude), 422, 'Missing longitude parameter.');
let point = $.wktToGeometry('POINT(' + latitude + ' ' + longitude + ')');
let index = $.first($.find('SpatialIndex', { isRoot: true }));
$.assert(!$.empty(index), 400, 'Spatial index not found. Run the indexing script first.');
// Get candidates from the index
let candidates = index.getGeometriesForPolygon({ polygon: point });
// Check each candidate for actual containment
for (let geom of candidates) {
let polygon = $.wktToGeometry(geom.wkt);
if (polygon.contains(point)) {
return {
id: geom.id,
name: geom.name,
wkt: geom.wkt
};
}
}
return null;
}
Performance Considerations
The root bounding box should tightly fit your data. A box that’s too large wastes index levels on empty space.
Deeper trees create smaller cells, reducing candidates but increasing index size. For most datasets, a depth of 6-8 works well.
When you add new geometries, call storeGeometry on the root node. For bulk updates, consider rebuilding the index entirely.
Each index node is a database object. A depth-7 tree can have up to 21,845 nodes, though most will be pruned if your data doesn’t fill the entire bounding box.
Related Topics
- Spatial Data - Core geographic functionality
- Scheduled Tasks - Automating index builds
References
System Keywords
General Keywords
Built-in keywords that are available in all scripting contexts.
| Name | Description |
|---|---|
applicationRootPath | Refers to the root path of the Structr application. |
applicationStore | Application-wide data store. |
baseUrl | Refers to the base URL for this Structr application. |
current | Refers to the object returned by URI Object Resolution, if available. |
host | Refers to the host name of the server that Structr runs on. |
ip | Refers to the IP address of the interface on which the request was received. |
locale | Refers to the current locale. |
me | Refers to the current user. |
now | Refers to the current timestamp. |
parameterMap | Refers to the HTTP request parameters of the current request. |
pathInfo | Refers to the HTTP path string of the current request. |
predicate | Refers to the set of query predicates for advanced find(). |
queryString | Refers to the HTTP query string of the current request. |
request | Refers to the current set of HTTP request parameters. |
session | Refers to the current HTTP session. |
tenantIdentifier | Refers to the tenant identifier configured in structr.conf. |
this | Refers to the enclosing object instance of the currently executing method or script. |
Markdown Rendering Hint: Children of Topic(General Keywords) not rendered because MarkdownTableFormatter prevents rendering of children.
Page Keywords
Built-in keywords that are available in page rendering contexts.
| Name | Description |
|---|---|
children | Refers to the child nodes of the current node. |
id | Refers to the id of the object returned by URI Object Resolution, if available. |
link | Refers to the linked filesystem element of an HTML element in a Page. |
page | Refers to the current page in a page rendering context. |
parent | Refers to the parent element of the current in a page rendering context. |
Markdown Rendering Hint: Children of Topic(Page Keywords) not rendered because MarkdownTableFormatter prevents rendering of children.
Special Keywords
Built-in keywords that are only available in special contexts.
| Name | Description |
|---|---|
data | Refers to the current element in an each() loop iteration or in a filter() expression. |
methodParameters | Refers to the arguments a method was called with. |
value | Refers to the input value in the write function of a Function property. |
Markdown Rendering Hint: Children of Topic(Special Keywords) not rendered because MarkdownTableFormatter prevents rendering of children.
Built-in Functions
Database Functions
| Name | Description | |
|---|---|---|
rollbackTransaction() | Marks the current transaction as failed and prevents all objects from being persisted in the database. | Open details |
remoteCypher() | Returns the result of the given Cypher query against a remote instance. | Open details |
cypher() | Executes the given Cypher query directly on the database and returns the results as Structr entities. | Open details |
isEntity() | Returns true if the given argument is a Structr entity (node or relationship). | Open details |
get() | Returns the value with the given name of the given entity, or an empty string. | Open details |
getOrNull() | Returns the value with the given name of the given entity, or null. | Open details |
search() | Returns a collection of entities of the given type from the database, takes optional key/value pairs. Searches case-insensitive / inexact. | Open details |
searchFulltext() | Returns a map of entities and search scores matching the given search string from the given fulltext index. | Open details |
searchRelationshipsFulltext() | Returns a map of entities and search scores matching the given search string from the given fulltext index. Searches case-insensitve / inexact. | Open details |
incoming() | Returns all incoming relationships of a node, with an optional qualifying relationship type. | Open details |
outgoing() | Returns all outgoing relationships of a node, with an optional qualifying relationship type. | Open details |
hasRelationship() | Returns true if the given entity has relationships of the given type. | Open details |
hasOutgoingRelationship() | Returns true if the given entity has outgoing relationships of the given type. | Open details |
hasIncomingRelationship() | Returns true if the given entity has incoming relationships of the given type. | Open details |
getRelationships() | Returns the relationships of the given entity with an optional relationship type. | Open details |
getOutgoingRelationships() | Returns the outgoing relationships of the given entity with an optional relationship type. | Open details |
getIncomingRelationships() | Returns all incoming relationships between the given nodes, with an optional qualifying relationship type. | Open details |
find() | Returns a collection of entities of the given type from the database. | Open details |
getOrCreate() | Returns an entity with the given properties, creating one if it doesn’t exist. | Open details |
createOrUpdate() | Creates an object with the given properties or updates an existing object if it can be identified by a unique property. | Open details |
findRelationship() | Returns a collection of relationship entities of the given type from the database, takes optional key/value pairs. | Open details |
prefetch() | Prefetches a subgraph. | Open details |
prefetch2() | Prefetches a subgraph using a query that returns explicit node and relationship collections. | Open details |
addLabels() | Adds the given set of labels to the given node. | Open details |
removeLabels() | Removes the given set of labels from the given node. | Open details |
set() | Sets a value or multiple values on an entity. The values can be provided as a map or as a list of alternating keys and values. | Open details |
create() | Creates a new node with the given type and key-value pairs in the database. | Open details |
delete() | Deletes the one or more nodes or relationships from the database. | Open details |
createRelationship() | Creates and returns relationship of the given type between two entities. | Open details |
setPrivileged() | Sets the given key/value pair(s) on the given entity with super-user privileges. | Open details |
findPrivileged() | Executes a find() operation with elevated privileges. | Open details |
instantiate() | Converts the given raw Neo4j entity to a Structr entity. | Open details |
jdbc() | Fetches data from a JDBC source. | Open details |
mongodb() | Opens a connection to a MongoDB source and returns a MongoCollection which can be used to further query the Mongo database. | Open details |
predicate.range | Returns a range predicate that can be used in find() function calls. | Open details |
predicate.withinDistance | Returns a query predicate that can be used with find() or search(). | Open details |
predicate.or | Returns a query predicate that can be used with find() or search(). | Open details |
predicate.not | Returns a query predicate that can be used with find() or search(). | Open details |
predicate.sort | Returns a query predicate that can be used with find() or search(). | Open details |
predicate.page | Returns a query predicate that can be used with find() or search(). | Open details |
predicate.startsWith | Returns a query predicate that can be used with find() or search(). | Open details |
predicate.lt | Returns an lt predicate that can be used in find() function calls. | Open details |
predicate.lte | Returns an lte predicate that can be used in find() function calls. | Open details |
predicate.gte | Returns a gte predicate that can be used in find() function calls. | Open details |
predicate.gt | Returns a gt predicate that can be used in find() function calls. | Open details |
Markdown Rendering Hint: Children of Topic(Database Functions) not rendered because MarkdownTableWithDetailsFormatter prevents rendering of children.
Conversion Functions
| Name | Description | |
|---|---|---|
md5() | Returns the MD5 hash of a given object. | Open details |
num() | Tries the convert given object into a floating-point number with double precision. | Open details |
long() | Tries to convert the given object into a long integer value. | Open details |
int() | Tries to convert the given object into an integer value. | Open details |
coalesce() | Returns the first non-null value in the list of expressions passed to it. In case all arguments are null, null will be returned. | Open details |
formurlencode() | Encodes the given object to an application/x-www-form-urlencoded string. | Open details |
urlencode() | URL-encodes the given string. | Open details |
escapeJavascript() | Escapes the given string for use with Javascript. | Open details |
escapeJson() | Escapes the given string for use within JSON. | Open details |
dateFormat() | Formats the given date object according to the given pattern, using the current locale (language/country settings). | Open details |
parseDate() | Parses the given date string using the given format string. | Open details |
toDate() | Converts the given number to a date. | Open details |
numberFormat() | Formats the given value using the given locale and format string. | Open details |
parseNumber() | Parses the given string using the given (optional) locale. | Open details |
hash() | Returns the hash (as a hexadecimal string) of a given string, using the given algorithm (if available via the underlying JVM). | Open details |
escapeHtml() | Replaces HTML characters with their corresponding HTML entities. | Open details |
escapeXml() | Replaces XML characters with their corresponding XML entities. | Open details |
unescapeHtml() | Reverses the effect of escape_html(). | Open details |
toGraphObject() | Converts the given entity to GraphObjectMap. | Open details |
bson() | Creates BSON document from a map / object. | Open details |
latLonToUtm() | Converts the given latitude/longitude coordinates into an UTM string. | Open details |
utmToLatLon() | Converts the given UTM string to latitude/longitude coordinates. | Open details |
Markdown Rendering Hint: Children of Topic(Conversion Functions) not rendered because MarkdownTableWithDetailsFormatter prevents rendering of children.
String Functions
| Name | Description | |
|---|---|---|
upper() | Returns the uppercase value of its parameter. | Open details |
lower() | Returns the lowercase version of the given string. | Open details |
join() | Joins the given collection of strings into a single string, separated by the given separator. | Open details |
concat() | Concatenates the given list of objects into a single string without a separator between them. | Open details |
split() | Splits the given string by the whole separator string. | Open details |
splitRegex() | Splits the given string by given regex. | Open details |
abbr() | Abbreviates the given string at the last space character before the maximum length is reached. | Open details |
capitalize() | Capitalizes the given string. | Open details |
titleize() | Titleizes the given string. | Open details |
indexOf() | Returns the position of the first occurrence of the given word in the given string, or -1 if the string doesn’t contain the word. | Open details |
contains() | Returns true if the given string or collection contains a given element. | Open details |
substring() | Returns the substring of the given string. | Open details |
length() | Returns the length of the given string. | Open details |
replace() | Replaces script expressions in the given template with values from the given entity. | Open details |
trim() | Removes whitespace at the edges of the given string. | Open details |
clean() | Cleans the given string. | Open details |
strReplace() | Replaces each substring of the subject that matches the given regular expression with the given replacement. | Open details |
startsWith() | Returns true if the given string starts with the given prefix. | Open details |
endsWith() | Returns true if the given string ends with the given suffix. | Open details |
base64encode() | Encodes the given string and returns a base64-encoded string. | Open details |
base64decode() | Decodes the given base64 text using the supplied scheme. | Open details |
stripHtml() | Removes all HTML tags from the given source string and returns only the content. | Open details |
stopWords() | Returns a list of words (for the given language) which can be ignored for NLP purposes. | Open details |
localize() | Returns a (cached) Localization result for the given key and optional domain. | Open details |
Markdown Rendering Hint: Children of Topic(String Functions) not rendered because MarkdownTableWithDetailsFormatter prevents rendering of children.
System Functions
| Name | Description | |
|---|---|---|
random() | Returns a random alphanumeric string of the given length. | Open details |
timer() | Starts/Stops/Pings a timer. | Open details |
store() | Stores the given value in the current request context under the given key. | Open details |
stackDump() | Logs the current execution stack. | Open details |
sleep() | Pauses the execution of the current thread for the given number of milliseconds. | Open details |
randomUuid() | Returns a new random UUID (v4). | Open details |
hasCacheValue() | Checks if a cached value exists for the given key. | Open details |
getCacheValue() | Retrieves the cached value for the given key. | Open details |
setLogLevel() | Sets the application log level to the given level, if supported. | Open details |
setSessionAttribute() | Store a value under the given key in the users session. | Open details |
getSessionAttribute() | Retrieve a value for the given key from the user session. | Open details |
removeSessionAttribute() | Remove key/value pair from the user session. | Open details |
isLocale() | Returns true if the current user locale is equal to the given argument. | Open details |
logEvent() | Logs an event to the Structr log. | Open details |
maintenance() | Allows an admin user to execute a maintenance command from within a scripting context. | Open details |
jobInfo() | Returns information about the job with the given job ID. | Open details |
jobList() | Returns a list of running jobs. | Open details |
systemInfo() | Returns information about the system. | Open details |
getenv() | Returns the value of the specified environment variable. If no value is specified, all environment variables are returned as a map. An environment variable is a system-dependent external named value. | Open details |
changelog() | Returns the changelog for a given entity. | Open details |
userChangelog() | Returns the changelog for the changes a specific user made. | Open details |
serverlog() | Returns the last n lines from the server log file. | Open details |
getAvailableServerlogs() | Returns a collection of available server logs files. | Open details |
structrEnv() | Returns Structr runtime env information. | Open details |
disableCascadingDelete() | Disables cascading delete in the Structr Backend for the current transaction. | Open details |
enableCascadingDelete() | Enables cascading delete in the Structr Backend for the current transaction. | Open details |
disableNotifications() | Disables the Websocket broadcast notifications in the Structr Backend UI for the current transaction. | Open details |
disableUuidValidation() | Disables the validation of user-supplied UUIDs when creating objects. | Open details |
enableNotifications() | Enables the Websocket broadcast notifications in the Structr Backend Ui for the current transaction. | Open details |
evaluateScript() | Evaluates a serverside script string in the context of the given entity. | Open details |
setEncryptionKey() | Sets the secret key for encryt()/decrypt(), overriding the value from structr.conf. | Open details |
doInNewTransaction() | Runs the given function in a new transaction context. | Open details |
doPrivileged() | Runs the given function in a privileged (superuser) context. | Open details |
doAs() | Runs the given function in the context of the given user. | Open details |
Markdown Rendering Hint: Children of Topic(System Functions) not rendered because MarkdownTableWithDetailsFormatter prevents rendering of children.
Mathematical Functions
| Name | Description | |
|---|---|---|
rint() | Returns a random integer in the given range. | Open details |
add() | Returns the sum of the given arguments. | Open details |
subt() | Subtracts the second argument from the first argument. | Open details |
mult() | Returns the product of all given arguments. | Open details |
quot() | Divides the first argument by the second argument. | Open details |
div() | Returns the result of value1 divided by value2. | Open details |
mod() | Implements the modulo operation on two integer values. | Open details |
floor() | Returns the given value, rounded down to the nearest integer. | Open details |
ceil() | Returns the given value, rounded up to the nearest integer. | Open details |
round() | Rounds the given argument to the nearest integer. | Open details |
max() | Returns the greater of the given values. | Open details |
min() | Returns the smaller of the given values. | Open details |
Markdown Rendering Hint: Children of Topic(Mathematical Functions) not rendered because MarkdownTableWithDetailsFormatter prevents rendering of children.
Access Control Functions
| Name | Description | |
|---|---|---|
copyPermissions() | Copies the security configuration of an entity to another entity. | Open details |
grant() | Grants the given permissions on the given node to the given principal. | Open details |
revoke() | Revokes the given permissions on the given entity from a user. | Open details |
isAllowed() | Returns true if the given principal has the given permissions on the given node. | Open details |
addToGroup() | Adds the given user as a member of the given group. | Open details |
removeFromGroup() | Removes the given user from the given group. | Open details |
isInGroup() | Returns true if the given user is in the given group. | Open details |
Markdown Rendering Hint: Children of Topic(Access Control Functions) not rendered because MarkdownTableWithDetailsFormatter prevents rendering of children.
Scripting Functions
| Name | Description | |
|---|---|---|
coalesceObjects() | Returns the first non-null value in the list of expressions passed to it. In case all arguments are null, null will be returned. | Open details |
weekDays() | Calculates the number of week days (working days) between given dates. | Open details |
mergeProperties() | Copies the values for the given list of property keys from the source entity to the target entity. | Open details |
retrieve() | Returns the value associated with the given key from the temporary store. | Open details |
schedule() | Schedules a script or a function to be executed in a separate thread. | Open details |
applicationStorePut() | Stores a value in the application level store. | Open details |
applicationStoreDelete() | Removes a stored value from the application level store. | Open details |
applicationStoreGet() | Returns a stored value from the application level store. | Open details |
applicationStoreGetKeys() | Lists all keys stored in the application level store. | Open details |
applicationStoreHas() | Checks if a key is present in the application level store. | Open details |
requestStorePut() | Stores a value in the request level store. | Open details |
requestStoreDelete() | Removes a stored value from the request level store. | Open details |
requestStoreGet() | Retrieves a stored value from the request level store. | Open details |
requestStoreGetKeys() | Lists all keys stored in the request level store. | Open details |
requestStoreHas() | Checks if a key is present in the request level store. | Open details |
call() | Calls the given user-defined function in the current users context. | Open details |
callPrivileged() | Calls the given user-defined function in a superuser context. | Open details |
Markdown Rendering Hint: Children of Topic(Scripting Functions) not rendered because MarkdownTableWithDetailsFormatter prevents rendering of children.
Logic Functions
| Name | Description | |
|---|---|---|
empty() | Returns a boolean value that indicates whether the given object is null or empty. | Open details |
equal() | Returns a boolean value that indicates whether the values are equal. | Open details |
lt() | Returns true if the first argument is less than the second argument. | Open details |
gt() | Returns true if the first argument is greater than the second argument. | Open details |
lte() | Returns true if the first argument is less that or equal to the second argument. | Open details |
gte() | Returns true if the first argument is greater than or equal to the second argument. | Open details |
not() | Returns the logical negation given boolean expression. | Open details |
and() | Returns the logical AND result of the given boolean expressions. | Open details |
or() | Returns the logical OR result of the given boolean expressions. | Open details |
one() | Checks if a number is equal to 1, returns the oneValue if yes, the otherValue if no. | Open details |
Markdown Rendering Hint: Children of Topic(Logic Functions) not rendered because MarkdownTableWithDetailsFormatter prevents rendering of children.
Collection Functions
| Name | Description | |
|---|---|---|
doubleSum() | Returns the sum of all the values in the given collection as a floating-point value. | Open details |
intSum() | Returns the sum of the given arguments as an integer. | Open details |
isCollection() | Returns true if the given argument is a collection. | Open details |
extract() | Extracts property values from all elements of a collection and returns them as a collection. | Open details |
merge() | Merges collections and objects into a single collection. | Open details |
mergeUnique() | Merges collections and objects into a single collection, removing duplicates. | Open details |
complement() | Removes objects from a list. | Open details |
unwind() | Converts a list of lists into a flat list. | Open details |
sort() | Sorts the given collection or array according to the given property key. Default sort key is ‘name’. | Open details |
size() | Returns the size of the given collection. | Open details |
first() | Returns the first element of the given collection. | Open details |
last() | Returns the last element of the given collection. | Open details |
nth() | Returns the element with the given index of the given collection. | Open details |
Markdown Rendering Hint: Children of Topic(Collection Functions) not rendered because MarkdownTableWithDetailsFormatter prevents rendering of children.
Rendering Functions
| Name | Description | |
|---|---|---|
setLocale() | Sets the locale for the current request. | Open details |
print() | Prints the given strings or objects to the output buffer. | Open details |
include() | Loads the element with the given name and renders its HTML representation into the output buffer. | Open details |
includeChild() | Loads a template’s child element with the given name and renders its HTML representation into the output buffer. | Open details |
render() | Renders the children of the current node. | Open details |
setDetailsObject() | Allows overriding the current keyword with a given entity. | Open details |
removeDomChild() | Removes a node from the DOM. | Open details |
replaceDomChild() | Replaces a node from the DOM with new HTML. | Open details |
insertHtml() | Inserts a new HTML subtree into the DOM. | Open details |
getSource() | Returns the rendered HTML content for the given element. | Open details |
hasCssClass() | Returns whether the given element has the given CSS class(es). | Open details |
template() | Returns a MailTemplate object with the given name, replaces the placeholders with values from the given entity. | Open details |
Markdown Rendering Hint: Children of Topic(Rendering Functions) not rendered because MarkdownTableWithDetailsFormatter prevents rendering of children.
Miscellaneous Functions
| Name | Description | |
|---|---|---|
dateAdd() | Adds the given values to a date. | Open details |
invalidateCacheValue() | Invalidates the cached value for the given key (if present). | Open details |
Markdown Rendering Hint: Children of Topic(Miscellaneous Functions) not rendered because MarkdownTableWithDetailsFormatter prevents rendering of children.
Input Output Functions
| Name | Description | |
|---|---|---|
log() | Logs the given objects to the logfile. | Open details |
fromJson() | Parses the given JSON string and returns an object. | Open details |
toJson() | Serializes the given object to JSON. | Open details |
importHtml() | Imports HTML source code into an element. | Open details |
importCss() | Imports CSS classes, media queries etc. from given CSS file. | Open details |
getContent() | Returns the content of the given file. | Open details |
setContent() | Sets the content of the given file. Content can either be of type String or byte[]. | Open details |
appendContent() | Appends content to a Structr File. | Open details |
copyFileContents() | Copies the content of sourceFile to targetFile and updates the meta-data accordingly. | Open details |
fromXml() | Parses the given XML and returns a JSON string. | Open details |
createArchive() | Creates and returns a ZIP archive with the given files (and folders). | Open details |
createFolderPath() | Creates a new folder in the virtual file system including all parent folders if they don’t exist already. | Open details |
createZip() | Creates and returns a ZIP archive with the given files (and folders). | Open details |
unarchive() | Unarchives given file to an optional parent folder. | Open details |
barcode() | Creates a barcode image of given type with the given data. | Open details |
config() | Returns the configuration value associated with the given key from structr.conf. | Open details |
exec() | Executes a script returning the standard output of the script. | Open details |
execBinary() | Executes a script returning the returning the raw output directly into the output stream. | Open details |
read() | Reads text from a file in the exchange/ folder. | Open details |
write() | Writes text to a new file in the exchange/ folder. | Open details |
append() | Appends text to a file in the exchange/ folder. | Open details |
xml() | Tries to parse the contents of the given string into an XML document, returning the document on success. | Open details |
xpath() | Returns the value of the given XPath expression from the given XML document. | Open details |
encrypt() | Encrypts the given string using AES and returns the ciphertext encoded in base 64. | Open details |
decrypt() | Decrypts a base 64 encoded AES ciphertext and returns the decrypted result. | Open details |
importGpx() | Parses a given GPX string and returns its contents as an object with. | Open details |
flow() | Executes a given Flow and returns the evaluation result. | Open details |
pdf() | Creates the PDF representation of a given page. | Open details |
translate() | Translates the given string from the source language to the target language. | Open details |
fromCsv() | Parses the given CSV string and returns a list of objects. | Open details |
toCsv() | Returns a CSV representation of the given nodes. | Open details |
getCsvHeaders() | Parses the given CSV string and returns a list of column headers. | Open details |
toExcel() | Creates Excel from given data. | Open details |
fromExcel() | Reads data from a given Excel sheet. | Open details |
Markdown Rendering Hint: Children of Topic(Input Output Functions) not rendered because MarkdownTableWithDetailsFormatter prevents rendering of children.
Security Functions
| Name | Description | |
|---|---|---|
hmac() | Returns a keyed-hash message authentication code generated out of the given payload, secret and hash algorithm. | Open details |
confirmationKey() | Creates a confirmation key to use as a one-time token. Used for user confirmation or password reset. | Open details |
createAccessToken() | Creates a JWT access token for the given user entity that can be used for request authentication and authorization. | Open details |
createAccessAndRefreshToken() | Creates both JWT access token and refresh token for the given User entity that can be used for request authentication and authorization. | Open details |
login() | Logs the given user in if the given password is correct. Returns true on successful login. | Open details |
pdfEncrypt() | Encrypts a PDF file so that it can’t be opened without password. | Open details |
Markdown Rendering Hint: Children of Topic(Security Functions) not rendered because MarkdownTableWithDetailsFormatter prevents rendering of children.
Validation Functions
| Name | Description | |
|---|---|---|
getErrors() | Returns all error tokens present in the current context. | Open details |
clearErrors() | Clears all error tokens present in the current context. | Open details |
clearError() | Clears the given error token from the current context. | Open details |
isValidUuid() | Tests if a given string is a valid UUID. | Open details |
isValidEmail() | Checks if the given address is a valid email address. | Open details |
assert() | Aborts the current request if the given condition evaluates to false. | Open details |
error() | Stores error tokens in the current context causing the transaction to fail at the end of the request. | Open details |
hasError() | Allows checking if an error has been raised in the scripting context. | Open details |
Markdown Rendering Hint: Children of Topic(Validation Functions) not rendered because MarkdownTableWithDetailsFormatter prevents rendering of children.
EMail Functions
| Name | Description | |
|---|---|---|
sendHtmlMail() | Sends an HTML email. | Open details |
sendPlaintextMail() | Sends a plaintext email. | Open details |
mailBegin() | Begins a new mail configuration. | Open details |
mailSetFrom() | Overwrites/Sets the from address (and optionally name) of the current mail. | Open details |
mailSetSubject() | Overwrites/Sets the subject of the current mail. | Open details |
mailSetHtmlContent() | Overwrites/Sets the HTML content of the current mail. | Open details |
mailSetTextContent() | Sets/Overwrites the text content of the current mail. | Open details |
mailAddTo() | Adds a To: recipient to the current mail. | Open details |
mailClearTo() | Clears the current list of To: recipients. | Open details |
mailAddCc() | Adds a Cc: recipient to the current mail. | Open details |
mailClearCc() | Clears the current list of Cc: recipients. | Open details |
mailAddBcc() | Adds a Bcc: recipient to the current mail. | Open details |
mailClearBcc() | Clears the current list of Bcc: recipients. | Open details |
mailSetBounceAddress() | Sets the bounce address of the current mail. | Open details |
mailClearBounceAddress() | Removes the bounce address from the current mail. | Open details |
mailAddReplyTo() | Adds a Reply-To: recipient to the current mail. | Open details |
mailClearReplyTo() | Removes all Reply-To: configuration from the current mail. | Open details |
mailAddMimePart() | Adds a MIME part to the current mail. | Open details |
mailAddAttachment() | Adds an attachment with an optional file name to the current mail. | Open details |
mailClearMimeParts() | Removes all custom MIME parts from the current mail. | Open details |
mailClearAttachments() | Removes all attachments from the current mail. | Open details |
mailAddHeader() | Adds a custom header to the current mail. | Open details |
mailRemoveHeader() | Removes a specific custom header from the current mail. | Open details |
mailClearHeaders() | Clears any configured custom headers for the current mail. | Open details |
mailSetInReplyTo() | Sets the In-Reply-To header for the outgoing mail. | Open details |
mailClearInReplyTo() | Removes the In-Reply-To header from the current mail. | Open details |
mailSaveOutgoingMessage() | Configures if the current mail should be saved or not. | Open details |
mailGetLastOutgoingMessage() | Returns the last outgoing message sent by the advanced mail module in the current script as a node of type EMailMessage. | Open details |
mailSend() | Sends the currently configured mail. | Open details |
mailDecodeText() | Decodes RFC 822 “text” token from mail-safe form as per RFC 2047. | Open details |
mailEncodeText() | Encodes RFC 822 “text” token into mail-safe form as per RFC 2047. | Open details |
mailSelectConfig() | Selects a configuration prefix for the SMTP configuration. | Open details |
mailSetManualConfig() | Sets a manual SMTP configuration for the current mail. | Open details |
mailResetManualConfig() | Resets a manual SMTP configuration for the current mail. | Open details |
mailGetError() | Returns the last error message (or null if no error has occurred). | Open details |
mailHasError() | Returns true if an error occurred while sending the mail. | Open details |
Markdown Rendering Hint: Children of Topic(EMail Functions) not rendered because MarkdownTableWithDetailsFormatter prevents rendering of children.
Http Functions
| Name | Description | |
|---|---|---|
GET() | Sends an HTTP GET request to the given URL and returns the response headers and body. | Open details |
HEAD() | Sends an HTTP HEAD request with optional username and password to the given URL and returns the response headers. | Open details |
PATCH() | Sends an HTTP PATCH request to the given URL and returns the response headers and body. | Open details |
POST() | Sends an HTTP POST request to the given URL and returns the response body. | Open details |
POSTMultiPart() | Sends a multi-part HTTP POST request to the given URL and returns the response body. | Open details |
PUT() | Sends an HTTP PUT request with an optional content type to the given URL and returns the response headers and body. | Open details |
DELETE() | Sends an HTTP DELETE request with an optional content type to the given URL and returns the response headers and body. | Open details |
addHeader() | Temporarily adds the given (key, value) tuple to the local list of request headers. | Open details |
clearHeaders() | Clears headers for the next HTTP request. | Open details |
setResponseHeader() | Adds the given header field and value to the response of the current rendering run. | Open details |
removeResponseHeader() | Removes the given header field from the server response. | Open details |
setResponseCode() | Sets the response code of the current rendering run. | Open details |
getRequestHeader() | Returns the value of the given request header field. | Open details |
validateCertificates() | Disables or enables strict certificate checking when performing a request in a scripting context. The setting remains for the whole request. | Open details |
getCookie() | Returns the requested cookie if it exists. | Open details |
setCookie() | Sets the given cookie. | Open details |
Markdown Rendering Hint: Children of Topic(Http Functions) not rendered because MarkdownTableWithDetailsFormatter prevents rendering of children.
MQTT Functions
| Name | Description | |
|---|---|---|
mqttPublish() | Publishes message on given mqtt client with given topic. | Open details |
mqttSubscribe() | Subscribes given topic on given mqtt client. | Open details |
mqttUnsubscribe() | Unsubscribes given topic on given mqtt client. | Open details |
Markdown Rendering Hint: Children of Topic(MQTT Functions) not rendered because MarkdownTableWithDetailsFormatter prevents rendering of children.
Geocoding Functions
| Name | Description | |
|---|---|---|
geocode() | Returns the geolocation (latitude, longitude) for the given street address using the configured geocoding provider. | Open details |
readShapefile() | Reads a shapefile from a Structr path and returns it as a list of WKT strings. | Open details |
wktToPolygons() | Converts a WKT string into a list of polygons. | Open details |
wktToGeometry() | Converts a WKT string into a geometry object. | Open details |
makePolygonValid() | Makes a polygon valid. | Open details |
getWfsData() | Reads features from a WFS endpoint and returns geometries. | Open details |
getWcsData() | Reads coverage data from a WCS endpoint and returns it. | Open details |
getWcsHistogram() | Reads coverage data from a WCS endpoint and returns it. | Open details |
coordsToPoint() | Converts a coordinate into a point. | Open details |
coordsToMultipoint() | Converts a coordinate array into a multipoint geometry. | Open details |
coordsToLineString() | Converts a coordinate array into a line string geometry. | Open details |
coordsToPolygon() | Converts a coordinate array into a polygon. | Open details |
azimuth() | Returns the azimuth between two geometries. | Open details |
distance() | Returns the distance between two geometries. | Open details |
lineSegment() | Returns a line segment with start point, azimuth and length. | Open details |
lineStringsToPolygons() | Merges line strings to polygons. | Open details |
convertGeometry() | Converts the given geometry from source CRS to destination CRS. | Open details |
getCoordinates() | Returns the coordinates of a geometry. | Open details |
Markdown Rendering Hint: Children of Topic(Geocoding Functions) not rendered because MarkdownTableWithDetailsFormatter prevents rendering of children.
Schema Functions
| Name | Description | |
|---|---|---|
propertyInfo() | Returns the schema information for the given property. | Open details |
functionInfo() | Returns information about the currently running Structr method, or about the method defined in the given type and name. | Open details |
typeInfo() | Returns the type information for the specified type. | Open details |
enumInfo() | Returns the possible values of an enum property. | Open details |
ancestorTypes() | Returns the list of parent types of the given type including the type itself. | Open details |
inheritingTypes() | Returns the list of subtypes of the given type including the type itself. | Open details |
getRelationshipTypes() | Returns the list of available relationship types form and/or to this node. Either potentially available (schema) or actually available (database). | Open details |
Markdown Rendering Hint: Children of Topic(Schema Functions) not rendered because MarkdownTableWithDetailsFormatter prevents rendering of children.
Predicate Functions
| Name | Description | |
|---|---|---|
predicate.empty | Returns a query predicate that can be used with find() or search(). | Open details |
predicate.equals | Returns a query predicate that can be used with find() or search(). | Open details |
predicate.contains | Returns a query predicate that can be used with find() or search(). | Open details |
predicate.and | Returns a query predicate that can be used with find() or search(). | Open details |
predicate.endsWith | Returns a query predicate that can be used with find() or search(). | Open details |
Markdown Rendering Hint: Children of Topic(Predicate Functions) not rendered because MarkdownTableWithDetailsFormatter prevents rendering of children.
Miscellaneous functions
| Name | Description | |
|---|---|---|
cache() | Stores a value in the global cache. | Open details |
Markdown Rendering Hint: Children of Topic(Miscellaneous functions) not rendered because MarkdownTableWithDetailsFormatter prevents rendering of children.
Logic functions
| Name | Description | |
|---|---|---|
if() | Evaluates a condition and executes different expressions depending on the result. | Open details |
is() | Evaluates a condition and executes an expressions if the result is true. | Open details |
Markdown Rendering Hint: Children of Topic(Logic functions) not rendered because MarkdownTableWithDetailsFormatter prevents rendering of children.
Collection functions
| Name | Description | |
|---|---|---|
each() | Evaluates a StructrScript expression for every element of a collection. | Open details |
filter() | Filters a list using a StructrScript expression. | Open details |
map() | Returns a single result from all elements of a list by applying a reduction function. | Open details |
any() | Evaluates a StructrScript expression for every element of a collection and returns true if the expression evaluates to true for any of the elements. | Open details |
all() | Evaluates a StructrScript expression for every element of a collection and returns true if the expression evaluates to true for all of the elements. | Open details |
none() | Evaluates a StructrScript expression for every element of a collection and returns true if the expression evaluates to true for none of the elements. | Open details |
Markdown Rendering Hint: Children of Topic(Collection functions) not rendered because MarkdownTableWithDetailsFormatter prevents rendering of children.
System Types
System types are built-in types that provide core functionality in Structr. They include types for users and groups, files and folders, pages and templates, email handling, and more. Each system type comes with predefined properties and methods. You can use these types directly or extend them in your schema to add custom properties and behavior. For details on extending types, see the Data Model chapter.
DataFeed
Fetches and stores content from RSS and Atom feeds. Structr periodically checks configured feeds and creates FeedItem objects for new entries. Key properties include url for the feed location, updateInterval for automatic refresh timing, lastUpdated for tracking, and maxItems and maxAge for limiting stored entries.
Details
Feed items include title, author, publication date, content, and any enclosures like images or audio files. The updateIfDue() method checks whether enough time has passed since the last fetch and updates only when necessary. Use cleanUp() to remove old items based on your retention settings. You can extend DataFeed or FeedItem with custom properties and add an onCreate method on FeedItem to process new entries automatically – for example, sending notifications or importing content into your application.
Methods
| Name | Description |
|---|---|
cleanUp() | Removes old feed items based on the configured maxItems and maxAge properties. |
updateFeed() | Fetches new entries from the remote feed URL and runs cleanUp afterward. |
updateIfDue() | Checks if an update is due based on lastUpdated and updateInterval, and fetches new items if necessary. |
Markdown Rendering Hint: Children of SystemType(DataFeed) not rendered because SystemTypeMarkdownFormatter prevents rendering of children.
EMailMessage
Stores email messages fetched from mailboxes or saved from outgoing mail. Key properties include subject, from, fromMail, to, cc, bcc, content (plain text), htmlContent, sentDate, receivedDate, messageId, inReplyTo for threading, header (all headers as JSON), mailbox, and attachedFiles.
Details
Attachments are stored as linked File objects in a date-based folder structure. Add an onCreate method to process incoming emails automatically – for example, creating support tickets. You can extend EMailMessage with custom properties and configure the subtype on the Mailbox via overrideMailEntityType.
Properties
| Name | Type | Description |
|---|---|---|
attachedFiles | File[] | Files that were attached to this message. |
bcc | String | BCC address of this message. |
cc | String | CC address of this message. |
content | String | Plaintext content of this message. |
from | String | Sender name of this message. |
fromMail | String | Sender address of this message. |
htmlContent | String | HTML content of this message. |
inReplyTo | String | inReplyTo of this message. |
mailbox | Mailbox | Mailbox this message belongs to. |
messageId | String | Message id of this message. |
receivedDate | Date | Date this message was received. |
replyTo | String | Reply address of this message. |
sentDate | Date | Date this message was sent. |
subject | String | Subject of this message. |
to | String | Recipient of this message. |
Markdown Rendering Hint: Children of SystemType(EMailMessage) not rendered because SystemTypeMarkdownFormatter prevents rendering of children.
File
Represents files in Structr’s virtual filesystem. Files can live on different storage backends – local disk, Amazon S3, or archive systems – while keeping consistent metadata and permissions. Key properties include name, contentType for MIME type, size, parent for folder location, and isTemplate for dynamic content evaluation.
Details
Structr automatically calculates checksums, extracts text via Apache Tika for full-text search, and supports OCR when Tesseract is installed. Files use the same permission system as all other objects. You can extend the File type with custom properties or create subtypes like InvoiceDocument or ProductImage.
Properties
| Name | Type | Description |
|---|---|---|
checksum | Long | xxHash checksum of the file’s content (generated automatically). |
contentType | String | Content type of the file. |
crc32 | Long | CRC32 checksum of the file’s content (optional, see below). |
isTemplate | Boolean | When checked, the content of this file is evaluated as a script and the resulting content is returned. |
md5 | String | MD5 checksum of the file’s content (optional, see below). |
parent | Folder | parent folder of this File or Folder |
path | String | full path of this file or folder (read-only) |
sha1 | String | SHA1 checksum of the file’s content (optional, see below). |
sha512 | String | SHA512 checksum of the file’s content (optional, see below). |
size | Long | Size of this file. |
Methods
| Name | Description |
|---|---|
doCSVImport() | Starts an asynchronous CSV import job and returns the job ID. |
doXMLImport() | Starts an asynchronous CSV import job and returns the job ID. |
getCSVHeaders() | Extracts and returns the column headers from a CSV file. |
getFirstLines() | Returns the first lines of the file along with the detected line separator (LF, CR, or CR+LF). |
getSearchContext() | Searches for a term in the file’s extracted text content and returns the surrounding context. |
getXMLStructure() | Analyzes the structure of an XML file and returns it as a JSON representation. |
Markdown Rendering Hint: Children of SystemType(File) not rendered because SystemTypeMarkdownFormatter prevents rendering of children.
Folder
Represents directories in Structr’s virtual filesystem. The folder structure you see is independent of where files are physically stored – you can reorganize freely without moving actual data. Key properties include name, parent for the containing folder, and children for contained files and subfolders.
Details
You can mount folders to external storage locations like local directories or cloud providers, with automatic change detection. Each folder can use a different storage backend, so frequently accessed files can live on fast storage while archives go somewhere cheaper. Permissions on folders affect visibility of their contents. You can extend the Folder type or create subtypes for specialized use cases.
Properties
| Name | Type | Description |
|---|---|---|
enabledChecksums | String | Override for the global checksums setting, allows you to enable or disable individual checksums for all files in this folder (and sub-folders). |
parent | Folder | parent folder of this File or Folder |
path | String | full path of this file or folder (read-only) |
Markdown Rendering Hint: Children of SystemType(Folder) not rendered because SystemTypeMarkdownFormatter prevents rendering of children.
Group
Organizes users for easier permission management. Instead of granting permissions to individual users, you grant them to groups – when a user joins a group, they automatically inherit all its permissions. Key properties include name and members for the collection of users and nested groups.
Details
Groups can contain other groups, so you can build hierarchies where permissions flow down automatically. In the Admin UI, you manage membership via drag-and-drop. Groups also serve as integration points for LDAP, letting you map external directory groups to Structr. You can extend the Group type or create subtypes like Department or Team.
Properties
| Name | Type | Description |
|---|---|---|
members | Principal[] | Members of the group, can be User or Group. |
Markdown Rendering Hint: Children of SystemType(Group) not rendered because SystemTypeMarkdownFormatter prevents rendering of children.
Image
Extends File with specialized image handling. When you upload an image, Structr automatically extracts EXIF metadata (camera info, GPS coordinates, date taken) and stores the dimensions. Two thumbnails are generated on first access and linked to the original via database relationships.
Details
Supported formats include JPEG, PNG, GIF, WebP, and TIFF. You can scale, crop, and convert between formats. The Admin UI offers a built-in image editor and an optimized view mode for browsing image folders. With Tesseract OCR installed, Structr can extract text from images for full-text search. You can extend Image or create subtypes like ProductImage.
Properties
| Name | Type | Description |
|---|---|---|
checksum | Long | xxHash checksum of the file’s content (generated automatically). |
contentType | String | Content type of the file. |
crc32 | Long | CRC32 checksum of the file’s content (optional, see below). |
exifIFD0Data | String | Exif IFD0 data. |
exifSubIFDData | String | Exif SubIFD data. |
gpsData | String | GPS data. |
height | Integer | Height of this image. |
isTemplate | Boolean | When checked, the content of this file is evaluated as a script and the resulting content is returned. |
md5 | String | MD5 checksum of the file’s content (optional, see below). |
orientation | Integer | Orientation of this image. |
parent | Folder | parent folder of this File or Folder |
path | String | full path of this file or folder (read-only) |
sha1 | String | SHA1 checksum of the file’s content (optional, see below). |
sha512 | String | SHA512 checksum of the file’s content (optional, see below). |
size | Long | Size of this file. |
width | Integer | Width of this image. |
Methods
| Name | Description |
|---|---|
doCSVImport() | Starts an asynchronous CSV import job and returns the job ID. |
doXMLImport() | Starts an asynchronous CSV import job and returns the job ID. |
getCSVHeaders() | Extracts and returns the column headers from a CSV file. |
getFirstLines() | Returns the first lines of the file along with the detected line separator (LF, CR, or CR+LF). |
getSearchContext() | Searches for a term in the file’s extracted text content and returns the surrounding context. |
getXMLStructure() | Analyzes the structure of an XML file and returns it as a JSON representation. |
Markdown Rendering Hint: Children of SystemType(Image) not rendered because SystemTypeMarkdownFormatter prevents rendering of children.
MailTemplate
Defines reusable email content for automated messages like registration confirmations or password resets. Key properties include name for referencing in code, locale for language variants, and content fields for subject, plain text, and HTML body. Use ${...} expressions for dynamic values like ${link} or ${me.name}.
Details
Structr uses predefined template names for built-in workflows: CONFIRM_REGISTRATION_* for self-registration and RESET_PASSWORD_* for password reset. The Admin UI provides a Template Wizard that generates these automatically, plus a visual editor with live preview. Each template can have multiple locale variants for multi-language support.
Properties
| Name | Type | Description |
|---|---|---|
description | String | Description of this template. |
locale | String | Locale for this template. |
text | String | Text content of this template. |
Markdown Rendering Hint: Children of SystemType(MailTemplate) not rendered because SystemTypeMarkdownFormatter prevents rendering of children.
Mailbox
Configures an email account for automatic fetching from IMAP or POP3 servers. The MailService periodically checks all mailboxes and stores new messages as EMailMessage objects. Key properties include host, mailProtocol (imaps or pop3), port, user, password, and folders to monitor.
Details
The service fetches messages newest first, detects duplicates via Message-ID, and extracts attachments as File objects. Use overrideMailEntityType to specify a custom subtype for incoming emails, enabling lifecycle methods for automatic processing. You can trigger immediate fetching with FetchMailsCommand or list available folders with FetchFoldersCommand.
Properties
| Name | Type | Description |
|---|---|---|
emails | EMailMessage[] | Messages in this mailbox. |
folders | String[] | Folders this mailbox queries. |
host | String | Host or IP address this mailbox connects to. |
mailProtocol | Enum | Mail protocol. |
password | String | Password this mailbox connects with. |
port | Integer | Port this mailbox connects to. |
user | String | Username this mailbox connects with. |
Methods
| Name | Description |
|---|---|
fetchMails() | Triggers an immediate fetch of emails from this mailbox, bypassing the regular MailService interval. Creates EMailMessage objects for new messages and extracts attachments. |
getAvailableFoldersOnServer() | Returns a list of folder names available on the configured mail server. Use this to discover which folders can be added to the folders property for fetching. |
Markdown Rendering Hint: Children of SystemType(Mailbox) not rendered because SystemTypeMarkdownFormatter prevents rendering of children.
MessageClient
Methods
| Name | Description |
|---|---|
sendMessage() | Sends a message to the specified topic. |
subscribeTopic() | Subscribes the client to the specified topic to receive messages. |
unsubscribeTopic() | Unsubscribes the client from the specified topic. |
Markdown Rendering Hint: Children of SystemType(MessageClient) not rendered because SystemTypeMarkdownFormatter prevents rendering of children.
Page
Represents a complete web page. Structr renders pages on the server, so browsers receive ready-to-display HTML rather than JavaScript that builds the page client-side. Key properties include name (also determines the URL), contentType for output format, position for start page selection, showOnErrorCodes for error pages, and sites for multi-site hosting.
Details
Pages support template expressions for dynamic content, repeaters for collections, partial reloads without full page refresh, and show/hide conditions. Permissions control both data access and what renders – you can make entire page sections visible only to certain users. URL Routing lets you define custom paths with typed parameters that Structr validates automatically.
Properties
| Name | Type | Description |
|---|---|---|
data-structr-id | String | Set to ${current.id} most of the time. |
hideConditions | String | Conditions which have to be met in order for the element to be hidden. This is an ‘auto-script’ environment, meaning that the text is automatically surrounded with ${}. |
sharedComponentConfiguration | String | The contents of this field will be evaluated before rendering this component. This is usually used to customize shared components to make them more flexible. This is an ‘auto-script’ environment, meaning that the text is automatically surrounded with ${}. |
showConditions | String | Conditions which have to be met in order for the element to be shown. This is an ‘auto-script’ environment, meaning that the text is automatically surrounded with ${}. |
Markdown Rendering Hint: Children of SystemType(Page) not rendered because SystemTypeMarkdownFormatter prevents rendering of children.
Site
Controls which pages are served for which domain. A single Structr instance can host multiple websites – useful for running public and internal sites side by side, serving localized versions under country domains, or operating staging and production on the same server. Key properties include name, hostname, and an optional port for exact matching.
Details
When a request arrives, Structr checks hostname and port against configured sites and serves only the assigned pages. Pages without site assignment are served everywhere (the default behavior). A page can belong to multiple sites. Sites control page visibility only – files remain accessible regardless of domain. Site configurations are included in deployment exports.
Properties
| Name | Type | Description |
|---|---|---|
hostname | String | Domain name used to match incoming requests to this site. Requests with a matching Host header are routed to pages assigned to this site. |
port | Integer | Port number used together with hostname to match incoming requests. Allows hosting multiple sites on different ports of the same domain. |
Markdown Rendering Hint: Children of SystemType(Site) not rendered because SystemTypeMarkdownFormatter prevents rendering of children.
Template
Contains text or markup that outputs directly into pages. Unlike HTML elements, templates give you full control over where children appear – you call render(children) explicitly. This lets you define layouts with multiple insertion points like sidebars and main content areas. Key properties include name, content, contentType (Markdown, AsciiDoc, HTML, JSON, XML, plaintext), and repeater settings.
Details
The render() function controls exactly where each child appears, while include() pulls content from elsewhere in the page tree. The Main Page Template typically sits below the Page element and defines the overall structure. Templates can also produce non-HTML output by setting the content type to application/json or text/xml.
Properties
| Name | Type | Description |
|---|---|---|
data-structr-id | String | Set to ${current.id} most of the time. |
hideConditions | String | Conditions which have to be met in order for the element to be hidden. This is an ‘auto-script’ environment, meaning that the text is automatically surrounded with ${}. |
sharedComponentConfiguration | String | The contents of this field will be evaluated before rendering this component. This is usually used to customize shared components to make them more flexible. This is an ‘auto-script’ environment, meaning that the text is automatically surrounded with ${}. |
showConditions | String | Conditions which have to be met in order for the element to be shown. This is an ‘auto-script’ environment, meaning that the text is automatically surrounded with ${}. |
Markdown Rendering Hint: Children of SystemType(Template) not rendered because SystemTypeMarkdownFormatter prevents rendering of children.
User
Represents user accounts in your application. Every request to Structr runs in the context of a user – either authenticated or anonymous. Users can log in via HTTP headers, session cookies, JWT tokens, or OAuth providers. Key properties include name and eMail for identification, password (stored as secure hash), isAdmin for full system access, blocked for disabling accounts, and locale for localization.
Details
Structr supports two-factor authentication via TOTP and automatically locks accounts after too many failed login attempts. For self-service scenarios, users can register themselves and confirm their account via email. You can extend the User type with custom properties or create subtypes like Employee or Customer.
Properties
| Name | Type | Description |
|---|---|---|
confirmationKey | String | Temporary token for email verification during self-registration. Set automatically when a user registers and cleared after successful confirmation. |
homeDirectory | Folder | The home directory of this user, if application.filesystem.enabled is set to true in structr.conf. |
skipSecurityRelationships | Boolean | When true, excludes this user from relationship-based permission checks. Useful for system users or service accounts that should bypass normal access control evaluation. |
workingDirectory | Folder | The work directory of this user, if application.filesystem.enabled is set to true in structr.conf. |
Markdown Rendering Hint: Children of SystemType(User) not rendered because SystemTypeMarkdownFormatter prevents rendering of children.
Widget
Provides reusable building blocks for pages – from simple HTML snippets to complete configurable components. Structr parses the widget’s HTML source when you insert it into a page. Key properties include name, source for HTML content, configuration for customizable variables (JSON), selectors for context menu suggestions, treePath for categories, and isPageTemplate for page creation.
Details
Template expressions in square brackets like [variableName] become configurable options that users fill in when inserting. The configuration JSON defines input types, defaults, and help text. Widgets can define shared components with <structr:shared-template> tags. The Widgets flyout shows both local and remote widgets, enabling sharing across applications.
Properties
| Name | Type | Description |
|---|---|---|
configuration | String | JSON object defining configurable template variables. Keys match square bracket expressions in the source, values define input labels and types for the insertion dialog. |
description | String | Explanatory text displayed when inserting the Widget. Supports HTML formatting. Shown in the dialog when the Widget is used as a page template. |
isPageTemplate | Boolean | When enabled, this Widget appears in the Create Page dialog as a page template option. |
selectors | String[] | CSS selectors that control where this Widget appears as a suggestion in the context menu. For example “table” or “div.container”. |
source | String | HTML source code of the Widget. Can include Structr expressions and template variables in square brackets like [variableName]. |
svgIconPath | String | Path to an SVG icon displayed in the Widgets flyout, can be an absolute URL. |
thumbnailPath | String | Path to a thumbnail image displayed in the Widgets flyout, can be an absolute URL. |
treePath | String | Slash-separated path for organizing Widgets into categories. Must begin with a slash, for example “/Forms/Input Elements”. |
Markdown Rendering Hint: Children of SystemType(Widget) not rendered because SystemTypeMarkdownFormatter prevents rendering of children.
Services
CronService
Executes global schema methods on a configurable schedule. Tasks run as superuser.
Settings
| Setting | Description |
|---|---|
CronService.tasks | Whitespace-separated list of method names to schedule |
<methodName>.cronExpression | Six-field cron expression: <s> <m> <h> <dom> <mon> <dow> |
CronService.allowparallelexecution | Allow concurrent execution of the same task (default: false) |
Markdown Rendering Hint: Children of Service(CronService) not rendered because ServiceMarkdownFormatter prevents rendering of children.
DirectoryWatchService
Synchronizes Structr folders with directories on the server filesystem. Monitors mounted directories for changes and updates file metadata automatically.
Configuration
Mount a directory by setting the mountTarget property on a Folder’s storage configuration. The service watches for file changes and periodically rescans the directory.
Folder Properties
| Property | Description |
|---|---|
mountTarget | Path to the directory on the server filesystem |
mountWatchContents | Enable filesystem event monitoring for immediate change detection |
mountScanInterval | Seconds between directory rescans (0 = no periodic scan) |
Settings
| Setting | Description |
|---|---|
application.filesystem.followsymlinks | Follow symbolic links when scanning directories |
Notes
- Only works on filesystems that support directory watch events
- File contents remain on disk and are not imported into the database
- Changes made to files in Structr are written to the corresponding files on disk
Markdown Rendering Hint: Children of Service(DirectoryWatchService) not rendered because ServiceMarkdownFormatter prevents rendering of children.
FtpService
Provides FTP access to Structr’s virtual filesystem. Users authenticate with their Structr credentials and see files according to their permissions.
Settings
| Setting | Default | Description |
|---|---|---|
application.ftp.port | 8021 | Port the FTP server listens on |
application.ftp.passivePortRange | – | Port range for passive mode, for example “50000-50100”. Required when running in Docker. |
Markdown Rendering Hint: Children of Service(FtpService) not rendered because ServiceMarkdownFormatter prevents rendering of children.
MailService
Periodically fetches emails from configured Mailbox objects via IMAP or POP3 and stores them as EMailMessage objects. Detects duplicates using Message-ID headers and extracts attachments automatically.
Settings
| Setting | Default | Description |
|---|---|---|
mail.maxemails | 25 | Maximum emails to fetch per mailbox per check |
mail.updateinterval | 30000 | Interval between checks in milliseconds |
mail.attachmentbasepath | /mail/attachments | Path for storing email attachments |
Related Types
Mailbox, EMailMessage
Markdown Rendering Hint: Children of Service(MailService) not rendered because ServiceMarkdownFormatter prevents rendering of children.
SSHService
Provides SSH access to an interactive Admin Console and SFTP/SSHFS access to Structr’s virtual filesystem. Only admin users can connect. Authentication requires a public key configured in the user’s publicKey property.
Settings
| Setting | Default | Description |
|---|---|---|
application.ssh.port | 8022 | Port the SSH server listens on |
application.ssh.forcepublickey | true | Require public key authentication, disabling password login |
Markdown Rendering Hint: Children of Service(SSHService) not rendered because ServiceMarkdownFormatter prevents rendering of children.
Maintenance Commands
Maintenance commands perform administrative operations on the database and application. They run with full privileges and are available only to admin users. You can execute maintenance commands through the Admin UI (Schema → Admin menu), the REST API (POST /structr/rest/maintenance/<command>), or programmatically using the maintenance() function. For details on execution methods, see the Maintenance chapter.
changeNodePropertyKey
Migrates property values from one property key to another.
Parameters
| Name | Description | Optional |
|---|---|---|
oldKey | Source property key | no |
newKey | Target property key | no |
Use this command when you rename a property in your schema and need to move existing data to the new key.
clearDatabase
Removes all nodes and relationships from the database.
Notes
- Warning: This action cannot be reversed. It deletes your entire application and all data, including non-Structr nodes and relationships.
copyRelationshipProperties
Copies property values from one key to another on all relationships.
Parameters
| Name | Description | Optional |
|---|---|---|
sourceKey | Source property key | no |
destKey | Destination property key | no |
createLabels
Updates Neo4j type labels on nodes to match their Structr type hierarchy.
Parameters
| Name | Description | Optional |
|---|---|---|
type | Limit to nodes of this type | yes |
removeUnused | Remove labels without corresponding types (default: true) | yes |
Use this command after changing type inheritance or when labels are out of sync.
The command reads each node’s type property, resolves the inheritance hierarchy, and creates a label for each type in the chain.
Notes
- Only works for nodes that have a value in their
typeproperty.
deleteSpatialIndex
Removes legacy spatial index nodes from the database.
Deletes all nodes with bbox and gtype properties.
Notes
- This is a legacy command for cleaning up old spatial indexes. You will probably never need it.
deployData
Exports or imports application data.
Parameters
| Name | Description | Optional |
|---|---|---|
mode | import or export | no |
source | Source folder path (required for import) | yes |
target | Target folder path (required for export) | yes |
types | Comma-separated list of types to export | yes |
Exports or imports data only, not the schema or application structure. Use this for backing up or migrating data between environments.
deploy
Exports or imports a Structr application without data.
Parameters
| Name | Description | Optional |
|---|---|---|
mode | import or export | no |
source | Source folder path (required for import) | yes |
target | Target folder path (required for export) | yes |
extendExistingApp | If true, import merges with existing application instead of replacing it | yes |
Exports or imports the schema, pages, files, and security configuration. The export creates a text-based format suitable for version control.
This is the same mechanism used by the Dashboard deployment feature.
directFileImport
Imports files from a server filesystem directory into Structr’s virtual filesystem.
Parameters
| Name | Description | Optional |
|---|---|---|
source | Source directory path on the server | no |
mode | copy (keep originals) or move (delete after import) | no |
existing | Handle duplicates: skip, overwrite, or rename (default: skip) | yes |
index | Enable fulltext indexing for imported files (default: true) | yes |
Notes
- When using Docker, copy files into the container first or use a mounted volume.
fixNodeProperties
Converts property values that were stored with an incorrect type.
Parameters
| Name | Description | Optional |
|---|---|---|
type | Node type to fix | no |
name | Specific property to fix (default: all properties) | yes |
Use this command after changing a property’s type in the schema, for example from String to Integer.
flushCaches
Clears all internal caches.
Use this command to reduce memory consumption or resolve cache invalidation issues.
letsencrypt
Creates or renews an SSL certificate using Let’s Encrypt.
Parameters
| Name | Description | Optional |
|---|---|---|
server | staging (test certificates) or production (valid certificates) | no |
challenge | Override the challenge method from structr.conf | yes |
wait | Seconds to wait for DNS or HTTP challenge preparation | yes |
reload | Reload HTTPS certificate without restart (default: false) | yes |
Notes
- The
letsencrypt.domainssetting must contain the full domain name for the certificate.
maintenanceMode
Enables or disables the maintenance mode.
Parameters
| Name | Description | Optional |
|---|---|---|
action | enable or disable | no |
When the maintenance mode is started, the following services are shut down:
- FtpService
- HttpService
- SSHService
- AgentService
- CronService
- DirectoryWatchService
- LDAPService
- MailService
After a short delay, the following services are restarted on different ports:
- FtpService
- HttpService
- SSHService
Notes
- Active processes will keep running until they are finished. If for example a cron job is running, it will not be halted. Only the services are stopped so no new processes are started.
rebuildIndex
Rebuilds database indexes by removing and re-adding all indexed properties.
Parameters
| Name | Description | Optional |
|---|---|---|
type | Limit to this node type | yes |
relType | Limit to this relationship type | yes |
mode | nodesOnly or relsOnly | yes |
Use this command after bulk imports or when search results are inconsistent.
setNodeProperties
Sets property values on all nodes of a given type.
Parameters
| Name | Description | Optional |
|---|---|---|
type | Node type to modify | no |
newType | New value for the type property | yes |
All parameters except type and newType are treated as property key-value pairs to set on matching nodes.
Notes
- Warning: After changing the
typeproperty, runcreateLabelsto update node labels. Otherwise, nodes may not be accessible through their new type.
setRelationshipProperties
Sets property values on all relationships of a given type.
Parameters
| Name | Description | Optional |
|---|---|---|
type | Relationship type to modify | no |
All parameters except type are treated as property key-value pairs to set on matching relationships.
Notes
- You cannot change a relationship’s type with this command. To change the type, delete and recreate the relationship.
setUuid
Generates UUIDs for nodes and relationships that lack an id property.
Parameters
| Name | Description | Optional |
|---|---|---|
type | Limit to this node type | yes |
relType | Limit to this relationship type | yes |
allNodes | Apply to all nodes | yes |
allRels | Apply to all relationships | yes |
Settings
The following table lists all configuration settings available in Structr. You can view and modify these settings in the Configuration Interface, which opens in a separate browser tab when you click the wrench icon in the Admin UI header bar. The Configuration Interface requires authentication with the superuser password from structr.conf. Alternatively, you can edit the structr.conf file directly and restart the server.
Advanced Settings
| Name | Description |
|---|---|
json.redundancyreduction | If enabled, nested nodes (which were already rendered in the current output) are rendered with limited set of attribute (id, type, name). |
json.lenient | Whether to use lenient serialization, e.g. allow to serialize NaN, -Infinity, Infinity instead of just returning null. Note: as long as Javascript doesn’t support NaN etc., most of the UI will be broken |
json.output.forcearrays | If enabled, collections with a single element are always represented as a collection. |
json.reductiondepth | For restricted views (ui, custom, all), only a limited amount of attributes (id, type, name) are rendered for nested objects after this depth. The default is 0, meaning that on the root depth (0), all attributes are rendered and reduction starts at depth 1. Can be overridden on a per-request basis by using the request parameter _outputReductionDepth |
json.output.dateformat | Output format pattern for date objects in JSON |
geocoding.provider | Geocoding configuration |
geocoding.language | Geocoding configuration |
geocoding.apikey | Geocoding configuration |
dateproperty.defaultformat | Default ISO8601 date format pattern |
zoneddatetimeproperty.defaultformat | Default zoneddatetime format pattern |
Markdown Rendering Hint: Children of Topic(Advanced Settings) not rendered because MarkdownTableFormatter prevents rendering of children.
Application Configuration Settings
| Name | Description |
|---|---|
application.changelog.enabled | Turns on logging of changes to nodes and relationships |
application.changelog.user_centric.enabled | Turns on user-centric logging of what a user changed/created/deleted |
application.filesystem.enabled | If enabled, Structr will create a separate home directory for each user. The home directory of authenticated users will override the default upload folder setting. See Filesystem for more information. |
application.filesystem.unique.paths | If enabled, Structr will not allow files/folders of the same name in the same folder and automatically rename the file. |
application.filesystem.unique.insertionposition | Defines the insertion position of the uniqueness criterion (currently a timestamp).
|
application.filesystem.checksums.default | List of additional checksums to be calculated on file creation by default. (File.checksum is always popuplated with an xxHash)
|
application.filesystem.indexing.enabled | Whether indexing is enabled globally (can be controlled separately for each file) |
application.filesystem.indexing.maxsize | Maximum size (MB) of a file to be indexed |
application.uploads.folder | The default upload folder for files uploaded via the UploadServlet. This must be a valid folder path and can not be empty (uploads to the root directory are not allowed). |
application.feeditem.indexing.remote | Whether indexing for type FeedItem will index the target URL of the FeedItem or the description |
application.feeditemcontent.indexing.enabled | Whether indexing is enabled for type FeedItemContent |
application.feeditemcontent.indexing.limit | Maximum number of words to be indexed per FeedItemContent. |
application.feeditemcontent.indexing.minlength | Minimum length of words to be indexed for FeedItemContent |
application.feeditemcontent.indexing.maxlength | Maximum length of words to be indexed for FeedItemContent |
application.remotedocument.indexing.enabled | Whether indexing is enabled for type RemoteDocument |
application.remotedocument.indexing.limit | Maximum number of words to be indexed per RemoteDocument. |
application.remotedocument.indexing.minlength | Minimum length of words to be indexed for RemoteDocument |
application.remotedocument.indexing.maxlength | Maximum length of words to be indexed for RemoteDocument |
application.proxy.mode | Sets the mode of the proxy servlet. Possible values are ‘disabled’ (off, servlet responds with 503 error code), ‘protected’ (only authenticated requests allowed) and ‘public’ (anonymous requests allowed). Default is disabled. |
application.httphelper.timeouts.connectionrequest | Timeout for outbound connections in seconds to wait when requesting a connection from the connection manager. A timeout value of zero is interpreted as an infinite timeout. |
application.httphelper.timeouts.connect | Timeout for outbound connections in seconds to wait until a connection is established. A timeout value of zero is interpreted as an infinite timeout. |
application.httphelper.timeouts.socket | Socket timeout for outbound connections in seconds to wait for data or, put differently, a maximum inactivity period between two consecutive data packets. A timeout value of zero is interpreted as an infinite timeout. |
application.httphelper.useragent | User agent string for outbound connections |
application.httphelper.charset | Default charset for outbound connections |
application.httphelper.urlwhitelist | A comma-separated list of URL patterns that can be used in HTTP request scripting functions (GET, PUT, POST etc.). If this value is anything other than *, whitelisting is applied to all outgoing requests. |
application.schema.automigration | Enable automatic migration of schema information between versions (if possible – may delete schema nodes) |
application.schema.allowunknownkeys | Enables get() and set() built-in functions to use property keys that are not defined in the schema. |
application.localization.logmissing | Turns on logging for requested but non-existing localizations. |
application.localization.usefallbacklocale | Turns on usage of fallback locale if for the current locale no localization is found |
application.localization.fallbacklocale | The default locale used, if no localization is found and using a fallback is active. |
deployment.schema.format | Configures how the schema is exported in a deployment export. file exports the schema as a single file. tree exports the schema as a tree where methods/function properties are written to single files in a tree structure. |
deployment.data.import.nodes.batchsize | Sets the batch size for data deployment when importing nodes. |
deployment.data.import.relationships.batchsize | Sets the batch size for data deployment when importing relationships. |
deployment.data.export.nodes.batchsize | Sets the batch size for data deployment when exporting nodes. The relationships for each node are collected and exported while the node itself is exported. It can make sense to reduce this number, if all/most nodes have very high amount of relationships. |
application.encryption.secret | Sets the global secret for encrypted string properties. Using this configuration setting is one of several possible ways to set the secret. Using the set_encryption_key() function is a way to set the encryption key without persisting it on disk. |
callbacks.logout.onsave | Setting this to true enables the execution of the User.onSave method when a user logs out. Disabled by default because the global login handler onStructrLogout would be the right place for such functionality. |
callbacks.login.onsave | Setting this to true enables the execution of the User.onSave method for login actions. This will also trigger for failed login attempts and for two-factor authentication intermediate steps. Disabled by default because the global login handler onStructrLogin would be the right place for such functionality. |
application.xml.parser.security | Enables various security measures for XML parsing to prevent exploits. |
Markdown Rendering Hint: Children of Topic(Application Configuration Settings) not rendered because MarkdownTableFormatter prevents rendering of children.
Cron Jobs Settings
| Name | Description |
|---|---|
cronservice.tasks | List with cron task configurations or method names. This only configures the list of tasks. For each task, there needs to be another configuration entry named ‘ |
cronservice.allowparallelexecution | Enables the parallel execution of the same cron job. This can happen if the method runs longer than the defined cron interval. Since this could lead to problems, the default is false. |
Markdown Rendering Hint: Children of Topic(Cron Jobs Settings) not rendered because MarkdownTableFormatter prevents rendering of children.
Database Configuration Settings
| Name | Description |
|---|---|
database.cache.uuid.size | Size of the database driver relationship cache |
database.result.lazy | Forces Structr to use lazy evaluation for relationship queries |
log.cypher.debug | Turns on debug logging for the generated Cypher queries |
log.cypher.debug.ping | Turns on debug logging for the generated Cypher queries of the websocket PING command. Can only be used in conjunction with log.cypher.debug |
database.result.softlimit | Soft result count limit for a single query (can be overridden by setting the _pageSize request parameter or by adding the request parameter _disableSoftLimit to a non-null value) |
database.result.fetchsize | Number of database records to fetch per batch when fetching large results |
database.prefetching.threshold | How many identical queries must run in a transaction to activate prefetching for that query. |
database.prefetching.maxduration | How long a prefetching query may take before prefetching will be deactivated for that query. |
database.prefetching.maxcount | How many results a prefetching query may return before prefetching will be deactivated for that query. |
Markdown Rendering Hint: Children of Topic(Database Configuration Settings) not rendered because MarkdownTableFormatter prevents rendering of children.
DoS Filter Settings
| Name | Description |
|---|---|
httpservice.dosfilter.ratelimiting | Enables rate limiting using Jetty’s DoSFilter. |
httpservice.dosfilter.maxrequestspersec | The maximum number of requests from a connection per second. Requests in excess of this are first delayed, then throttled. |
httpservice.dosfilter.delayms | The delay given to all requests over the rate limit, before they are considered at all. -1 means just reject request, 0 means no delay, otherwise it is the delay. |
httpservice.dosfilter.maxwaitms | How long to blocking wait for the throttle semaphore in milliseconds. |
httpservice.dosfilter.throttledrequests | The number of requests over the rate limit able to be considered at once. |
httpservice.dosfilter.throttlems | How long to async wait for semaphore in milliseconds. |
httpservice.dosfilter.maxrequestms | How long to allow a request to run in milliseconds. |
httpservice.dosfilter.maxidletrackerms | How long to keep track of request rates for a connection before deciding that the user has gone away and discarding it, in milliseconds. |
httpservice.dosfilter.insertheaders | If true, insert the DoSFilter headers into the response. |
httpservice.dosfilter.remoteport | If true then rate is tracked by IP+port (effectively connection). If false, rate is tracked by IP address only. |
httpservice.dosfilter.ipwhitelist | A comma-separated list of IP addresses that will not be rate limited. Defaults to localhost. |
httpservice.dosfilter.managedattr | If set to true, this servlet is set as a ServletContext attribute with the filter name as the attribute name. This allows context external mechanisms (e.g. JMX via ContextHandler managed attribute) to manage the configuration of the filter. |
httpservice.dosfilter.toomanycode | The HTTP status code to send if there are too many requests. By default is 429 (too many requests), but 503 (service unavailable) is another option. |
Markdown Rendering Hint: Children of Topic(DoS Filter Settings) not rendered because MarkdownTableFormatter prevents rendering of children.
General Settings
| Name | Description |
|---|---|
application.title | The title of the application as shown in the log file. This entry exists for historical reasons and has no functional impact other than appearing in the log file. |
application.instance.name | The name of the Structr instance (displayed in the top right corner of structr-ui) |
application.instance.stage | The stage of the Structr instance (displayed in the top right corner of structr-ui) |
application.console.cypher.maxresults | The maximum number of results returned by a cypher query in the admin console. If a query yields more results, an error message is shown. |
application.runtime.enforce.recommended | Enforces version check for Java runtime. |
application.systeminfo.disabled | Disables transmission of telemetry information. This information is used to improve the software and to better adapt to different hardware configurations. |
application.legacy.requestparameters.enabled | Enables pre-4.0 request parameter names (sort, page, pageSize, etc. instead of _sort, _page, _pageSize, …) |
application.heap.min_size | Minimum Java heap size (-Xms). Examples: 512m, 1g, 2g. Note: Changes require a restart of Structr. |
application.heap.max_size | Maximum Java heap size (-Xmx). Examples: 2g, 4g, 8g. Note: Changes require a restart of Structr. |
application.timezone | Application timezone (e.g. UTC, Europe/Berlin). If not set, falls back to system timezone or UTC. Note: Changes require a restart of Structr. |
application.uuid.allowedformats | Configures which UUIDv4 types are allowed: With dashes, without dashes or both. |
application.uuid.createcompact | Determines if UUIDs are created with or without dashes. This setting is only used if application.uuid.allowedformats is set to both. WARNING: Requires a restart to take effect. |
application.email.validation.regex | Regular expression used to validate email addresses for User.eMail and is_valid_email() function. |
application.scripting.debugger | Enables Chrome debugger initialization in scripting engine. The current debugger URL will be shown in the server log and also made available on the dashboard. |
application.scripting.js.wrapinmainfunction | Forces js scripts to be wrapped in a main function for legacy behaviour. |
application.scripting.allowedhostclasses | Space-separated list of fully-qualified Java class names that you can load dynamically in a scripting environment. |
application.cluster.enabled | Enables cluster mode (experimental) |
application.cluster.name | The name of the Structr cluster |
application.cluster.log.enabled | Enables debug logging for cluster mode communication |
application.stats.aggreation.interval | Minimum aggregation interval for HTTP request stats. |
base.path | Path of the Structr working directory. All files will be located relative to this directory. |
tmp.path | Path to the temporary directory. Uses java.io.tmpdir by default |
files.path | Path to the Structr file storage folder |
changelog.path | Path to the Structr changelog storage folder |
data.exchange.path | IMPORTANT: Path is relative to base.path |
scripts.path | Path to the Structr scripts folder. IMPORTANT: Path is relative to base.path |
scripts.path.allowsymboliclinks | Setting to true disables an additional check that disallows symbolic links in script paths. |
scripts.path.allowpathtraversal | Setting to true disables an additional check that disallows path traversals (.. in path). |
log.level | Configures the default log level. Takes effect immediately. |
log.querytime.threshold | Milliseconds after which a long-running query will be logged. |
log.callback.threshold | Number of callbacks after which a transaction will be logged. |
log.functions.stacktrace | If true, the full stacktrace is logged for exceptions in system functions. |
log.scriptprocess.commandline | Configures the default logging behaviour for the command line generated for script processes. This applies to the exec()- and exec_binary() functions, as well as some processes handling media conversion or processing. For the exec() and exec_binary() function, this can be overridden for each call of the function. |
log.directorywatchservice.scanquietly | Prevents logging of each scan process for every folder processed by the directory watch service |
configuration.provider | Fully-qualified class name of a Java class in the current class path that implements the org.structr.schema.ConfigurationProvider interface. |
configured.services | Services that are listed in this configuration key will be started when Structr starts. |
Markdown Rendering Hint: Children of Topic(General Settings) not rendered because MarkdownTableFormatter prevents rendering of children.
Licensing Settings
| Name | Description |
|---|---|
license.key | Base64-encoded string that contains the complete license data, typically saved as ‘license.key’ in the main directory. |
license.validation.timeout | Timeout in seconds for license validation requests. |
license.allow.fallback | Allow Structr to fall back to the Community License if no valid license exists (or license cannot be validated). Set this to false in production environments to prevent Structr from starting without a license. |
Markdown Rendering Hint: Children of Topic(Licensing Settings) not rendered because MarkdownTableFormatter prevents rendering of children.
Miscellaneous Settings
| Name | Description |
|---|---|
translation.google.apikey | Google Cloud Translation API Key |
translation.deepl.apikey | DeepL API Key |
Markdown Rendering Hint: Children of Topic(Miscellaneous Settings) not rendered because MarkdownTableFormatter prevents rendering of children.
OAuth Settings
| Name | Description |
|---|---|
oauth.servers | Space-separated list of available OAuth services. Defaults to a list of all available services. |
oauth.logging.verbose | Optional. Enables verbose logging for OAuth login. Useful for debugging. |
oauth.github.authorization_location | Optional. URL of the authorization endpoint. Uses default GitHub endpoint if not set. |
oauth.github.token_location | Optional. URL of the token endpoint. Uses default GitHub endpoint if not set. |
oauth.github.client_id | Required. Client ID from your GitHub OAuth application. |
oauth.github.client_secret | Required. Client secret from your GitHub OAuth application. |
oauth.github.redirect_uri | Optional. Structr endpoint for the OAuth authorization callback. Defaults to ‘/oauth/github/auth’. |
oauth.github.user_details_resource_uri | Optional. User details endpoint. Defaults to ‘https://api.github.com/user’. |
oauth.github.error_uri | Optional. Redirect URI on unsuccessful authentication. Defaults to ‘/login’. |
oauth.github.return_uri | Optional. Redirect URI on successful authentication. Defaults to ‘/’. |
oauth.github.logout_uri | Optional. Logout URI. Defaults to ‘/logout’. |
oauth.github.scope | Optional. OAuth scope. Defaults to ‘user:email’. |
oauth.linkedin.authorization_location | Optional. URL of the authorization endpoint. Uses default LinkedIn endpoint if not set. |
oauth.linkedin.token_location | Optional. URL of the token endpoint. Uses default LinkedIn endpoint if not set. |
oauth.linkedin.client_id | Required. Client ID from your LinkedIn OAuth application. |
oauth.linkedin.client_secret | Required. Client secret from your LinkedIn OAuth application. |
oauth.linkedin.redirect_uri | Optional. Structr endpoint for the OAuth authorization callback. Defaults to ‘/oauth/linkedin/auth’. |
oauth.linkedin.user_details_resource_uri | Optional. User details endpoint. Defaults to ‘https://api.linkedin.com/v2/userinfo’. |
oauth.linkedin.error_uri | Optional. Redirect URI on unsuccessful authentication. Defaults to ‘/login’. |
oauth.linkedin.return_uri | Optional. Redirect URI on successful authentication. Defaults to ‘/’. |
oauth.linkedin.logout_uri | Optional. Logout URI. Defaults to ‘/logout’. |
oauth.linkedin.scope | Optional. OAuth scope. Defaults to ‘openid profile email’. |
oauth.google.authorization_location | Optional. URL of the authorization endpoint. Uses default Google endpoint if not set. |
oauth.google.token_location | Optional. URL of the token endpoint. Uses default Google endpoint if not set. |
oauth.google.client_id | Required. Client ID from your Google Cloud Console OAuth credentials. |
oauth.google.client_secret | Required. Client secret from your Google Cloud Console OAuth credentials. |
oauth.google.redirect_uri | Optional. Structr endpoint for the OAuth authorization callback. Defaults to ‘/oauth/google/auth’. |
oauth.google.user_details_resource_uri | Optional. User details endpoint. Defaults to ‘https://www.googleapis.com/oauth2/v3/userinfo’. |
oauth.google.error_uri | Optional. Redirect URI on unsuccessful authentication. Defaults to ‘/login’. |
oauth.google.return_uri | Optional. Redirect URI on successful authentication. Defaults to ‘/’. |
oauth.google.logout_uri | Optional. Logout URI. Defaults to ‘/logout’. |
oauth.google.scope | Optional. OAuth scope. Defaults to ‘email’. |
oauth.facebook.authorization_location | Optional. URL of the authorization endpoint. Uses default Facebook endpoint if not set. |
oauth.facebook.token_location | Optional. URL of the token endpoint. Uses default Facebook endpoint if not set. |
oauth.facebook.client_id | Required. App ID from your Facebook Developer application. |
oauth.facebook.client_secret | Required. App secret from your Facebook Developer application. |
oauth.facebook.redirect_uri | Optional. Structr endpoint for the OAuth authorization callback. Defaults to ‘/oauth/facebook/auth’. |
oauth.facebook.user_details_resource_uri | Optional. User details endpoint. Defaults to ‘https://graph.facebook.com/me’. |
oauth.facebook.error_uri | Optional. Redirect URI on unsuccessful authentication. Defaults to ‘/login’. |
oauth.facebook.return_uri | Optional. Redirect URI on successful authentication. Defaults to ‘/’. |
oauth.facebook.logout_uri | Optional. Logout URI. Defaults to ‘/logout’. |
oauth.facebook.scope | Optional. OAuth scope. Defaults to ‘email’. |
oauth.auth0.tenant | Required (recommended). Auth0 tenant domain (e.g., ‘your-tenant.auth0.com’). When set, authorization_location and token_location are built automatically. |
oauth.auth0.authorization_path | Optional. Path to authorization endpoint. Only used with tenant setting. Defaults to ‘/authorize’. |
oauth.auth0.token_path | Optional. Path to token endpoint. Only used with tenant setting. Defaults to ‘/oauth/token’. |
oauth.auth0.userinfo_path | Optional. Path to userinfo endpoint. Only used with tenant setting. Defaults to ‘/userinfo’. |
oauth.auth0.authorization_location | Required if tenant not set. Full URL of the authorization endpoint. Ignored if tenant is configured. |
oauth.auth0.token_location | Required if tenant not set. Full URL of the token endpoint. Ignored if tenant is configured. |
oauth.auth0.client_id | Required. Client ID from your Auth0 application. |
oauth.auth0.client_secret | Required. Client secret from your Auth0 application. |
oauth.auth0.redirect_uri | Optional. Structr endpoint for the OAuth authorization callback. Defaults to ‘/oauth/auth0/auth’. |
oauth.auth0.user_details_resource_uri | Optional. User details endpoint. Built from tenant if not set. |
oauth.auth0.error_uri | Optional. Redirect URI on unsuccessful authentication. Defaults to ‘/login’. |
oauth.auth0.return_uri | Optional. Redirect URI on successful authentication. Defaults to ‘/’. |
oauth.auth0.logout_uri | Optional. Logout URI. Defaults to ‘/logout’. |
oauth.auth0.scope | Optional. OAuth scope. Defaults to ‘openid profile email’. |
oauth.auth0.audience | Optional. The API audience (identifier) of your Auth0 API. Required for API access tokens. |
oauth.azure.tenant_id | Required. Azure AD tenant ID, or ‘common’ for multi-tenant apps, or ‘organizations’ for work accounts only. |
oauth.azure.authorization_location | Optional. URL of the authorization endpoint. Built automatically from tenant_id if not set. |
oauth.azure.token_location | Optional. URL of the token endpoint. Built automatically from tenant_id if not set. |
oauth.azure.client_id | Required. Application (client) ID from Azure AD app registration. |
oauth.azure.client_secret | Required. Client secret from Azure AD app registration. |
oauth.azure.redirect_uri | Optional. Structr endpoint for the OAuth authorization callback. Defaults to ‘/oauth/azure/auth’. |
oauth.azure.user_details_resource_uri | Optional. User details endpoint. Defaults to ‘https://graph.microsoft.com/v1.0/me’. |
oauth.azure.error_uri | Optional. Redirect URI on unsuccessful authentication. Defaults to ‘/login’. |
oauth.azure.return_uri | Optional. Redirect URI on successful authentication. Defaults to ‘/’. |
oauth.azure.logout_uri | Optional. Logout URI. Defaults to ‘/logout’. |
oauth.azure.scope | Optional. OAuth scope. Defaults to ‘openid profile email’. |
oauth.keycloak.server_url | Required. Keycloak server URL (e.g., ‘https://keycloak.example.com’). |
oauth.keycloak.realm | Required. Keycloak realm name. Defaults to ‘master’. |
oauth.keycloak.authorization_location | Optional. URL of the authorization endpoint. Built automatically from server_url and realm if not set. |
oauth.keycloak.token_location | Optional. URL of the token endpoint. Built automatically from server_url and realm if not set. |
oauth.keycloak.client_id | Required. Client ID from your Keycloak client configuration. |
oauth.keycloak.client_secret | Required. Client secret from your Keycloak client configuration. |
oauth.keycloak.redirect_uri | Optional. Structr endpoint for the OAuth authorization callback. Defaults to ‘/oauth/keycloak/auth’. |
oauth.keycloak.user_details_resource_uri | Optional. User details endpoint. Built automatically from server_url and realm if not set. |
oauth.keycloak.error_uri | Optional. Redirect URI on unsuccessful authentication. Defaults to ‘/login’. |
oauth.keycloak.return_uri | Optional. Redirect URI on successful authentication. Defaults to ‘/’. |
oauth.keycloak.logout_uri | Optional. Logout URI. Defaults to ‘/logout’. |
oauth.keycloak.scope | Optional. OAuth scope. Defaults to ‘openid profile email’. |
Markdown Rendering Hint: Children of Topic(OAuth Settings) not rendered because MarkdownTableFormatter prevents rendering of children.
Security Settings
| Name | Description |
|---|---|
superuser.username | Name of the superuser |
superuser.password | Password of the superuser |
security.authentication.propertykeys | List of property keys separated by space in the form of |
initialuser.create | Enables or disables the creation of an initial admin user when connecting to a database that has never been used with structr. |
initialuser.name | Name of the initial admin user. This will only be set if the user is created. |
initialuser.password | Password of the initial admin user. This will only be set if the user is created. |
security.twofactorauthentication.issuer | Must be URL-compliant in order to scan the created QR code |
security.twofactorauthentication.algorithm | Respected by the most recent Google Authenticator implementations. Warning: Changing this setting after users are already confirmed will effectively lock them out. Set [User].twoFactorConfirmed to false to show them a new QR code. |
security.twofactorauthentication.digits | Respected by the most recent Google Authenticator implementations. Warning: Changing this setting after users are already confirmed may lock them out. Set [User].twoFactorConfirmed to false to show them a new QR code. |
security.twofactorauthentication.period | Defines the period that a TOTP code will be valid for, in seconds. Respected by the most recent Google Authenticator implementations. Warning: Changing this setting after users are already confirmed will effectively lock them out. Set [User].twoFactorConfirmed to false to show them a new QR code. |
security.twofactorauthentication.logintimeout | Defines how long the two-factor login time window in seconds is. After entering the username and password the user has this amount of time to enter a two factor token before he has to re-authenticate via password |
security.twofactorauthentication.loginpage | The application page where the user enters the current two factor token |
security.twofactorauthentication.whitelistedips | A comma-separated (,) list of IPs for which two factor authentication is disabled. Both IPv4 and IPv6 are supported. CIDR notation is also supported. (e.g. 192.168.0.1/24 or 2A01:598:FF30:C500::/64) |
security.jwt.secrettype | Selects the secret type that will be used to sign or verify a given access or refresh token |
security.jwt.secret | Used if ‘security.jwt.secrettype’=secret. The secret that will be used to sign and verify all tokens issued and sent to Structr. Must have a min. length of 32 characters. |
security.jwt.jwtissuer | The issuer for the JWTs created by this Structr instance. |
security.jwt.expirationtime | Access token timeout in minutes. |
security.jwt.refreshtoken.expirationtime | Refresh token timeout in minutes. |
security.jwt.keystore | Used if ‘security.jwt.secrettype’=keypair. A valid keystore file containing a private/public keypair that can be used to sign and verify JWTs |
security.jwt.keystore.password | The password for the given ‘security.jwt.keystore’ |
security.jwt.key.alias | The alias of the private key of the given ‘security.jwt.keystore’ |
security.jwks.provider | URL of the JWKS provider |
security.jwks.group.claim.key | The name of the key in the JWKS response claims whose value(s) will be used to look for Group nodes with a matching jwksReferenceId. |
security.jwks.id.claim.key | The name of the key in the JWKS response claims whose value will be used as the ID of the temporary principal object. |
security.jwks.name.claim.key | The name of the key in the JWKS response claims whose value will be used as the name of the temporary principal object. |
security.jwks.admin.claim.key | The name of the key in the JWKS response claims in whose values is searched for a value matching the value of security.jwks.admin.claim.value. |
security.jwks.admin.claim.value | The value that must be present in the JWKS response claims object with the key given in security.jwks.admin.claim.key in order to give the requesting user admin privileges. |
security.passwordpolicy.forcechange | Indicates if a forced password change is active |
security.passwordpolicy.onchange.clearsessions | Clear all sessions of a user on password change. |
security.passwordpolicy.maxage | The number of days after which a user has to change his password |
security.passwordpolicy.remindtime | The number of days (before the user must change the password) where a warning should be issued. (Has to be handled in application code) |
security.passwordpolicy.maxfailedattempts | The maximum number of failed login attempts before a user is blocked. (Can be disabled by setting to zero or a negative number) |
security.passwordpolicy.resetfailedattemptsonpasswordreset | Configures if resetting the users password also resets the failed login attempts counter |
security.passwordpolicy.complexity.enforce | Configures if password complexity is enforced for user passwords. If active, changes which violate the complexity rules, will result in an error and must be accounted for. |
security.passwordpolicy.complexity.minlength | The minimum length for user passwords (only active if the enforce setting is active) |
security.passwordpolicy.complexity.requireuppercase | Require at least one upper case character in user passwords (only active if the enforce setting is active) |
security.passwordpolicy.complexity.requirelowercase | Require at least one lower case character in user passwords (only active if the enforce setting is active) |
security.passwordpolicy.complexity.requiredigits | Require at least one digit in user passwords (only active if the enforce setting is active) |
security.passwordpolicy.complexity.requirenonalphanumeric | Require at least one non alpha-numeric character in user passwords (only active if the enforce setting is active) |
application.ssh.forcepublickey | Force use of public key authentication for SSH connections |
registration.allowloginbeforeconfirmation | Enables self-registered users to login without clicking the activation link in the registration email. |
registration.customuserattributes | Attributes the registering user is allowed to provide. All other attributes are discarded. (eMail is always allowed) |
confirmationkey.passwordreset.validityperiod | Validity period (in minutes) of the confirmation key generated when a user resets his password. Default is 30. |
confirmationkey.registration.validityperiod | Validity period (in minutes) of the confirmation key generated during self registration. Default is 2 days (2880 minutes) |
confirmationkey.validwithouttimestamp | How to interpret confirmation keys without a timestamp |
letsencrypt.wait | Wait for this amount of seconds before trying to authorize challenge. Default is 300 seconds (5 minutes). |
letsencrypt.challenge.type | Challenge type for Let’s Encrypt authorization. Possible values are ‘http’ and ‘dns’. |
letsencrypt.domains | Space-separated list of domains to fetch and update Let’s Encrypt certificates for |
letsencrypt.production.server.url | URL of Let’s Encrypt server. Default is ‘acme://letsencrypt.org’ |
letsencrypt.staging.server.url | URL of Let’s Encrypt staging server for testing only. Default is ‘acme://letsencrypt.org/staging’. |
letsencrypt.user.key.filename | File name of the Let’s Encrypt user key. Default is ‘user.key’. |
letsencrypt.domain.key.filename | File name of the Let’s Encrypt domain key. Default is ‘domain.key’. |
letsencrypt.domain.csr.filename | File name of the Let’s Encrypt CSR. Default is ‘domain.csr’. |
letsencrypt.domain.chain.filename | File name of the Let’s Encrypt domain chain. Default is ‘domain-chain.crt’. |
letsencrypt.key.size | Encryption key length. Default is 2048. |
Markdown Rendering Hint: Children of Topic(Security Settings) not rendered because MarkdownTableFormatter prevents rendering of children.
Server Settings
| Name | Description |
|---|---|
application.host | The listen address of the Structr server. You can set this to your domain name if that name resolves to the IP of the server the instance is running on. |
application.http.port | HTTP port the Structr server will listen on |
application.https.port | HTTPS port the Structr server will listen on (if SSL is enabled) |
application.ssh.port | SSH port the Structr server will listen on (if SSHService is enabled) |
application.ftp.port | FTP port the Structr server will listen on (if FtpService is enabled) |
application.ftp.passiveportrange | FTP port range for pasv mode. Needed if Structr is run in a docker container, so the port mapping can be done correctly. |
application.https.enabled | Whether SSL is enabled |
application.keystore.path | The path to the JKS keystore containing the SSL certificate. Default value is ‘domain.key.keystore’ which fits with the default value for letsencrypt.domain.key.filename which is ‘domain.key’. |
application.keystore.password | The password for the JKS keystore |
application.rest.path | Defines the URL path of the Structr REST server. Should not be changed because it is hard-coded in many parts of the application. |
application.baseurl.override | Overrides the baseUrl that can be used to prefix links to local web resources. By default, the value is assembled from the protocol, hostname and port of the server instance Structr is running on |
application.root.path | Root path of the application, e.g. in case Structr is being run behind a reverse proxy with additional path prefix in URI. If set, the value must start with a ‘/’ and have no trailing ‘/’. A valid value would be /xyz |
maintenance.application.http.port | HTTP port the Structr server will listen on in maintenance mode |
maintenance.application.https.port | HTTPS port the Structr server will listen on (if SSL is enabled) in maintenance mode |
maintenance.application.ssh.port | SSH port the Structr server will listen on (if SSHService is enabled) in maintenance mode |
maintenance.application.ftp.port | FTP port the Structr server will listen on (if FtpService is enabled) in maintenance mode |
maintenance.resource.path | The local folder for static resources served in maintenance mode. If no path is provided the a default maintenance page with customizable text is shown in maintenance mode. |
maintenance.message | Text for default maintenance page (HTML is allowed) |
maintenance.enabled | Enables maintenance mode where all ports can be changed to prevent users from accessing the application during maintenance. |
httpservice.gzip.enabled | Use GZIP compression for HTTP transfers |
httpservice.connection.ratelimit | Defines the rate limit of HTTP/2 frames per connection for the HTTP Service. |
httpservice.async | Whether the HttpServices uses asynchronous request handling. Disable this option if you encounter problems with HTTP responses. |
httpservice.httpbasicauth.enabled | Enables HTTP Basic Auth support for pages and files |
httpservice.sni.required | Enables strict SNI check for the http service. |
httpservice.sni.hostcheck | Enables SNI host check. |
json.indentation | Whether JSON output should be indented (beautified) or compacted |
html.indentation | Whether the page source should be indented (beautified) or compacted. Note: Does not work for template/content nodes which contain raw HTML |
ws.indentation | Prettyprints websocket responses if set to true. |
application.session.timeout | The session timeout for inactive HTTP sessions in seconds. Default is 1800. Values lower or equal than 0 indicate that sessions never time out. |
application.session.max.number | The maximum number of active sessions per user. Default is -1 (unlimited). |
application.session.clear.onstartup | Clear all sessions on startup if set to true. |
application.session.clear.onshutdown | Clear all sessions on shutdown if set to true. |
httpservice.uricompliance | Configures the URI compliance for the Jetty server. This is simply passed down and is Jetty’s own specification. |
httpservice.force.https | Enables redirecting HTTP requests from the configured HTTP port to the configured HTTPS port (only works if HTTPS is active). |
httpservice.cookies.httponly | Set HttpOnly to true for cookies. Please note that this will disable backend access! |
httpservice.cookies.samesite | Sets the SameSite attribute for the JSESSIONID cookie. For SameSite=None the Secure flag must also be set, otherwise the cookie will be rejected by the browser! |
httpservice.cookies.secure | Sets the secure flag for the JSESSIONID cookie. |
access.control.accepted.origins | Comma-separated list of accepted origins, sets the Access-Control-Allow-Origin header. |
access.control.max.age | Sets the value of the Access-Control-Max-Age header. Unit is seconds. |
access.control.allow.methods | Sets the value of the Access-Control-Allow-Methods header. Comma-delimited list of the allowed HTTP request methods. |
access.control.allow.headers | Sets the value of the Access-Control-Allow-Headers header. |
access.control.allow.credentials | Sets the value of the Access-Control-Allow-Credentials header. |
access.control.expose.headers | Sets the value of the Access-Control-Expose-Headers header. |
Markdown Rendering Hint: Children of Topic(Server Settings) not rendered because MarkdownTableFormatter prevents rendering of children.
Servlet Settings
| Name | Description |
|---|---|
httpservice.servlets | Servlets that are listed in this configuration key will be available in the HttpService. Changes to this setting require a restart of the HttpService in the ‘Services’ tab. |
configservlet.enabled | Enables the config servlet (available under http(s)://<your-server>/structr/config) |
jsonrestservlet.path | URL pattern for REST server. Do not change unless you know what you are doing. |
jsonrestservlet.class | FQCN of servlet class to use in the REST server. Do not change unless you know what you are doing. |
jsonrestservlet.authenticator | FQCN of authenticator class to use in the REST server. Do not change unless you know what you are doing. |
jsonrestservlet.defaultview | Default view to use when no view is given in the URL |
jsonrestservlet.outputdepth | Maximum nesting depth of JSON output |
jsonrestservlet.resourceprovider | FQCN of resource provider class to use in the REST server. Do not change unless you know what you are doing. |
jsonrestservlet.user.class | User class that is instantiated when new users are created via the servlet |
jsonrestservlet.user.autologin | Only works in conjunction with the jsonrestservlet.user.autocreate key. Will log in user after self registration. |
jsonrestservlet.user.autocreate | Enable this to support user self registration |
jsonrestservlet.unknowninput.validation.mode | Controls how Structr reacts to unknown keys in JSON input. accept allows the unknown key to be written. ignore removes the key. reject rejects the complete request. The warn options behave identical but also log a warning. |
flowservlet.path | The URI under which requests are accepted by the servlet. Needs to include a wildcard at the end. |
flowservlet.defaultview | Default view to use when no view is given in the URL. |
flowservlet.outputdepth | Maximum nesting depth of JSON output. |
htmlservlet.path | URL pattern for HTTP server. Do not change unless you know what you are doing. |
htmlservlet.class | FQCN of servlet class to use for HTTP requests. Do not change unless you know what you are doing. |
htmlservlet.authenticator | FQCN of authenticator class to use for HTTP requests. Do not change unless you know what you are doing. |
htmlservlet.defaultview | Not used for HtmlServlet |
htmlservlet.outputdepth | Not used for HtmlServlet |
htmlservlet.resourceprovider | FQCN of resource provider class to use in the HTTP server. Do not change unless you know what you are doing. |
htmlservlet.resolveproperties | Specifies the list of properties that are be used to resolve entities from URL paths. |
htmlservlet.customresponseheaders | List of custom response headers that will be added to every HTTP response |
pdfservlet.path | The URI under which requests are accepted by the servlet. Needs to include a wildcard at the end. |
pdfservlet.defaultview | Default view to use when no view is given in the URL. |
pdfservlet.outputdepth | Maximum nesting depth of JSON output. |
pdfservlet.resolveproperties | Specifies the list of properties that are be used to resolve entities from URL paths. |
pdfservlet.customresponseheaders | List of custom response headers that will be added to every HTTP response |
websocketservlet.path | URL pattern for WebSockets. Do not change unless you know what you are doing. |
websocketservlet.class | FQCN of servlet class to use for WebSockets. Do not change unless you know what you are doing. |
websocketservlet.authenticator | FQCN of authenticator class to use for WebSockets. Do not change unless you know what you are doing. |
websocketservlet.defaultview | Unused |
websocketservlet.outputdepth | Maximum nesting depth of JSON output |
websocketservlet.resourceprovider | FQCN of resource provider class to use with WebSockets. Do not change unless you know what you are doing. |
websocketservlet.user.autologin | Unused |
websocketservlet.user.autocreate | Unused |
csvservlet.path | URL pattern for CSV output. Do not change unless you know what you are doing. |
csvservlet.class | Servlet class to use for CSV output. Do not change unless you know what you are doing. |
csvservlet.authenticator | FQCN of Authenticator class to use for CSV output. Do not change unless you know what you are doing. |
csvservlet.defaultview | Default view to use when no view is given in the URL |
csvservlet.outputdepth | Maximum nesting depth of JSON output |
csvservlet.resourceprovider | FQCN of resource provider class to use in the REST server. Do not change unless you know what you are doing. |
csvservlet.user.autologin | Unused |
csvservlet.user.autocreate | Unused |
csvservlet.frontendaccess | Unused |
uploadservlet.path | URL pattern for file upload. Do not change unless you know what you are doing. |
uploadservlet.class | FQCN of servlet class to use for file upload. Do not change unless you know what you are doing. |
uploadservlet.authenticator | FQCN of authenticator class to use for file upload. Do not change unless you know what you are doing. |
uploadservlet.defaultview | Default view to use when no view is given in the URL |
uploadservlet.outputdepth | Maximum nesting depth of JSON output |
uploadservlet.resourceprovider | FQCN of resource provider class to use for file upload. Do not change unless you know what you are doing. |
uploadservlet.user.autologin | Unused |
uploadservlet.user.autocreate | Unused |
uploadservlet.allowanonymousuploads | Allows anonymous users to upload files. |
uploadservlet.maxfilesize | Maximum allowed file size for single file uploads. Unit is Megabytes |
uploadservlet.maxrequestsize | Maximum allowed request size for single file uploads. Unit is Megabytes |
loginservlet.path | The URI under which requests are accepted by the servlet. Needs to include a wildcard at the end. |
loginservlet.defaultview | Default view to use when no view is given in the URL. |
loginservlet.outputdepth | Maximum nesting depth of JSON output. |
logoutservlet.path | The URI under which requests are accepted by the servlet. Needs to include a wildcard at the end. |
logoutservlet.defaultview | Default view to use when no view is given in the URL. |
logoutservlet.outputdepth | Maximum nesting depth of JSON output. |
tokenservlet.path | The URI under which requests are accepted by the servlet. Needs to include a wildcard at the end. |
tokenservlet.defaultview | Default view to use when no view is given in the URL. |
tokenservlet.outputdepth | Maximum nesting depth of JSON output. |
deploymentservlet.filegroup.name | For unix based file systems only. Adds the group ownership to the created deployment files. |
healthcheckservlet.whitelist | IP addresses in this list are allowed to access the health check endpoint at /structr/health. |
histogramservlet.whitelist | IP addresses in this list are allowed to access the query histogram endpoint at /structr/histogram. |
openapiservlet.server.title | The main title of the OpenAPI server definition. |
openapiservlet.server.version | The version number of the OpenAPI definition |
metricsservlet.whitelist | IP addresses in this list are allowed to access the health check endpoint at /structr/metrics. |
Markdown Rendering Hint: Children of Topic(Servlet Settings) not rendered because MarkdownTableFormatter prevents rendering of children.
Mail Configuration Settings
| Name | Description |
|---|---|
smtp.host | Address of the SMTP server used to send e-mails |
smtp.port | SMTP server port to use when sending e-mails |
smtp.tls.enabled | Whether to use TLS when sending e-mails |
smtp.tls.required | Whether TLS is required when sending e-mails |
mail.maxemails | The number of mails which are checked |
mail.updateinterval | The interval in which the mailbox is checked. Unit is milliseconds |
mail.attachmentbasepath | The |
Markdown Rendering Hint: Children of Topic(Mail Configuration Settings) not rendered because MarkdownTableFormatter prevents rendering of children.
Glossary
A
B
C
D
E
F
G
H
I
J
K
| Name | Parent |
|---|---|
| Kafka | APIs & Integrations / Message Brokers |
| KafkaClient Properties | APIs & Integrations / Message Brokers / Kafka |
| Keep Callbacks Simple | APIs & Integrations / Message Brokers / Best Practices |
| Keep Summaries Short | APIs & Integrations / OpenAPI / Best Practices |
| Key and Domain | Admin User Interface / Localization / Main Area |
| Key-Value Format | Expert Topics / Built-in Analytics / Designing Event Messages |
| Keycloak | Security / OAuth / Configuration / Provider Settings |
| Keywords | Building Applications / Dynamic Content / Template Expressions |
L
M
N
O
P
Q
| Name | Parent |
|---|---|
| Query Histogram | Operations / Monitoring |
| Query Operators | APIs & Integrations / MongoDB / Reading Data |
| Query Parameters | Expert Topics / Built-in Analytics / Querying Events |
| Querying Data | Admin User Interface / Graph |
| Querying Events | Expert Topics / Built-in Analytics |
| Querying PostgreSQL | APIs & Integrations / JDBC / Examples |
| Querying SQL Server | APIs & Integrations / JDBC / Examples |
| Querying the Index | Tutorials / Building A Spatial Index |
| queryString | References / System Keywords / General Keywords |
| Quick Reference | Admin User Interface / Overview |
| Quick Start | APIs & Integrations / Email |
| quot() | References / Built-in Functions / Mathematical Functions |
R
S
T
U
V
W
X
| Name | Parent |
|---|---|
| X-Forwarded-For | REST Interface / Request headers |
| X-Password | REST Interface / Request headers |
| X-Structr-Cluster-Node | REST Interface / Request headers |
| X-Structr-Edition | REST Interface / Request headers |
| X-StructrSessionToken | REST Interface / Request headers |
| X-User | REST Interface / Request headers |
| XML | Building Applications / Overview / Create or Import Data |
| xml() | References / Built-in Functions / Input Output Functions |
| xpath() | References / Built-in Functions / Input Output Functions |
Z
| Name | Parent |
|---|---|
| ZIP Archives | Admin User Interface / Files / Content Type Features |
| zoneddatetimeproperty.defaultformat | References / Settings / Advanced Settings |
Markdown Rendering Hint: GlossaryEntry(A) not rendered because no formatter registered for format markdown, mode overview and GlossaryEntry(A)
Markdown Rendering Hint: GlossaryEntry(B) not rendered because no formatter registered for format markdown, mode overview and GlossaryEntry(B)
Markdown Rendering Hint: GlossaryEntry(C) not rendered because no formatter registered for format markdown, mode overview and GlossaryEntry(C)
Markdown Rendering Hint: GlossaryEntry(D) not rendered because no formatter registered for format markdown, mode overview and GlossaryEntry(D)
Markdown Rendering Hint: GlossaryEntry(E) not rendered because no formatter registered for format markdown, mode overview and GlossaryEntry(E)
Markdown Rendering Hint: GlossaryEntry(F) not rendered because no formatter registered for format markdown, mode overview and GlossaryEntry(F)
Markdown Rendering Hint: GlossaryEntry(G) not rendered because no formatter registered for format markdown, mode overview and GlossaryEntry(G)
Markdown Rendering Hint: GlossaryEntry(H) not rendered because no formatter registered for format markdown, mode overview and GlossaryEntry(H)
Markdown Rendering Hint: GlossaryEntry(I) not rendered because no formatter registered for format markdown, mode overview and GlossaryEntry(I)
Markdown Rendering Hint: GlossaryEntry(J) not rendered because no formatter registered for format markdown, mode overview and GlossaryEntry(J)
Markdown Rendering Hint: GlossaryEntry(K) not rendered because no formatter registered for format markdown, mode overview and GlossaryEntry(K)
Markdown Rendering Hint: GlossaryEntry(L) not rendered because no formatter registered for format markdown, mode overview and GlossaryEntry(L)
Markdown Rendering Hint: GlossaryEntry(M) not rendered because no formatter registered for format markdown, mode overview and GlossaryEntry(M)
Markdown Rendering Hint: GlossaryEntry(N) not rendered because no formatter registered for format markdown, mode overview and GlossaryEntry(N)
Markdown Rendering Hint: GlossaryEntry(O) not rendered because no formatter registered for format markdown, mode overview and GlossaryEntry(O)
Markdown Rendering Hint: GlossaryEntry(P) not rendered because no formatter registered for format markdown, mode overview and GlossaryEntry(P)
Markdown Rendering Hint: GlossaryEntry(Q) not rendered because no formatter registered for format markdown, mode overview and GlossaryEntry(Q)
Markdown Rendering Hint: GlossaryEntry(R) not rendered because no formatter registered for format markdown, mode overview and GlossaryEntry(R)
Markdown Rendering Hint: GlossaryEntry(S) not rendered because no formatter registered for format markdown, mode overview and GlossaryEntry(S)
Markdown Rendering Hint: GlossaryEntry(T) not rendered because no formatter registered for format markdown, mode overview and GlossaryEntry(T)
Markdown Rendering Hint: GlossaryEntry(U) not rendered because no formatter registered for format markdown, mode overview and GlossaryEntry(U)
Markdown Rendering Hint: GlossaryEntry(V) not rendered because no formatter registered for format markdown, mode overview and GlossaryEntry(V)
Markdown Rendering Hint: GlossaryEntry(W) not rendered because no formatter registered for format markdown, mode overview and GlossaryEntry(W)
Markdown Rendering Hint: GlossaryEntry(X) not rendered because no formatter registered for format markdown, mode overview and GlossaryEntry(X)
Markdown Rendering Hint: GlossaryEntry(Y) not rendered because no formatter registered for format markdown, mode overview and GlossaryEntry(Y)
Markdown Rendering Hint: GlossaryEntry(Z) not rendered because no formatter registered for format markdown, mode overview and GlossaryEntry(Z)
Markdown Rendering Hint: Unknown(Rendering options) not rendered because no formatter registered for format markdown, mode overview and Unknown(Rendering options)
Load / Update Mode
This setting allows you to enable delayed rendering or lazy loading for this element.
| Name | Description |
|---|---|
Eager | Renders the element in the initial server-side rendering run. |
When page has finished loading | Renders the element after the initial rendering run is done. |
With a delay after page has finished loading | Renders the element after a configurable number of milliseconds after the page has finished loading. |
When element becomes visible | Renders the element when it is scrolled into view. |
With periodic updates | Renders the element and refreshes its content after a configurable number of milliseconds. |
Markdown Rendering Hint: Children of Topic(Load / Update Mode) not rendered because MarkdownTableFormatter prevents rendering of children.
Delay or Interval (ms)
Configures the number of milliseconds for delayed and / or periodic refresh according to the load / update mode setting above.
Advanced find
Markdown Rendering Hint: Feature(Transitive sorting) not rendered because no formatter registered for format markdown, mode overview and Feature(Transitive sorting)
Logging
Markdown Rendering Hint: Function(log()) not rendered because no formatter registered for format markdown, mode overview and Function(log())
Markdown Rendering Hint: Function(setLogLevel()) not rendered because no formatter registered for format markdown, mode overview and Function(setLogLevel())
Markdown Rendering Hint: Function(serverlog()) not rendered because no formatter registered for format markdown, mode overview and Function(serverlog())
Markdown Rendering Hint: Function(getAvailableServerlogs()) not rendered because no formatter registered for format markdown, mode overview and Function(getAvailableServerlogs())
Statistics
Markdown Rendering Hint: Function(logEvent()) not rendered because no formatter registered for format markdown, mode overview and Function(logEvent())
FTP server
Location
Stores geographic coordinates for spatial queries. Key properties are latitude and longitude (WGS84). The withinDistance predicate finds all locations within a radius – useful for store locators or proximity searches. This works both in StructrScript and via REST API with _latlon and _distance parameters.
Details
Address-based queries are automatically geocoded using Google Maps, Bing, or OpenStreetMap, with results cached for performance. Any type with latitude and longitude properties can use distance queries – extend Location directly or add these properties to your own types like Store or Event. For polygons and complex geometries, use WKT representations with Structr’s geometry functions.
Markdown Rendering Hint: Children of SystemType(Location) not rendered because SystemTypeMarkdownFormatter prevents rendering of children.
VideoFile
Extends File with specialized video handling. VideoFile inherits all standard file functionality – storage backends, metadata, permissions, indexing – and adds video-specific features like transcoding between formats, playback from specific timestamps, and streaming delivery.
Details
Like all files, videos can live on different storage backends while keeping consistent metadata and permissions. Reference them in pages using standard HTML video tags. You can extend VideoFile with custom properties or create subtypes for specialized video categories.
Markdown Rendering Hint: Children of SystemType(VideoFile) not rendered because SystemTypeMarkdownFormatter prevents rendering of children.
Access Control Dialog
Access Control Dialog
The Access Control dialog is a standardized interface used across nearly all data types in Structr, with only minor variations based on the specific type you’re working with.
Owner
At the top of the dialog, you’ll see the current owner of the object. Use the dropdown to either assign a new owner or remove ownership entirely. These changes affect only the selected object by modifying its OWNS relationship in the database.
Visibility
The visibility section lets you control who can see the current object and its children using the familiar visibility flags for authenticated and unauthenticated users. If you check “Apply visibility switches recursively”, Structr propagates your visibility settings down through the entire hierarchy, which is especially useful when working with Pages, HTML elements, Templates, and Folders.
Permissions
The permissions table at the bottom lets you grant read, write, delete, and access control permissions to specific users or groups. Use the dropdown in the first row to add permissions for additional users or groups. In certain contexts, you can apply these permissions recursively to child objects as well. Remove a permission by unchecking the last checkbox in its row. These changes affect only the selected object by modifying its SECURITY relationships in the database.
Built-in keywords
Predefined keywords that can be used in scripting contexts to access internal objects and contextual information.
Relationships
Cascading Delete Options
The following cascading delete options exist.
Markdown Rendering Hint: Constant(NONE) not rendered because no formatter registered for format markdown, mode overview and Constant(NONE)
Markdown Rendering Hint: Constant(SOURCE_TO_TARGET) not rendered because no formatter registered for format markdown, mode overview and Constant(SOURCE_TO_TARGET)
Markdown Rendering Hint: Constant(TARGET_TO_SOURCE) not rendered because no formatter registered for format markdown, mode overview and Constant(TARGET_TO_SOURCE)
Markdown Rendering Hint: Constant(ALWAYS) not rendered because no formatter registered for format markdown, mode overview and Constant(ALWAYS)
Markdown Rendering Hint: Constant(CONSTRAINT_BASED) not rendered because no formatter registered for format markdown, mode overview and Constant(CONSTRAINT_BASED)
Autocreation Options
The following automatic creation options exist.
Markdown Rendering Hint: Constant(NONE) not rendered because it was already rendered previously.
Markdown Rendering Hint: Constant(SOURCE_TO_TARGET) not rendered because it was already rendered previously.
Markdown Rendering Hint: Constant(TARGET_TO_SOURCE) not rendered because it was already rendered previously.
Markdown Rendering Hint: Constant(ALWAYS) not rendered because it was already rendered previously.
Resource Access Permissions
Synonyms: Resource Access Grants, Resource Access Grant
Markdown Rendering Hint: Synonym(Resource Access Grants) not rendered because no formatter registered for format markdown, mode overview and Synonym(Resource Access Grants)
Markdown Rendering Hint: Synonym(Resource Access Grant) not rendered because no formatter registered for format markdown, mode overview and Synonym(Resource Access Grant)
Admin Console
Event Action Mapping
Parameter types
Possible types of Event Action Mapping parameters.
Markdown Rendering Hint: EventAction(User input) not rendered because no formatter registered for format markdown, mode overview and EventAction(User input)
Markdown Rendering Hint: EventAction(Constant value) not rendered because no formatter registered for format markdown, mode overview and EventAction(Constant value)
Markdown Rendering Hint: EventAction(Script expression) not rendered because no formatter registered for format markdown, mode overview and EventAction(Script expression)
Markdown Rendering Hint: EventAction(Page parameter) not rendered because no formatter registered for format markdown, mode overview and EventAction(Page parameter)
Markdown Rendering Hint: EventAction(Page size parameter) not rendered because no formatter registered for format markdown, mode overview and EventAction(Page size parameter)
Event Actions
Backend actions that can be executed via Event Action Mapping.
Markdown Rendering Hint: EventAction(No action) not rendered because no formatter registered for format markdown, mode overview and EventAction(No action)
Markdown Rendering Hint: EventAction(Create new object) not rendered because no formatter registered for format markdown, mode overview and EventAction(Create new object)
Markdown Rendering Hint: EventAction(Update object) not rendered because no formatter registered for format markdown, mode overview and EventAction(Update object)
Markdown Rendering Hint: EventAction(Delete object) not rendered because no formatter registered for format markdown, mode overview and EventAction(Delete object)
Markdown Rendering Hint: EventAction(Append child) not rendered because no formatter registered for format markdown, mode overview and EventAction(Append child)
Markdown Rendering Hint: EventAction(Remove child) not rendered because no formatter registered for format markdown, mode overview and EventAction(Remove child)
Markdown Rendering Hint: EventAction(Insert HTML) not rendered because no formatter registered for format markdown, mode overview and EventAction(Insert HTML)
Markdown Rendering Hint: EventAction(Replace HTML) not rendered because no formatter registered for format markdown, mode overview and EventAction(Replace HTML)
Markdown Rendering Hint: EventAction(Previous page) not rendered because no formatter registered for format markdown, mode overview and EventAction(Previous page)
Markdown Rendering Hint: EventAction(Next page) not rendered because no formatter registered for format markdown, mode overview and EventAction(Next page)
Markdown Rendering Hint: EventAction(First page) not rendered because no formatter registered for format markdown, mode overview and EventAction(First page)
Markdown Rendering Hint: EventAction(Last page) not rendered because no formatter registered for format markdown, mode overview and EventAction(Last page)
Markdown Rendering Hint: EventAction(Sign in) not rendered because no formatter registered for format markdown, mode overview and EventAction(Sign in)
Markdown Rendering Hint: EventAction(Sign out) not rendered because no formatter registered for format markdown, mode overview and EventAction(Sign out)
Markdown Rendering Hint: EventAction(Sign up) not rendered because no formatter registered for format markdown, mode overview and EventAction(Sign up)
Markdown Rendering Hint: EventAction(Reset password) not rendered because no formatter registered for format markdown, mode overview and EventAction(Reset password)
Markdown Rendering Hint: EventAction(Execute flow) not rendered because no formatter registered for format markdown, mode overview and EventAction(Execute flow)
Markdown Rendering Hint: EventAction(Execute method) not rendered because no formatter registered for format markdown, mode overview and EventAction(Execute method)
Notifications
Notifications that can be executed after an action was executed.
Markdown Rendering Hint: EventNotification(Custom dialog) not rendered because no formatter registered for format markdown, mode overview and EventNotification(Custom dialog)
Markdown Rendering Hint: EventNotification(Fire event) not rendered because no formatter registered for format markdown, mode overview and EventNotification(Fire event)
Markdown Rendering Hint: EventNotification(Inline text message) not rendered because no formatter registered for format markdown, mode overview and EventNotification(Inline text message)
Follow-up actions
Automated follow-up actions that can be executed after an action was executed.
Markdown Rendering Hint: EventBehaviour(Partial refresh) not rendered because no formatter registered for format markdown, mode overview and EventBehaviour(Partial refresh)
Markdown Rendering Hint: EventBehaviour(Partial refresh linked) not rendered because no formatter registered for format markdown, mode overview and EventBehaviour(Partial refresh linked)
Markdown Rendering Hint: EventBehaviour(Navigate to URL) not rendered because no formatter registered for format markdown, mode overview and EventBehaviour(Navigate to URL)
Markdown Rendering Hint: EventBehaviour(Fire event) not rendered because no formatter registered for format markdown, mode overview and EventBehaviour(Fire event)
Markdown Rendering Hint: EventBehaviour(Full page reload) not rendered because no formatter registered for format markdown, mode overview and EventBehaviour(Full page reload)
Markdown Rendering Hint: EventBehaviour(Sign out) not rendered because no formatter registered for format markdown, mode overview and EventBehaviour(Sign out)
Markdown Rendering Hint: EventBehaviour(None) not rendered because no formatter registered for format markdown, mode overview and EventBehaviour(None)
Dynamic types
Dynamic type options
Value-based schema constraints
String property validation
For string attributes, the format is interpreted as a regular expression that validates input. All values written to the attribute must match this regular expression pattern.
Numeric property validation
For numeric attributes, the format specifies a valid range using mathematical interval notation, allowing you to enforce that input values fall within a certain interval. For example, [2,100[ accepts values from 2 (inclusive) to 100 (exclusive).
Date property validation
For date attributes, the format specifies a date pattern following Java’s SimpleDateFormat specification. This allows you to accept date strings in custom formats beyond the default ISO-8601 format while still writing the millisecond-precision long value into the database.
Enum property validation
For enum attributes, the format field is interpreted as a comma-separated list of possible values. For example, “small, medium, large” defines an enum property that can only be set to one of those three values.
Java internals
SecurityContext
Encapsulates the current user and access path.
View
A view is a named collection of attributes that can be accessed via REST and from within the scripting environment, controlling which attributes are included in REST interface output.